

The Spriteling system separates competitive players from casual ones. Capturing flags grants permanent stat bonuses that scale throughout matches. Strategic flag choices based on role directly impact team fights and objective control.
Understanding Spriteling Mechanics
Flags operate on capture-and-hold principles granting immediate stat buffs—physical attack, magic power, damage reduction, health regen. Bonuses compound with equipment and arcana, creating persistent advantages.
River Sprites yield 63 gold each with 60-second respawns. Tyrant at 4:00 grants 71 gold per player. Flag control near objectives creates positional advantages for contests.
Capture requires 3-5 seconds of zone presence. Buffs respawn on 90-second cycles, syncing with jungle buff rotations. Blue buff priority: Jungle > Mid > Marksman. Coordinate flag captures with buff timings to deny enemy resources.
For premium heroes and skins, Honor of Kings Tokens top up through BitTopup ensures fast, secure access.
Current Meta (Patch 1.10.5 + Nov 2025 Update)
Early aggression dominates. Top junglers:
Lam: 54.9% win rate Diamond+, 98% pro pick/ban, 67% KWC win rate
Augran: 55.1% win rate Diamond+, 94% pro pick/ban
Lam's clear: Red 0:30 → Azure 0:45 → Blue 1:00 → gank 1:15
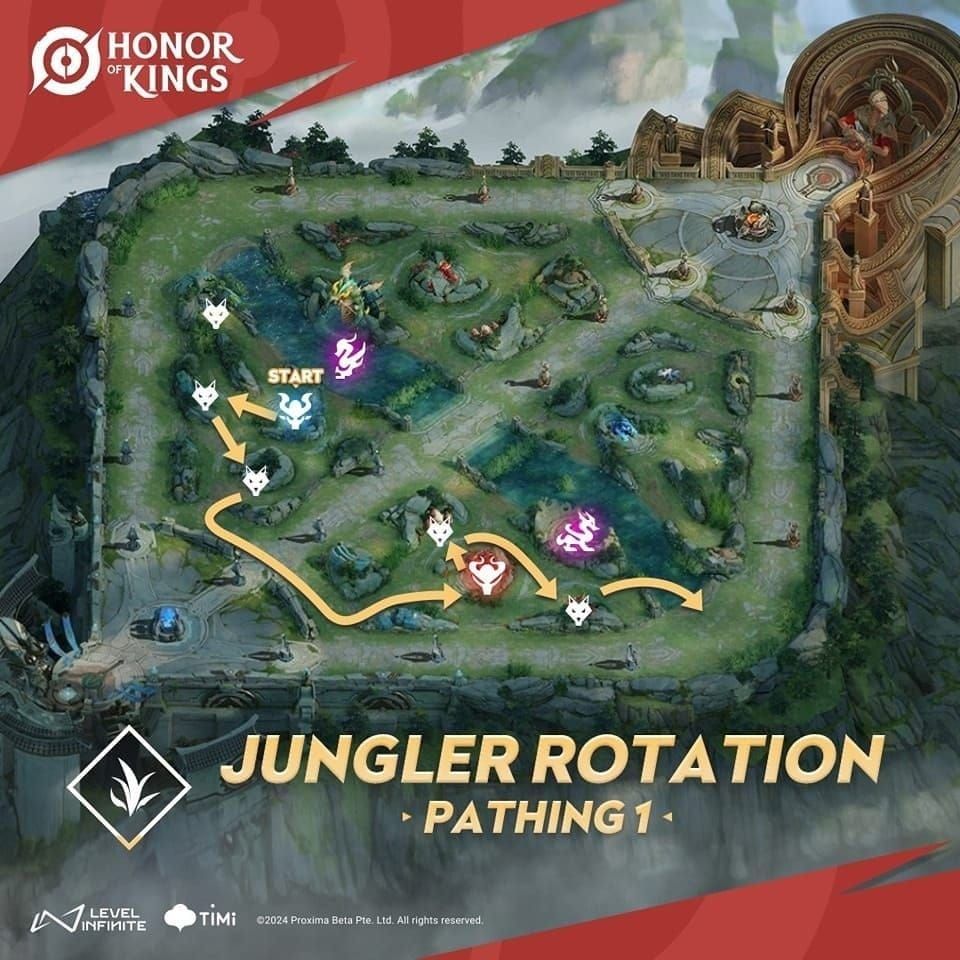
Augran's clear: Blue-Azure 0:30 → small camps 0:45 → Crimson 1:15 → gank 1:30-2:00 (level 4)
Level 2 ganks at 1:00-1:30 yield 73% win rates. Reaching level 4 by 2:00-2:30 creates 67% gank success rates.
Top picks:
Marksman: Loong (55.3% win, 26.8% pick, 96% pro pick/ban)
Mage: Daji (54.7% win), Yixing (52.8% win)
Support: Yaria (53.8% win) - Loong-Yaria duo achieves 70%+ win rates
Tank Spriteling Choices
Tanks need damage mitigation and team utility over offense. Percentage-based reduction scales better late game than flat stats.
Top 3 Tank Flags
1. Defensive Fortification: Percentage damage reduction scaling with incoming damage. Compounds with armor/magic resist for 30-40% effective health increases.
2. Regeneration: Health-per-second during combat. Maintains map presence during objective windows. Sustains through poke and extended sieges.
3. CC Enhancement: Extends stuns/slows by 0.3-0.5 seconds. Critical for Rush Down comps (68% KWC win rate). Allows teammate follow-up.
Mitigation Strategy
Against physical comps: armor percentage flags (scales with equipment) Against mages: magic resistance flags (counters Daji's 54.7% win rate burst) Blind pick: hybrid flags for balanced mitigation
45% CDR from Tranquility Boots + CDR flags creates ability spam for repeated peels.
Mage Spriteling Meta
Amplify burst windows for single-rotation eliminations. Prioritize magic penetration and ability power.
Best Burst Mage Flags
Magic Penetration: Percentage-based, ignores portion of total resistance. Maintains damage vs stacking defenses.
Ability Power Amplification: Raw AP scaling with ability ratios. Creates lethal breakpoints on high-ratio abilities like Daji's ultimate.
Cooldown Reduction: Enables multiple rotations per fight. Reaches 45% cap with Tranquility Boots for ability spam.
Damage Amplification
Increased magic damage dealt flags multiply final damage after resistance reductions—exponential scaling. Synergizes with Yaria's Verdant Predator (converts damage to true damage, then amplifies).
Capture amplification flags 30-45 seconds before major fights to ensure buff uptime during critical engagements.
Positioning
Maintain 600-800 range from frontline, keep carries within 400 range for follow-up. Flags amplify damage from safe distances—no risky forward positioning needed.
Marksman Optimization
Balance early vulnerability with late-game scaling. Flags must address survival while amplifying carry potential.
Late-Game Scaling Flags
Attack Speed Amplification: Percentage increases multiply with equipment. Reaches max attack speed caps earlier for faster DPS.
Critical Strike Enhancement: Increases crit multipliers beyond base 200%. At 100% crit chance, deletes tanks in 3-4 seconds.
Range Extension: Grants additional attack range. Loong's ultimate + extension flags = 800+ range, outranging most defensive abilities.
Defensive vs Offensive
Defensive: Against assassins (Hayabusa). Damage reduction allows survival of initial burst. Offensive: With strong peel (Yaria 53.8% win rate). Loong-Yaria duo enables full offensive investment. Hybrid: One defensive + one offensive for balanced profiles in solo queue.
Surviving Dives
Flat health + percentage reduction creates effective health above burst thresholds. Movement speed flags enable kiting. Position near flags for escape options.
Vision control around flags creates early warnings. Maintain flag presence near team for support peel access.
Assassin & Support Strategies
Buy Honor of Kings recharge online through BitTopup for instant hero access.
Assassin Flags
Movement Speed: Percentage increases compound with boots. Lam's 10x Mutation arcana stacks multiplicatively for flanking routes.
Ability Haste: Reduces ultimate cooldowns for multiple assassination attempts per fight.
Burst Amplification: Increases damage in 2-3 second windows matching rotation timings. Creates one-shot potential.
Support Flags
Aura Effects: Team-wide buffs. Angela (53.3% win) transforms individual captures into team advantages.
Ally Damage Boost: Yaria's ultimate + damage flags = 70%+ duo win rates.
CDR: Frequent peel and CC applications. Layered protection for aggressive carry positioning.
Timing
Capture flags before ganks for active buffs during fights. Major objectives:
Tyrant 4:00 (71 gold/player)
Tempest Dragon 4:00
Storm Lord 10:00 (136 gold)
Secure flags 30-60 seconds before spawns for maximum contest uptime.
Counterjungling + flag denial = 15-20% gold leads. Explains Lam's 98% pro pick/ban.
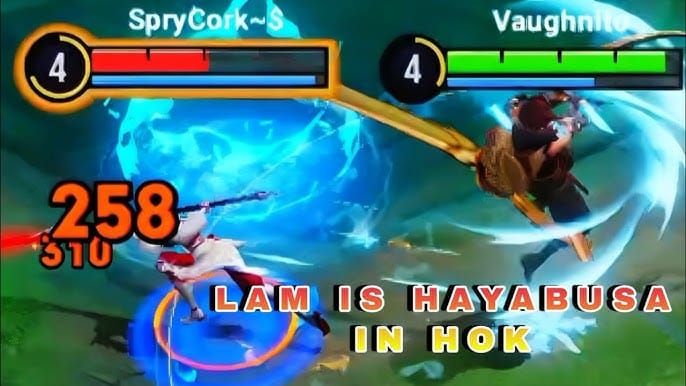
Hayabusa Ultimate Breakdown
Phantom Shuriken eliminates squishies in 1.5 seconds. Targeted dash marks enemies, rapid strikes deal physical damage based on missing health. Execute threshold increases vs low-health targets.
Damage Calculation
Base damage + bonus physical attack + missing health percentage. Exponential scaling below 50% health. Targets seem to die impossibly fast due to missing health multiplier.
Timing: 0.5s dash → 1.0s damage window (untargetable) → 0.5s recovery. Total 2.0s commitment creates counterplay windows.
Cooldown: 40-50 seconds. Failed attempts leave Hayabusa vulnerable without escapes.
Warning Signs
Visual: Distinctive stance + shuriken effects 0.3-0.5s before activation
Audio: Directional sound indicates approach vector Positioning: Aggressive backline positioning 2-3s before engaging
High-Risk Nature
2.0s animation locks predictable positioning for coordinated CC. Failed eliminations leave Hayabusa in enemy backlines without escapes.
Defensive items (invulnerability/immunity) completely negate damage. Support shields/heals during damage window save targets.
Lower success in coordinated play vs solo queue. Limited competitive usage despite strong solo performance.
Surviving Hayabusa Ultimate
Layered defenses create 70%+ survival rates. Maintain effective health above 40-60% burst threshold through itemization, flags, and shields.
Time defensive abilities during 1.0s damage window. 0.5s animation warning provides reaction time.
Spriteling Mitigation
Defensive Flags: 20-30% damage reduction directly counters burst. Creates 100-200 health survival margins.
Health Flags: Increases max health pools above single-rotation burst potential. Combined with mitigation = effective health exceeding Hayabusa's damage.
Regeneration Flags: 40-80 health regen during 2.0s ultimate duration. Passive mitigation requires no active input.
Positioning & Awareness
Stay within 400-600 range of support for peel abilities. Monitor minimap for Hayabusa disappearances indicating roams.
Ward jungle entrances for 2-3s advance warning. Allows defensive prep or tower retreat.
Role-Specific Tactics
Marksman: Max range from frontline, stay near support. Save movement abilities for dodging. Build one defensive item (3rd/4th).
Mage: Use CC to interrupt approach before ultimate. Position behind tanks as physical barriers.
Support: Reserve peel abilities specifically for Hayabusa ultimate. Hold shields/heals/CC until he commits.
Tank: Body-block approach to carries. Absorb ultimate with superior health pools.
Flag Buffs for Survival
Invulnerability Flags: Complete damage negation when activated during damage window. Requires precise timing.
Movement Speed Flags: Outpace approach speed for kiting. Prevents ultimate activation entirely.
Shield Flags: Temporary health buffers absorb burst portions. Activate upon detecting approach.
Advanced Team Fight Tactics
Synchronized team flag control creates multiplicative benefits. Individual captures provide personal advantages; coordinated control overwhelms opponents.
Capture Timing
Optimal: 30-60 seconds before anticipated fights. Tyrant example—capture nearby flags at 3:00-3:30 for maximum 4:00 contest uptime.
Sequential captures maintain continuous buff uptime. As one expires, capture next in rotation.
Contested captures require numerical advantage. Establish vision + numbers before initiating.
Ultimate Coordination
Mage ultimates after damage amplification flags achieve eliminations against normally-surviving targets.
Support ultimates align with offensive flag captures. Yaria's Predator + damage flags = 70%+ win rates.
Tank ultimates + mitigation flags create frontline resilience surviving concentrated focus.
Common Mistakes
1. Wrong Role Flags: Tanks choosing offense sacrifice utility for marginal damage.
2. Poor Timing: Capturing after objectives wastes buff uptime during downtime.
3. Solo Dangerous Captures: Invites ganks. Risk-reward heavily favors avoiding unless vision confirms safety.
4. Ignoring Synergy: Some flags synergize with specific kits. Research hero-flag interactions.
Measuring Effectiveness
Key Metrics
Flag Control %: Above 60% correlates strongly with victory. Cumulative stat advantages compound.
Buff Uptime %: Pros maintain 70-80% through efficient routing.
Objective Conversion with Buffs: Above 65% indicates effective flag usage creating real impact.
Stat Comparisons
Offensive: 15-25% damage increase = 300-500 additional damage per fight. Determines single-rotation eliminations.
Defensive: 20-30% effective health = 40-60% more total damage output through extended survival. Often exceeds offensive flag value.
Utility: CDR/movement speed enable plays otherwise impossible. Value through playmaking opportunities vs raw stats.
Evolution Priority
Early: Flags enhancing 4:00-10:00 objective window performance. Snowball through Tyrant/Dragon control.
Late: Marksmen upgrade attack speed/crit. Tanks prioritize mitigation vs increased enemy damage.
Expert Tips
15-20% gold leads from optimal buff securing + counterjungling stem from disciplined fundamentals.
Pro Preferences
Junglers: Movement speed + experience flags optimize clear efficiency. Lam's clear becomes 10-15s faster.
Carries: Scaling flags for late-game power. Loong's 96% pro pick/ban reflects exceptional scaling with attack speed/range flags.
Supports: Utility flags enhancing team performance. Loong-Yaria 70%+ win rates demonstrate team-first mentality.
Adapting to Enemy Comp
vs Assassins: Defensive priority for carries. Survival threshold becomes primary concern.
vs Tanks: Penetration + sustained damage flags overcome high defenses. Percentage penetration maintains effectiveness.
vs Poke: Regeneration + sustain flags heal through incremental damage. Maintains map presence preventing forced recalls.
Meta Predictions
Current meta favors early aggression (Rush Down 68% KWC win rate). Future patches likely address dominant junglers (Lam 38.7% ban, Augran 45.2% ban).
Emerging strategies prioritize early power over scaling. Aggressive enemy territory captures reward decisive early advantages.
Predicted evolution: increased objective-focused flag control around major spawns (Tyrant 71 gold, Storm Lord 136 gold).
FAQ
Best tank Spriteling choices? Defensive fortification (percentage damage reduction), regeneration (health-per-second), CC enhancement (0.3-0.5s stun/slow extension). Maximize survivability and utility over damage.
How to survive Hayabusa ultimate? Defensive flags (20-30% reduction), position within 400-600 range of support, time defensive abilities during 1.0s damage window. Build one defensive item, stay above 50% health.
Marksman flag choices? Attack speed amplification, critical strike enhancement, one defensive flag. Loong benefits from range extension synergizing with Infinite Vastness ultimate.
Counter assassin burst? Percentage damage reduction + health-boosting flags raise pools above burst thresholds. Position near Yaria (53.8% win) for peel and damage amplification.
When to capture flags? 30-60 seconds before objectives: Tyrant 4:00 (71 gold), Dragon 4:00, Storm Lord 10:00 (136 gold). Coordinate with 90-second buff respawns.
Pro optimization? Synergize flags with hero clear paths and power spikes. Maintain 70-80% buff uptime. Coordinate captures with ultimate cooldowns for maximum burst windows.
Dominate with perfect Spriteling setups. Power up at BitTopup—fast, secure Honor of Kings top-ups and rewards!