

Master the art of support optimization with our comprehensive 2025 guide covering Genshin's most dominant support characters. We'll break down Bennett's game-changing ATK mechanics, Xingqiu's flawless Hydro application, and Kuki's Hyperbloom mastery—plus all the artifact math, weapon choices, and team synergies you need to dominate the current meta.
The Support Revolution: How 2025 Changed Everything
What Makes a Support Character Meta Now?
Here's the thing about Genshin in 2025—raw damage multipliers aren't king anymore. The meta has shifted hard toward reaction-based damage, and that means your support characters aren't just there to babysit your DPS anymore. They're the backbone of your entire damage output.
Bennett remains the undisputed champion of support utility, sitting pretty in SS-tier for good reason. His Elemental Burst doesn't just heal—it provides a flat ATK bonus calculated from his total base ATK (that's character level + weapon base ATK, not your artifact stats). This is why weapon choice matters so much more than people realize.
Xingqiu? He's evolved into something special. Sure, he's still your go-to off-field Sub-DPS, but his Rain Swords mechanic has become absolutely crucial for consistent Hydro application. Every Normal Attack during his Burst triggers Hydro damage, enabling those sweet Vaporize reactions while giving you 20% damage reduction and interruption resistance. Not bad for a bookworm.
Then there's Kuki Shinobu—honestly, Dendro's introduction turned her from a niche pick into an absolute powerhouse. Her Sanctifying Ring pulses Electro every 1.5 seconds, and in Hyperbloom teams? We're talking 150,000+ damage per rotation when she's properly built. That's not support damage—that's carry-level output.
The numbers don't lie: Bennett contributes 20-30% of total team DPS in traditional comps, while optimized Kuki builds can single-handedly carry entire rotations. Energy Recharge requirements have gotten stricter too—Bennett needs 180-250% ER depending on team comp, Xingqiu wants 190-260% for consistent uptime.
Team Efficiency in the Modern Era
2025's all about slot efficiency. Why run a character that does one thing when you can run someone who does four? Bennett's the perfect example—ATK buffing, healing, Pyro application, AND energy generation in one slot. That's value.
The Bennett + Xingqiu combo in National variants? It dominated Spiral Abyss with over 77% adoption rates last cycle. There's a reason for that kind of usage—these two together solve most team building problems before you even pick your DPS.
buy genesis crystals for meta support characters through BitTopup's platform if you're serious about optimization. Trust me, artifact farming for three supports simultaneously gets expensive fast, and their competitive pricing with instant delivery makes the grind way more manageable.
Bennett: The Irreplaceable Buffer
Artifacts That Actually Matter
Let's get one thing straight—Bennett's artifact priority isn't what most guides tell you. Yes, 4-piece Noblesse Oblige is still optimal for pure support (20% Burst DMG + 20% party ATK for 12 seconds), but your main stat choices need to be smarter.
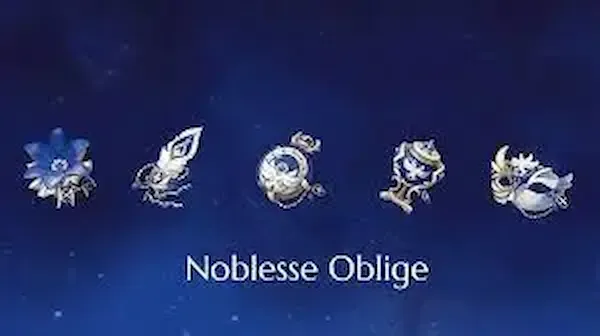
Energy Recharge on Sands is non-negotiable. HP% on Goblet for survivability. Healing Bonus on Circlet if you're going full support. But here's where it gets interesting—if you're running Burst Support Bennett for personal damage, 2pc Noblesse + 2pc Emblem of Severed Fate changes the game completely.
That Emblem combo gives you 20% Burst DMG plus up to 75% additional Burst DMG based on your Energy Recharge. Since you need high ER anyway, you're essentially getting free damage. Your endgame targets should be 17,000-19,000 HP, 200% ER for solo Pyro teams (175-220% for double Pyro), and if you're going the damage route, 50-60% CRIT Rate with 130-180% CRIT DMG.
The Base ATK Weapon Game
This is where people mess up constantly. Bennett's buff scales ONLY from base ATK—that's character level plus weapon base ATK. Your artifacts don't matter for the buff calculation at all.
Mistsplitter Reforged sits at the top with 674 base ATK and 44.1% CRIT DMG. It's his best-in-slot, period. Aquila Favonia matches that 674 base ATK and adds a healing proc that actually synergizes with his kit. For those of us not swimming in 5-star weapons, Skyward Blade offers 608 base ATK with 55.1% ER—solid choice that reduces your artifact ER requirements.
Favonius Sword gets overlooked, but it's actually brilliant for energy-hungry teams. 454 base ATK with 61.3% ER, plus particle generation on CRIT hits. The base ATK difference between Favonius and Aquila? About 220 flat ATK added to your team buff at C1. That's a bigger DPS increase than most artifact upgrades you'll ever farm.
Constellation Reality Check
C1 is absolutely game-changing. It removes the HP restriction AND adds 20% base ATK to the bonus. This single constellation transforms Bennett from conditional support to unconditional team buffer. If you're going to invest in any 4-star constellation, make it this one.
C6 is controversial but honestly? In 2025's meta, it's usually beneficial. The 15% Pyro DMG bonus and Pyro infusion only affect Sword, Claymore, and Polearm users, and most meta carries either have unoverridable infusions or actually want the Pyro. Yes, it conflicts with Physical Eula, but mono-Pyro teams are incredibly strong right now.
C5 gives you +3 Burst levels without the infusion drama—perfect middle ground if you're worried about future team flexibility.
Xingqiu: The Hydro Application Master
Emblem vs Everything Else (Spoiler: Emblem Wins)
4-piece Emblem of Severed Fate has completely taken over Xingqiu builds, and the math is pretty convincing. 20% ER plus up to 75% Burst DMG based on total ER means that with typical 200%+ ER requirements, you're getting around 50% Burst DMG from the 4-piece effect alone.

The old 2pc Noblesse + 2pc Heart of Depth combo (20% Burst DMG + 15% Hydro DMG) just can't compete with those numbers. Your main stats should prioritize ER or ATK% on Sands depending on weapon, Hydro DMG on Goblet, and CRIT Rate or DMG on Circlet.
Substats follow the usual priority: ER to breakpoint first, then CRIT stats in 1:2 ratio, followed by ATK% and EM for reaction damage. Don't sleep on that EM—it actually matters more than people think for reaction teams.
The Energy Recharge Puzzle
This is where Xingqiu gets expensive. That 80 Energy Burst cost creates some serious ER requirements—we're talking 190-260% depending on your team and weapon setup. Solo Hydro teams need the highest investment, while double Hydro with Yelan can reduce requirements by 30-40%.
Sacrificial Sword changes everything though. With reliable procs, you can drop ER requirements to around 150%. That's the difference between needing perfect ER substats and having flexibility for damage stats.
genshin bennett xingqiu kuki shinobu recharge optimization becomes crucial here—BitTopup's competitive Genesis Crystal packages with instant delivery make the artifact farming grind much more bearable when you're trying to hit these precise ER breakpoints across multiple characters.
C6 Xingqiu gets 3 Energy per third sword rain hit, effectively reducing ER requirements by 30-40%. Suddenly weapons like Primordial Jade Cutter become viable options instead of being locked into Sacrificial Sword.
Hydro Application Mastery
Xingqiu's Rain Swords work through multiple mechanisms, and understanding them is key to maximizing his potential. You get Hydro application from the initial Skill cast, orbital sword contact, and Burst-triggered sword rain on Normal Attacks.
The Burst effect triggers once per second regardless of attack speed—perfect for consistent Vaporize reactions with Pyro carries. C2 extends Burst duration by 3 seconds and applies 15% Hydro RES reduction for 4 seconds. That's roughly 20% more damage overall.
Those Rain Swords aren't just for show either. 20% damage reduction plus interruption resistance, and when they shatter, you get 6% Max HP healing through his A1 passive. This defensive utility often lets you skip dedicated healers entirely.
Kuki Shinobu: The Hyperbloom Queen
Healing vs Damage: Choose Your Path
Kuki's build path depends entirely on what your team needs, and honestly, most people are building her wrong. Hyperbloom builds should prioritize Elemental Mastery—we're talking 900-1100 EM with 20-30k HP for the sweet spot.
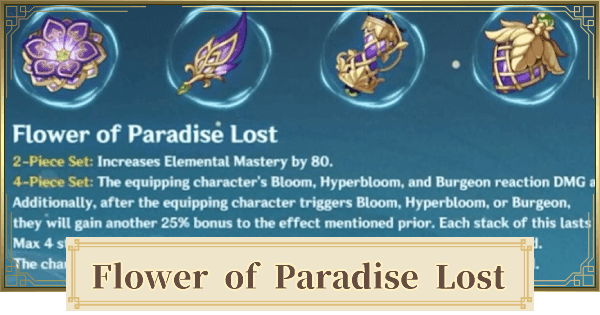
4-piece Flower of Paradise Lost is her best-in-slot for reactions, providing 80 EM and up to 40% Hyperbloom DMG with additional stacks. The damage scaling is exponential, not linear.
For pure healing builds, 4-piece Tenacity of the Millelith gives 20% HP and 20% party ATK on Skill hits. Hybrid builds using 2pc Gilded Dreams + 2pc Flower of Paradise Lost provide 160 EM while maintaining HP flexibility. With 25k HP and 900 EM, you're looking at 5-7k healing per tick while triggering 10k+ Hyperbloom reactions. That's having your cake and eating it too.
Electro Application Timing
Kuki's Sanctifying Ring pulses every 1.5 seconds for 12 seconds (15 at C2), giving you 8-10 consistent Electro applications per cast. This timing is absolutely crucial for Hyperbloom teams where precise Electro timing determines reaction ownership.
The ring attaches to your active character and follows them around—much better AoE coverage during quickswap rotations compared to stationary effects. C4 adds Thundergrass Marks that trigger 9.7% Max HP AoE Electro damage every 5 seconds when allies attack marked enemies. This constellation is a game-changer for energy generation and additional Electro application.
Team Building Around Kuki
Hyperbloom teams are where Kuki truly shines. The premium setup is Kuki/Nahida/Xingqiu/Yelan, but the F2P alternative of Kuki/Dendro Traveler/Xingqiu/Sucrose is surprisingly powerful.
Standard rotation follows strict priority: Hydro first, Dendro second, then Electro triggering. Energy requirements range from 135-175% at C0 (115-140% at C4). In Raiden teams, you can drop Kuki's ER needs to 100% and go full EM/HP investment.
Advanced Optimization: The Numbers Game
Energy Recharge by Team Composition
ER calculations aren't one-size-fits-all. Bennett needs 195-255% in solo Pyro teams, 175-220% in double Pyro, and 160-190% in triple Pyro compositions. Raiden teams can reduce these by 20-30% across the board.
Xingqiu scales from 190-260% for solo Hydro down to 150% with Sacrificial procs and proper batteries. Double Hydro resonance with Yelan provides additional energy generation—about 25% reduction in requirements.
Kuki maintains relatively low requirements at 135-175% for C0, dropping to 115-140% at C4. She's actually quite energy-efficient compared to the other two.
Elemental Mastery Scaling Deep Dive
EM becomes crucial for reaction builds, especially Kuki in Hyperbloom teams. At level 90, each EM point provides 0.35% increased reaction damage, and Hyperbloom scales exclusively from the triggering character's EM and level.
Kuki's optimal 900-1100 EM range enables 12-18k Hyperbloom damage per proc with proper artifacts and team buffs. 4-piece Flower of Paradise Lost adds 40% base Hyperbloom damage plus up to 100% additional through stacks—EM investment becomes incredibly efficient.
EM sharing through Sucrose or Albedo can reduce Kuki's requirements to 850-950 while maintaining similar output. It's all about team synergy.
Meta Team Compositions That Actually Work
National Team Evolution
Raiden National (Raiden/Xiangling/Xingqiu/Bennett) represents the pinnacle of support synergy. Bennett provides ATK buffing and Pyro resonance, Xingqiu enables Vaporize reactions, while Raiden solves energy problems for everyone. It's elegant in its simplicity.

Childe National substitutes Raiden for on-field Hydro application. Higher ER investment required, but the AoE damage potential is superior. International team (Childe/Xiangling/Bennett/Kazuha) showcases optimal support layering—every character provides multiple forms of enhancement.
Hyperbloom Strategies
Hyperbloom teams center around Kuki's Electro triggering Dendro cores from Hydro + Dendro reactions. Premium comp is Kuki/Nahida/Alhaitham/Furina for single-target destruction, while budget Kuki/Dendro Traveler/Xingqiu/Sucrose remains accessible and powerful.
Advanced strategies incorporate Anemo grouping for core consolidation and EM sharing for enhanced reaction damage. Sucrose provides both while maintaining 4pc VV for resistance shredding—multiplicative improvements across the board.
Investment Priority: Where to Spend Your Resources
The 80/20 Rule
Support investment follows diminishing returns. Bennett reaches 80% effectiveness at level 80 with 8/8/8 talents and decent artifacts. That final 20% requires level 90, crowned Burst, and perfect substats—expensive for marginal gains.
Priority order for account development: Bennett first for universal compatibility, Xingqiu second for reaction enabling, then Kuki for Dendro compositions. Focus on universal artifact sets like Noblesse and Emblem before character-specific options.
Constellation Pull Strategy
Bennett C1 provides the largest single power spike for any 4-star character. Prioritize this above most 5-star pulls for account progression—seriously.
Xingqiu C2 and C6 represent significant breakpoints. C2 gives roughly 20% damage increase through extended uptime and resistance shredding. C6 enables non-Sacrificial weapons and superior energy management.
Kuki C2 extends Skill duration by 3 seconds—25% more Electro applications and reduced rotation downtime. Worth considering if you're running Hyperbloom as a main strategy.
Common Mistakes (And How to Avoid Them)
Stat Priority Errors
The biggest mistake? Building ATK% on Bennett for his buff. His buff scales from base ATK only—artifact ATK% provides zero benefit to team buffing. HP% and ER substats are infinitely more valuable.
Overcapping ER is another frequent error, especially Xingqiu builds exceeding 300% without damage investment. There's a sweet spot, and going beyond it is wasted potential.
EM neglect on Kuki severely limits Hyperbloom potential. Reaction damage scales exponentially—1000 EM builds significantly outperform pure healing optimization in most scenarios.
Energy Management Issues
Rotation length mismatches create energy deficits. Bennett's 15-second cooldown with 12-second duration requires precise timing for 100% uptime. Longer rotations create gaps in team buffing.
Favonius weapons on multiple characters can provide team-wide energy support, reducing individual ER requirements and improving rotation consistency. Don't underestimate the power of good energy management.
FAQ
Q: What Energy Recharge should I aim for on Bennett, Xingqiu, and Kuki Shinobu?
Bennett needs 180-250% ER (higher for solo Pyro), Xingqiu requires 190-260% (150% with Sacrificial Sword), and Kuki needs 135-175% at C0 (115-140% at C4). Raiden battery support reduces these by 20-30%.
Q: Should I pull for Bennett C6 or avoid it?
C6 adds Pyro infusion that conflicts with Physical DPS like Eula but enables powerful mono-Pyro teams. It's beneficial for most 2025 meta comps since many characters have unoverridable infusions. C5 provides similar damage without infusion if you're concerned about flexibility.
Q: Which artifacts are best for each support?
Bennett: 4pc Noblesse for team buffing. Xingqiu: 4pc Emblem for damage. Kuki: 4pc Flower of Paradise Lost for Hyperbloom or 4pc Tenacity for pure healing.
Q: How much EM does Kuki need for Hyperbloom?
Target 900-1100 EM with 20-30k HP for optimal damage. This enables 10k+ per reaction while maintaining 5-7k healing per tick. Diminishing returns kick in past 1100 EM.
Q: Best weapons for each character?
Bennett: Mistsplitter or Aquila for highest base ATK. Xingqiu: Sacrificial Sword for energy or Primordial Jade Cutter for damage. Kuki: Freedom-Sworn for Hyperbloom or Iron Sting as F2P option.
Q: Which support should I invest in first?
Bennett first for universal compatibility, then Xingqiu for National teams, followed by Kuki for Dendro comps. This order gives you access to the most meta team options with the least investment.