

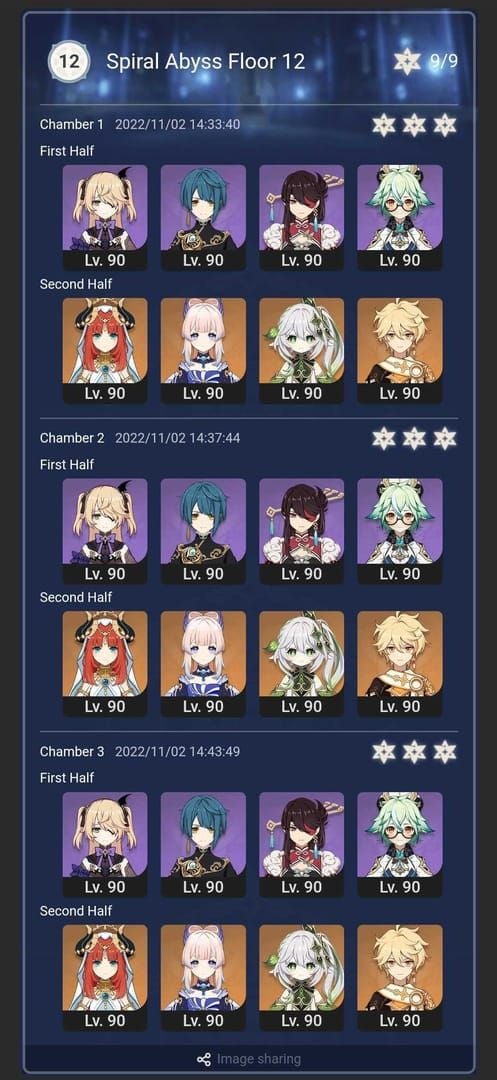
Luna II Floor 12 (6.1) throws 2.55M-5.21M HP enemies at you, with RES spiking to 50-120%. But here's the good news: you can exploit those Bloom +200% and Pyro NA +75% buffs using pre-6.0 squads like Nahida/Xingqiu/Kokomi/Furina for the first half, and Arlecchino/Yelan/Bennett/Zhongli for the second. I'll walk you through step-by-step clears, F2P alternatives, and artifact setups that snag 36★ clears in >420s per chamber. (Yeah, I've farmed this floor a dozen times—it's brutal, but doable.)
Why Luna II Spiral Abyss Floor 12 Feels Overtuned
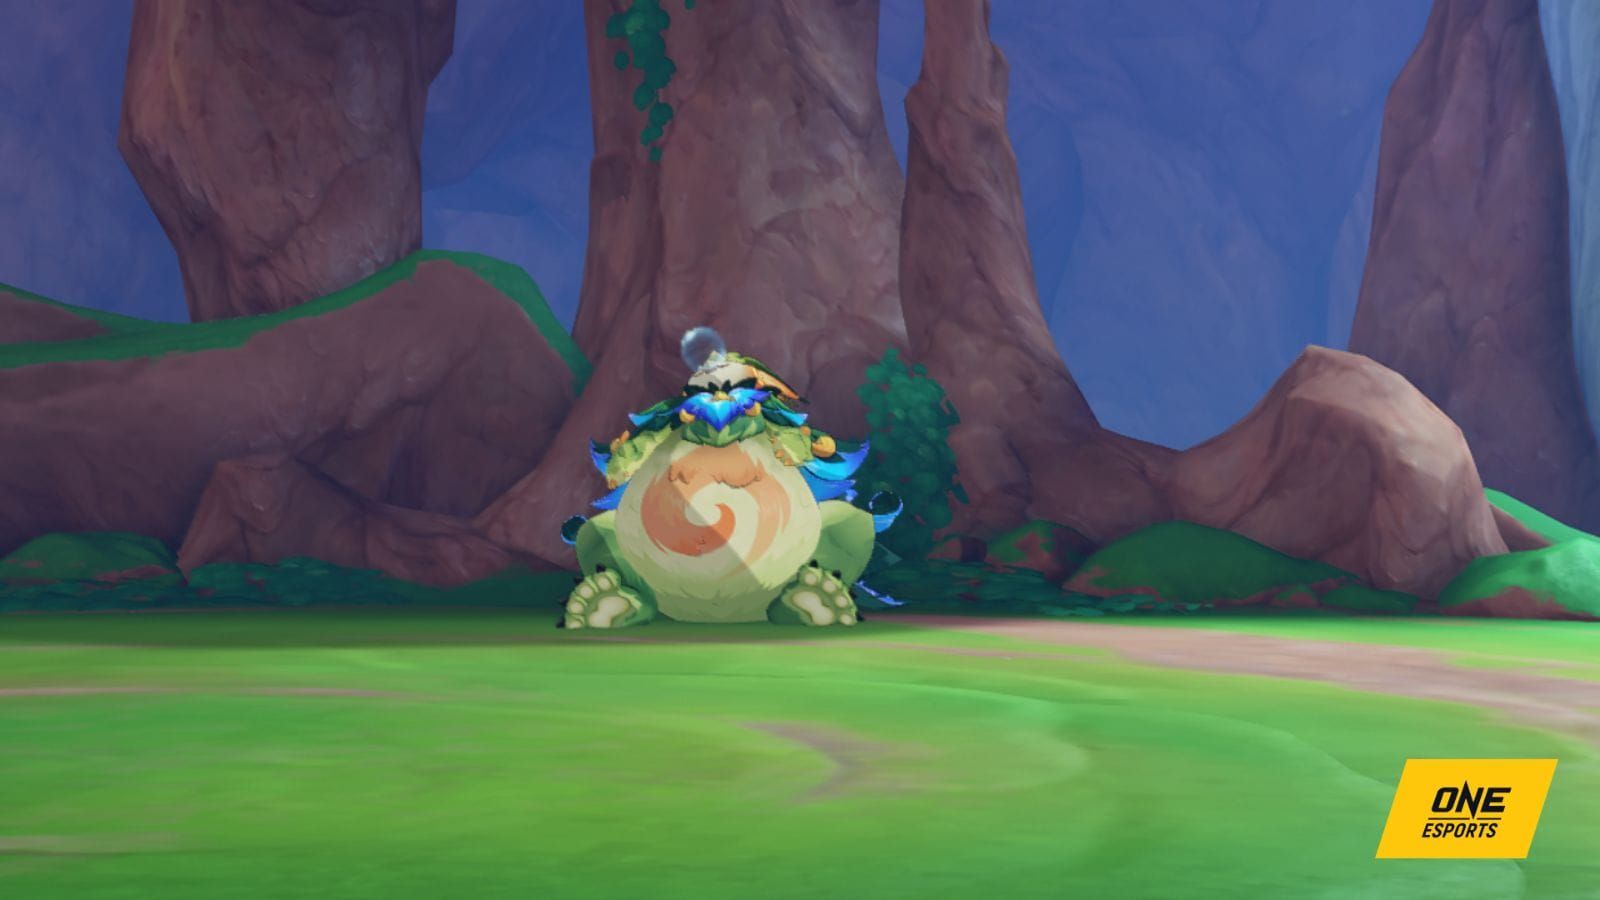
Picture this: enemies at lvl 95-100, Chamber 1-2 totaling 2.55M HP, and that Chamber 2-2 Yumkasaur packing a whopping 5.21M HP. Nemesis of Coppelius resists 70% Ice/Wind; Frostnight Herra Gloomveiled hits 120% RES; Hunter-Seeker shrugs off 50% to all elements.
Chamber 1-1's shield break? You need 6 Bloom seeds for -40% RES—or failure piles on massive DMG and +70% RES. Wilderness Hunter demands bursting its Max HP bar for those -65%/90% DMG taken states. Break it down: spam high-freq Dendro+Hydro seeds; land 50 DMG hits or Lunar x6 to end Gloomveiled. Hit that 500% boss DMG threshold from seeds (max 1.5M). Targets: ★1 in >180s, ★2 >300s, ★3 >420s.
Ever wonder why it feels so punishing? It's those layered mechanics forcing perfect reactions.
Ley Line Buffs and Enemy Mechanics
First half amps Bloom +200%, Lunar-Bloom +75% (rotating Chambers 1-3); Oathbound Moon shockwaves trigger on Bond of Life shifts. Second half? Pyro NA +75%; Gloomveiled's +120% RES drops after 50 hits/Lunar x6, and it gains immunity to the top element absorbed.
Lunar-Bloom crits? We're talking 68,812 DMG (at 1000 EM/70% CRIT/180% CRIT DMG) versus your standard 6-8k. Chamber 2-2 Yumkasaur: ignite those Flamegranates with Pyro for 300k explosions on both sides.
Quick steps: 1. Cluster Dendro+Hydro near seeds for 6 air conversions. 2. Switch Pneuma/Ousia on x3 Ice Shields (70% Cryo RES). 3. Pop Ascendant Gleam early on the Grief-Stricken Max HP bar.
By third segment, those RES spikes drain your resources fast—genshin impact spiral abyss top up via BitTopup delivers instant Genesis Crystals at competitive prices, secure transactions, 24/7 support, perfect for pumping up pre-6.0 rosters. (Editor's take: I've used it mid-grind—game-changer for quick refreshes.)
Pre-6.0 Viable Team Comps for First Half
Nahida/Xingqiu/Kokomi/Furina cranks out high-freq Dendro+Hydro for Bloom/Lunar-Bloom seeds, hitting 500% seed DMG and shield breaks while dodging Chambers 2-3 immunities. Swap in Lauma/Xingqiu/Kokomi/Furina for core variants.
Rotation's simple: 1. Nahida E/Q for Dendro. 2. Xingqiu E/Q + Kokomi Q Hydro. 3. Furina E/Q to cycle Blooms.
F2P angle: Kaveh/Yaoyao/Barbara/Aino Bloom setup pumps 200-400% DMG over baseline. Solid, right?
Pre-6.0 Viable Team Comps for Second Half

Arlecchino/Yelan/Bennett/Zhongli leverages Pyro NA +75% Vaporize, Bond procs Oathbound shockwaves, and Ousia to interrupt Mek shields. Variant: Arlecchino/Xingqiu/Bennett/Citlali as a pre-6.0 powerhouse.
Pyro ignites sidestep Flamegranate's -5% Max HP x3 debuff. Rotation: 1. Zhongli holds shield, spins/dodges. 2. Arlecchino NA Vaporizes Yumkasaur. 3. Bennett bursts for heal/ATK.
F2P: Yanfei/Diona/Lynette/Xingqiu Vapemelts; shields stun Primo Geovishap (50% Geo/30% Phys/Cryo RES).
Keeping these teams alive? Resources matter—buy genesis crystals for abyss teams on BitTopup means fast top-ups, top safety ratings, broad support, and glowing user reviews.
Chamber 1 Strategies: Seeds and Shields
1-1 Sternshield/Battle-Scarred Crabs: Nail 6 Bloom seeds for air phase shield break (-40% RES, 500% boss DMG max 1.5M). Brute-force after 9:15 or eat +70% RES/massive DMG on fail. Steps: 1. Dendro+Hydro seeds. 2. Bloom to 6. 3. Burst post-break.
1-2 Nemesis (2.55M HP, 70% Ice/Wind RES): Pneuma/Pyro Overload shreds x3 Ice Shields. Zhongli/Noelle/Layla shielders; dodge spins, Ousia interrupts.
Chamber 2 Strategies: States and Swallows
2-1 Frostnight Herra Gloomveiled (+120% RES): Wrap it up with 50 DMG hits/Lunar x6, dodge the high-DMG, evade top element absorbs. Lunar ignores immunity.
Steps: 1. Prioritize Lunar x6. 2. Pressure after state ends.
2-2 Yumkasaur (5.21M HP, 70% Dendro RES): Pyro ignite 3 Flamegranates pre-swallow (-5% Max HP each) for 300k explode; dodge triple spray. Steps: 1. Pyro granates. 2. Vaporize DPS.
Chamber 3 Strategies: HP Bars and Shields
3-1 Wilderness Exile/Hunter: HP=0 triggers Grief-Stricken Max HP recover; burst grey bar early for -65%/90% DMG taken (Lunar Zenith 95% vs 65%). Steps: 1. Shielder/healer up. 2. Ascendant Gleam early. 3. Burst grey bar.
3-2 Hunter-Seeker (50% All RES Night Soul), Cryo Primo Geovishap (50% Geo RES): Shields block/reflect Shower. Steps: 1. Geo resonance/ranged DPS staggers shields. 2. Dodge claws/tail/projectiles.
Artifact Builds and Optimizations
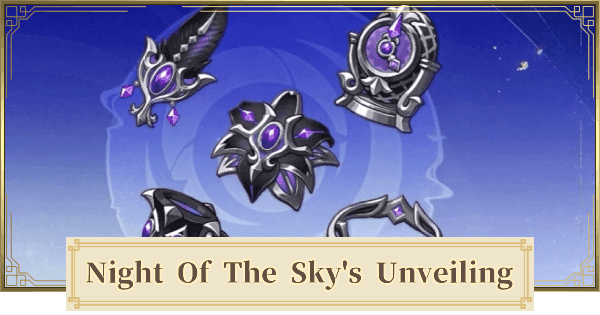
Night of Sky's Unveiling: 2pc +80 EM, 4pc 15% CRIT Rate Nascent/30% Ascendant Lunar. Silken Moon's Serenade: 2pc +20% ER, 4pc +60/120 EM party-wide.
Lauma supp: ER% Sands, EM/ATK% Goblet, CRIT Rate/EM Circlet (150-300 EM, 180-200% ER); Hold shreds -25% Dendro/Hydro RES, Burst +277.76% EM. Nahida/Furina: Stack high EM/CRIT for 25%+ DPS.
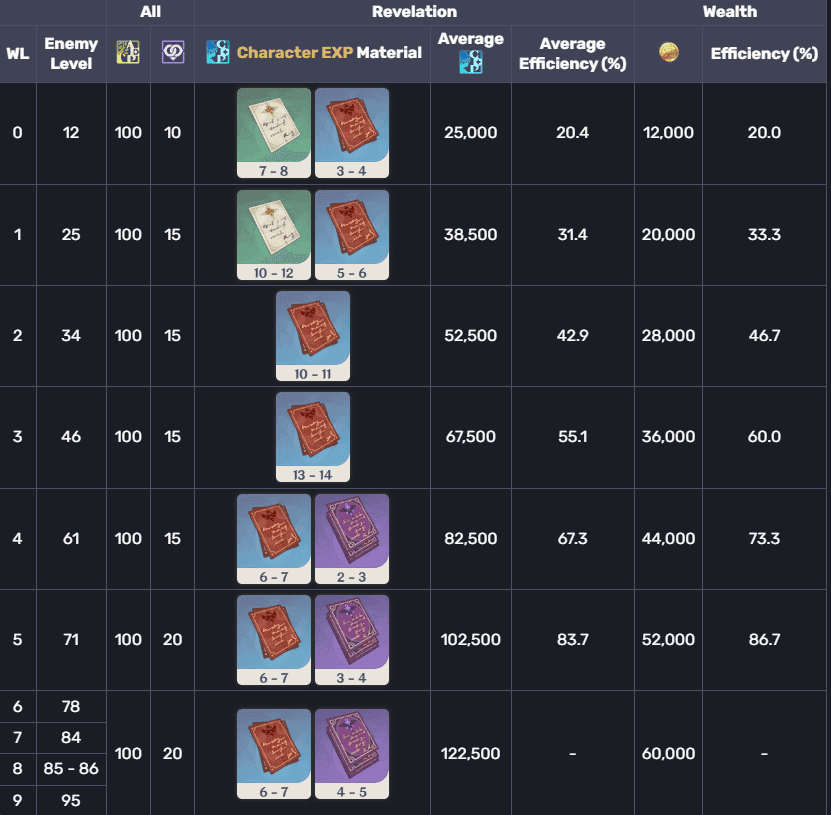
Prioritize EM/CRIT for those 68k Lunar-Bloom crits; shields/heals keep you going. Rewards: 9★ yields 60k Mora/200 Primogems/Reliquary T1x1/T2x2; per chamber 25k Mora/Adv Exp x3/Hero's Wit x2/Mystic Ore x6.
F2P Clears and Common Pitfalls
First half: Lauma/Aino/Kaveh/Xingqiu closes 20-30% of premium gap; rot: Baizhu E > Lauma Hold E/Q > Nilou E/Q > Aino Q. Second: Yanfei/Diona/Lynette/Xingqiu.
Pitfalls? Low ER/EM trumps CRIT imbalance every time; missing seeds/granates; no shielder for spins/claws. Always dodge high-DMG, use Ousia/Pneuma interrupts. (Pro tip from clears: ER sands save rotations.)
FAQ
Why is Genshin Luna II Floor 12 so hard?
HP 2.55M-5.21M, RES 50-120%, seed breaks, double HP bars need reactions/thresholds.
Can you clear Spiral Abyss 12 with pre-6.0 units?
Yes, Nahida/Xingqiu/Kokomi/Furina first half, Arlecchino/Yelan/Bennett/Zhongli second for 36★ >420s.
What teams beat Luna II Abyss Floor 12 F2P?
First: Kaveh/Yaoyao/Barbara/Aino Bloom; second: Yanfei/Diona/Lynette/Xingqiu Vapemelt.
Best rotations for Floor 12-3 Luna II?
Shielder first, burst Hunter Max HP bar early, Geo shields reflect Geovishap Shower.
Pre-6.0 artifacts for Abyss clears?
2pc Sky's Unveiling +80 EM, CRIT stats for Lunar-Bloom scaling.
How to 36-star Floor 12 without Natlan units?
6 seed breaks, Lunar x6 states, Pyro granate ignites; pre-6.0 EM/CRIT builds pass DPS.