

Quick Answer: Nod-Krai's got 25 Remarkable Chests scattered across Lempo Isle, Hiisi Island, and Paha Isle. Each one drops 5 Primogems plus some pretty unique furnishing blueprints. Just make sure you've wrapped up the Archon Quest first—trust me on this one.
What You're Actually Getting From These Chests
The Numbers Game
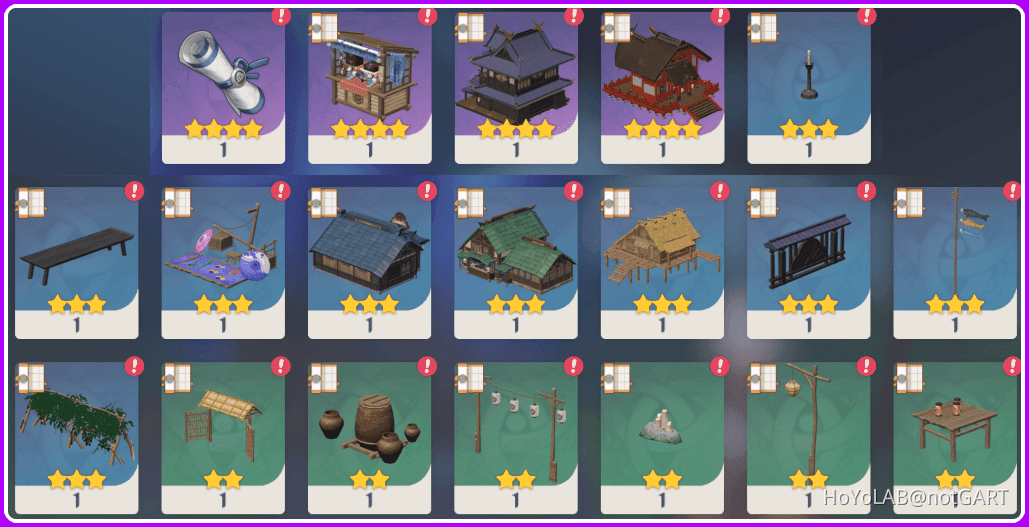
Here's the deal with Nod-Krai's Remarkable Chests—they're those distinctive green containers that actually feel worth your time. Each one coughs up 5 Primogems and exclusive Serenitea Pot blueprints you can't get anywhere else. We're talking 125 Primogems total plus 25 unique furnishing designs, including some standouts like 'Nasha Market - Seeing is Believing' and 'Colossal Assisted Movement Pivot' (yeah, that's really what they called it).
The breakdown's pretty straightforward:
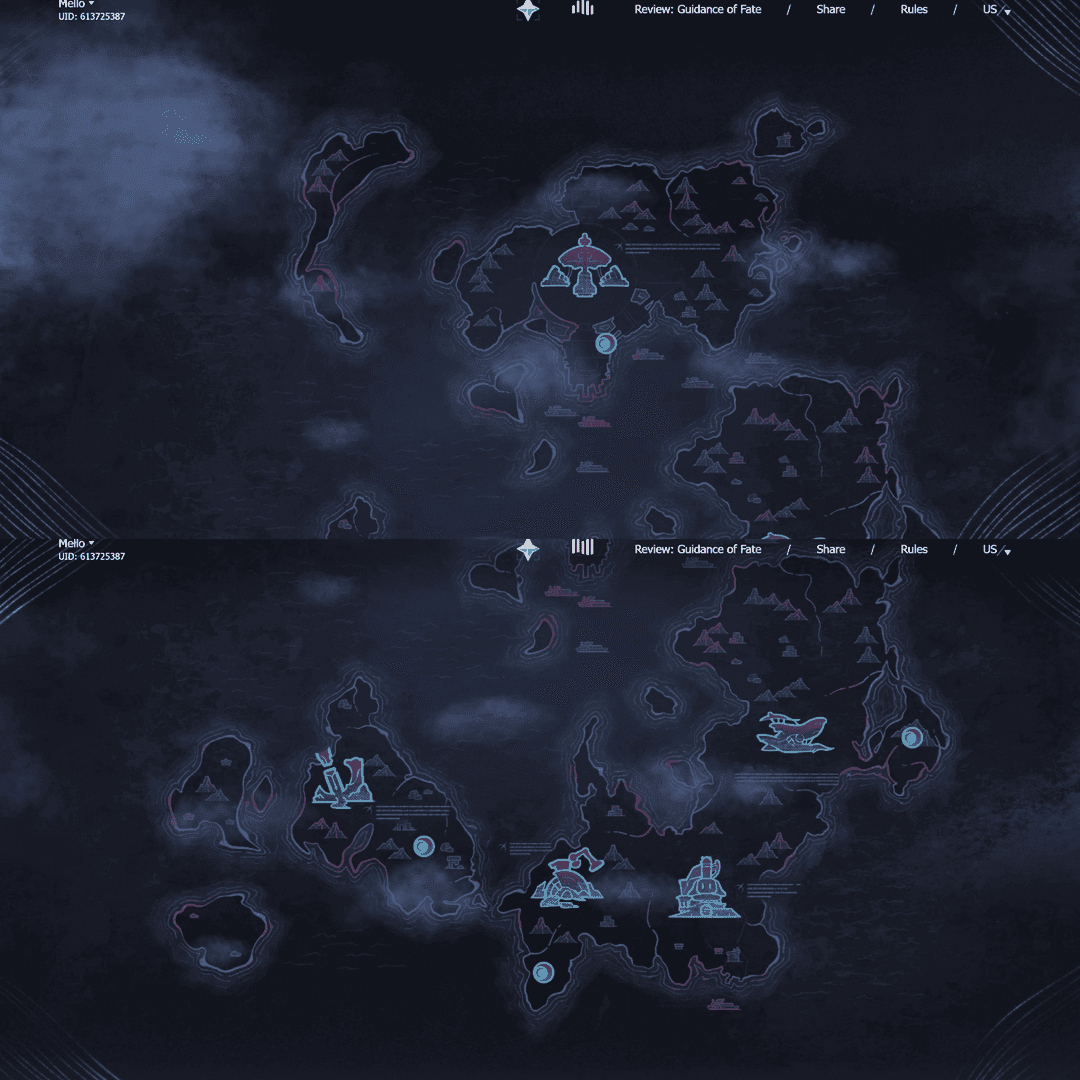
Paha Isle: 9 chests hiding among 53 total containers
Hiisi Island: 5 chests scattered across 22 total containers
Lempo Isle: 11 chests spread across various landmarks
Now, while you're hunting these down, don't sleep on the 4 Shrines of Depths in the region. Those bad boys drop 80 Primogems each—that's 320 total—but you'll need Borderland Shrine Keys from upgrading your Statues of the New Moon.
Before You Start Running Around
Complete that main Archon Quest first. Seriously. I've seen too many players get frustrated trying to access areas that are story-locked. Chests #24 and #25? They're completely off-limits until you finish 'The Tale-Telling Heart' world quest. Several puzzle mechanics just... won't work until you've progressed the story.
If you're looking to boost your Primogem stash while exploring, Genshin Impact recharge gift option through BitTopup offers solid pricing and instant Genesis Crystal delivery—handy when you're grinding through content.
Getting Around Efficiently
Your Teleport Priority List
Here's how I tackle Nod-Krai exploration:
Blue Amber Lake (your central hub for everything)
Maroon Basin (ship access point)
Frostmoon Enclave (northern cluster efficiency)
Kuuvahki Experimental Design Bureau (that Fatui base everyone loves to hate)
Quick note about the Nod-Krai Treasure Compass—it's great for standard chests and Lunoculus, but it completely ignores Remarkable Chests. Bit of an oversight, honestly.
Northern Section: Chests 1-8
Chest #1 - Krumkake Craftshop: This bipolar object puzzle had me scratching my head initially. You're carrying a magnetic sphere between kuuvahki robots, switching polarity to guide it onto those red crates. Takes some patience. Reward: 'Nasha Market - Seeing is Believing'.

Chest #2 - Western Beach: Standard combat encounter—Cryo Slimes and a Radiant Beast. These new enemy types hit harder than you'd expect. Reward: 'Nasha Market - Wares Worth Staying For'.
Chest #3 - Hiisi Island Coast: Frostnight Scion at the western shore of Frostmoon Enclave. Bring Pyro. Seriously. Reward: 'Colossal Assisted Movement Pivot'.
Chest #4 - Hilichurl Camp: Three Hilichurls hanging around deer statues near the Teleport Waypoint. Nothing fancy here. Reward: 'Steelbound Secrecy'.
Chest #5 - Northern Island: Unguarded chest on that tiny island north of Thunderclap Reef. Swim or ice-bridge your way over. Reward: 'Nasha Market - Lure of Lingering Fragrance'.
Chest #6 - Southwest Hiisi: Electro Slimes on a cliff formation. Pyro reactions make quick work of them. Reward: 'Nasha Market - Seize the Dawn'.
Chest #7 - Blue Amber Lake South: Another Frostnight Scion in open field combat. At least there's room to maneuver. Reward: 'Uncertain Boundaries'.
Chest #8 - Blue Amber Lake Waypoint: Right next to the teleport point. Free real estate. Reward: 'Rusty Sheet-Metal Workbench'.
Central Region: Chests 9-16
Chest #9 - Starsand Shoal: Abandoned camp at the northern end of the shoal. Easy pickup. Reward: 'Workshop Cabin - Ship Ashore'.
Chest #10 - Fatui Camp: South of Nothing Passage—you know the drill with Fatui agents. Reward: 'City Street Lamp - Clear Path Ahead'.
Chest #11 - Waterfall Cave: Hidden cave at the waterfall's top, southwest of Nothing Passage. Bit tricky to spot. Reward: 'Pale Moonlight Guides the Way Home'.
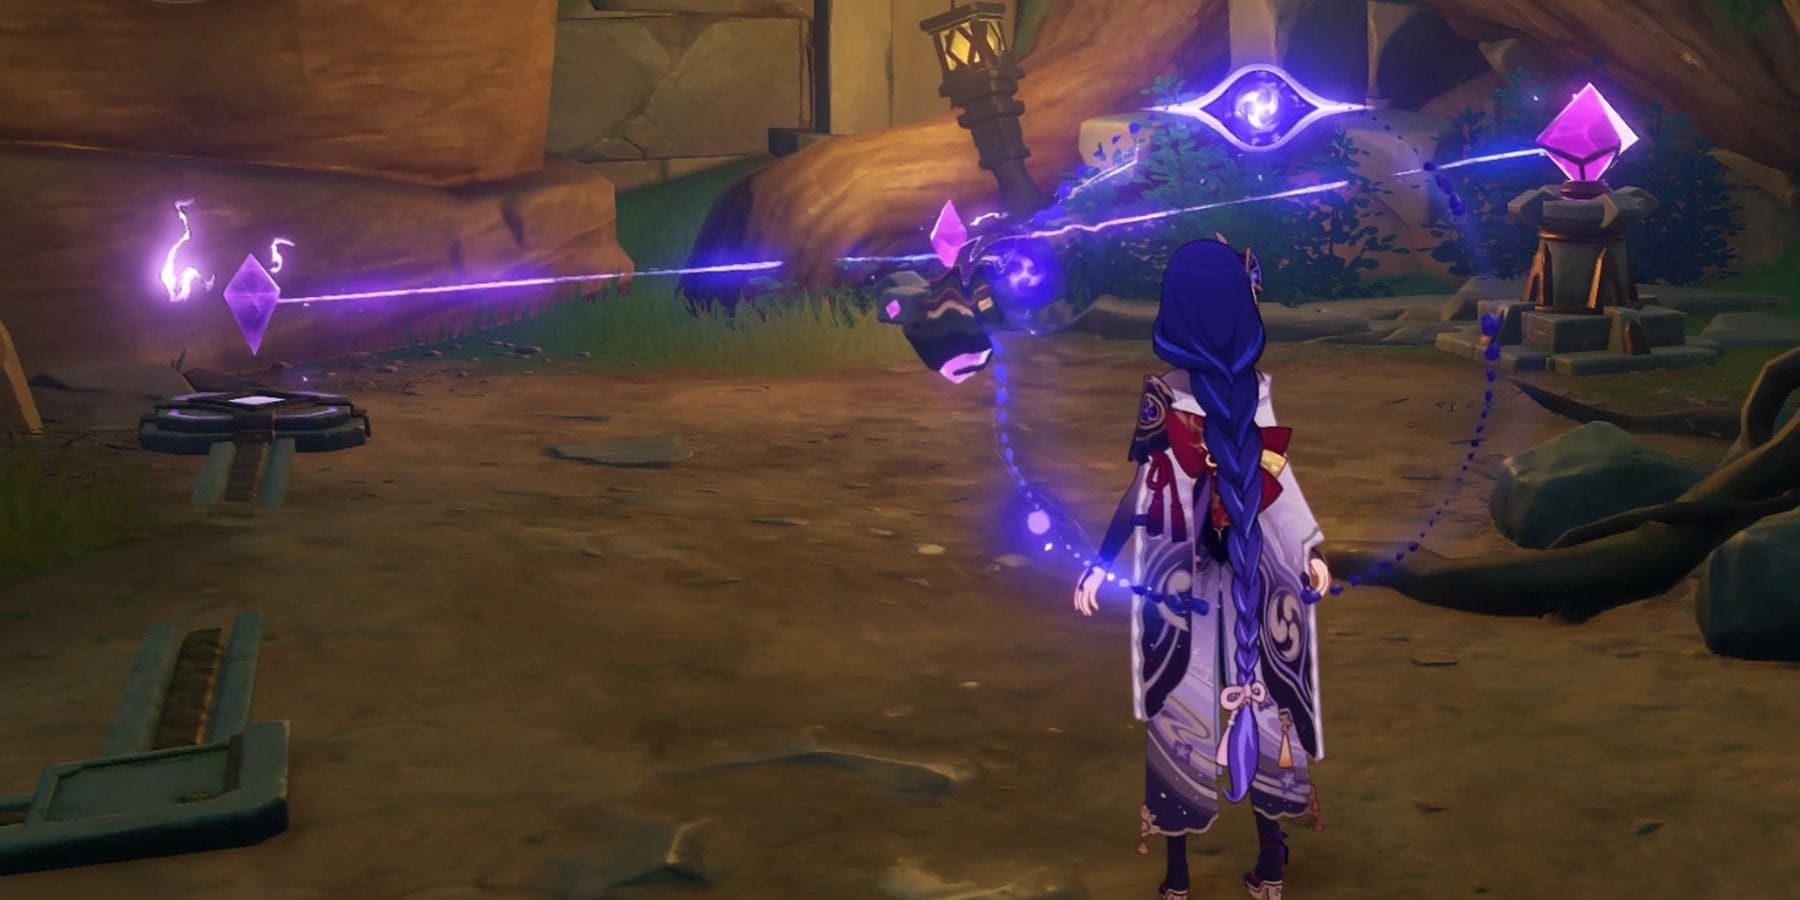
Chest #12 - Relay Mechanism Puzzle: This one's south of Nothing Passage. Position those small bots until lightning creates matching faces. Fair warning—the community's calling these mechanics finicky, and they're not wrong.
Chest #13 - Northwest Nothing Passage: Standard Frostnight Scion encounter. You've got this by now.
Chest #14 - Paha Isle Fatui Base: Clear out Fatui agents and landcruisers near the Statue of the New Moon. Reward: 'Pedunculate Oak Wood Moonward Backed Chair' (someone had fun with these names).
Chest #15 - Fatui Base Interior: You'll need to grab an ID card within the base to remove the protective barrier. Multi-step puzzle that actually feels integrated. Reward: 'Small Cargo Container - Safe Stowage'.
Chest #16 - Ship Location: Board the vessel near Maroon Basin waypoint. Reward: 'Little Cover'.
Running low on Primogems during your exploration? Consider the Genshin Impact top up promo on BitTopup for secure transactions with competitive rates and instant delivery.
Southern Territory: Chests 17-25
Chest #17 - Landcruiser Guards: North of Maroon Basin, you're facing three mechanical Landcruisers. Position yourself on the beach edge—gives you better combat space. Reward: 'Mechanical Figurine - Flash of Inspiration'.
Chest #18 - Northern Paha Isle: That horse-like Electro Frostnight Scion. Pyro advantage is your friend here. Reward: 'Twin-Handled Hanging Pot - Hot Soup'.
Chest #19 - Shoreline Location: Fatui agents plus a Cryo Radiant Beast near those icy blue formations. Dual enemy encounters need tactical planning. Reward: 'Warmth Shared With Friends'.
Chest #20 - Kuuvahki Container: Fatui base container that opens via Kuuvahki energy manipulation. Some guides call this a hatch door puzzle near the Bureau—same thing. Reward: 'Heavy Hooffall'.
Chest #21 - Northwestern Shore: More Fatui forces by the Kuuvahki Experimental Design Bureau. Reward: 'Painted Pedunculate Oak Wood Barrel'.
Chest #22 - Western Hill: Frostnight Scion at an elevated Bureau position. High ground advantage goes both ways. Reward: 'Shadow of the Frostmoon'.
Chest #23 - Windsworn Path Cavern: Underground west of Blue Amber Lake. Use those Kuuvahki-charged plants to break rock barriers. There's a Lunoculus nearby for efficient dual collection. Reward: 'Twilight Threaded Leaves'.
Chest #24 - Abandoned Workshop: Northern underground section at Blue Amber Lake. Requires 'The Tale-Telling Heart' quest completion—no shortcuts here. Reward: 'Silver Fir Wood Round Low Table'.
Chest #25 - Sanctum of the Oathkeeper: Underground Sanctum area on Hiisi Island. Your final collection point. Reward: 'Nasha Market - Impenetrable Vault'.
Puzzle Mechanics That Actually Matter
Kuuvahki Energy System
Those bipolar object puzzles require magnetic polarity switching between robots. Community feedback's calling the mechanics clunky—they're not wrong, but precise positioning gets you through. Kuuvahki-charged plants break specific rock barriers when you activate them through energy source proximity.
Multi-Step Requirements
Some chests aren't just sitting there waiting:
ID Card Collection: Chest #15 needs that access card from the Fatui base
Quest Gates: Chests #24 and #25 demand world quest progression
Environmental Tools: Chest #23 requires plant activation before demolition
Smart Collection Route
Time-Efficient Sequence
Here's how I'd tackle this if I were starting fresh:
Phase 1: Lempo Isle accessible chests (1-2 hours of solid exploration)
Phase 2: Hiisi Island combat encounters (1-3 hours depending on your team)
Phase 3: Paha Isle Fatui infiltration (2-4 hours—those bases are dense)
Phase 4: Underground and quest-locked locations (1-2 hours once unlocked)
Resource Prep
Pack stamina restoration for all that vertical terrain: Sweet Madame, Northern Smoked Chicken, Goulash for cold resistance. Co-op mode gives individual rewards with coordinated elemental advantages against regional enemies—worth considering if you're struggling with the combat encounters.
When Things Go Wrong
Detection Issues
Chests #5 and #8 don't have enemy guards, so they blend into backgrounds easily. Systematic grid searching around waypoints works better than random wandering. Remember—Treasure Compass can't detect Remarkable Chests directly.
Puzzle Resets
Relay Mechanism puzzles reset if you move away until they despawn, then return. Kuuvahki puzzles need proper positioning relative to energy sources and quest prerequisite verification. When in doubt, check your quest log.
FAQ
How many Remarkable Chests are we talking about in Nod-Krai? 25 total: 9 on Paha Isle, 5 on Hiisi Island, 11 on Lempo Isle. Each drops 5 Primogems plus a unique furnishing blueprint.
What's the actual reward breakdown? 125 total Primogems (5 per chest) plus 25 exclusive Serenitea Pot blueprints including the 'Nasha Market' series, 'Colossal Assisted Movement Pivot', and 'Shadow of the Frostmoon'.
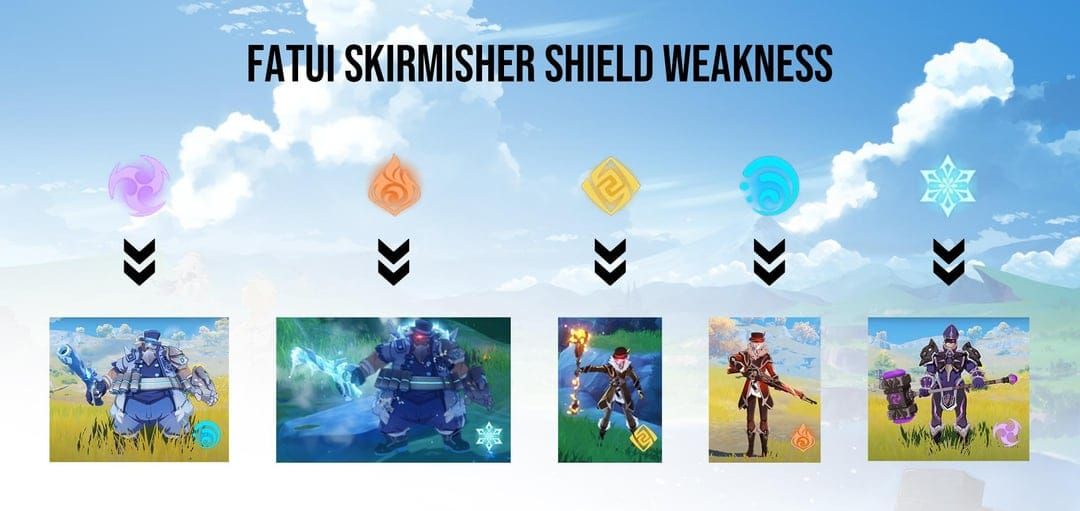
Do I need specific characters for collection? No character requirements, but Pyro absolutely destroys Cryo enemies and Frostnight Scions, while Electro handles Hydro slimes efficiently.
Can the Treasure Compass find Remarkable Chests? Nope—no direct detection capability. But it's great for finding standard chests and Lunoculus while you're manually checking coordinates.
Are any chests time-gated? Chests #24 and #25 require 'The Tale-Telling Heart' world quest completion for underground access. Complete the main Archon Quest first for full puzzle mechanic availability.
How do Remarkable Chests compare to Luxurious Chests? Remarkable (green): 5 Primogems plus furnishing blueprints. Luxurious (golden, from Shrines of Depths): 80 Primogems plus artifacts and premium materials. Different leagues entirely.