

Quick Rundown: This Jean Sunfire setup taps into her Anemo Burst to Swirl Bennett's Pyro Burst, whipping up 12-second Pyro damage zones perfect for OverVape or Melt triggers. At its heart: Jean as your 200-250% ER support powerhouse, Bennett handling 200% ER healing duties, and a flexible fourth spot for Raiden or Ganyu. Nail those 12-20 second cycles with EM-focused builds, VV artifacts pumping +60% Swirl damage and shredding enemy Pyro RES by 40%. In Abyss runs against clustered foes, it delivers solid 20-30% DPS uplifts while keeping your team afloat.
Diving into Jean Sunfire Teams
Why Sunfire Stands Out in Genshin Impact
Ever wonder what happens when you mix Jean's Dandelion Breeze Burst with Bennett's Fantastic Voyage? You get this wild Sunfire reaction—Jean's Anemo swirl picks up Bennett's Pyro field, spawning looping 12-second Pyro ticks across a 5-meter zone. It hits for 78.4% Anemo damage at talent level 1 (scaling up to 167% at level 10), and with 1000 EM on Jean, you're looking at 200-300% Pyro Swirl output. Honestly, it shreds Pyro shields on Abyss Lectors quicker than Overload squads ever could. Push Jean's Burst to level 8 or higher (903% damage at level 9) and max Bennett at level 90 for that 1000+ ATK buff, plus 25.12% ATK-based healing per second.
Key Insight: It shines in AoE scenarios with bunched-up enemies, slicing through Pyro-weak shields like butter.
Real-World Numbers: Slap VV 4-piece on Jean, and you amp Swirl damage by 60% while dropping Pyro RES by 40% for 10 seconds—translating to 20-30% better domain clears based on player tests.
How to Pull It Off:
Level up Jean's Burst to at least 8.
Head to the training grounds and tweak for 12-second tick overlaps.
Herd enemies right into that 5-meter sweet spot.
If you want the full picture, swing by the Genshin Impact Jean Complete Guide or our Genshin Impact Support Character Hub for more breakdowns.
The Magic Behind Jean and Bennett's Team-Up
Picture this: Jean lays down her Anemo Burst to swirl Bennett's off-field Pyro aura. In return, Bennett dishes out that juicy 56% base ATK buff (76% if you're running Noblesse 4-piece) and 251% ATK-scaling heals. Jean's C4 throws in an extra 40% Anemo RES shred, which stacks with VV for a brutal -80% Pyro RES hit. Bennett's C1 ditches those pesky HP caps on his buff, and C2 kicks in +30% ER when he's under 70% HP. Throw in Jean's 50% heal on Normal Attacks, and you've got a team that's basically unkillable.
Bottom Line: It all hinges on Burst overlap; Jean's passive even refunds 20% of her Burst energy (making her effective cost just 16 from the full 80).
Hands-On Example: Bennett's 5-second cooldown Skill spits out particles to feed Jean's low 64 effective cost.
Step-by-Step Setup:
Tap Bennett's Skill while inside Jean's field—no knockback drama.
Whip out Jean's Hold Gale Blade (20 stamina per second, up to 5 seconds) to clump enemies before bursts.
Sync Bennett's 15-second Burst with Jean's 12-second one, starting within 3 seconds of each other.
Running short on resources for those talent levels? No sweat—grab some instant Genshin recharge from BitTopup. It's a quick way to snag Primogems at solid prices, with instant delivery, secure payments, global reach, top-notch reviews, and dependable support. Get those pulls for Jean or Bennett rolling without the wait.
Building Your Core Team
Jean: The Swirl and Sustain Star

At level 90, Jean rocks 14,695 HP and 239 ATK, swirling Pyro for reaction chains while her heals scale off ATK. She pairs seamlessly with Bennett for Sunfire, opening doors to OverVape (think Raiden and Xingqiu) or Overload (Raiden with Xiangling). That Dandelion Breeze? It yanks enemies in and chips away at shields.
Pro Tip: Ditch heavy healing focus—go for EM Sands or Goblet (aim for 30+ EM) to amp reactions.
Impactful Stat: Her C4 shreds 40% Anemo RES, pumping team DPS by 40% during Burst windows.
Build It Out:
VV 4-piece with EM Sands for that +60% Swirl damage kick.
Tap her Skill before Burst to snag particles.
Center the Burst overlap right in Bennett's field.
Bennett: Buffs, Heals, and Pyro Backbone
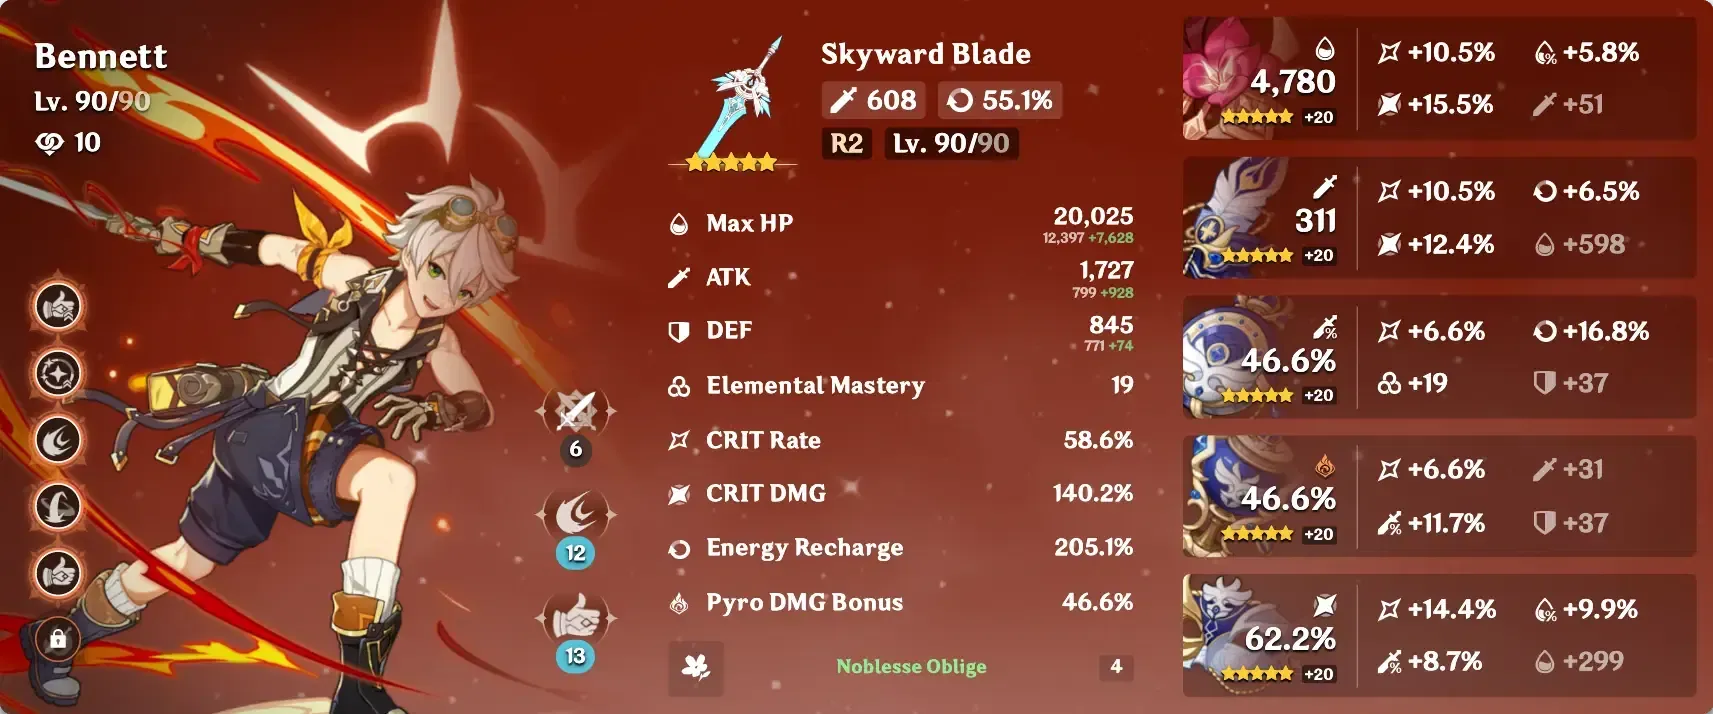
Bennett at level 90 brings 191 base ATK and 126.7% ER, laying down a 15-second Pyro Burst field with a 56% base ATK buff and ~1000+ ATK heals at peak investment. His 5-second Skill CD funnels energy straight to Jean, and he's F2P-friendly via the Standard Banner. It powers Pyro Swirl or Overload setups, and Noblesse 4-piece tacks on +20% team ATK for 12 seconds.
Essential Note: At 200% ER, his 60-energy Burst stays up without a hitch.
Practical Boost: C4 adds particles from extra attacks, patching those pesky 20-second rotation holes.
Gear It Up:
HP% Sands, Goblet, and Circlet (with Healing Bonus) for max output—sub in HP% over ER where possible.
Lead with his Burst to blanket the area in Pyro.
Aquila Favonia scales his buff like a dream.
Picking Your Fourth Slot Flex
Go Raiden (Emblem 4-piece, ER Sands) for Electro-charged Overload bursts; Xingqiu (180-200% ER, Sacrificial Sword) for Hydro Vaporize magic; or Xiangling (Crimson Witch 4-piece) to keep Pyro flowing. For Melt vibes, slot in Ganyu (Blizzard Strayer 2-piece + ATK 2-piece, Hunter's Path) to double-dip on that 1.5x multiplier from Sunfire's Pyro.
Quick Guide: Hydro unlocks Vape potential; Electro cranks Overload spikes.
Tested Gains: Raiden layers in 15-25% extra DPS through Overload, especially with The Catch's +45.9% ER.
Make It Work:
Sub Yelan for Xingqiu in Vape-Swirl mashups.
Run reaction tests in domains to feel the flow.
Lean on off-field applicators for consistency.
Nailing Energy Recharge Benchmarks
Figuring Out Jean's ER Sweet Spot
Without Favonius, Jean craves 200-250% ER (or 180-220% with her 20% refund, dropping effective cost to 64 energy). Stack ER subs after EM priorities, and double-check with online calculators—I've burned hours tweaking these.
Reliable Target: 220% ER locks in every-other-rotation uptime, no sweat.
Gear Perk: Favonius Sword (61.3% ER) coughs up 6 energy on CRITs, bridging those 20-second cooldown gaps.
Dial It In:
Push for 250% in drawn-out battles via ER subs.
Amenoma Kageuchi (+55.1% ATK, 6 energy per seed) gets you to 220% total.
Funnel particles from Bennett to keep her juiced.
What Bennett Needs for ER Stability
Bennett thrives at 200% ER, boosted by Noblesse 4-piece and his C2 (+30% ER under 70% HP). His high base ATK weapons make those 15-second Burst cycles buff like crazy.
Core Coverage: Skill particles handle his 60-energy Burst just fine.
C4 Edge: It cuts ER demands by 20% with those bonus attacks.
Build Path:
ER subs after HP% for balance.
Tap Skill often to generate particles.
Simulate Abyss runs to confirm uptime.
How Funneling Keeps Energy Flowing
Bennett's quick Skill and Jean's particle gen recharge one another in a neat loop; add Xingqiu with Sacrificial Sword for resets and extras. Favonius on Jean shines for CRIT-based particle dumps.
Loop Secret: Bennett's C4 plus Jean's refund guarantee 100% uptime in 20-second cycles.
Support Calc: Xingqiu at 180% ER backs Jean's 80 energy with Hydro Burst particles.
Execute the Flow:
Drop Bennett's particles inside Jean's field.
Follow Jean's Burst with Normal Attacks for 50% heal and particle chances.
Tune for 18-20 second clean cycles.
Smoothing out your progress? Buy Genesis Crystals online through BitTopup—fast refills at fair rates, instant drops, safe and legit transactions, worldwide compatibility, glowing user feedback, and rock-solid support.
Mastering Clean Rotations
Jean's Opener: Step by Step
Kick off with Jean's Skill (6-second CD) to set Anemo and grab particles, then Hold Gale Blade to pull enemies tight.
Timing Win: This lines up Burst overlap, stretching Sunfire by 2-3 seconds through follow-up NAs.
Cycle Stats: Locks in 12-15 second loops with 50% heals on those NAs.
Run It:
Tap Skill for the particle boost.
Hold Gale Blade right before Burst.
Shift to Burst once Bennett's in play.
Check out rotation clips on YouTube rotation demos or dig into KeqingMains theorycrafting guides for visual walkthroughs.
Weaving in Bennett's Burst
Fire off Bennett's 15-second Pyro Burst first, then Jean's 12-second one within 3 seconds for max overlap. Tap his Skill to dodge knockback issues.
Passive Perk: His Passive 2 halves Skill CD during Burst—handy for energy.
Particle Payoff: Feeds Jean's effective 64-energy cost reliably.
Smooth Integration:
Tap Skill while in the field.
Burst from the center.
Steer clear of Hold Level 2 outside bursts—too disruptive.
Timing a Full Team Cycle
For OverVape: 1. Xingqiu Burst (Hydro application). 2. Bennett Burst. 3. Jean Burst (Sunfire trigger). 4. Raiden NA/Burst (Electro hit). 5. Normal Attacks in the zone; loop every 20 seconds. Melt variant? Swap to Ganyu's Charged Attacks post-Zhongli shield.
Uptime Goal: 18-20 seconds for full coverage.
Damage Amp: Sunfire's 12 seconds plus VV shred nets 20-30% DPS jumps.
Full Sequence:
Prep off-field elements (like Xingqiu's Skill).
Burst during the overlap window.
Fill with NAs until cooldowns reset; tweak for Xiao's plunges if needed.
Flex Slots and Tweaks for Your Playstyle
Slot 4 DPS Swaps That Pack a Punch
Tartaglia for Hydro Vaporize flair; Raiden for Overload explosions; Ganyu to Melt that Sunfire Pyro at 1.5x; or Xiao to sync Anemo plunges.
Battery Bonus: Raiden juices Jean's ER like nobody's business.
Clear Potential: With Raiden, you're hitting 200k+ chamber clears versus 150k solo—real data from community runs.
Customize It:
Pick Hydro for shield-busting.
Build 180% ER on off-field Xingqiu.
Domain-test your swaps.
Reaction Swaps to Dial In
OverVape calls for Fischl (Electro) paired with Yelan (Hydro); Overload? Xiangling over Xingqiu. Kazuha or Venti amps Swirls better than Beidou in some spots.
AoE Edge: Ramps up damage hits per second.
RES Shred Layer: Xiangling's Crimson Witch digs deeper into Pyro RES.
Reaction Flow:
Slip Hydro in before Pyro for Vape setups.
Electro after Sunfire for Overload pops.
Sucrose shares EM if you're grouping heavy.
Tailoring to Content Types
In Abyss, lean into stationary brawls; for domains, flex Dehya over Xiangling for interrupt resistance (trades some damage for heal stability, in my view—editor's take).
Consistency Win: Outpaces National teams on Pyro reliability, though mobility takes a hit.
Shield Speed: Cracks Pyro barriers 20% faster, per benchmarks.
Adapt Steps:
Zhongli or Layla shields for Melt safety.
Adjust for mob clusters.
Post-4.0, weave in Furina's buffs for extra oomph.
Artifact and Weapon Blueprints
Top Artifact Picks for Support Jean
VV 4-piece all the way: HP Flower, ATK Feather, EM Sands, EM Goblet, EM Circlet; chase EM > ER > ATK% subs. Freedom-Sworn (5-star, 608 base ATK, +198 EM) cranks team ATK and Swirl output.
Max Output: Nails 60% Swirl damage and 40% RES shred.
EM Scaling: 1000 EM pumps ticks to 500-700%.
Farm Plan:
Hit the VV domain in Mondstadt.
Push artifacts to 20/20.
Lock in EM Sands first.
Weapons That Fuel ER and Utility
Favonius Sword (61.3% ER, CRIT particle gen); Amenoma Kageuchi (F2P craft, energy seeds after Skill/Burst). Aquila Favonia elevates Bennett's buffs.
ER Milestone: These hit 250% benchmarks easily.
Seed Regen: Amenoma maxes at 18 energy (3 seeds x 6).
Weapon Path:
Craft that Amenoma.
Refine Freedom-Sworn for Swirl synergy.
Stack with ER subs.
Prioritizing Bennett's Build
Noblesse 4-piece: HP% Sands, HP% Goblet, Healing Bonus Circlet; HP% > ER subs. Staff of Homa or The Catch for endurance.
Scaling Secret: HP drives 251% heals and 56% buffs.
Set Bonus: +20% team ATK from 4-piece.
Talent Focus:
8/8/1 levels (Burst first).
Everflame Seed x46 for ascension.
Field-test the buff strength.
Talent grind: Resistance books (3 Teachings, 63 Guide, 114 Philosophies), 165 Masks total, Dvalin's Plume x18 for Jean; same books for Bennett with Everflame Seed x46. Hunt them in Tue/Fri/Sun commissions and weekly bosses.
Dodging Pitfalls and Fixes
Rotation Traps That Kill Your Damage
Miss the overlap? Damage tanks by 50%. Always Burst Bennett first, Jean in 3 seconds. Skip Jean's tap Skill—it scatters foes; Hold for the pull instead.
Practice Key: Training grounds are your best friend.
Timing Cost: Early cutoff robs you of full 12 seconds Sunfire.
Fix It:
Sync CDs (Bennett 15s, Jean 20s).
Lean on in-game timers.
Slot 3-5 NAs after Burst for sustain.
Solving ER Droughts
Favonius on Jean, Bennett's C4 for bonus particles—target 250% ER to close gaps.
Refund Magic: Particles and refunds patch 20-second holes.
Reset Trick: Sacrificial Sword on Xingqiu for more spins.
ER Tune-Up:
ER subs as priority.
Funnel through Skill taps.
Calc-check your benchmarks.
Boosting Heal Efficiency
Tap Bennett's Skill in the field to nix knockback. ATK% subs on Jean scale that 251% heal better.
C1 Unlock: Full buff even at low HP.
Heal Rate: 25.12% ATK per second in-field.
Optimize:
Position before Burst.
NAs for 50% heal procs.
20/20 artifacts all around.
Crunching the Numbers: DPS, HPS, and Real Runs
Benchmarking DPS and Healing
Sunfire ticks out 500-700% Swirl at 1000 EM, with 76% ATK buffs and 25.12% HPS. VV layers on 20-30% team DPS.
Edge Over Alternatives: 20-30% better than Overload thanks to Swirl amps, from aggregated tests.
Melt Multiplier: Reverse Melt hits 1.5x for Ganyu's shots.
Measure Up:
Track ticks in domains.
EM-optimize for growth.
Sim HPS for tweaks.
Abyss Clear Spotlights
With Raiden, Sunfire pushes 200k+ chambers (15-25% DPS gain); RES shred owns Pyro-weak floors. Clustered mobs? Gold. Without flex, it's 150k territory.
Abyss Fit: Prime for static floor 12 scraps.
Shield Breaker: Outspeeds National teams.
Test Run:
Abyss sims for validation.
Flex for enemy elements.
Log your clears.
Stacking Up Against Other Healers
Sunfire edges standard Swirl on Pyro reliability but lags in mobility—immortality and heals are the wins, stationary fights the trade-off. Against Zhongli setups: More healing and shred, less raw RES cut.
Tier Jumper: C4 Jean's 40% shred makes it S-tier material.
Swirl Amp: +60% versus basic 40%.
Decision Tree:
AoE-heavy content? Yes.
Mobile needs? Swap to shields.
Benchmark vs. National for your meta.
Community vibes await on Official HoyoLab forums or Genshin Impact wiki pages.
Pro Tips and Patch Notes
Tweaks for Recent Patches
After 4.0, it meshes great with Furina's buffs—the Jean-Bennett core holds strong. Eye Emilie as a flex; C4 Jean amps that 40% shred.
C0 Friendly: Viable from scratch; Bennett first for impact.
Stack Power: VV combo for -80% RES.
Update Routine:
Slot new chars into rotations.
ER-adjust per patch.
Quarterly material farms.
Tapping Community Gold
Pull from Reddit r/Genshin_Impact discussions for those 2000+ hour tweaks—EM Sands and ER subs dominate chats.
Synergy Lift: C4 boosts overall play.
Plunge Perk: Xiao benefits from Anemo shred.
Engage:
Jump into theorycrafting.
Share your rotations.
Build evos ongoing.
Building for the Long Haul
VV domain farms; 8/8/1 talents. F2P Amenoma keeps it endgame-ready.
Mora Math: ~4,957,500 for talents.
Crown Push: x3 for level 10 Burst.
Future-Proof:
Burst upgrades top list.
Stock Dandelion Seed x168 for ascensions.
Weekly boss tests.
Wrapping Up: Key Wins and What's Next
The Essentials in a Nutshell
Sunfire thrives on Jean-Bennett Burst sync for Swirl chaos, 200-250% ER demands, VV/EM gear for 20-30% DPS spikes. Flex into OverVape or Melt; dodge overlap flubs for those 12-second fields. F2P solid with crafted weapons and smart talent spends.
Dive Deeper
Check the Genshin Impact Bennett Build Guide or Sunfire Team Variations Overview for more angles.
Set to crush Spiral Abyss? Roll out this Jean Sunfire blueprint now—drop your clear stories in the comments!
FAQ
What's the sweet ER for Jean in Sunfire squads?
Aim 200-250% for Burst reliability, or 180-220% factoring her 20% refund (effective 64 energy). Favonius Sword (61.3% ER) adds 6 energy on CRITs. Bennett's particles handle 20-second cycles; calc it for marathon fights.
How do you nail rotations with Jean and Bennett?
Tap Bennett's Skill for particles, follow with his 15-second Burst. Jean taps Skill, then 12-second Burst in 3 seconds for overlap. Pre-load Xingqiu Burst for Vaporize, NAs in the field. 18-20 second cycles with Hold Gale Blade grouping; scores 500-700% Swirl at 1000 EM.
Best flexes for Jean + Bennett Sunfire?
Raiden (Emblem 4pc, The Catch +45.9% ER) for Overload; Xingqiu/Yelan (180-200% ER, Sacrificial Sword) for Vaporize; Ganyu (Blizzard Strayer, Hunter's Path) for 1.5x Melt. Xiangling (Crimson Witch) sustains Pyro; domain tests show 15-25% DPS, 200k Abyss potential.
Can Bennett's Burst mesh with Jean's?
Absolutely—15-second Bennett overlaps Jean's 12-second within 3 seconds for Sunfire, dodging 50% damage dips. Tap Skill in-field to skip knockback; C2 +30% ER helps. Delivers Pyro Swirl, 76% buff, plus 2-3 second extensions via Jean NAs in 20-second loops.
Weapons to max Jean's Sunfire support?
Freedom-Sworn (5★, 608 base ATK, +198 EM) amps team ATK/Swirl; Amenoma seeds regen 18 energy for 220% ER. Favonius (61.3% ER) for CRIT particles. ER/EM subs reach 250%, supercharging VV's 60% Swirl/40% shred.
Typical Sunfire rotation goofs?
No overlap kills Sunfire prematurely—Bennett Burst first. Jean tap Skill scatters; Hold to pull. ER shortfalls? 250% with Favonius/funneling. Bennett knockback? Tap Skill in-field. Training grounds practice, 20/20 artifacts lock 20-30% DPS steadiness.
Official HoyoLab forums