

Quick Answer: Genshin Impact's elemental system features three reaction categories: Amplifying (Melt/Vaporize with 1.5x-2x multipliers), Transformative (Swirl/Overloaded scaling with EM), and Additive (Aggravate/Spread adding flat damage). Eight elemental resonances provide team-wide buffs, with Pyro's 25% ATK boost and Dendro's EM scaling being most versatile for meta compositions.
Look, I've been covering Genshin's meta since launch, and honestly? The elemental system still trips up players who've been around for years. There's a reason why—this isn't just fire beats ice logic we're dealing with here.
Elemental Reactions Fundamentals
Reaction Types Overview
Here's where things get interesting. Elemental reactions happen when two different elements make contact with a target, but—and this is crucial—the character applying the second element (the trigger) determines how damage gets calculated. Application order isn't just important; it's everything.
Amplifying Reactions multiply your triggering attack's damage. They scale with ATK, CRIT stats, and EM, plus they can critically hit. Think of them as damage steroids for your existing attacks.
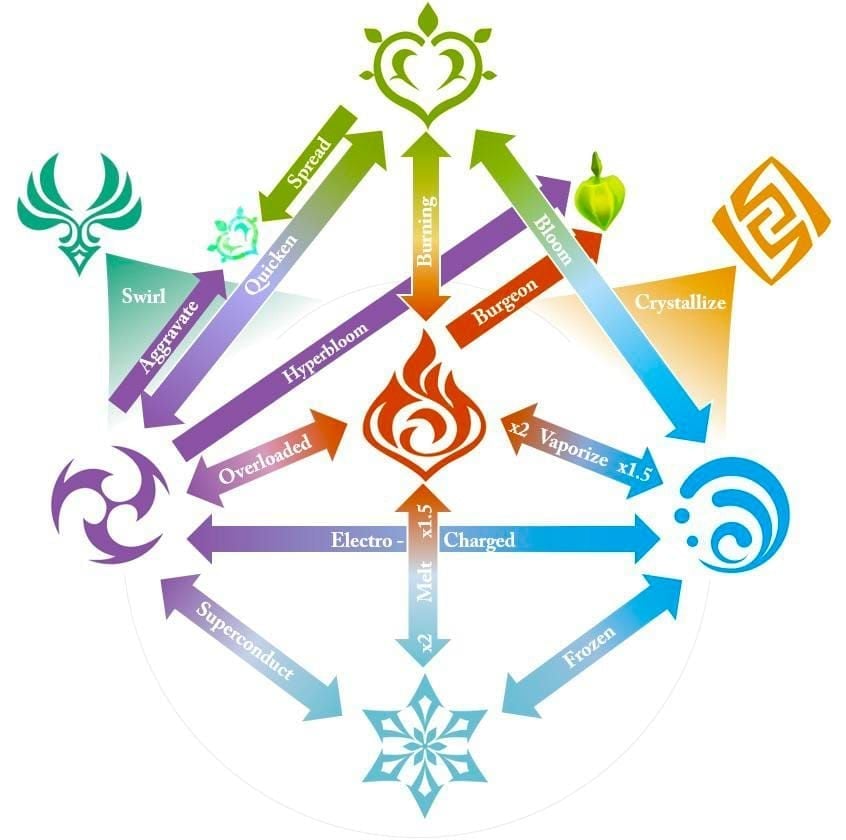
Transformative Reactions create entirely separate damage instances that scale exclusively with Character Level and EM. They can't CRIT and ignore enemy DEF completely. Weird? Yes. Powerful? Absolutely.
Additive Reactions add flat damage bonuses that scale from Level and EM before CRIT and damage bonuses apply. They're the newest kids on the block, and frankly, they've changed everything about Dendro teams.
Elemental Gauge Theory
Every entity has invisible gauges tracking elemental units—1U, 2U, 4U. Reactions consume these units at specific ratios, and understanding this separates good players from great ones.
Forward reactions consume aura faster. Reverse reactions consume at 0.5x rates, enabling more triggers. For example, Xingqiu's Rain Swords apply 1U Hydro, while Childe's melee applies 1U-2U depending on the attack. Small details that make massive differences in practice.
Damage Calculation Basics
Amplifying: Base Attack × Reaction Multiplier × (1 + EM Bonus) × Damage Bonuses × CRIT multipliers
Transformative: Base Reaction Damage (Level-dependent) × (1 + EM Bonus) × Enemy Resistance
Additive: Base Attack + [Flat Reaction Bonus × (1 + EM Bonus)], then affected by CRIT/damage bonuses
Yeah, it's math. But it's math that'll double your damage output when you get it right.
Transformative Reactions Guide
Swirl Mechanics
Swirl might look simple—Anemo plus Pyro/Hydro/Cryo/Electro—but it's deceptively complex. It deals AoE damage of the absorbed element, scaling with your Anemo character's level and EM.
The 4-piece Viridescent Venerer set reduces enemy resistance by 40% for 10 seconds. That's not just good; that's mandatory for serious content.

Here's something most guides won't tell you: Anemo characters can trigger secondary reactions through swirls. Kazuha's Skill can swirl Electro to trigger Aggravate on Quickened enemies. Mind-blowing when you see it in action.
Electrocharged Chains
Electrocharged (Hydro + Electro) deals Electro DoT and chains between Hydro-affected enemies. Unlike other reactions, it doesn't fully consume triggering elements, so both auras persist.
Taser teams exploit this brilliantly—Fischl, Beidou, Xingqiu creating constant procs while enabling simultaneous Swirl reactions. It's chaos, but organized chaos.
Overloaded Explosions
Overloaded (Pyro + Electro) produces AoE Pyro damage with knockback. High base damage multiplier makes it effective for enemy groups, though that knockback can be... problematic.
Yanfei and Yoimiya trigger consistent Overloaded with Fischl or Raiden support. Pro tip: Anemo characters can mitigate knockback by regrouping enemies after explosions.
Superconduct Debuff
Superconduct (Cryo + Electro) deals AoE Cryo damage and reduces Physical RES by 40% for 12 seconds. Essential for Physical DPS like Eula and Razor—affects all enemies hit by the reaction.
Eula, Diona, Fischl, Raiden form the meta Superconduct composition. Simple, effective, devastating.
Amplifying Reactions Mastery
Vaporize Optimization
Hydro triggering Pyro aura provides 2x damage (Forward Vape). Pyro triggering Hydro gives 1.5x (Reverse Vape).
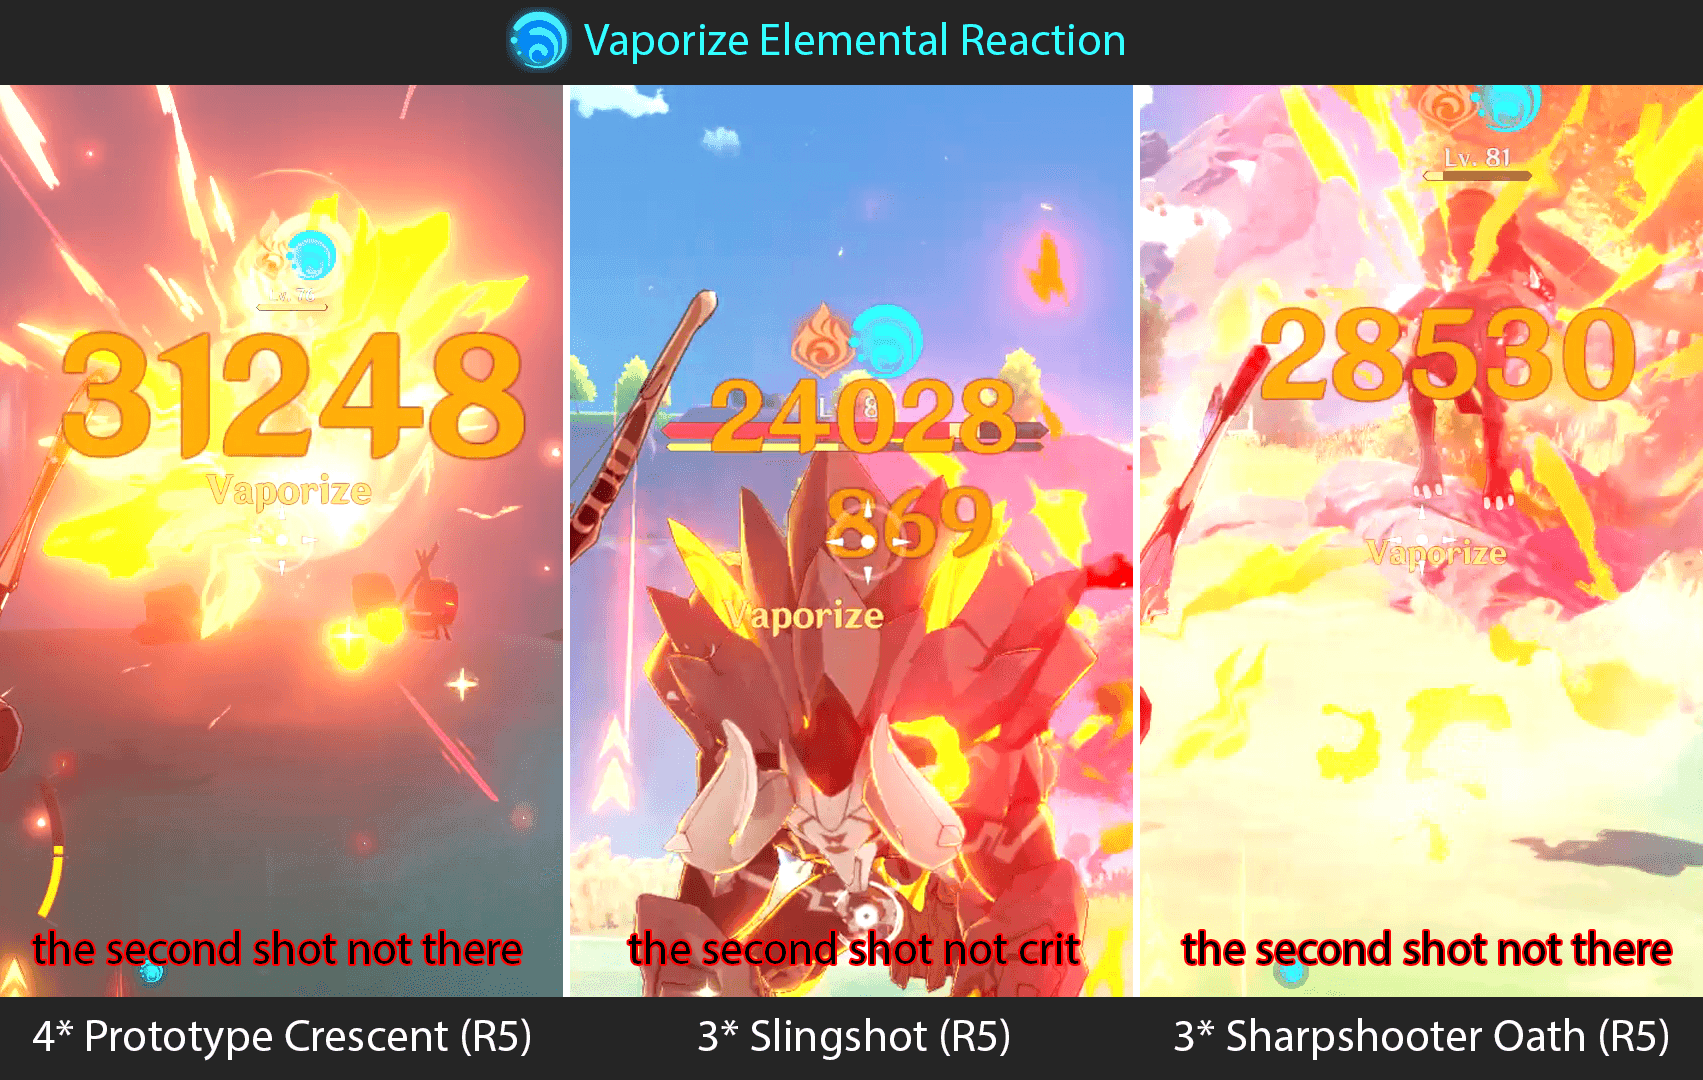
Counter-intuitively, Reverse Vape often produces higher DPS due to that 0.5x aura consumption rate allowing multiple triggers. Xingqiu and Yelan pair with Hu Tao, Diluc, or Yoimiya for optimal Reverse Vape setups.
Melt Damage Maximization
Pyro on Cryo provides 2x damage (Forward Melt), Cryo on Pyro offers 1.5x (Reverse Melt). Ganyu exemplifies Melt optimization with Charged Attacks amplified by Bennett and Xiangling's Pyro application.
Build priority: CRIT stats and ATK, with EM supplementary. 4-piece Wanderer's Troupe or Shimenawa's excel for Charged Attack Melt DPS.
Character Synergies
Bennett provides ATK buffs, healing, and consistent Pyro application—he's basically three characters in one. Xingqiu and Yelan dominate Hydro support with perfect timing for Pyro DPS. Kazuha enhances through Elemental DMG bonuses and VV resistance shred.
Don't forget Internal Cooldown mechanics—standard ICD (~2.5 seconds or 3 hits) requires strategic timing. It's not just about spamming abilities.
Dendro Reaction System
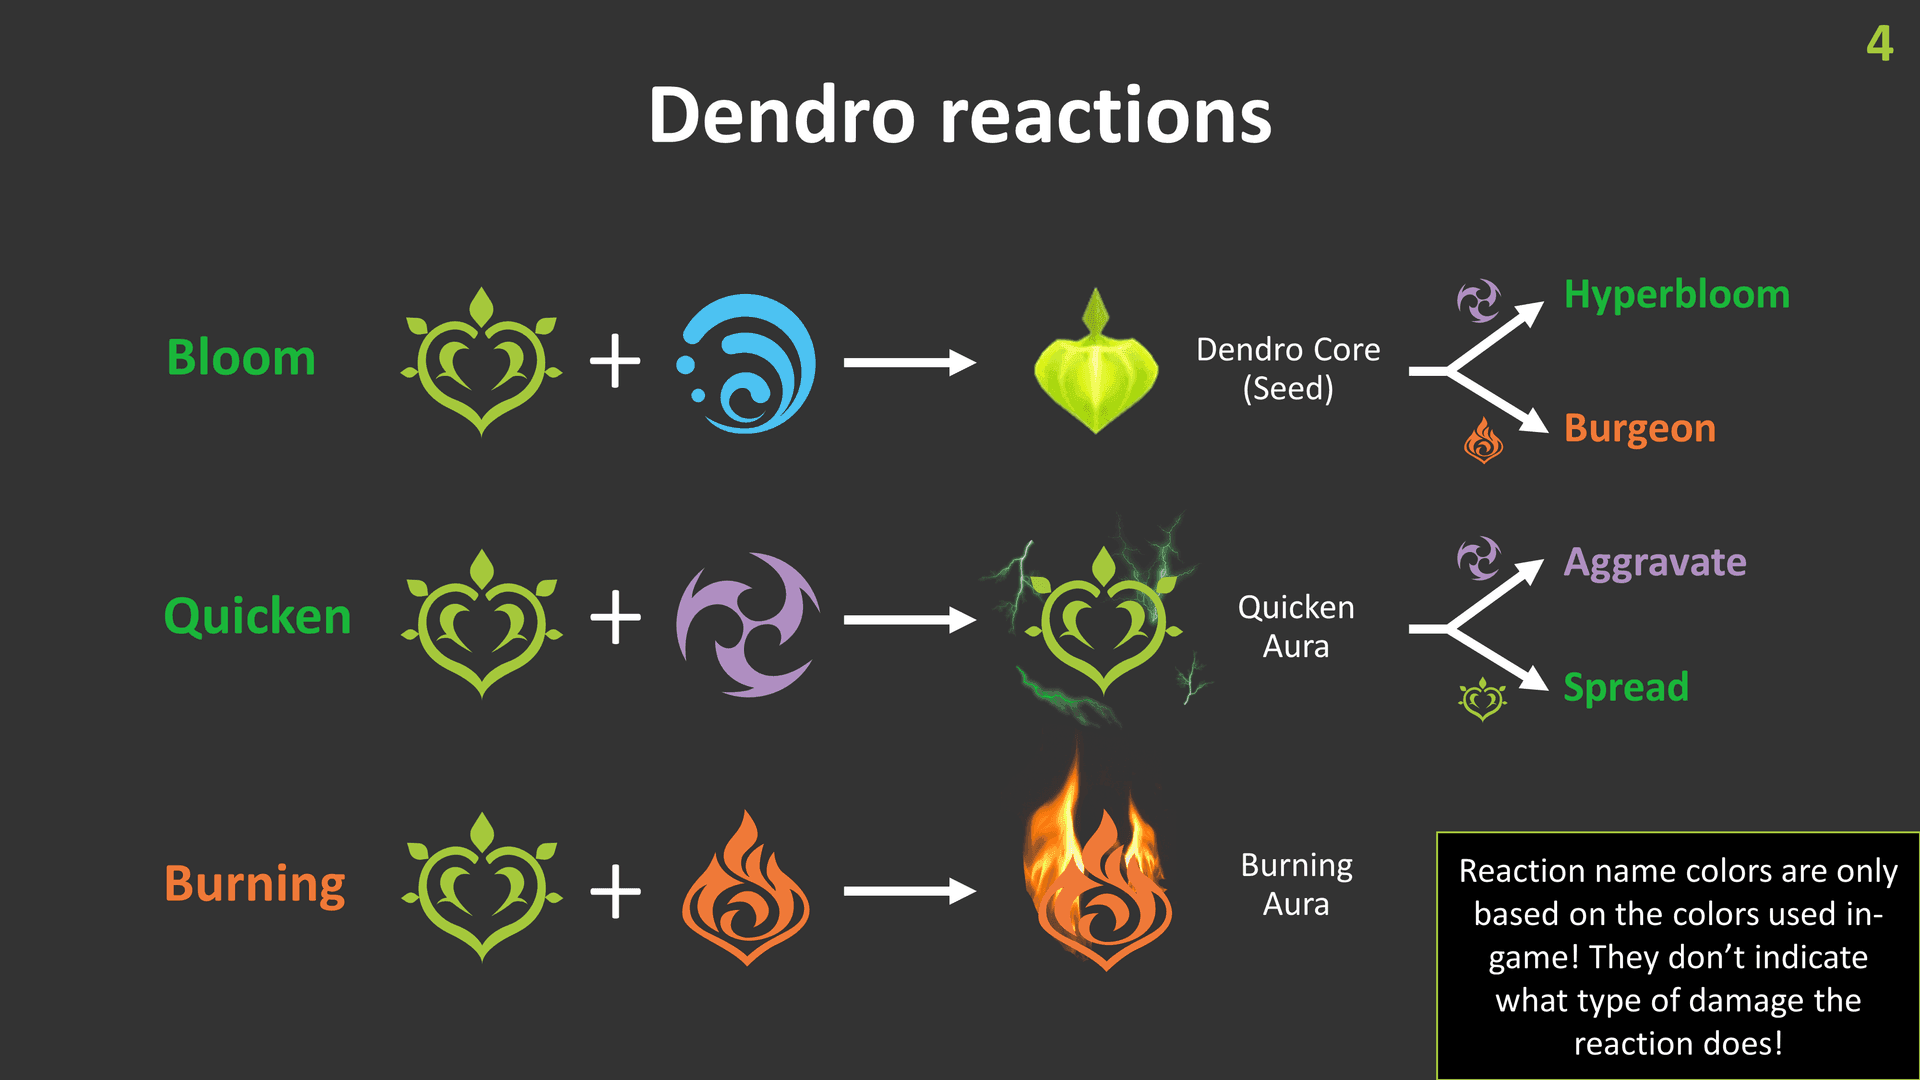
Bloom Reactions
Bloom (Dendro + Hydro) creates Dendro Cores that explode after 6 seconds or when the 5-core limit gets exceeded. Damage scales with the trigger character's Level and EM.
Nilou transforms these into Bountiful Cores with larger AoE and faster detonation. Nahida, Kokomi, Nilou, Collei maximize core production and survivability—though you'll want that survivability when cores start exploding near you.
Hyperbloom Teams
Hyperbloom (Electro + Dendro Cores) creates homing projectiles with a 3x reaction multiplier—literally the highest damage reactions available right now.
Kuki Shinobu excels as trigger with consistent AoE Electro and healing. Nahida, Xingqiu, Kuki core composition works beautifully. That homing system? Effective against spread enemies regardless of positioning.
Burgeon Strategies
Burgeon (Pyro + Dendro Cores) causes immediate detonation with 3x multiplier and larger AoE than Bloom. Thoma serves as the premier trigger with shield-based application and defensive utilities.
Warning: high self-damage requires shields or healing from Thoma, Zhongli, or Bennett. That larger AoE is ideal for grouped enemies, though.
Quicken Mechanics
Quicken (Dendro + Electro) creates a non-damaging aura enabling Aggravate (Electro on Quickened, 1.15x multiplier) and Spread (Dendro on Quickened, 1.25x multiplier). The flat damage gets affected by CRIT, damage bonuses, and enemy DEF/RES.
Fischl's A4 passive triggers additional Electro with no ICD, creating cascading Aggravate reactions. It's beautiful to watch and devastating to experience.
Elemental Resonance Complete Guide
All Seven Resonance Effects
Fervent Flames (Pyro): 25% ATK increase, 40% Cryo duration reduction. Most versatile for ATK-scaling characters—there's a reason every meta team wants this.
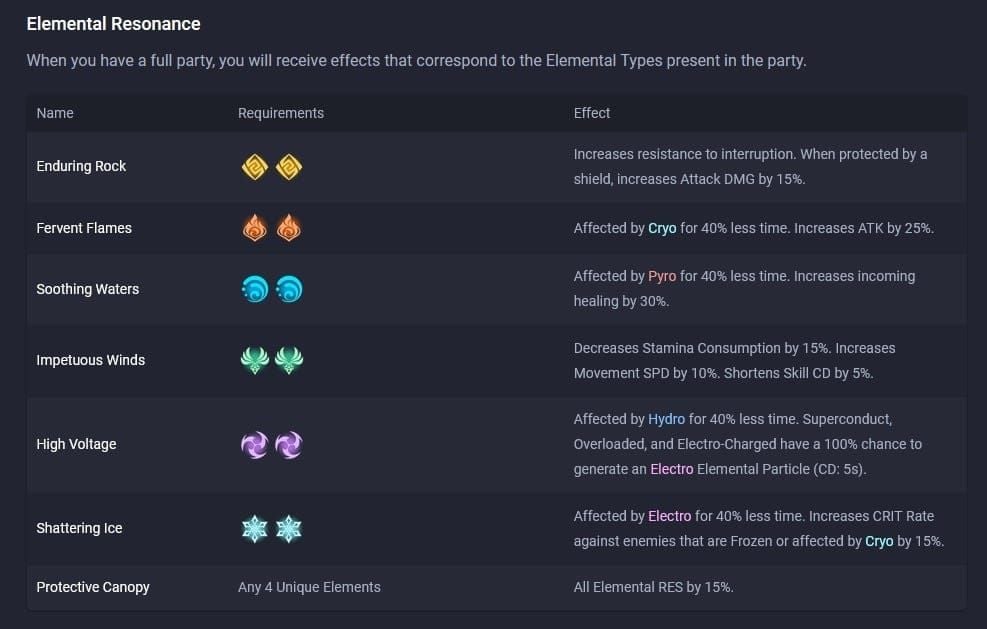
Soothing Water (Hydro): 25% Max HP increase. Benefits Yelan, Neuvillette, Furina, Kokomi significantly.
High Voltage (Electro): Generates particles on Electro reactions (5s cooldown). Maintains Burst uptime like nothing else.
Shattering Ice (Cryo): 15% CRIT Rate vs Frozen/Cryo enemies. Synergizes perfectly with Blizzard Strayer.
Enduring Rock (Geo): 15% shield strength, 15% damage when shielded, 20% Geo RES reduction.
Impetuous Winds (Anemo): 15% stamina reduction, 10% movement speed, 5% cooldown reduction. Quality of life improvements that add up.
Sprawling Greenery (Dendro): Base 50 EM + 30 EM for 6s after Burning/Quicken/Bloom + 20 EM for 6s after Aggravate/Spread/Hyperbloom/Burgeon. Effects stack, making this incredibly powerful for reaction teams.
Meta Combinations
Pyro + Anemo dominates meta teams—National variants with Bennett, Xiangling, Xingqiu, Kazuha prove this daily.
Dendro + Electro creates powerful reaction teams with EM bonuses and energy generation.
Hydro + Cryo excels in Freeze teams (Ayaka, Shenhe, Kokomi, Kazuha).
Geo + Pyro offers defensive-offensive hybrid (Itto, Gorou, Bennett, Xiangling).
To maximize team potential with optimal character builds, Buy Genesis Crystals Online through trusted platforms offering competitive rates and instant delivery for ideal resonance combinations.
Advanced Reaction Strategies
Internal Cooldown Management
ICD follows the ~2.5-second or 3-hit rule, but exceptions exist. Fischl's A4 has no ICD, enabling every Aggravate proc. Xiangling's Pyronado has independent ICD per flame.
Coordinated attacks from multiple characters bypass individual limitations. Stagger abilities to ensure optimal reaction sequences—timing is everything here.
Reaction Priority System
Higher priority reactions consume elements first. Fridge teams use Frozen priority over Bloom, preserving Dendro auras. When you apply Hydro on Cryo+Dendro, it triggers Frozen first, then Bloom.
Strategic application ensures desired reactions while preventing unwanted interactions. It's like conducting an orchestra, except the orchestra explodes.
Multi-Element Combos
Kazuha's Burst absorbs one element while his Skill swirls others, enabling multiple simultaneous reactions. EM-built Anemo can Swirl Electro to trigger Hyperbloom on Dendro Cores.
Advanced techniques require precise timing but offer exceptional damage potential. Worth the practice investment.
Character Tier List for Reactions
Best Reaction Enablers
Fischl: Premier Electro enabler with consistent off-field application and that ICD-free A4. She's irreplaceable in Aggravate teams.
Xingqiu/Yelan: Perfect Hydro timing for Pyro DPS with damage reduction. The gold standard for enablers.
Nahida: Extensive Dendro application with EM-sharing capabilities. Changed the entire Dendro meta single-handedly.
Kazuha: Elemental DMG bonuses, resistance shred, crowd control. Swiss army knife of supports.
Investment Priorities
Level 90 is crucial for Transformative triggers due to dramatic base damage scaling—don't cheap out here.
EM weapons like Iron Sting, Mappa Mare, Sacrificial Fragments provide substantial substats. 4-piece Gilded Dreams provides up to 230 EM and 14% ATK.
Substats priority: EM > Energy Recharge > ATK% > CRIT for reaction triggers.
For efficient character acquisition and reaction team optimization, Genshin Impact Top Up services provide quick Genesis Crystal access without extended waiting periods.
Artifact and Weapon Optimization
Elemental Mastery Builds
Full EM optimization means EM main stats on Sands/Goblet/Circlet. Yes, all three.
Gilded Dreams (4pc): Up to 230 EM and 14% ATK—versatile for most reaction characters.
Flower of Paradise Lost (4pc): EM bonuses with Bloom damage specialization.
Viridescent Venerer (4pc): Mandatory for Anemo supports. That 40% resistance shred isn't negotiable.
Weapon Recommendations
Freedom-Sworn: EM substats with team-wide buffs—premium option.
A Thousand Floating Dreams: Massive EM bonuses for Dendro characters.
Dragon's Bane/The Widsith: Excellent 4-star alternatives with EM substats. Budget-friendly but effective.
Meta Team Compositions
Spiral Abyss Teams
National variants: Xiangling, Xingqiu, Bennett + Raiden (Rational) or Kazuha (International). Still dominating after all these years.
Hyperbloom: Nahida, Xingqiu, Kuki Shinobu + flex slot.
Freeze: Ayaka, Shenhe, Kokomi, Kazuha.
Aggravate: Keqing, Fischl, Nahida, Kazuha.
Domain Farming Comps
Anemo characters provide crowd control and AoE damage—essential for efficiency.
Transformative reaction teams excel with their AoE nature and consistent output.
Energy management becomes crucial for multiple enemy waves. Plan your rotations accordingly.
For domain farming efficiency with premium characters, Cheap Genshin Top Up options provide cost-effective Genesis Crystal access for specialized farming teams.
2025 Updates and Changes
New Character Synergies
Furina's HP manipulation creates new synergies with HP-scaling characters—we're still discovering optimal combinations.
Neuvillette benefits from Hydro resonance and reaction compositions in ways that surprised even veteran theorycrafters.
Baizhu provides Dendro support with healing for comfortable Bloom teams.
Future characters will likely emphasize reaction synergies and team-based gameplay even more. The solo carry era is ending.
FAQ
What are the strongest elemental reactions for damage in 2025? Hyperbloom and Burgeon offer the highest damage with 3x multipliers scaling with EM and level. Aggravate/Spread are excellent for hybrid scaling characters. Vaporize/Melt remain powerful for high base damage characters.
How much Elemental Mastery should I prioritize for reaction characters? Transformative triggers need 800-1000+ EM—go all in. Additive reaction characters benefit from 200-400 EM while maintaining CRIT/ATK. Amplifying characters need minimal EM; focus CRIT/ATK instead.
Which elemental resonance combinations work best together? Pyro + Anemo dominates through ATK bonuses and utility. Dendro + Electro excels for reaction teams. Hydro + Cryo is perfect for Freeze teams. Avoid rainbow teams for damage content—specialization beats generalization.
How do I optimize team rotations for consistent reactions? Understand ICD patterns and stagger abilities accordingly. Apply aura elements first, then triggers. Use no-ICD characters like Fischl's A4 for consistency. Practice timing to maintain auras—muscle memory matters.
What's the difference between Forward and Reverse reactions? Forward reactions provide higher multipliers (2x) but consume auras faster. Reverse reactions offer lower multipliers (1.5x) but consume at reduced rates, often resulting in higher total DPS. It's about sustained damage vs burst damage.
How important is character level for reaction damage? Level 90 is crucial for Transformative reactions due to dramatic base damage scaling—the difference is night and day. Amplifying/Additive reactions benefit less; level 80/90 is sufficient while prioritizing other investments.