

The Spiral Abyss Floor 12 rotation (Dec 16, 2026 - Jan 16, 2026) features Whirlwind Moon blessing with 75% off-field Pyro DMG bonus and plunging attack buffs. Level 95-100 enemies across three chambers demand 40,000+ DPS and precise execution. Two proven teams—National and Hyperbloom—consistently achieve 36-star clears with 180-200% Energy Recharge on supports.
Understanding Floor 12's January 2026 Difficulty Spike
The Whirlwind Moon blessing unleashes shockwave True DMG every 2 seconds when you trigger Swirl reactions. Off-field characters gain 75% Pyro DMG Bonus, making Xiangling exceptionally powerful. Plunging Attack DMG increases by 75%, creating specialized strategies for certain encounters.
Secure character constellations or weapons through Genshin Impact Genesis Crystals top up on BitTopup for competitive pricing and instant delivery.
Why This Rotation Feels Harder
Three core factors create difficulty: enemy level scaling (95-100), specific resistance mechanics, and tight DPS windows. Star requirements demand exceptional time management—3 stars requires remaining challenge time exceeding 420 seconds (90-second clears per chamber).
Chamber-specific mechanics compound this. Furnace Shell Mountain Weasel has 50% Pyro Resistance. Super-Heavy Landrover starts with 150% resistance to all damage types, requiring specific Pyro application to become vulnerable.
Ley Line Disorder Mechanics
The 75% off-field Pyro DMG bonus makes Xiangling-centered compositions top-tier—her Pyronado snapshots this bonus and maintains enhanced damage after switching. Plunging attacks reduce Furnace Shell Mountain Weasel shield by 25% per hit—four consecutive plunges break it completely.
The Real DPS Check
While 40,000+ DPS represents baseline requirements, execution quality matters more than raw stats. Proper rotation sequencing, energy management, and enemy pattern understanding create larger performance gaps than minor artifact differences.
Star thresholds: 1 star needs 180s remaining (240s clear), 2 stars need 300s (120s clear), 3 stars demand 420s (90s clear). The 2-to-3 star jump requires 33% DPS increase—achievable through optimized rotations.
Complete Enemy Lineup by Chamber

Chamber 1
First Half:
Waves 1-5: Recon Log Mek - Pneuma (5 units)
Waves 1-10: Fatui Cryo Cicin Mage (3 units)
Wave 11: Construction Specialist Mek - Pneuma (1 unit)
Cryo Cicin Mages regenerate shields through summoned Cicins. Defeat Cicins to prevent shield restoration. Pyro dispels Cryo shields most efficiently.
Second Half:
Waves 1-2: Furnace Shell Mountain Weasel (1 unit)
50% Pyro Resistance and shield mechanics require counter-strategies. Four plunging attacks break shield, creating 25-second vulnerability windows.
Chamber 2
First Half:
Wave 1: Oprichniki Fireblade Shock Trooper (1), Oprichniki Line Trooper (2)
Wave 2: Kairagi: Dancing Thunder (1), Kairagi: Fiery Might (1)
Wave 3: Ruin Guard (1)
Wave 4: Ruin Drake: Skywatch (1)
Kairagi pair recovers 50% HP when one falls below critical health. Defeat both simultaneously to prevent recovery. Ruin Drake becomes vulnerable when bow strikes hit weak point.
Second Half:
Wave 1: Veteran Tainted Water-Spouting Phantasm (1)
Wave 2: Veteran Tainted Water-Splitting Phantasm (1)
Both possess complete Hydro immunity. Sequential spawning demands energy management between waves.
Chamber 3
First Half:
Super-Heavy Landrover: Mechanized Fortress (1 unit)
Begins with 150% resistance to all damage. Pyro attacks fill progress bar to 100%, applying Cryo shield. Breaking Cryo shield reduces resistance to normal levels.
Second Half:
Veteran Arithmetic Enhancer Mek (1 unit)
20-unit Geo shield increases resistances by 200% when active. Plunge attacks break shield efficiently. Once broken, remains vulnerable for 15 seconds. Ousia-aligned—Pneuma-arkhe reactions stun unshielded boss.
Team #1: National Variant
Leverages 75% off-field Pyro DMG bonus exceptionally well.
Core Composition
Xiangling (Off-field Pyro DPS): Snapshots 75% Pyro DMG bonus with Pyronado. Needs 180-200% ER
Xingqiu (Hydro Enabler): Consistent Hydro for Vaporize. Needs 180-200% ER
Bennett (Healer/Buffer): ATK buffs + Pyro resonance. Needs 200% ER
Sucrose (Anemo Driver): Triggers Swirl for shockwave True DMG, shares EM, VV shred. Needs 160-180% ER
Substitutions
Anemo: Kazuha or Venti for improved grouping
Hydro: Yelan for superior personal damage
Pyro DPS: Thoma for shields (lower damage)
Optimal Rotation
Bennett Burst - establish ATK buff
Sucrose Skill/Burst - Swirl Pyro for resistance shred
Xiangling Burst - snapshot Bennett buff + blessing bonus
Xingqiu Burst + Skill - apply Hydro for Vaporize
Sucrose Normal Attacks - drive reactions
Repeat as cooldowns expire
Artifact & Weapon Requirements
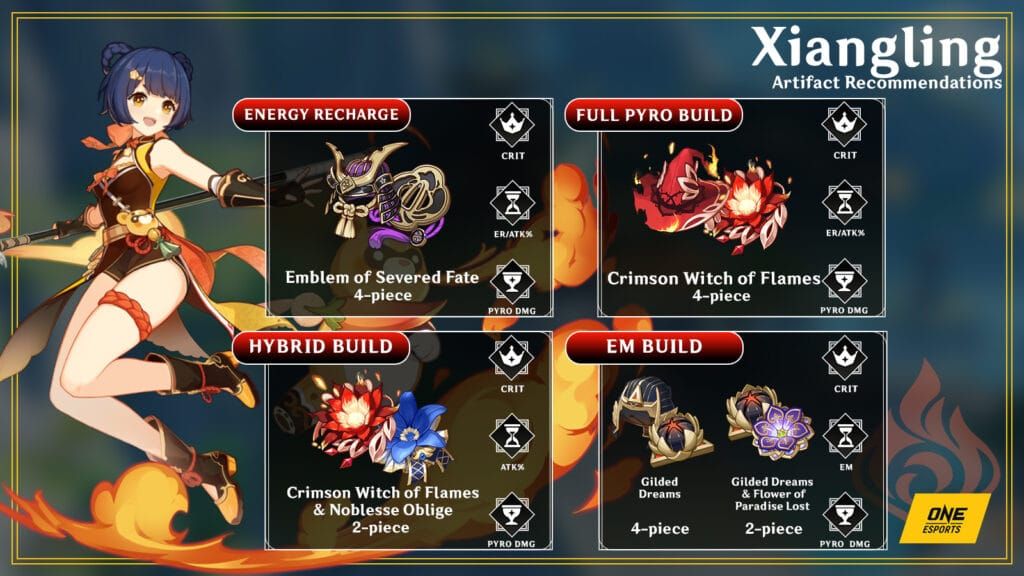
Xiangling:
4pc Emblem of Severed Fate (ER/Pyro/Crit)
The Catch (R5), Dragon's Bane, Favonius Lance
180-200% ER, 60%+ CR, 120%+ CD
Xingqiu:
4pc Emblem (ER/Hydro/Crit)
Sacrificial Sword, Favonius Sword
180-200% ER, 60%+ CR, 120%+ CD
Bennett:
4pc Noblesse Oblige (ER/HP/Healing)
Favonius Sword, Prototype Rancour
200%+ ER
Sucrose:
4pc Viridescent Venerer (EM/EM/EM)
Sacrificial Fragments, Thrilling Tales
160-180% ER, 400+ EM
Team #2: Hyperbloom Core
Exceptional single-target damage with minimal field time.
Core Composition
Dendro Traveler (Dendro Enabler): Consistent off-field Dendro. Needs 180-200% ER
Xingqiu (Hydro Enabler): Rapid Hydro for Dendro Core generation. Needs 180-200% ER
Kuki Shinobu (Electro Trigger/Healer): Triggers Hyperbloom, provides healing. Needs 800+ EM
Sucrose (Grouping/EM Buffer): Groups enemies, shares EM. Needs 160-180% ER
Constellation Priority
All function at C0, but impactful upgrades:
Kuki C2: Extended skill duration, increased EM scaling
Xingqiu C6: Significant personal damage
Dendro Traveler C2: Reduces burst cost 80→60
Sucrose C1: Additional skill charge
Buy Genshin Genesis Crystals recharge through BitTopup for fast, secure transactions.
Rotation
Dendro Traveler Burst - establish Dendro field
Xingqiu Burst + Skill - begin Hydro for Dendro Cores
Kuki Shinobu Skill - trigger Hyperbloom
Sucrose Skill/Burst - group enemies, share EM
Normal Attacks - continue reactions
Hyperbloom doesn't snapshot—Kuki should trigger after receiving Sucrose's EM sharing.
Stat Thresholds
Kuki Shinobu:
800+ EM, 25,000+ HP
4pc Flower of Paradise Lost or Gilded Dreams
Iron Sting, Toukabou Shigure
Dendro Traveler:
180-200% ER
4pc Deepwood Memories or Noblesse
Xingqiu:
180-200% ER, 60%+ CR
4pc Emblem
Sucrose:
400+ EM, 160-180% ER
4pc Viridescent Venerer
When to Use vs National
Hyperbloom excels:
Single-target (Chamber 1 Second Half, Chamber 3)
Sustained damage over burst windows
Lower artifact investment
National excels:
Multi-target with groupable enemies
Chambers benefiting from 75% Pyro bonus
Burst damage windows
Chamber 1 Strategy
First Half: Crowd Control
Group Recon Log Meks with Anemo skills. Apply Pyro to dispel Cryo Cicin Mage shields. Defeat summoned Cicins to prevent shield regeneration. Focus burst on Construction Specialist Mek in Wave 11.
Second Half: Single-Target
Execute four plunging attacks to break Furnace Shell Mountain Weasel shield. Unleash full DPS during vulnerability window. Repeat when shield regenerates.
Characters with accessible plunge mechanics (Xiao, Diluc, Kazuha) streamline this. Hyperbloom teams excel since Dendro Core damage ignores elemental resistances.
Time Benchmarks
For 3-star clears (90s total):
First Half: 45-50s
Second Half: 40-45s
Chamber 2 Strategy
Shield Breaking
Kairagi pair recovers 50% HP when one falls below critical health. Defeat both simultaneously using:
Freeze teams to lock in place
Strong AoE burst (Xiangling Pyronado, Xingqiu Rain Swords)
Coordinate final hits within 2-3 seconds
Ruin Drake becomes vulnerable when bow strikes hit weak point.
Energy Management
Four-wave structure demands conservation:
Generate particles during Waves 1-2 without bursts
Reserve full rotations for Kairagi (Wave 2)
Rebuild energy during Wave 3
Execute full burst on Ruin Drake (Wave 4)
Second Half
Veteran Tainted Water Phantasms have complete Hydro immunity. Sequential spawning creates natural burst windows:
Use 70-80% burst damage on first Phantasm
Conserve one major burst for second
Leverage skills and normals during transitions
Chamber 3 Strategy
Super-Heavy Landrover (First Half)
Vulnerability sequence:
Apply Pyro to fill progress bar to 100%
Boss gains Cryo shield
Break Cryo shield with Pyro
Resistance drops to normal
Execute full DPS rotation
Pyro serves dual purposes—filling bar AND breaking shield.
Veteran Arithmetic Enhancer Mek (Second Half)
20-unit Geo shield increases resistances by 200%. Breaking creates 15s vulnerability windows.
Optimal approach:
Use plunge attacks to break Geo shield
Trigger Pneuma-Ousia Annihilation (if using Pneuma character) to stun
Execute full burst during 15s vulnerability
Repeat shield-breaking
Zero-Gravity field creates natural plunging opportunities.
I-Frame Usage
Use burst animations as invincibility frames:
Activate during boss charge-ups
Dodge unavoidable AoE attacks
Chain multiple bursts during dangerous phases
Final 30 Seconds
If bosses remain above 30% HP with 30s left:
Use all remaining bursts regardless of buff status
Ignore energy regeneration
Accept damage to maintain offense
Chain bursts for continuous i-frames
Troubleshooting Clear Failures
Missing DPS
Missing 3-star by 10-20s = execution issues:
Failing to snapshot buffs (Xiangling burst outside Bennett field)
Wasting bursts on low-HP enemies
Poor positioning
Ignoring mechanics
Missing by 30+ seconds = stat deficiencies. Verify: 60%+ CR, 120%+ CD, appropriate DMG goblets.
Energy Problems
180-200% ER on supports isn't optional—it's mandatory.
National Team:
Xiangling: 180-200% (220%+ without Bennett)
Xingqiu: 180-200% (160%+ with Sac Sword)
Bennett: 200%+
Sucrose: 160-180%
Hyperbloom:
Dendro Traveler: 180-200%
Xingqiu: 180-200%
Kuki: Minimal (skill-based)
Sucrose: 160-180%
Favonius weapons generate white particles for entire team, solving persistent energy issues.
Survivability
Bennett's burst provides sufficient healing for National. Kuki handles Hyperbloom sustain.
If dying consistently:
Verify healers have adequate HP%/Healing Bonus
Use burst i-frames for major attacks
Improve dodge timing
Exception: Super-Heavy Landrover can one-shot poorly-built characters. Consider shields if lacking dodge skill.
Constellation Misconceptions
Floor 12 requires zero 5-star constellations and minimal 4-star constellations. National and Hyperbloom achieve 36-star clears at C0.
Genuinely impactful:
Xingqiu C6: Significant damage
Bennett C1: Removes HP restriction
Sucrose C1: Additional skill charge
Kuki C2: Enhanced Hyperbloom
Artifact Optimization
Crit Targets
Main DPS (Xiangling, Xingqiu):
CR: 60-70% minimum
CD: 120-150% minimum
Ratio: 1:2 CR to CD
Supports: Crit unnecessary—focus on role-specific stats (ER, EM, HP%).
ATK% vs EM Priority
Reaction Triggers (Kuki in Hyperbloom):
Prioritize EM exclusively
Target 800+ EM
ATK% provides zero benefit
Reaction Enablers (Xiangling in Vaporize):
Balance ATK%, Elemental DMG, Crit
EM provides marginal benefit
Focus ATK% and Crit
Buffers (Sucrose):
Stack EM for sharing
Target 400+ EM
ER secondary
Energy Recharge Calculator
Base ER (solo, no particles):
80-cost: 200-220%
60-cost: 180-200%
40-cost: 140-160%
Adjustments:
Subtract 20-40% with same-element battery
Subtract 10-20% per Favonius holder
Add 20% for single-target chambers
Set Bonuses
Highest Priority:
4pc Emblem (Xiangling, Xingqiu):
Increases burst damage by 25% of ER
Solves ER while boosting damage
4pc Viridescent Venerer (Sucrose, Kazuha, Venti):
Reduces enemy resistance by 40%
Mandatory for Anemo supports
4pc Flower of Paradise Lost (Kuki in Hyperbloom):
Increases Hyperbloom damage by 80%
Alternative: 4pc Gilded Dreams (70% EM)
Medium Priority:
4pc Noblesse (Bennett):
20% ATK buff to team after burst
Never stop at 2pc sets permanently.
Resource Investment Strategy
Talent Priority
Crowning (9→10) costs significant resources for 5-8% damage increase.
Highest Priority:
Xiangling Burst
Xingqiu Burst
Main DPS Normal/Charged Attacks
Medium Priority:
Bennett Burst
Support Skills
Talent level 8 provides 90%+ maximum potential. Levels 9-10 are luxury investments.
Weapon Refinement
High-Impact:
The Catch (R1→R5): Free, massive burst damage
Sacrificial Sword/Fragments (R1→R3): Improves skill reset
Dragon's Bane (R1→R5): Substantial reaction damage
Low-Impact:
5-star weapons: 5-10% per refinement
Favonius: R3 comfortable, R5 marginal
Prototype: Generally low value
Never use Primogems for weapon refinements.
Genesis Crystal Spending
Highest Value:
Kazuha: Universal Anemo support
Nahida: Best Dendro enabler
Yelan: Hydro sub-DPS
Medium Value:
Signature weapons: 15-20% damage
4-star constellations: Comfort
Low Value:
5-star constellations: Unnecessary
Weapon refinements: Minimal gains
BitTopup Advantages
Competitive pricing vs official channels
Instant Genesis Crystal delivery
Secure payment processing
Wide game coverage
Responsive customer service
Established reputation
FAQ
What makes Floor 12 January 2026 harder?
Level 95-100 enemies with specific resistances—Furnace Shell Mountain Weasel has 50% Pyro Resistance, Super-Heavy Landrover starts with 150% all-element resistance, Veteran Arithmetic Enhancer Mek gains 200% resistance from Geo shield. These demand specific counter-strategies.
Can I clear with only 4-stars?
Yes. National (Xiangling, Xingqiu, Bennett, Sucrose) and Hyperbloom (Dendro Traveler, Xingqiu, Kuki, Sucrose) achieve 36-star clears. Require 180-200% ER on supports and proper artifacts but zero 5-stars.
How much DPS needed for Chamber 3?
40,000+ DPS baseline for 3-star clears (90s completion). Execution quality matters more—proper rotations compensate for 10-15% DPS deficits. Missing by 30+ seconds = stat issues; 10-20 seconds = execution issues.
Optimal Hyperbloom rotation?
Dendro Traveler burst → Xingqiu burst + skill → Kuki skill → Sucrose skill/burst → normal attacks. Hyperbloom doesn't snapshot—ensure Kuki triggers after receiving Sucrose's EM buff.
Which Ley Line Disorder is active?
Blessing of the Abyssal Moon: Whirlwind Moon (Dec 16, 2025 - Jan 16, 2026). Triggers shockwave True DMG every 2s on Swirl, grants 75% off-field Pyro DMG Bonus, increases Plunging Attack DMG by 75%.
Common mistakes preventing 3-star clears?
Failing to snapshot buffs, wasting bursts on low-HP enemies, poor energy management, attacking shielded enemies without breaking shields, playing too conservatively in final 30 seconds. Execution improvements often exceed artifact upgrades.