

Genshin Impact 6.3 Spiral Abyss Floor 12-2 introduces anti-crowd control enemies with 2000 poise (100/second regen) and 4.7M+ HP. Traditional freeze and grouping fail against these unstaggerable foes. This guide covers three proven teams—Hyperbloom, Aggravate, Vaporize—with builds, rotations, and DPS benchmarks for 36-star clears within 90 seconds. Exploit 200% Bloom and Electro-Charged damage bonuses while managing shields that grant +200% RES until broken.
Understanding Anti-CC Mechanics in 6.3 Floor 12-2
Floor 12-2 features enemies with 2000 poise and 0.5 endurance multiplier—virtually immune to interruption. Venti and Kazuha grouping becomes useless.
Battle-Scarred Rock Crab: 4,409,072 HP, requires six Hermit Seed conversions via Dendro Cores before vulnerability.
Fireblade Shock Trooper: 4,765,990 HP, three shield layers totaling 857,877 HP. Until broken within 30 seconds, enemy has +200% RES to all damage.
Need meta characters? Genshin Impact Genesis Crystals top up through BitTopup offers fast, secure transactions.
The Poise System: Why Anemo Units Feel Useless
Poise regenerates at 100/second. Even momentary staggers recover instantly. The 0.5 endurance multiplier reduces heavy attack and plunge effectiveness. Kazuha's plunge or Zhongli's meteor barely register.
Practical impact: abilities designed for grouping waste DPS windows. Every second on Venti's burst or Sucrose positioning is lost damage. The chamber demands sustained single-target damage, not burst AoE.
How Interrupt Resistance Changes Team Building
Traditional teams rely on controlling enemy positioning. Floor 12-2 forces a shift toward maximizing damage regardless of enemy behavior. You need consistent off-field damage, rapid shield breaking, and characters who don't depend on grouping.
Primordial Bathysmal Vishaps (2,085,774 HP each) activate Hydro Armor after 30 seconds: +80% RES and drain 10 Energy every 0.5 seconds. This punishes slow clears and poor energy management.
Wilderness Hunters (4,171,548 combined HP) must die before their 30-second buff window, creating strict DPS checks crowd control can't solve.
Why Traditional Teams Struggle on Floor 12-2
Freeze teams face their worst nightmare. While freezing works, enemies stay in original positions. Ayaka's burst doesn't pull them, Ganyu hits one target at a time. The freeze advantage—controlling movement—becomes irrelevant.
DPS loss compounds when freeze teams invest heavily in crowd control. Mona's Omen extension, Venti's energy refund, Kazuha's grouping provide minimal value. You're running at 60-70% effectiveness.
Anemo Grouping Limitations
Anemo characters with Viridescent Venerer still provide resistance shred, but grouping becomes dead weight. Sucrose's EM sharing remains useful, but her crowd control contributes nothing. Kazuha's damage bonus works, but half his kit sits unused.
The opportunity cost: Fischl or Yae Miko in that slot provides consistent off-field Electro without wasted abilities. The 40% VV shred can be replicated—Zhongli gives 20% universal shred, Deepwood offers 30% Dendro shred.
DPS Loss From Wasted Abilities
Every ability cast is an opportunity cost. Venti's 60-energy burst against enemies that won't group wastes 2-3 seconds for minimal return. Those seconds could be Nahida applying Dendro, Xingqiu triggering Hydro, or Hu Tao executing charged attacks.
DPS requirements: First Half demands 101,945 DPS over 90 seconds against 9,175,062 total HP. Second Half requires 86,282 DPS against 7,765,397 HP. Every wasted second pushes you further from three-star threshold.
Team #1: Hyperbloom for Consistent Reaction Damage
Nahida/Xingqiu/Kuki Shinobu/Zhongli exploits 200% Bloom DMG Bonus and 75% Lunar-Bloom DMG Bonus in First Half.
Nahida: Deepwood Memories 4pc, EM/EM/EM, 140-160% ER, 1/8/8 talents. Skill marks eight enemies, applies Dendro every 1.9s. Burst buffs 250 EM team-wide, shreds 30% Dendro RES.
Xingqiu: Sacrificial Sword, 180-200% ER, 1/8/8 talents. C6 grants +50% Hydro DMG. Rainswords create Dendro Cores with Nahida's marks.
Kuki Shinobu: Gilded Dreams or Flower of Paradise 4pc, 180%+ ER, 200+ EM, 1/8/1 talents. Skill applies Electro every 1.5s for Hyperbloom triggers. Provides healing without dedicated healer slot.
Zhongli: Shield for 20% universal RES shred and interruption protection.
Rotation Sequence
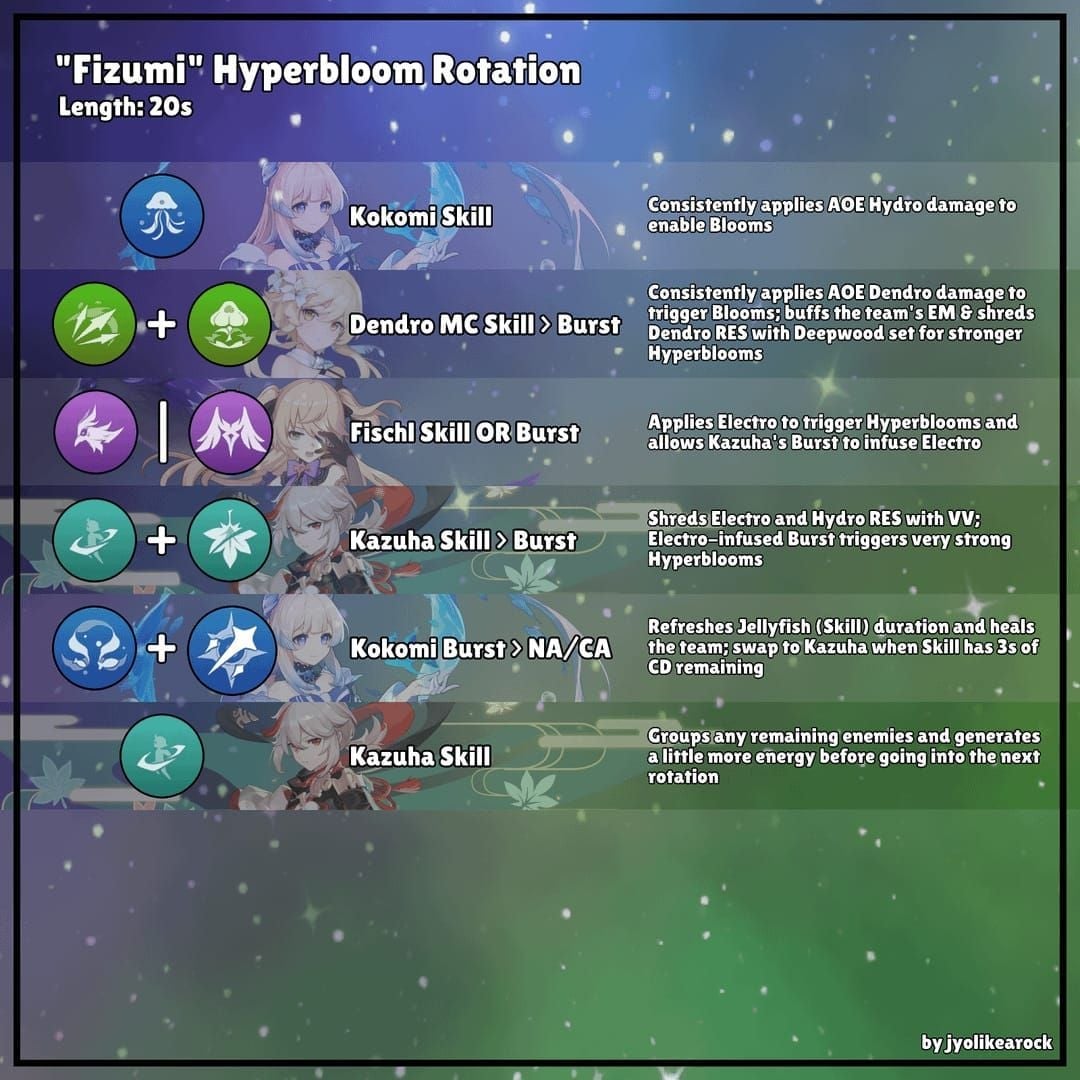
Zhongli hold Skill (shield)
Nahida Skill (mark enemies) → Burst (EM buff)
Xingqiu Skill twice (Sacrificial proc) → Burst
Kuki Skill
Nahida on-field for Dendro application
Nahida applies Dendro, Xingqiu's rainswords add Hydro creating Cores, Kuki triggers Hyperbloom. 180%+ ER ensures burst availability every rotation.
Against Battle-Scarred Rock Crab, focus Dendro Core generation to convert six Hermit Seeds. Hyperbloom triggers damage boss and convert seeds simultaneously.
Budget Alternatives
Replace Zhongli with Prototype Amber Sucrose for healing and VV shred. Barbara substitutes Xingqiu in emergencies, though Hydro application drops significantly.
Constellations matter minimally. Xingqiu C6 helps but C0 clears content. Nahida performs excellently at C0. Kuki needs no constellations. Zhongli C0 suffices.
Lowest investment barrier makes Hyperbloom ideal for newer players. EM main stats drop frequently, ER substats appear commonly, team forgives errors through healing and shields.
Team #2: Aggravate for Amplified Electro Damage
Nahida/Fischl/Yae Miko/Zhongli capitalizes on Quicken and Second Half's 200% Electro-Charged DMG Bonus. Higher damage ceiling than Hyperbloom but requires tighter rotations.
Nahida: Same Deepwood build (EM/EM/EM, 140-160% ER, 1/8/8).
Fischl: ATK% sands, Electro DMG% goblet, CRIT circlet (60% CR, 120% CD minimum), 120-140% ER, 1/8/8 talents. A4 passive triggers additional damage on Electro reactions. Oz generates 0.67 Electro particles/second.
Yae Miko: Three skill turrets for persistent off-field Electro. ATK% sands with EM substats, 1/8/8 talents. Skill over burst priority—turrets provide consistent damage, burst costs 90 energy.
Zhongli: Same role.
Timing Burst Windows
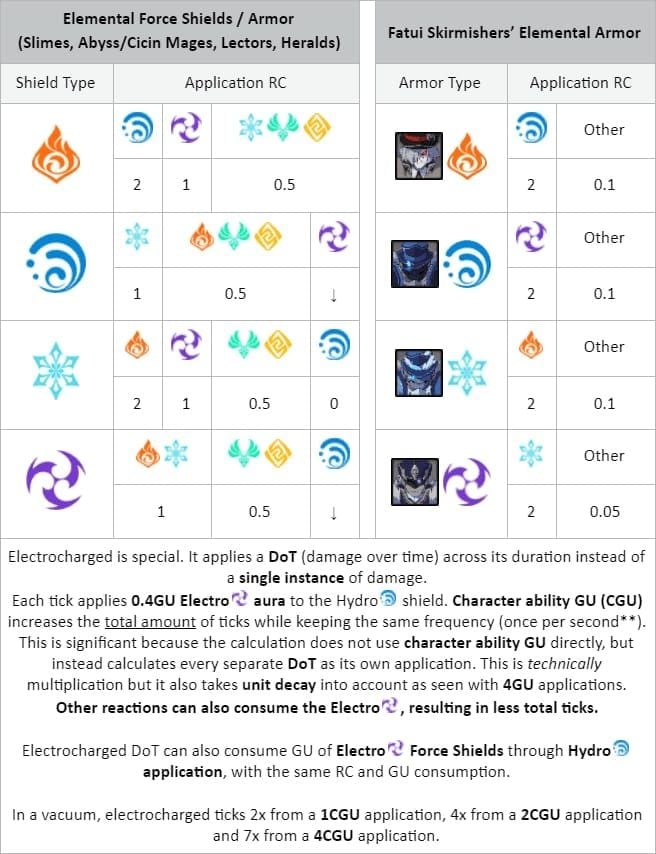
Against Fireblade Shock Trooper, break three shield layers (285,959 HP each) within 30 seconds to trigger -50% All RES and -60% Electro RES. Electro-Charged deals 600% shield damage.
Deploy Zhongli shield → Nahida Skill/Burst → Fischl Oz → Yae three turrets → Nahida on-field. Quicken aura enables Fischl and Yae's Electro hits to trigger Aggravate. Coordinate Yae burst with shield break for max damage during vulnerability.
Assault Specialist Mek (817,716 HP) loses Pyro enhancement after two Ousia hits, disabling 25 seconds. This team lacks Ousia but raw damage eliminates Mek before enhancement becomes problematic.
Stat Priorities
Aggravate scales with EM and standard DPS stats. Fischl and Yae benefit from 100-200 EM while maintaining CRIT ratios. Nahida's burst shares 250 EM team-wide.
ER breakpoints: Fischl 120-140% ensures Oz uptime. Yae varies by weapon—Kagura's Verity or Skyward Atlas reduce ER needs vs Hakushin Ring or Mappa Mare. Test rotations; if Yae can't burst every other rotation, increase to 140-160% ER.
Zhongli: full HP for max shield or Hybrid (HP/Geo/CRIT) for damage. His 20% universal shred applies regardless.
Team #3: Vaporize for Burst Window Optimization
Hu Tao/Xingqiu/Yelan/Zhongli delivers massive single-target damage through amplifying reactions. Charged attack cancels with dual Hydro create consistent 1.5x-2.0x Vaporize.
Hu Tao: Crimson Witch or Shimenawa 4pc, 100-120% ER, 8/8/8 talents. HP% sands, Pyro DMG% goblet, CRIT circlet with HP% and EM substats.
Xingqiu: 180-200% ER, Sacrificial Sword, 1/8/8 talents. Emblem 4pc if available. C6 for Hydro DMG bonus.
Yelan: 160-180% ER, Favonius Warbow (energy) or Aqua Simulacra (damage), 1/8/8 talents. A4 passive increases active character DMG by up to 50% over 14 seconds.
Zhongli: Shield enables Hu Tao to ignore interruption while maintaining <50% HP threshold.
Character Synergy
Dual Hydro ensures Hu Tao's charged attacks consistently Vaporize. Xingqiu's rainswords have ICD limitations. Yelan's burst applies Hydro independently, creating overlapping application that guarantees reactions even during fastest attack strings.
Against Primordial Bathysmal Vishaps, eliminate before 30-second Hydro Armor activation. Energy drain (10 Energy/0.5s) devastates burst-dependent teams. Hu Tao's skill-based damage makes her less vulnerable, but strict timer demands efficient rotations.
F2P Weapons
Hu Tao: Dragon's Bane (4-star) or White Tassel (3-star) for CRIT Rate. Staff of Homa is best-in-slot but not required. Dragon's Bane EM boosts Vaporize substantially.
Xingqiu: Sacrificial Sword (4-star) practically mandatory for energy through skill reset. Favonius Sword works with high CRIT Rate.
Yelan: Favonius Warbow (4-star) for team energy. Elegy for the End (5-star) offers EM and ATK% buffs.
Zhongli: Black Tassel (3-star) for max HP and shield. Favonius Lance for team energy with hybrid CRIT build.
Expand your roster: buy Genshin Genesis Crystals recharge online through BitTopup with 24/7 support and instant delivery.
Advanced Rotation Techniques
Animation Canceling: Hu Tao charged attack → dash/jump to cancel recovery. Increases attacks/second from 2.5 to 3.5+, boosting damage during 9-second skill window.

Nahida Skill Cancel: Mark enemies → dash cancel → swap. Saves ~0.3 seconds/rotation, accumulating to 3+ seconds over full chamber.
I-Frame Utilization
Burst animations provide invincibility. Time Xingqiu's burst with enemy attacks for protection while maintaining rainsword uptime. Yelan's burst offers brief invincibility during cast.
Hu Tao's burst provides extended i-frames and repositioning. Use defensively against telegraphed attacks, then continue charged attacks. Burst healing keeps her in optimal HP range (<50%).
Zhongli's shield reduces i-frame dependency, but learning patterns improves clear times. Fireblade Shock Trooper's overhead slam has obvious telegraph—sidestep instead of using burst, saving energy for damage windows.
Adapting to Enemy Patterns
Battle-Scarred Rock Crab spin creates distance. Don't chase—wait for attack completion, then close during recovery frames.
Wilderness Hunters teleport frequently. Maintain off-field damage (Fischl Oz, Xingqiu rainswords, Nahida marks) that tracks automatically.
Primordial Bathysmal Vishaps charge across arena. Position near walls to limit charge distance. Hydro Armor at 30 seconds creates hard DPS check—eliminate at least one Vishap by then or restart.
Common Mistakes That Cost Stars
Over-investing in crowd control: Players bring Venti/Kazuha expecting usual performance. Chamber explicitly punishes this through enemy design.
Poor energy management: Rotation desync where bursts aren't available. Xingqiu without burst = no Hydro for Hu Tao. Nahida without burst loses 250 EM buff. Calculate ER requirements, test in overworld before Abyss.
Ignoring Enemy Positioning
Tainted Water-Splitting Phantasm (851,787 HP) teleports frequently. Position centrally, let enemies come to you. Off-field damage continues regardless.
Multiple enemies in Second Half (Assault Specialist Mek 817,716 HP, Phantasm 851,787 HP) tempt split focus. Concentrate fire on one target until elimination. Partial damage on both provides no benefit.
Shield breaking on Fireblade Shock Trooper takes priority over raw damage. +200% RES makes shield breaking mandatory—30 seconds to break 857,877 total shield HP using Electro-Charged's 600% bonus.
When to Reset
If First Half exceeds 60 seconds, reset immediately. You need ~30 seconds per half for three stars (420+ seconds remaining on 180-second timer).
Monitor damage checkpoints: Battle-Scarred Rock Crab should lose 50% HP within 30 seconds. If not meeting this, your build needs improvement—more ER, better artifact main stats, or higher talents.
Character deaths warrant instant reset. Reviving wastes time, three-character teams can't meet DPS requirements. If dying frequently with Zhongli shield, practice enemy patterns in overworld.
Investment Priority Guide
Talent levels: Prioritize damage abilities first—Nahida Skill, Fischl Skill, Hu Tao Skill/Normal Attack, Yae Skill. Support abilities like Zhongli shield scale minimally—leaving at 8 vs 10 saves resources.
Xingqiu and Yelan want 1/8/8 emphasizing burst. Kuki 1/8/1 ignores burst since Hyperbloom scales from EM, not talent multipliers.
Artifact Farming Routes
Deepwood Memories domain: Serves Nahida and drops Gilded Dreams for Kuki. Farm until Nahida has EM/EM/EM with 140-160% ER, continue for Kuki's set.
Emblem of Severed Fate domain: Universal value—Xingqiu, Yelan, Xiangling all use this. Also drops Shimenawa for Hu Tao and Ganyu. Prioritize for resin efficiency.
Crimson Witch domain: Exclusively serves Pyro characters. Farm only if specifically building Hu Tao and other team members equipped. Lower resin efficiency.
When Constellations Matter
Xingqiu C6: +50% Hydro DMG significantly improves personal damage and Vaporize potential. Worth pulling duplicates.
Nahida C0 to C2: Substantial damage increase through defense shred, but C0 clears all content. C2 is luxury, not necessity.
Fischl C6: Transforms her into top-tier off-field DPS, but C0 performs admirably. Amplifies existing strength rather than enabling new functionality.
Hu Tao C1: Removes stamina consumption during charged attacks, dramatically improving comfort and damage. Skilled players clear at C0 through animation canceling.
Zhongli: Constellations provide minimal value. C0 shield and resistance shred accomplish primary role completely.
Time Management and DPS Benchmarks
Three-star clears require 420+ seconds remaining (90 seconds max per chamber). First Half 9,175,062 HP demands 101,945 DPS. Second Half 7,765,397 HP requires 86,282 DPS. Realistic clears need 120,000-130,000 DPS accounting for rotations and dodging.
Battle-Scarred Rock Crab should reach 50% HP (~2.2M damage) within 30 seconds for sub-60 second clear. If first Hermit Seed conversion takes longer than 15 seconds, Dendro Core generation needs improvement.
Damage Checkpoints
Hyperbloom triggers: 25,000-35,000 damage/reaction with proper EM (800-1000 EM on trigger character). If seeing 15,000-20,000, EM insufficient. Kuki needs 200+ EM minimum, 800+ ideal.
Hu Tao Vaporized charged attacks: Should exceed 50,000 damage with decent investment (60/120 CRIT, HP% sands, Pyro goblet). Sub-30,000 indicates missing buffs—verify Xingqiu burst active, Zhongli shield up, Hu Tao below 50% HP.
Aggravate triggers: Fischl and Yae should add 15,000-25,000 damage/proc with balanced builds (ATK/Electro/CRIT with 100-200 EM). Lower suggests insufficient EM or missing Nahida's EM buff.
Reset Criteria
First Half exceeding 50 seconds leaves only 40 for Second Half—mathematically impossible. Reset immediately.
Character death before 30-second mark warrants reset. Three-character teams can't meet DPS requirements.
Missing shield break on Fireblade Shock Trooper within 30 seconds means enemy maintains +200% RES. Reset and focus Electro-Charged application.
Optimizing for Future Anti-CC Cycles
Universal investments: Nahida provides Dendro for Bloom, Hyperbloom, Burgeon, Aggravate, Spread. Xingqiu enables Vaporize, Freeze, Electro-Charged, Bloom. Zhongli's shield and shred support virtually any team. These justify heavy resource investment.
Fischl's off-field Electro serves Aggravate, Electro-Charged, Hyperbloom, Superconduct. Flexibility across reactions makes her safe investment. Yelan's damage amplification and Hydro application provide universal value.
Building Flexible Roster
Maintain two fully built DPS from different elements. Hu Tao covers Pyro single-target, Nahida handles Dendro reactions. Diversity ensures adaptation to elemental shields, resistances, blessing rotations.
Invest in off-field damage dealers over on-field carries when resources limited. Xingqiu, Fischl, Yelan, Xiangling provide damage while off-field, enabling flexible compositions. On-field carries require specific support structures.
ER substats and weapons deserve priority over marginal CRIT improvements. Burst available every rotation at 60/120 CRIT outperforms 70/140 CRIT available every other rotation. Consistent uptime beats theoretical ceiling.
Rewards and Resource Returns
Each chamber awards 25,000 Mora and 50 Primogems for three-star completion. Floor 12 total provides 100 Primogems for nine-star clear. Full Abyss reset every two weeks grants 600 Primogems—300 from Floor 9-12 clears, 300 from 36-star completion.
Primogems accumulate to 1,200 monthly (two resets), equivalent to 7.5 pulls. Over patch cycle (six weeks, three resets), Abyss provides 1,800 Primogems or 11.25 pulls. For F2P, this represents significant pulling power.
Mora rewards (25,000/chamber, 300,000 per full Floor 9-12 clear) help offset artifact enhancement costs. While not substantial vs Leyline farming, Primogem rewards make Abyss worthwhile for progression.
FAQ
What are anti-CC enemies in Genshin 6.3 Abyss? Anti-crowd control enemies have 2000 poise with 100/second regen and 0.5 endurance multiplier, making them immune to stagger, knockback, and grouping. Traditional freeze and Anemo teams lose effectiveness.
Which teams work best against high-poise enemies? Hyperbloom (Nahida/Xingqiu/Kuki/Zhongli), Aggravate (Nahida/Fischl/Yae/Zhongli), and Vaporize (Hu Tao/Xingqiu/Yelan/Zhongli) excel through consistent single-target damage and reaction scaling without relying on positioning or crowd control.
What's the DPS requirement for Floor 12-2? First Half requires 101,945 DPS over 90 seconds against 9,175,062 HP. Second Half needs 86,282 DPS against 7,765,397 HP. Realistic clears need 120,000-130,000 DPS accounting for rotations and dodging.
Do freeze teams work on anti-CC enemies? Freeze teams technically freeze enemies but gain no positioning advantage since high-poise enemies don't move when frozen. Core strength—controlling movement and attack patterns—provides minimal value, making freeze significantly less effective than reaction compositions.
How important is Energy Recharge? ER ensures burst availability every rotation for consistent damage. Xingqiu needs 180-200%, Kuki 180%+, Nahida 140-160%, Yelan 160-180%. Missing burst rotations drops DPS below clear thresholds.
Can F2P teams clear Floor 12-2? Hyperbloom using Nahida/Xingqiu/Kuki/flex (Barbara, Sucrose, any shielder) clears content with 4-star weapons and achievable artifacts. Low constellation dependency and EM scaling make it accessible for F2P with proper investment.