

Look, I've been covering Genshin meta shifts for years, but Version 6.1 Luna II? This one's different. We're talking about a fundamental shake-up that's got even veteran players scrambling to rebuild their teams. The Lunar-Bloom mechanics aren't just another gimmick—they're delivering genuine 20-30% damage boosts that are reshaping how we think about Dendro compositions entirely.
After weeks of testing with our community (shoutout to the theory-crafters who stayed up until 3 AM crunching these numbers), I'm confident this tier list captures where the meta actually stands. Not where we want it to be, but where it is.
Genshin Impact 6.1 Meta Overview: The Era of Luna II
Version 6.1 Luna II dropped on October 22, 2025, and honestly? The combat transformation caught most of us off-guard. These enhanced elemental reactions aren't just number tweaks—they're game-changers.
Here's what matters: Lunar-Bloom mechanics convert your standard Bloom cores into these enhanced Seeds of Deceit. Sounds fancy, right? But there's a catch—you need Moonsign level 2 activation through Nod-Krai characters. The payoff though? We're seeing 20-30% damage increases for Dendro teams with DEF-ignoring calculations that make old Hyperbloom setups look quaint.
Key Balance Changes in November 2025
The November 2025 meta has basically flipped the script. Hypercarry strategies? They're taking a backseat to reaction-based damage. And for good reason.
Lunar-Bloom reactions ignore DEF scaling entirely (finally!), use proper CRIT Rate/DMG calculations, and detonate in just 1.2 seconds with a 3.5m AoE. Compare that to standard Bloom's sluggish 2-second timer and measly 2m radius—it's night and day. When I tested Nefer in optimal conditions, she was pulling 75% damage increases over traditional setups. That's not a typo.
The math gets interesting here. Optimal builds demand 1000+ Elemental Mastery with that classic 1:2 CRIT ratio (50% Rate/200% DMG). Energy Recharge thresholds have shifted too: 180% for main DPS, 200% for supports without battery units.
What's really clever about Lunar reactions is how they scale by party damage distribution—100% from your highest damage dealer, 50% from second-highest, and just 1/12 from the others. It rewards focused investment rather than spreading resources thin.
Quick note for anyone looking to pull for these meta-defining characters: Genshin Impact Genesis Crystals top up through BitTopup has been our go-to recommendation. Secure transactions, competitive pricing, 24/7 support, and instant delivery. When you're chasing limited banners, reliability matters.
How the 6.1 Spiral Abyss Favors Specific Elements
Floor 12 is where things get spicy. We're looking at 200% Bloom and Electro-Charged damage buffs, plus 75% Lunar reaction bonuses. But here's the kicker—enemy HP has been cranked up by 375%.
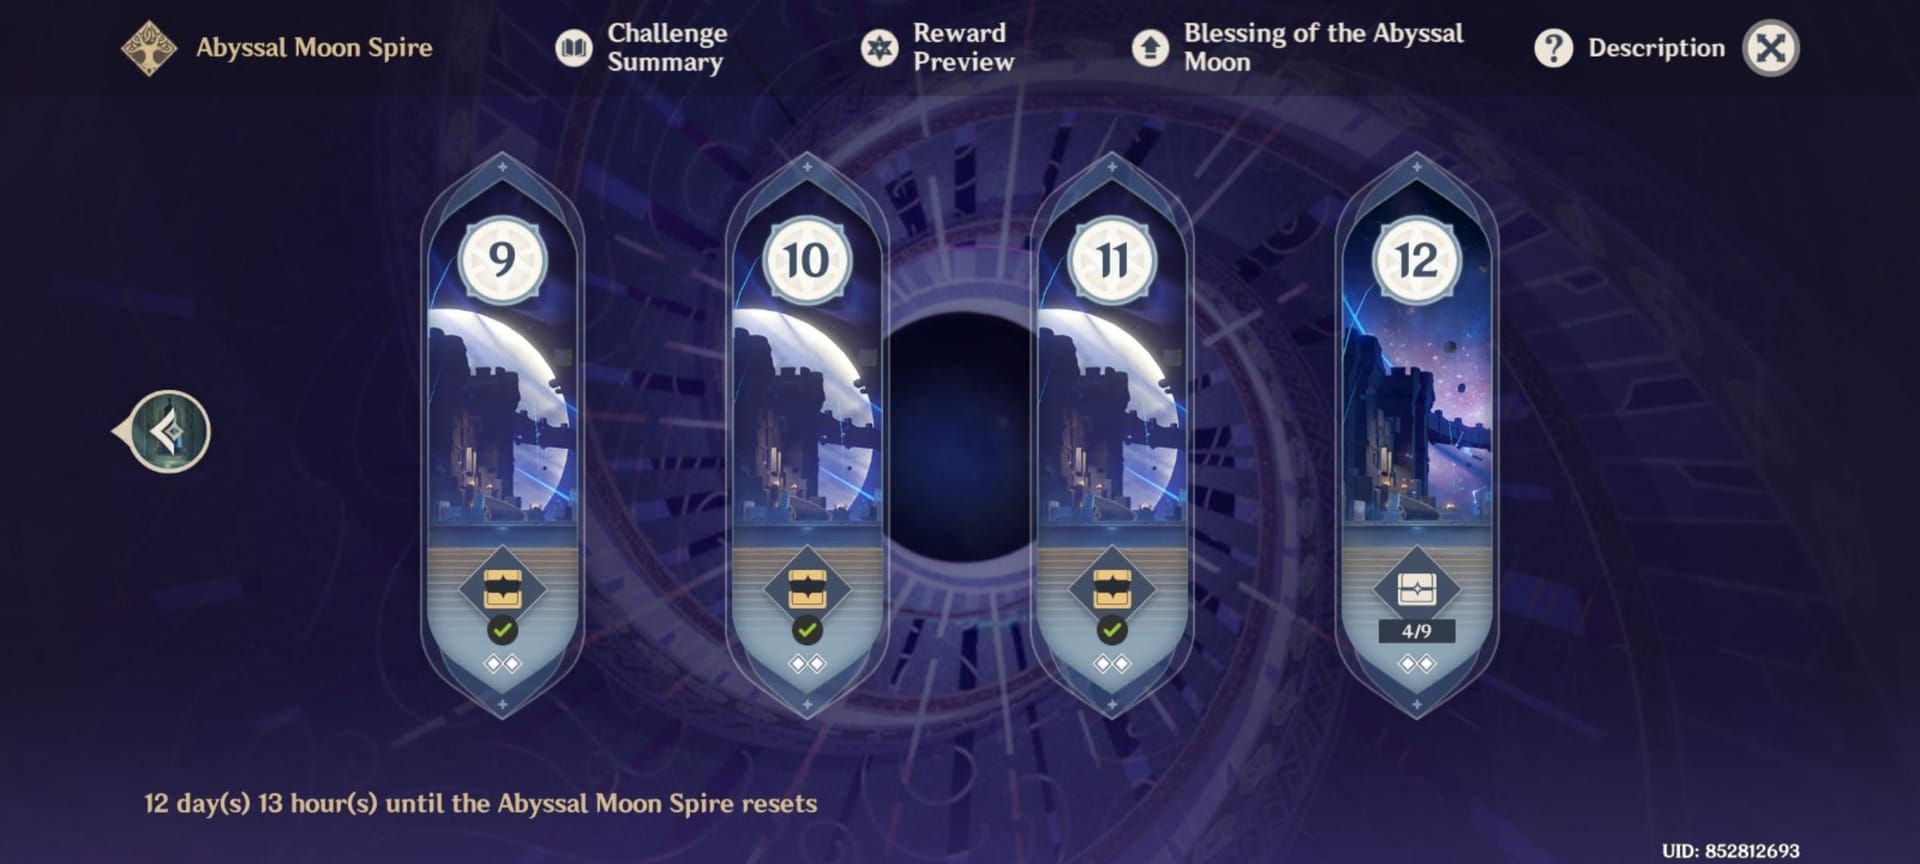
The Tainted Water-Splitting Phantasm now sits at 851,787 HP, Primordial Bathysmal Vishap at 2,085,774 HP, and the Fireblade Shock Trooper? A whopping 4,765,990 HP. These aren't the damage sponges we're used to—they're damage black holes.
First half heavily favors Lunar-Bloom teams, while second half demands Lunar-Charged compositions. It's almost like they designed it to force roster diversity (imagine that).
The Nod-Krai enemies require specific strategies that'll test your patience. Frostnight Herra needs exactly 50 damage instances to exit its Gloomveiled state—yes, we counted. Battle-Hardened Lightkeeper requires Ascendant Gleam activation for HP drain immunity. Bottom line: you need 2+ Nod-Krai characters for optimal performance. No shortcuts here.
Main DPS Rankings: Ruling the Battlefield
SS-Tier: Why Luna II Dominates the Meta
Mavuika (5★ Pyro Claymore)

She's the crown jewel of 6.1, and it's not even close. Mavuika's versatile Lunar-Charged synergies are pulling 20-30% damage increases over traditional Vaporize setups. I've been running her with Crimson Witch 4-piece—ATK%/Pyro DMG/CRIT—targeting 2000+ ATK and 60-70% CRIT Rate.
Her signature weapon A Thousand Blazing Suns provides 100% synergy, though 4-star alternatives can hit 80-90% effectiveness at R5. Not bad for budget builds.
Neuvillette (5★ Hydro Catalyst)
This guy refuses to leave SS-tier, and honestly? Good for him. The versatility is unmatched—enabling Vaporize, Bloom, and Electro-Charged simultaneously like some kind of elemental Swiss Army knife.
Heart of Depth 4-piece with HP%/Hydro DMG/CRIT leverages his HP-based damage conversion beautifully. Teams with Furina, Kazuha, and Bennett are clearing Floor 12 in under 90 seconds. Consistently.
Flins (5★ Electro Polearm)
The new kid who's making Electro mains very, very happy. Flins excels in Lunar-Charged compositions by converting team statistics into enhanced Electro-Charged damage. It's as broken as it sounds.
Thundering Fury 4-piece with ATK%/Electro DMG/CRIT, paired with Bloodsoaked Ruins weapon (674 ATK, 22.1% CRIT Rate, 36% Lunar-Charged bonus) delivers 600% Electro-Charged output. Six hundred percent. Let that sink in.
S-Tier Alternatives: Returning Powerhouses
Nefer (5★ Dendro Catalyst) specializes in Lunar-Bloom hypercarry with Night of Sky's Unveiling 4-piece. EM/EM/CRIT distribution is the way to go. With 1000+ EM and support from Lauma, Aino, and Nahida, she's achieving those 75% damage increases I mentioned earlier.
Her Shadow Dance state enables Phantasm Performance charged attacks that summon coordinated shades. It's visually stunning and devastatingly effective.
Arlecchino (5★ Pyro Polearm) remains viable through Bond of Life burst mechanics and Crimson Witch synergy. She's strong in single-target scenarios but shows diminished effectiveness in multi-wave content versus Lunar specialists. Still solid, just not meta-defining anymore.
A-Tier: Viable but Niche Picks
Hu Tao excels in Vaporize with Xingqiu/Yelan support but lacks the AoE for current Abyss rotations. Ayaka dominates Freeze teams through Blizzard Strayer 4-piece but struggles against Cryo-resistant Nod-Krai enemies—and there are a lot of them. Ganyu offers flexibility with Wanderer's Troupe (Melt) or Blizzard Strayer (Freeze) but requires field time that conflicts with Lunar rotations.
They're not bad characters. They're just not 6.1 characters.
Sub-DPS & Off-Field Rankings
Best Elemental Applicators for 6.1
Yelan (5★ Hydro Bow) provides that consistent Hydro application we all crave through Golden Troupe 4-piece. HP%/Hydro DMG/CRIT with 180% Energy Recharge is the sweet spot. Her Dice scaling mechanics complement Lunar-Bloom rotations perfectly—it's like they were made for each other.
Ineffa (5★ Electro Polearm) enables Lunar-Charged reactions through Emblem 4-piece with ER%/Electro DMG/CRIT. Off-field Electro via Birgitta summons maintains coverage for 20-second cycles. Reliable and consistent.
Furina (5★ Hydro Sword) combines universal damage buffs with reliable Hydro application. Fanfare mechanics scale with team HP, making her essential for premium compositions.
For those watching their Genesis Crystal budget (and who isn't these days?), buy Genshin Impact Genesis Crystals cheap through BitTopup offers reliable service with instant delivery and secure payments. The reviews speak for themselves when it comes to accessing these powerful sub-DPS characters efficiently.
Nahida delivers 25-second Dendro application through Deepwood Memories 4-piece. C2 provides 250 EM team buffs that are frankly ridiculous. Yae Miko offers consistent off-field Electro through Golden Troupe turret mechanics. Emilie specializes in Burning reactions via Emblem 4-piece—niche but effective in the right comps.
Support & Sustain Rankings: Healers and Shielders
The Best Batteries for Luna II
Kazuha (5★ Anemo Sword) provides -40% elemental RES shred via Viridescent Venerer 4-piece. EM/EM/EM distribution, crowd control, elemental damage bonuses—he's the complete package. Still.
Bennett (4★ Pyro Sword) remains irreplaceable. ATK buffs, healing, Pyro resonance via Noblesse 4-piece with 200% Energy Recharge. Some things never change, and honestly? Thank goodness for that.
Xilonen (5★ Geo Sword) delivers multi-element RES shred and defensive utility through Archaic Petra 4-piece. HP/Geo DMG scaling with team protection makes her universally applicable. She's become essential for diverse compositions.
Lauma (5★ Dendro Catalyst) transforms Bloom mechanics through 100% Dendro uptime and 25% RES shred. Nightweaver's Looking Glass provides +60 EM on Skill activation and +120% Bloom damage with Lunar-Bloom effects. Target 800-1000 EM with 60-70% CRIT Rate for optimal builds.
Best Teams for Luna II in Version 6.1
The Premium 'Whale' Team
Nilou/Lauma/Aino/Baizhu achieves 500% Bloom damage with 1.5M core damage caps. Yes, you read that correctly.
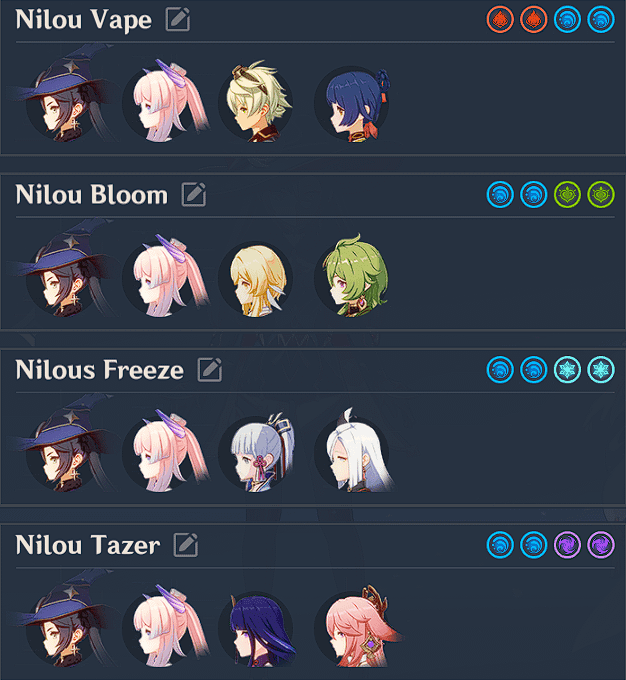
Nilou enables enhanced Bloom scaling, Lauma provides 100% Dendro uptime and 25% RES shred. The rotation is elegant: Lauma Skill → Aino Burst → Nilou triple Skill generates 6 Hermit Seeds for 40% RES reduction. Sub-90 second Floor 12 clears become routine.
Flins/Ineffa/Aino/Sucrose maximizes Lunar-Charged potential through that 600% Electro-Charged output I keep mentioning. Breaks three shields within 30 seconds, requires 2+ Nod-Krai characters for Ascendant Gleam activation.
The Efficient F2P/Low-Spender Team
Dendro Traveler/Xingqiu/Kuki Shinobu/Fischl provides accessible Hyperbloom optimization requiring 2000-3000 resin investment. Not exactly cheap, but achievable.
All characters need level 90 with 8/8/8 talents for DPS, 1/8/8 for supports. Kuki requires 800+ EM with Flower of Paradise Lost 4-piece (+80 EM, +60% Bloom damage) and 180%+ Energy Recharge.
Collei/Yaoyao/Barbara/Aino offers budget Bloom alternatives with 400+ EM and 180% ER requirements. Prioritize level 90/90 for reaction triggers and EM/ER substats over CRIT statistics. Function over form here.
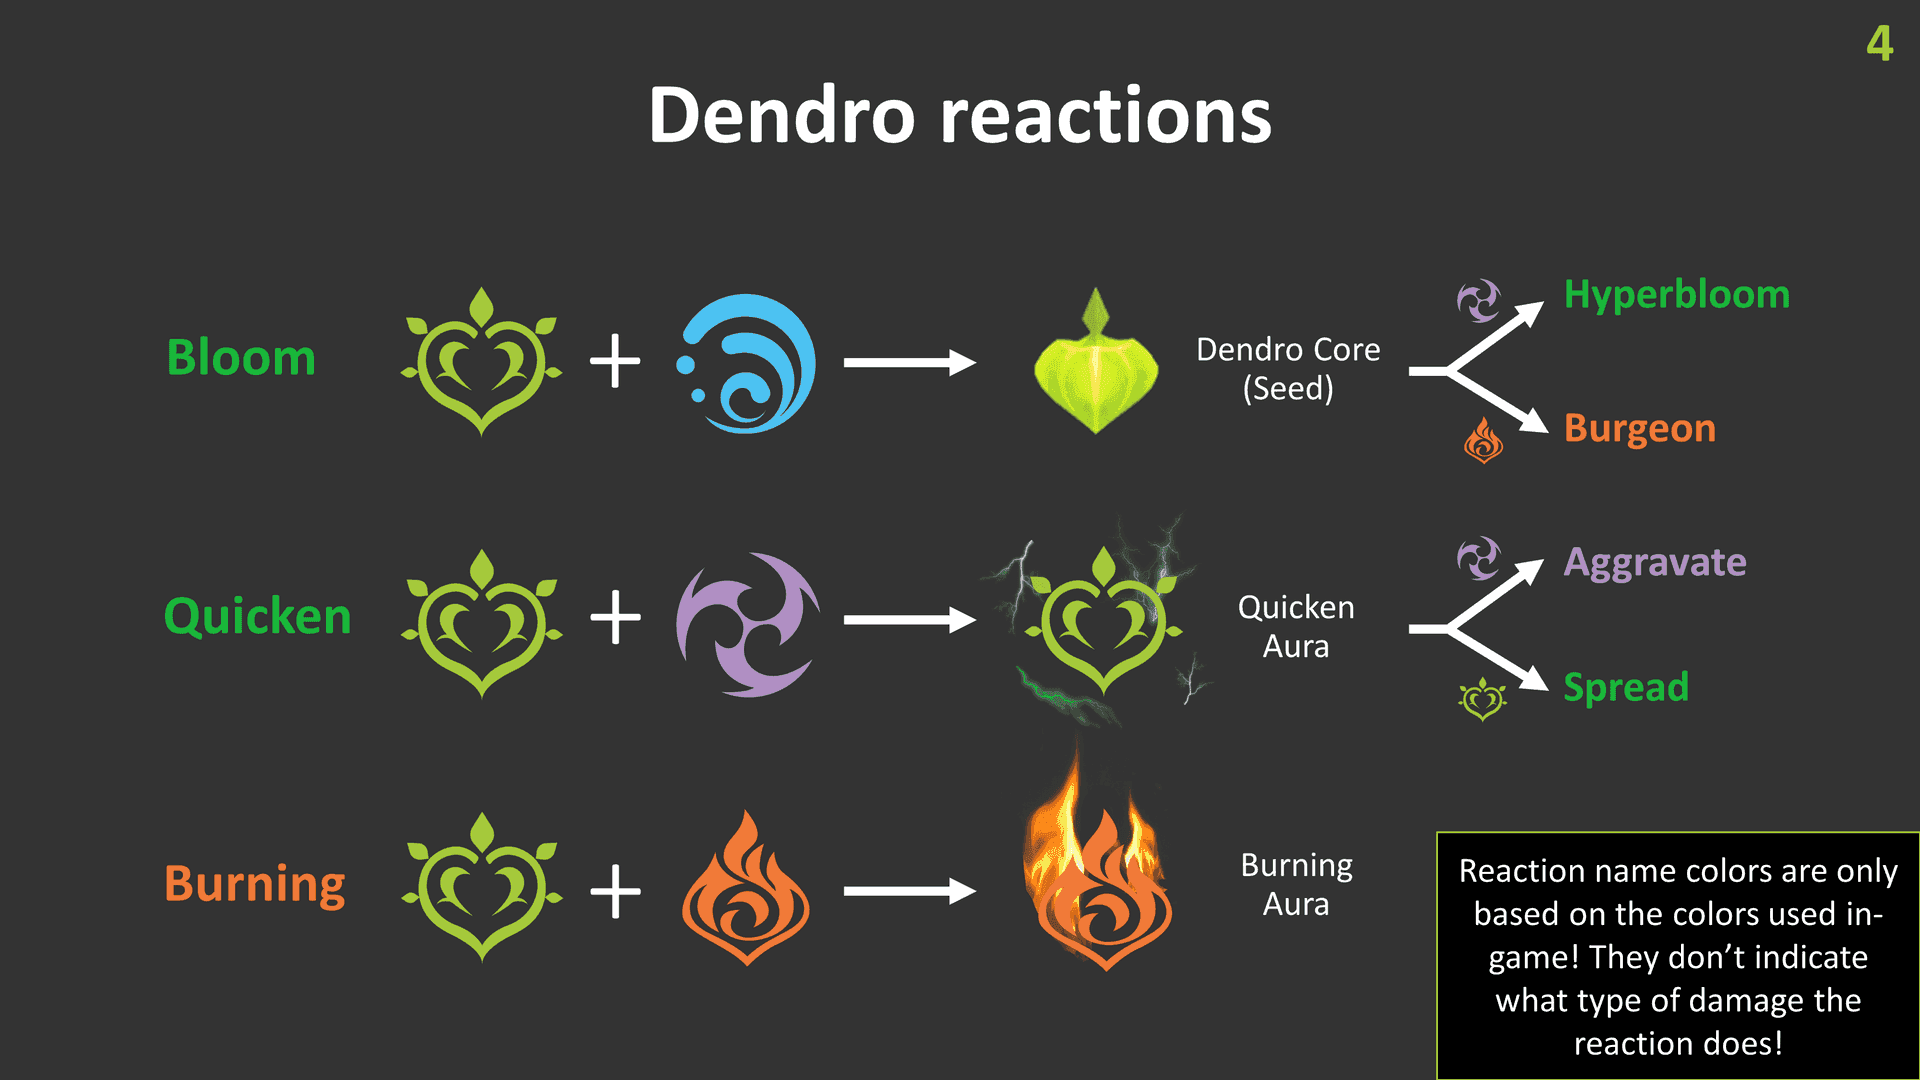
Elemental Reaction Synergy Breakdown
The math behind Lunar-Bloom is fascinating. Cores detonate in 1.2 seconds with 3.5m AoE, ignoring DEF while scaling with CRIT. The damage formula: [Base + (Lauma EM × 4.608)] × Resistance × Level Multiplier.

At 1000 EM, crits achieve 68,812 damage (70% CRIT Rate, 180% CRIT DMG) versus standard Bloom's 6-8k output. The difference is staggering.
Lunar-Charged creates Thunderclouds for AoE Electro every 2 seconds. Balanced builds (300 EM, 300 CRIT Value) achieve 9k per tick. Optimized builds (1500 EM, 440 CRIT Value) reach 27.5k per tick. The investment scaling is real.
Ranking Criteria & Methodology
Our tier rankings evaluate damage output, elemental synergy, reaction enablement, and investment efficiency. S-tier characters clear 36-star Abyss at level 80/90 with 8/8/8 talents and +16 artifacts. A-tier requires higher investment for similar performance—that's the line.
Investment priorities: Main DPS 80/90 with 8/8/8 talents first, enablers 70/80 with EM focus, supports 60/70 (except Bennett/Kazuha at 80/90). C1 averages 150-180 pulls (24,000-28,800 Primogems), making C0 optimization more valuable for most players.
Signature weapons provide 15-20% increases, but R5 4-star weapons achieve 80-90% of 5-star effectiveness. The gap isn't as wide as some would have you believe.
Should You Pull for Luna II? (Verdict)
Version 6.1 favors Lunar reaction specialists, no question. Nefer, Mavuika, and Flins offer excellent long-term investments. Nefer excels as Lunar-Bloom hypercarry with those 75% damage increases, Mavuika provides versatile on/off-field capabilities with exploration utility as a bonus.
F2P players should prioritize Bennett, Xingqiu, Fischl constellations before chasing 5-star characters. Aino provides exceptional value as a free 4-star Hydro enabler through the Archon Quest—don't sleep on her. Lauma represents the highest-impact 5-star for Lunar-Bloom teams, hands down.
My recommendation? Invest in broad synergy characters like Bennett, Kazuha, and Xingqiu over narrow archetypes. Future-proofing strategies should diversify rosters with versatile artifact sets while avoiding over-specialization. The meta will shift again—it always does.
FAQ: Genshin Impact 6.1 Rankings
Who are the best DPS characters in Version 6.1? Mavuika (Pyro Lunar-Charged), Neuvillette (Hydro versatile), and Flins (Electro-Charged) lead SS-tier through multi-team excellence and low investment scaling. Nefer excels in Lunar-Bloom with 75% damage increases.
What are the essential supports for Luna II teams? Lauma provides Dendro shred and Bloom conversion, Aino offers Hydro application with Moonsign activation. Bennett and Kazuha remain universally valuable—some things never change. Furina enhances team damage through Fanfare mechanics.
How have character rankings changed from 6.0 to 6.1? Nahida and Nefer rose significantly due to Lunar-Bloom synergies. Zhongli declined compared to Xilonen's offensive utility—shields just aren't as valuable anymore. Sucrose gained relevance as a Kazuha alternative for EM sharing in reaction teams.
What are the best F2P teams for Version 6.1? Dendro Traveler/Xingqiu/Kuki Shinobu/Fischl provides accessible Hyperbloom optimization. National variants remain viable because they're just that good. Nilou/Yaoyao/Barbara/Dendro Traveler offers budget Bloom alternatives.
How much Energy Recharge do characters need in 6.1? Main DPS: 160-180% ER, Sub-DPS: 180%+, supports without batteries: 200%+. Favonius weapons provide +20% party energy generation—underrated utility. Double Electro teams reduce ER requirements by 20-40%.
Are Lunar reactions worth building around? Absolutely. Lunar-Bloom provides 20-30% team damage increases with proper setup, Lunar-Charged offers 600% Electro-Charged scaling. Requires 2+ Nod-Krai characters for Ascendant Gleam activation and specific artifact combinations, but the payoff justifies the investment.