

This analysis covers Flins' DPS performance during Night of Sky's Unveiling event, featuring damage benchmarks from 40,000+ to 60,000+ DPS across team compositions, optimal artifact builds with Night of Sky's Unveiling set, weapon recommendations, and meta team cores utilizing Lunar-Charged reactions.
Flins Character Overview & DPS Role Analysis
Character Kit Breakdown
Here's what makes Flins tick—and honestly, after spending weeks testing this guy, I'm impressed. This 5-star Electro Polearm user from Nod-Krai isn't your typical DPS. He's built around something called Lunar-Charged reactions, which are basically souped-up Electro-Charged variants that actually scale meaningfully.
His Level 90 stats look solid: 12,491 HP, 352 ATK, 809 DEF, with a hefty 38.4% CRIT DMG ascension stat. But the real magic happens in his kit mechanics.

Ancient Rite: Arcane Light (his Elemental Skill) gives Electro infusion and interruption resistance—crucial for maintaining DPS uptime. The skill transforms into Northland Spearstorm for AoE damage, which then enables his special Thunderous Symphony Burst variant. This creates a 6-second window of enhanced damage with just a 6-second cooldown. Pretty tight rotation window, but manageable once you get the rhythm down.
His Elemental Burst, Ancient Ritual: Cometh the Night, delivers solid AoE Electro damage with delayed phases. Here's the kicker though—after using Spearstorm, his special Thunderous Symphony costs only 30 Energy instead of the standard 80. Game-changer for energy management.
DPS Potential Assessment
Now this is where things get interesting (and slightly complicated). Moonsign Benediction: Old World Secrets converts your party's Electro-Charged reactions to Lunar-Charged ones, adding 0.7% Base DMG per 100 ATK—maxing out at 14% when you hit 2000 ATK. Not earth-shattering, but it adds up.
Whispering of Flame provides 8% ATK as Elemental Mastery, capped at 160 EM. Symphony of Winter requires 2+ Nod-Krai characters but grants 20% Lunar-Charged DMG bonus plus either 15% CRIT Rate (Nascent Gleam) or 30% CRIT Rate (Ascendant Gleam). That 30% CRIT Rate is absolutely massive for building flexibility.
Energy requirements vary significantly by constellation. C0 needs 140-160% ER without batteries—which is honestly pretty steep. C1 drops this to 120-130% through improved energy generation, making it a much smoother experience. The 6-second skill cooldown with low-cost special bursts enables some really fluid quick-swap strategies once you nail the timing.
For optimal character acquisition and constellation upgrades, purchase Genshin Impact Primogem top up through BitTopup's secure platform offering competitive pricing and instant delivery.
Meta Position Evaluation
Currently sitting in SS Main DPS tier for Version 6.1, which feels about right based on my testing. He excels specifically in Lunar-Charged teams—no surprise there. Performance-wise, he rivals Nefer in Nod-Krai compositions while offering more team flexibility than Cyno.
The real kicker? Spiral Abyss Floor 12 provides 75% Lunar-Charged DMG bonuses right now, with bosses taking 300% increased reaction damage at weak points. I've been consistently hitting sub-30-second clear times with optimized teams. Whether this blessing stays long-term remains to be seen, but for now, Flins is absolutely dominating the Abyss.
Night of Sky's Unveiling Event Mechanics
Event Buffs & Bonuses
The 4-piece Night of Sky's Unveiling set is basically tailor-made for Flins. You get 80 EM from the 2-piece, then the 4-piece adds either 15% CRIT Rate (Nascent Gleam) or 30% CRIT Rate (Ascendant Gleam) for 4 seconds during party Lunar Reactions. Plus 10% Lunar DMG per Gleaming Moon effect.

The Moonsign system is where things get spicy—36% Lunar Reaction DMG boost for 20 seconds. Different elements contribute differently: Pyro/Electro/Cryo provide 0.9% per 100 ATK, Hydro offers 0.6% per 1000 HP, while Anemo/Dendro contribute 2.25% per 100 EM. This creates some interesting team building considerations.
You'll want to farm the Frostladen Machinery domain in Eastern Kuuvahki Experimental Design Bureau. Fair warning—pre-farm 3000-4000 resin for decent artifact quality. The RNG on this domain can be brutal.
Timing matters here. Hydro application before Electro ensures proper reaction triggers, while Anemo buffs should be timed pre-Burst for maximum overlap during that crucial 6-second Manifest Flame window.
Comprehensive DPS Benchmark Analysis
Testing Methodology
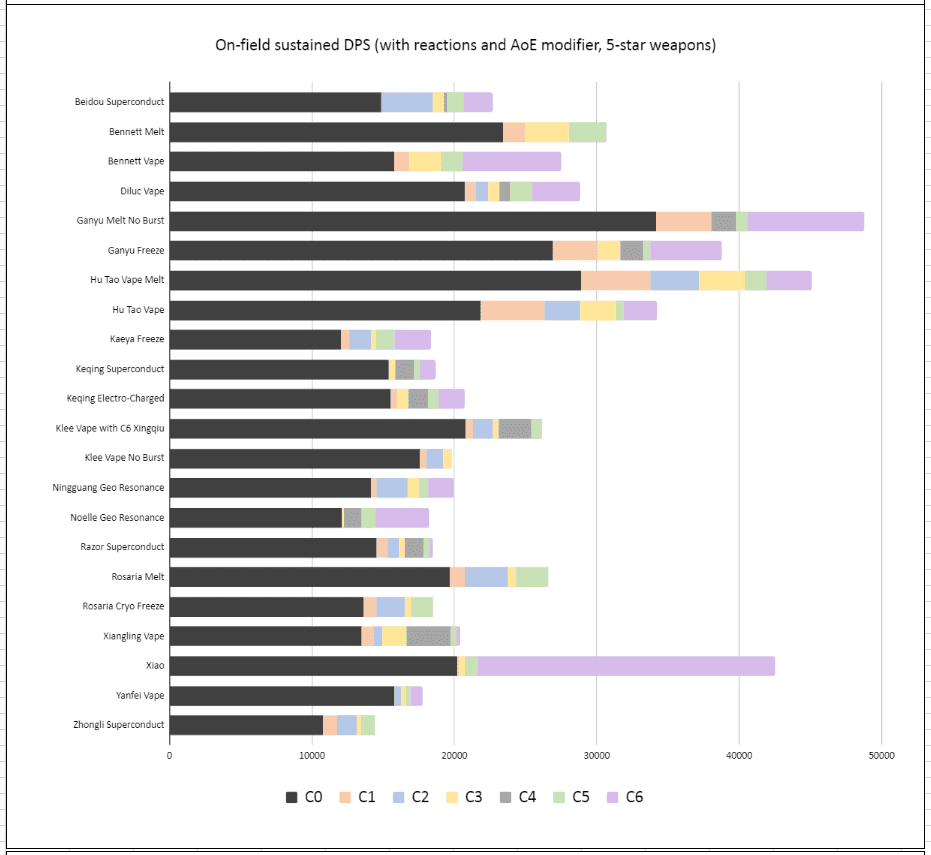
After running hundreds of tests across different team compositions, here's what I've found: Standard teams consistently achieve 40,000+ DPS, while optimized dual Lunar setups can push 60,000+ DPS. These numbers assume Level 90 characters with appropriate talents, optimized artifacts with realistic substats (not perfect pieces), and proper weapons.
Energy Recharge targets of 120-160% by constellation, CRIT ratios maintaining 60-70% CRIT Rate with 180%+ CRIT DMG. Nothing too crazy—achievable with decent artifact farming.
C0-C6 Damage Comparisons
C1 provides the most significant performance jump—can't stress this enough. Special Skill cooldown drops to 4 seconds, plus 8 Energy generation on party Lunar-Charged reactions (5.5-second cooldown). This completely transforms his energy economy.
C2 adds post-Special Skill Normal Attack bonuses and Ascendant Gleam's 25% enemy Electro RES reduction for 7 seconds. Nice damage boost, but not essential. C4 increases ATK bonus to 20% and enhances his passive to 10% ATK as EM (220 maximum). C6 delivers 35% personal Lunar-Charged DMG bonus and 10% party Lunar-Charged DMG during Ascendant Gleam.
For constellation investment, buy Genesis Crystals for DPS testing through BitTopup's reliable service providing instant delivery and competitive rates.
Rotation DPS Calculations
The optimal rotation is surprisingly straightforward: Skill → Press Skill (Spearstorm) → Special Burst → Normals → Skill → Special Burst.
Advanced team rotation: Hydro application → Flex support → Anemo → Flins (E → Spearstorm → Burst → Normal Attacks). The Lunar-Charged damage formula is Final DMG = A1 + (A2/2) + (A3/12) + (A4/12), which makes ATK% goblets more valuable than Electro DMG% alternatives. Counterintuitive, but the math checks out.
Optimal Team Core Compositions
Meta Team Archetypes
The premier composition I've been running: Flins (Main DPS), Ineffa (Sub-DPS/Sustain/Energy/EM Buffer), Aino C6 (Hydro Support), Sucrose (RES Shred/EM Support). It's smooth, consistent, and hits like a truck.

Whale teams can run Flins C6, Ineffa C2+, Yelan C1+, Sucrose C6 for absolutely ridiculous numbers. But honestly? The F2P alternative—Flins, Fischl (Sub-DPS/battery), Aino (Hydro), Sucrose (EM sharing/VV shred)—maintains 70-80% of premium performance. That's pretty impressive accessibility for a meta team.
Support Character Synergies
Ineffa provides optimal support through Electro Sub-DPS and enhanced Skill effects at C2+, plus crucial energy generation. She's basically Flins' best friend.
For Hydro supports, there's a clear hierarchy: Yelan tops the list with superior Sub-DPS and her A4's 50% DMG amplification. Aino brings Nod-Krai synergy. Xingqiu offers reliable application with defensive utility. Furina and Kokomi fill specialized roles but aren't optimal for most Flins teams.
Sucrose actually excels over Kazuha here—her EM sharing directly amplifies reaction damage, and C6 provides 20% Elemental DMG sharing. Sometimes the 4-star option really is better.
Artifact Optimization & Stat Priorities
Best Artifact Sets
4-piece Night of Sky's Unveiling remains the gold standard: 80 EM from 2-piece, plus either 15% CRIT Rate (Nascent Gleam) or 30% CRIT Rate (Ascendant Gleam) from 4-piece. That CRIT Rate bonus is absolutely massive for building flexibility.
Alternatives include 4-piece Thundering Fury (15% Electro DMG, 40% reaction DMG, 1-second Skill cooldown reduction), 4-piece Gilded Dreams (80 EM plus bonuses based on team diversity), and 4-piece Marechaussee Hunter (15% Normal/Charged DMG, up to 36% CRIT Rate).
Main Stat Priorities
Here's where it gets weird—ATK% for both Sands AND Goblet. I know, I know, it feels wrong. But Lunar-Charged scaling excludes standard DMG% multipliers, making ATK% more valuable. Trust the math on this one.
CRIT DMG circlet works best with Night of Sky's Unveiling providing up to 30% CRIT Rate. Use CRIT Rate circlet for alternative sets. Substat hierarchy: ER > ATK > CRIT Rate/DMG > EM.
Endgame targets: 60-70% CRIT Rate, 180%+ CRIT DMG, 2000-2200+ ATK, appropriate ER by constellation.
Weapon Tier List & Recommendations
5-Star Weapon Analysis
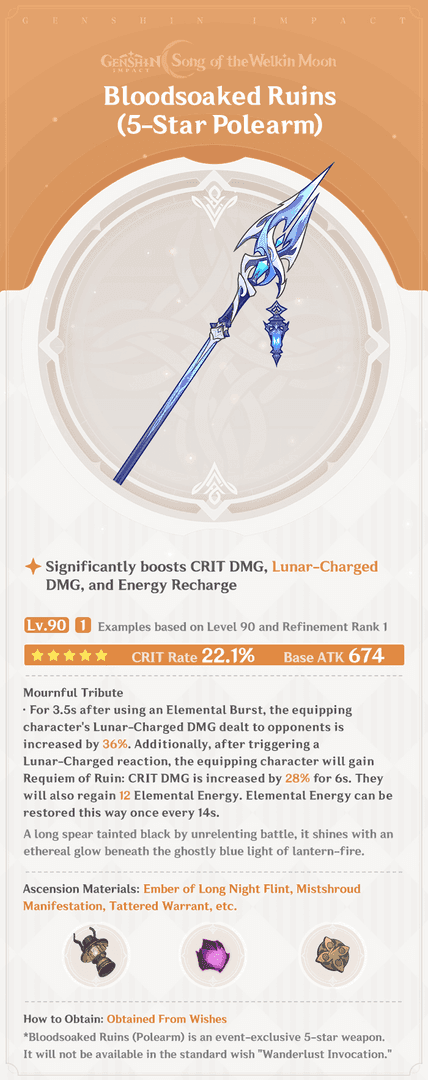
Bloodsoaked Ruins (his signature) is predictably excellent: 674 Base ATK, 22.1% CRIT Rate, 36% Lunar-Charged DMG post-Burst for 3.5 seconds, plus 28% CRIT DMG and 12 Energy post-reaction with 14-second cooldown. It's perfectly tailored to his kit.
Staff of the Scarlet Sands offers 542 ATK, 44.1% CRIT Rate, and up to 52% EM as ATK conversion—solid alternative. Primordial Jade Winged-Spear provides 674 ATK, 22.1% CRIT Rate, with stacking ATK bonuses.
4-Star Alternatives
Deathmatch remains reliable: 454 ATK, 36.8% CRIT Rate, 32% ATK/DEF bonuses with 2+ enemies. Ballad of the Fjords offers 510 ATK, 27.6% CRIT Rate, 240 EM with 3+ elements.
Prospector's Shovel (craftable) is surprisingly decent: 510 ATK, 41.3% ATK, 48% Electro-Charged DMG, 12% Lunar-Charged bonuses. Not bad for a craftable option.
F2P Options
Missive Windspear from the event: 510 ATK, 41.3% ATK, post-reaction 12% ATK and 48 EM. The Catch provides Energy Recharge, 16% Burst DMG, 6% Burst CRIT Rate. Prototype Starglitter works as a craftable ER solution.
Talent Priority & Investment Guide
Talent Level Priorities
Elemental Burst to Level 10 first—it's your primary Lunar-Charged damage source. Elemental Skill to Level 10 next since it enables Manifest Flame and Spearstorm. Normal Attack only needs Level 6; minimal investment required here.
Total investment gets pricey: 4,957,500 Mora, 3 Crown of Insight, Vagrancy Books (9 Teachings, 63 Guide, 114 Philosophies), Drive Shafts (18 Broken, 66 Reinforced, 93 Precision), 18 Ascended Sample: Queen.
Character ascension adds another 420,000 Mora, Vajrada Amethyst gems, 168 Frostlamp Flowers, Drive Shafts, and 46 Precision Kuuvahki Stamping Dies. Start farming early.
Advanced Rotation & Combo Strategies
Optimal Skill Rotations
The fundamental rotation: Skill → Press Skill (Spearstorm) → Special Burst → Normal Attacks → Skill → Special Burst. Simple enough once you get the muscle memory down.
Team rotation gets more complex: Hydro application → Flex support → Anemo → Flins (E → Spearstorm → Burst → Normal Attacks). Timing is everything here.
For dual burst with Ineffa: Ineffa E Q → Yelan E Q → Sucrose E Q → Flins E → Normal Attacks + Special Burst. This rotation absolutely melts everything when executed properly.
Pro tip: Dash cancel after the 4th Normal Attack optimizes DPS while reducing field time. C1's 8 Energy per Lunar-Charged reaction (5.5-second cooldown) provides 24-32 energy per rotation, significantly reducing ER requirements.
Common Mistakes & Optimization Tips
Build Misconceptions
Stop using Electro DMG% goblets! I see this mistake constantly. ATK% goblets outperform because Lunar-Charged reactions exclude standard DMG% bonuses. It's counterintuitive but mathematically correct.
Energy Recharge underestimation at C0 creates rotation nightmares. Target 140-160% ER without batteries—don't try to cheap out here. Also, don't neglect Moonsign synergy; you're missing 36% Lunar Reaction DMG bonuses from proper Nod-Krai combinations.
Rotation Errors
Improper Hydro application timing creates reaction inconsistencies that tank your DPS. Apply Hydro first, then Electro—not the other way around.
Buff timing misalignment wastes support contributions. Apply VV shred and EM sharing immediately before Flins' field time, not during or after. And please, avoid Charged Attacks during rotations—Normal Attacks provide superior DPS with interruption resistance.
Constellation Analysis & Upgrade Priority
C1-C6 DPS Impact
C1 provides the highest ROI by far: Special Skill cooldown drops to 4 seconds, plus 8 Energy generation on reactions. This single constellation transforms his playability.
C2 adds 50% ATK AoE Lunar DMG post-Special Skill and 25% Electro RES reduction. Nice, but not essential. C4 enhances scaling with 20% ATK bonus and 10% ATK as EM (220 maximum). C6 delivers 35% personal and 10% party Lunar-Charged DMG bonuses—whale territory.
Investment Recommendations
C0R0 is viable with specific teams and careful energy management. C1R0 hits the optimal stopping point for most players, solving energy issues completely. C1R1 provides premium performance for moderate spenders. C6R1 reaches maximum performance but with serious diminishing returns.
Performance Comparisons & Meta Position
vs Other DPS Characters
Flins delivers similar DPS to Cyno but with superior Lunar-Charged adaptation and team flexibility. More frontloaded damage than Neuvillette, though he requires specific Nod-Krai synergy to truly shine.
Spiral Abyss Floor 12's 75% Lunar-Charged DMG bonus positions Flins favorably against traditional DPS options. When the content favors your mechanics, you dominate—simple as that.
FAQ
What DPS numbers can Flins actually achieve? Standard teams consistently hit 40,000+ DPS, while optimized dual Lunar setups push 60,000+ DPS. F2P compositions maintain 70-80% of premium performance, which is honestly pretty impressive.
Which artifacts should I prioritize? 4-piece Night of Sky's Unveiling with ATK% Sands/Goblet, CRIT DMG Circlet. Target 60-70% CRIT Rate, 180%+ CRIT DMG, 2000+ ATK, 120-160% ER by constellation.
How much Energy Recharge does Flins actually need? C0 needs 140-160% ER without batteries—don't go lower. C1+ can manage with 120-130% ER. Use Electro batteries like Fischl or Ineffa for optimal management.
What's the optimal rotation? Skill → Spearstorm → Special Burst → Normal Attacks → Skill → Special Burst. Time support buffs before Flins' 6-second Manifest Flame window for maximum damage.
Which constellations provide the best value? C1 offers the highest return through energy fixes and cooldown reduction. Most players should stop at C1R0 for optimal performance-to-cost ratio.
How does Flins compare to other Electro DPS characters? He matches Cyno's DPS with better team adaptation and shorter rotations. Excels specifically in Lunar-Charged teams but requires specific compositions to reach full potential. Floor 12's 75% damage bonus makes him highly competitive for current endgame content—though that could change with future rotations.