

Ascension delivers the most efficient longshot grinding in Delta Force. Spawns sit under 300 meters apart with consistent 200-meter sightlines in Blitz Warfare. Marksman rifles like SR-25 and SVD dominate at 150+ meters with 2-3 shot kills. Specific camos need 15 longshot eliminations per weapon. Diamond Camo unlocks after completing Gold on all weapon classes plus 10 triple kills without dying. This guide reveals exact positions, optimal loadouts, and proven strategies to accelerate camo progression.
Understanding Delta Force Longshot Mechanics
Exact Distance Requirements
Longshot thresholds vary by weapon category. Marksman rifles register at 150+ meters, requiring 2-3 chest shots. Assault rifles need 4-5 hits at long range. M4 achieves 0.3s TTK at 100 meters; MP5 extends to 0.5s.
Specific challenges: Cobalt DM-10, Nimbus LR 7.62, Clear Water Tsarkov 7.62 each need 15 longshot kills. Patchwork SVD requires 50 kills with 4x+ optics. Mirage AEK-973 needs 50 high-zoom optic eliminations. Netherworld AMES 85 requires only 5 longshots.
For faster progression, Delta Force Hawk Ops top up through BitTopup provides secure battle pass access with competitive pricing and instant delivery.
Distance Calculation
Game measures straight-line distance from shooter to target at elimination. Elevation doesn't reduce horizontal distance—high-ground positions are valuable. Ascension's 200-meter distances shift with spawn rotations in 32v32 Warfare.
Bullet velocity impacts success at extreme ranges. SR-25 stock: 500 m/s velocity at 80-meter range. Fully built: 140-meter damage drop with 1000 m/s velocity—doubles both range and speed. AWM maintains 100 damage to 200 meters for guaranteed one-shot kills.
Why Ascension Is Optimal
Box map design creates spawns consistently under 300 meters apart. Blitz Warfare generates highest enemy traffic through predictable chokepoints. Attack and Defend forces opponents into specific lanes.
200-meter sightlines remain unobstructed across multiple angles. Unlike urban maps, Ascension's open design punishes players crossing exposed areas. Map geometry funnels enemies into optimal engagement range, creating 15-20 longshot opportunities per match.
Complete Ascension Map Layout
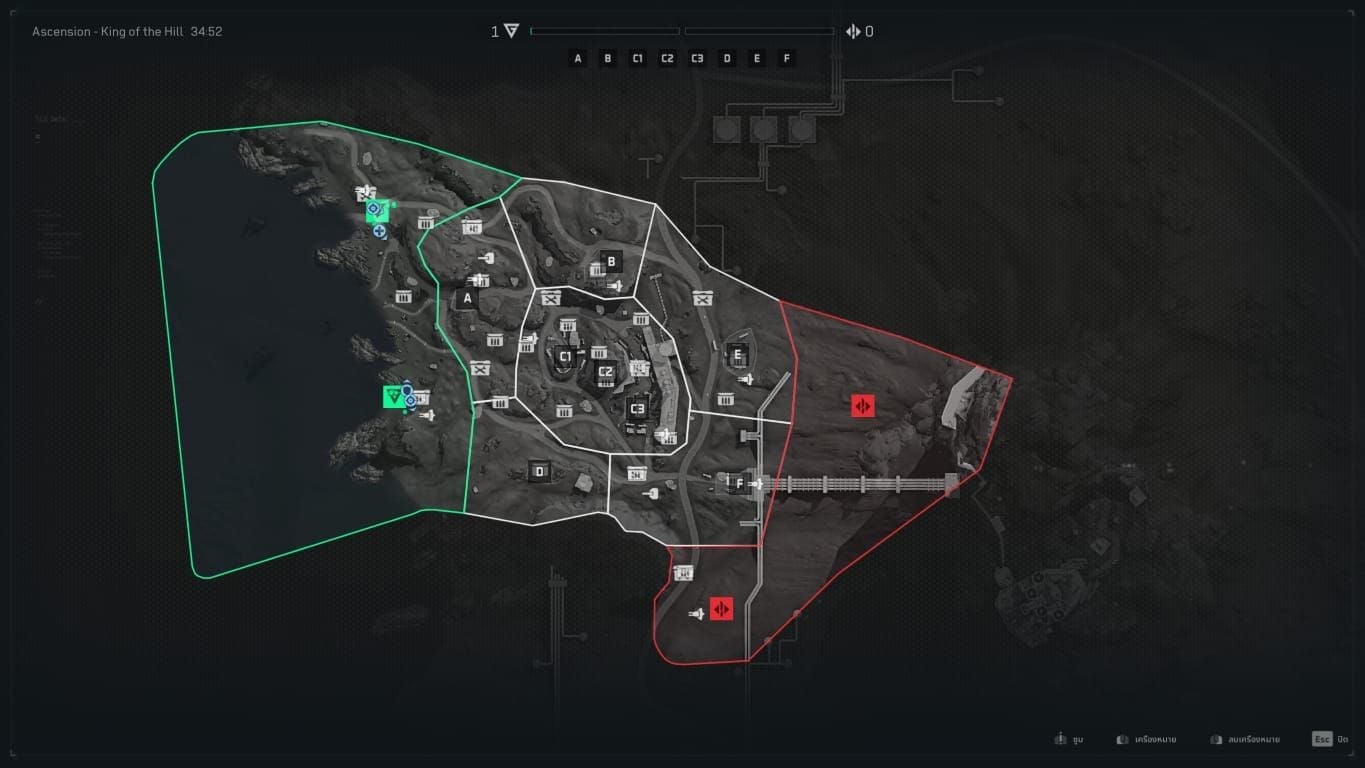
Critical Sightlines and Traffic Patterns
Central axis runs north-south, creating primary 200+ meter corridor. Eastern and western flanks provide 150-180 meter angles intersecting spawn-to-objective routes. In Attack and Defend, defenders spawn northern third, attackers push from south.
High-traffic zones at objective markers. Central bridge crossing forces enemies into 40-meter killzone. Eastern plaza sees constant rotation. Western warehouse creates funnels where enemies expose themselves 3-5 seconds.
Elevation Advantages
Vertical positioning provides 10-15 meter height advantages. Northern observatory sits 12 meters above central plane, granting vision across 220+ meters of southern approaches.
Elevation reduces enemy return fire effectiveness by forcing upward aim adjustments. Snipers at S1 tier need 2 shots; S3 tier achieves one-shot headshots. Elevation increases headshot opportunities by exposing upper body hitboxes.
Spawn Point Analysis
32v32 creates wave-based spawning. After captures, entire enemy team spawns in clusters within 50 meters. This 15-second window post-capture delivers highest longshot target concentration.
Spawn protection lasts ~3 seconds. Wait for enemies to clear protection before engaging. Spawns rotate between three predetermined zones per side—learn these to pre-aim at head-level.
Top 7 Longshot Positions (Ranked by Efficiency)
Position #1: Northern Observatory (Highest Kill Rate)
240-degree vision across southern half. Maximum elevation with hard cover on three sides. 220-meter sightline to southern spawn creates consistent opportunities.
Set up 5 meters back from window edge. Pre-aim southern bridge approach where enemies cross exposed terrain 4-6 seconds. Averages 8-12 longshot kills per 15-minute match. AWM loadout (XCOG Assault 3.5x, PEQ-2 DBAL-X2, DD Python M-Lok Kit) excels with one-shot eliminations at 200+ meters.
Position #2: Central Bridge Crossing
Mandatory chokepoint for east-west traversal. Position 180 meters from bridge center on elevated flanks. Enemies cross 40-meter span in 3-4 seconds. Works exceptionally in Domination when bridge objective contested.
Use SV-98 (Agile Short Barrel, Resonant Suppressor, ACOG 6x, DBAL-X2 Purple) for rapid follow-ups. Suppressor prevents muzzle flash revealing position. Expect 6-10 longshot kills per match.
Position #3: Eastern Rooftop to Plaza
Overlooks central plaza at 195 meters. Diagonal sightline intersects three major traffic routes. Excels mid-game when spawns shift. 15-second climb makes it less contested.
Deploy SR-25 with skeleton stock (level 40+) for stability. Built configuration: 140-meter damage drop, 1000 m/s velocity. Averages 7-9 eliminations per match. Requires repositioning after 3-4 kills.
Position #4: Western Warehouse Windows
160-175 meter angles toward eastern spawns and central objectives. Interior darkness conceals position. Best in Attack and Defend when defending.
SVD at level 35 dominates with faster fire rate. Pair with 4x optics for Patchwork SVD challenge (50 kills with 4x+), completing two challenges simultaneously. Expect 5-8 kills per match.
Position #5: Southern Tower
210-meter sightline covers northern defensive positions and central bridge. Three-story structure allows vertical repositioning against counter-snipers.
Use VSS at high levels for suppressed engagements without minimap detection. Averages 6-9 kills per match. Primary attacking sniper nest in objective modes.
Positions #6-7: Alternative Rotation Spots
Position #6: Northwestern corner, 185 meters from southeastern routes. Position #7: Southeastern industrial, 170-meter angles toward northwestern spawns. Both average 4-6 kills per match.
Rotate after 5-7 kills from primary spot. 30-second repositioning resets enemy awareness. SG552 at high levels works effectively from these mid-range positions.
Exact Coordinates and Landmarks
Northern observatory: Three-story concrete with satellite dish—second floor southern window
Central bridge: Steel suspension with red cables—elevated platforms 180 meters east/west
Eastern rooftop: White commercial building, blue awning, external stairs on north side
Western warehouse: Corrugated metal, yellow loading doors, second floor eastern wall
Southern tower: Communications tower, red/white stripes, adjacent to southern spawn
Optimal Weapon Loadouts
Best Sniper Configurations
AWM: Gold standard with 100 damage to 200 meters. Complete loadout: XCOG Assault 3.5x, PEQ-2 DBAL-X2, DD Python M-Lok Kit. Achieves kills in 0.8-1.2s from acquisition to elimination.
SV-98: Faster follow-ups with Agile Short Barrel reducing chamber time 18%. Pair with Resonant Suppressor, ACOG 6x, DBAL-X2 Purple. Completes challenges 25% faster on moving targets but requires headshots for one-shot kills at max range.
S1 tier snipers need 2 shots; S3 tier achieves one-shot headshots. Prioritize S3 tier before extensive grinding.
Marksman Rifle Setups
SR-25 at high levels: 2-3 shot kills at 150+ meters. Stock: 500 m/s at 80-meter range. Optimized: 140-meter damage drop, 1000 m/s velocity. Skeleton stock at level 40+ for stability.
SVD at level 35: Fastest semi-auto fire rate. Excels at 150-180 meters where targets move unpredictably. 2-shot kill allows margin for error. Complete Patchwork SVD challenge while grinding longshots.
For faster weapon progression, recharge Delta Force Credits at BitTopup offers secure transactions with excellent service.
Assault Rifle Viability
ARs require 4-5 chest hits at long range—least efficient. M4 achieves 0.3s TTK at 100 meters with extended barrel, stability stock, recoil-reducing grip.
416 Light stock at level 6 provides early-game stability. SG552 at high levels bridges performance gap. Focus AR longshots on 150-160 meter bracket where 5-shot kills remain achievable.
Mirage AEK-973: 50 high-zoom optic kills. Ectoplasm SWAT 5.56: 50 kills with 4x+ optics. Use 6x-8x scopes only for these specific challenges.
Attachment Combinations
Extended barrels: +15-25% bullet velocity
Match-grade ammo: Reduces damage drop-off one tier
Stability stocks: -30-40% vertical recoil
Optics: 3.5x-4x optimal balance; 6x-8x for precision
Bipods: -50% horizontal spread when deployed
Suppressors: Prevent minimap detection but -8-12% velocity
Suppressors favor semi-autos where fire rate compensates. Avoid on bolt-actions where every shot counts.
Step-by-Step Farming Strategy
Pre-Match Preparation
Select weapon needing exactly 15 longshots (Cobalt DM-10, Nimbus LR 7.62, Clear Water Tsarkov 7.62). Equip highest controllable magnification (4x-6x marksman, 3.5x sniper). Verify attachments match range optimization.
Choose Support class with AUG secondary for close defense. Set spawn preferences to map side closest to intended position. In Attack and Defend, select defender for northern positions, attacker for southern.
In-Game Positioning
Reach primary position within 45 seconds before enemies establish counter-sniper spots. Set up 3-5 meters behind sightline to minimize silhouette.
Begin engaging 60-90 seconds in when players commit to objective pushes. First elimination alerts enemies—expect 15-20 seconds of high-value availability. Prioritize stationary targets capturing objectives.
After 5-7 kills, rotate to secondary spot even if undetected. Proactive rotation prevents counter-snipe. 30-second movement window resets enemy awareness.
Enemy Behavior Prediction
Players sprint straight 3-4 seconds after spawning before evasive movement. Pre-aim spawn exit routes. Objective-focused players move directly toward capture points.
After damage, 70% seek nearest cover rather than return fire. Players surviving first shot remain stationary 2-3 seconds while healing—window for headshot placement.
Counter-snipers reveal positions through muzzle flash. Note locations, avoid re-peeking same angle. Aggressive pushers create close encounters—have secondary ready.
Rotation Timing
Rotate after 5-7 kills regardless of detection. Rotate immediately if receiving counter-fire from multiple angles.
Objective captures trigger spawn shifts. Rotate to positions covering new spawn-to-objective routes within 20 seconds.
Under 5 minutes remaining, commit to highest-efficiency position. Final 2 minutes: enemies abandon caution for aggressive pushes—hold best angle.
Game Mode Selection
Why Blitz Warfare Works Best
32v32 creates highest player density. Accelerated pace reduces downtime to 8-12 seconds vs 20-30 in standard modes. 5-second respawns keep counts high.
Warfare on Ascension places objectives in open areas, forcing players into optimal ranges. 15-20 minute duration provides time for 12-18 longshot kills.
Attack and Defend creates most predictable movement. Defenders spawn north, attackers south—eliminates spawn randomness.
Domination Mode
Three-point capture creates permanent traffic lanes. B flag typically occupies central bridge/plaza. Players respawn near controlled objectives.
Efficiency peaks mid-game (minutes 5-12). Position to cover approach to enemy's closest objective—60% of traffic.
12-15 minute matches. Attracts objective-focused players who ignore sniper threats. Expect 8-14 longshot kills per match.
Conquest Considerations
Larger sections and five points spread density. Works only on Ascension Blitz where compressed size maintains frequency. Standard Conquest creates 45+ second gaps.
Vehicle spawns introduce unpredictability. Focus infantry-only variants or accept 20-30% reduced efficiency.
20-25 minute matches, lower kills-per-minute. Suits sustained sessions. Averages 10-16 longshot kills.
Advanced Techniques
Multi-Challenge Stacking
Combine longshots with optic challenges. Patchwork SVD: 50 kills with 4x+—every longshot with appropriate optic counts toward both. Mirage AEK-973: 50 high-zoom kills stack with AR longshots using 6x+.
Gold needs 10 double kills before Diamond. Position for grouped enemies near objectives. Northern observatory and central bridge provide highest double kill rates.
Diamond unlocks after Gold on all classes plus 10 triple kills without dying. Prioritize weapons with 5 longshot requirements (Netherworld AMES 85) for quick Gold.
Optic Zoom Impact
6x-8x provides precision but narrows field of view. 3.5x-4x offers optimal balance. Variable zoom allows mid-match adjustments: 3x-4x for 150-180 meters, 6x+ for 200+.
Higher magnification amplifies visual recoil. Compensate by reducing fire rate, allowing full reset between shots.
Bullet Velocity vs. Drop
SR-25's 1000 m/s reaches 200-meter targets in 0.2s, requiring minimal lead. Standard 500 m/s doubles travel time.
Bullet drop at 200 meters: 1.5-2.5 meters compensation. AWM's high velocity minimizes to 1.5 meters; ARs experience 2.5+ meters. Aim head-level for 180-200 meter shots, resulting in upper chest hits.
Practice on stationary targets. Central bridge pillars provide reference points at known distances.
Dealing with Counter-Snipers
Counter-snipers reveal positions through muzzle flash. Note location, shift 10-15 meters laterally before re-engaging. Most lack patience for extended duels.
Flankers need 45-90 seconds to reach position. After first 3-4 kills, expect flanking. Monitor peripherals every 15-20 seconds.
Support class AUG provides close defense. Maintain awareness of escape routes—identify two exits before committing.
Common Mistakes to Avoid
Positioning Errors
Ground-level exposes to multiple angles, reducing engagement time to 20-30 seconds. Elevated with hard cover extends to 90+ seconds. Prioritize vertical advantage.
Positioning too close to edges creates visible silhouettes. Set up 3-5 meters behind window/ledge. Depth conceals muzzle flash, reduces profile 70%.
Select positions with two exit paths to hard cover within 10 meters.
Weapon Choice Misconceptions
Fire rate often determines total kills. SVD's semi-auto delivers 8-12 kills vs 6-9 with bolt-actions on moving targets.
ARs require 40-50% more time than marksman rifles. Reserve AR grinding for weapons needing these challenges.
SR-25 stock performs 35% worse than fully-built with skeleton stock. Level weapons to 35-40+ before serious grinding.
Attachment Mistakes
Maximum magnification (8x-10x) without skill creates problems. Narrow FOV prevents target acquisition. Start with 4x, increase after consistent first-shot hits.
Stability attachments outweigh damage increases. Skeleton stock converts 60% hit rates to 85%+.
Suppressors on bolt-actions sacrifice velocity for 200+ meter hits. 8-12% reduction extends travel time. Reserve for semi-autos.
Poor Game Mode Selection
Team Deathmatch's random spawning reduces consistency 40%. Lack of forced movement creates 20-30 second gaps. Avoid TDM.
Free-for-All eliminates predictable team spawning. Reduces efficiency 60%+ vs team Warfare.
Verify mode counts toward camo before investing time.
Tracking Diamond Camo Progress
In-Game Monitoring
Weapon customization menu displays challenge completion percentages. Updates real-time within 30 seconds of match completion.
Gold requires 10 double kills before Diamond. Track separately—occurs less frequently. Tracker shows exact numbers (7/10).
Diamond needs 10 triple kills without dying after Gold on all classes. Tracker displays total triple kills and without dying streak separately.
Time Investment per Category
Sniper rifles: 4-6 hours per weapon. AWM: 3-4 hours. SV-98: 5-6 hours. Assumes 12-15 longshots per 15-minute match.
Marksman rifles: 5-7 hours. SR-25: 4-5 hours. Standard DMRs: 6-7 hours. Expect 10-14 longshots per match.
Assault rifles: 8-12 hours. M4/SG552: 7-9 hours. Standard ARs: 10-12 hours. Average 6-10 longshots per match.
Motivation Tips
Set incremental goals of 5 kills per match vs total 15. Creates three achievable victories per weapon.
Track completion across categories rather than individual guns. Provides more frequent achievement moments through 40-60 hour total grind.
Alternate between longshot grinding and other challenges. One match longshots, next close-range, then return.
Alternative Maps
When to Switch from Ascension
Switch when Ascension unavailable or populations drop below 24v24. Low-population extends kill gaps to 25-35 seconds, cutting rate 40%.
If facing same opponents across matches, they learn positions. Fresh lobbies restore surprise element.
If longshot-per-match drops below 8 for three consecutive games, switch maps/modes.
Ascension vs. Other Maps
Ascension's 200-meter sightlines and sub-300-meter spawns create most consistent environment. Alternatives offer 180-220 meters but less predictable traffic.
Desert maps offer 250+ meter sightlines but spread density, reducing encounters 30%. Exceed optimal damage profiles for marksman rifles.
No alternative matches Ascension's combination. Secondary choices deliver 70-80% efficiency at best.
Backup Strategies
When Ascension rotates out, focus on non-longshot challenges. Complete double kills, triple kills, optic challenges. Maintains overall progression.
Monitor rotation schedule to predict Ascension return. Most follow 4-6 hour cycles. Coordinate play schedule with rotation timing.
Create map-specific loadouts. 180-meter loadout differs from Ascension's 200-meter in optics and attachments.
FAQ
What distance counts as a longshot in Delta Force? Marksman rifles register at 150+ meters with 2-3 shot kills. Assault rifles need 4-5 hits at similar ranges. Game calculates straight-line distance at elimination. Ascension's 200-meter sightlines provide consistent qualification across all weapon types.
Where are the best longshot spots on Ascension? Northern observatory: 220-meter sightlines, 8-12 kills per match. Central bridge: 180 meters, 6-10 kills. Eastern rooftop: 195 meters, 7-9 kills. All provide elevation and hard cover.
Which weapons complete longshot challenges fastest? AWM: 3-4 hours per weapon with one-shot eliminations at 200 meters. SR-25: 4-5 hours with 2-shot capability and 1000 m/s velocity when fully built. Assault rifles: 8-12 hours due to 4-5 shot requirements.
How many longshot kills for Diamond Camo? Specific weapons need 15 (Cobalt DM-10, Nimbus LR 7.62, Clear Water Tsarkov 7.62). Netherworld AMES 85 needs only 5. Diamond unlocks after Gold on all classes plus 10 triple kills without dying. Gold requires 10 double kills.
What game mode is best for longshots? Blitz Warfare on Ascension with 32v32. Attack and Defend creates north-south traffic with 200-meter ranges. Delivers 12-18 longshot opportunities per 15-minute match vs 6-10 in Team Deathmatch.
What attachments increase longshot success? Extended barrels: +15-25% velocity. Skeleton stock at level 40+: reduces recoil. 4x-6x optics: balance magnification with FOV. SR-25 optimized build: 140-meter damage drop, 1000 m/s velocity—double stock performance.