

Master Operations Mode meta with S-tier weapons like CI-19 and M4A1, proven attachment combinations, role-based strategies, and Season 6 updates reshaping tactical gameplay.
What's Actually Working in Operations Mode Right Now
Here's the thing about Season 6: War Ablaze – it completely flipped the script on how we approach loadouts. That suppressor rework on September 23rd wasn't just a minor tweak. We're talking +9% range bonuses and enhanced recoil reduction that's boosting survival rates by 15-20%.
The days of mindless rushing? Pretty much over. Smart positioning wins fights now.
S-tier weapons maintain those coveted 6%+ pick rates for good reason – they're genuinely dominant across multiple scenarios. A-tier stuff? Still solid, but you'll feel the trade-offs.
Quick note on progression: if you're serious about optimizing loadouts fast, Delta Force Gold recharge fast through BitTopup gets you instant access to premium attachments. Their pricing's competitive, delivery's instant, and the transaction security is solid.
Meta shifts happen quarterly with major seasons, plus monthly balance patches that keep things interesting. Mark your calendar – Season 7: Gizmo drops November 18th with more weapon adjustments incoming.
The S-Tier Weapons Everyone's Actually Using
Assault Rifles That Dominate
CI-19 Assault Rifle – 9.5% pick rate tells the whole story. This thing excels at long-range precision like nothing else. That 60-round drum magazine? Game-changer across all classes.
For long-range builds, use code6HLOANO09MFFCME3G7LT2. You'll get the New Leviathan Barrel pushing effective range to 55m, plus the CI-19 Newtype Stable Gas Block that makes recoil management almost trivial.
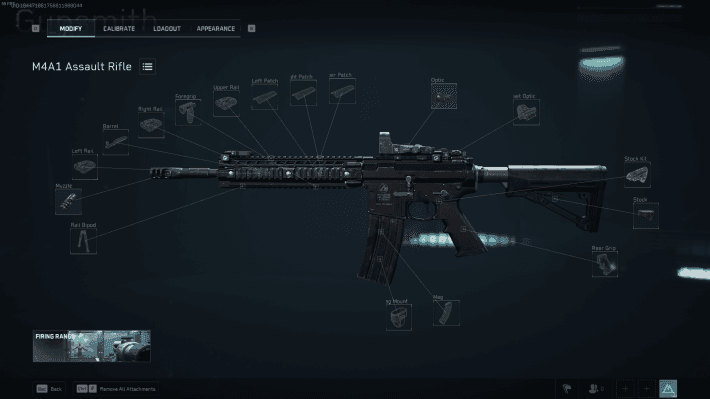
M4A1 Assault Rifle sits at 10.1% pick rate because it just works. 25 damage per round, 672 RPM, low recoil – it's the Swiss Army knife of assault rifles. Build code6FINC4G0CQTV1IBVCBQVT pairs the Sandstorm Vertical Compensator (+9 control) with a 45-round extended mag.
Honestly? If you're new to the game, start with the M4A1. The learning curve's much friendlier.
SMGs That Actually Matter
SMG-45 Submachine Gun owns close-quarters with a 6.1% pick rate and 40m effective range. Urban maps become your playground with that 40-round extended magazine.
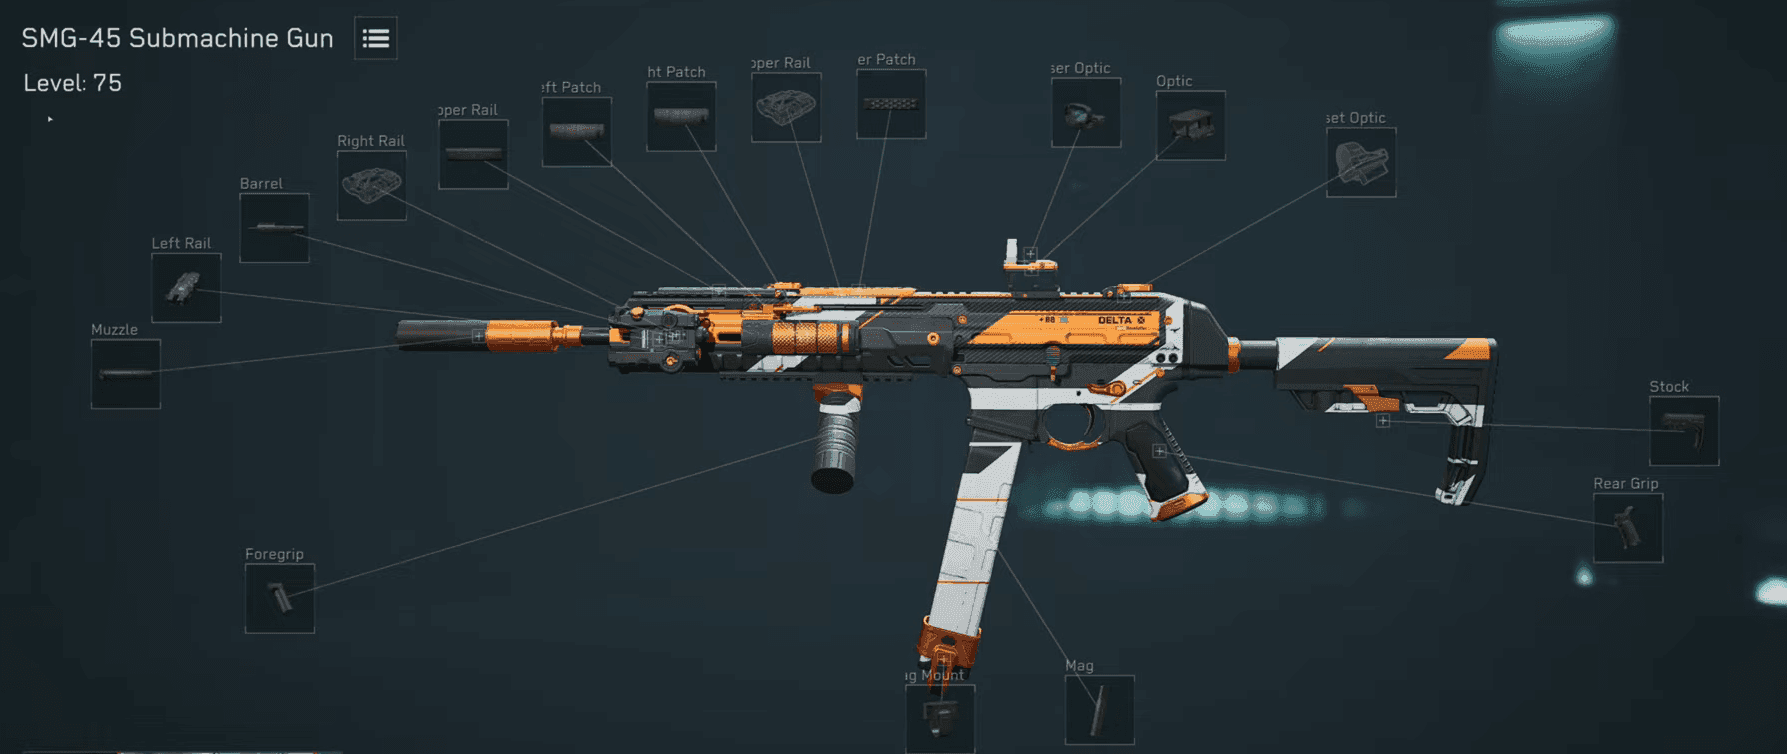
Meta build code6HLOBLC09MFFCME3G7LT2 includes the SMG Echo Suppressor – perfect for stealth ops and recoil reduction. Trust me, once you go suppressed SMG, regular builds feel clunky.
Sniper Rifles Worth Your Time
AWM Sniper Rifle delivers 100 damage with 200m effective range. One-shot elimination potential to the chest within 30m makes positioning crucial.
Build code6F50VEC0CH8TK2MI8PG7U features the Resonant Sniper Rifle Suppressor and AWM Skyline Long Barrel (unlocks at Level 35). Fair warning – this setup requires patience and map knowledge.
A-Tier: The Reliable Workhorses
M7 Battle Rifle offers four-shot kill potential with a 7% pick rate. High penetration handles about 80% of scenarios you'll encounter. Build code6HG788005KBR2BJ359PNA uses the Practical Long Barrel Combo (+10% range), but you'll need solid recoil management skills.
SCAR-H Assault Rifle hits for 40 damage per shot with a 3.8% pick rate. The recoil pattern's beginner-friendly, especially with the Beaver Long Barrel and Sandstorm Vertical Compensator via code6FFGJ500CQTV1IBVCBQVT.
SR-3M SMG serves as the budget option for close-range burst damage. Despite that 0.7% pick rate, it's viable with PBS Russian Suppressor and VSS 45-Round Magazine. Code6FFVV9O02IUUSDGSUS7DN if you're curious.
AS VAL Assault Rifle excels in stealth scenarios with its integrated suppressor (3% pick rate). The VSS Tsunami Long Barrel Combo enhances suppressed flanking via code6FIN6LS0CQTV1IBVCBQVT. Perfect for players who prefer sneaky approaches.
Building Loadouts by Role
Assault Class Philosophy
M4A1 or CI-19 for mid-range versatility makes sense here. Prioritize recoil control attachments, pair with D-Wolf for repositioning, focus on coordinated pushes. Stinger's healing synergizes beautifully with sustained firefights.
Support Role Thinking
SMG-45 builds excel when you're healing teammates in close quarters. That high RPM and 40-round magazine protects your squad during medical procedures. Position yourself 10-15m from engagement zones with clear escape routes.
Sniper Configurations
Master AWM fundamentals before attempting advanced techniques. That one-shot potential requires precise positioning and constant team communication. Pair with Luna for intel gathering and ambush setups.
Flex Player Setups
M7 Battle Rifle handles roughly 80% of scenarios with four-shot kill potential and high penetration. Requires consistent aim training and recoil pattern memorization, though.
Attachment Priorities That Actually Matter
What to Focus On First
1) Recoil control (Sandstorm Vertical Compensator gives +9 Control) 2) Optics matching your engagement range (Cobra for mid-range, OSIGHT for CQC) 3) Extended magazines (45-round for M4A1 is essential) 4) Laser accessories (DBAL-X2 for Tactical Stance benefits)
Don't stack similar benefits – diminishing returns hit hard. Resonant Ergonomic Grip provides +16% moving stability, while calibrated foregrips boost ADS speed by +4%.
Range Enhancement Strategies
New Leviathan Barrel extends CI-19 range to 55m. Practical Long Barrel Combo adds +10% range for M7. Always balance improvements against handling characteristics.
For premium modifications, cheap Delta Force Hawk Ops top up through BitTopup provides cost-effective access. Their secure payment system and 24/7 support make transactions smooth.
Map-Specific Weapon Choices
Close-Quarter Maps
Space City favors SMG-45 with suppressed attachments. That 40m effective range covers most distances, while high RPM provides excellent room-clearing capabilities. Coordinate with Luna intel for ambush positioning.
Long-Range Engagements
Brakkesh demands CI-19 or AWM for 55m+ engagements. The desert environment favors precision shooting with minimal cover available. Position at elevated locations with clear sightlines.
Mixed Combat Zones
Forest maps demand adaptability. Suppressed SR-3M excels in vegetation, but maintain backup options for clearings. During Wildfire Events, 30-40m fog visibility favors SMGs over long-range setups.
What Pro Players Actually Run
Tournament players gravitate toward CI-19 long-range builds with code6FIN5OG0CQTV1IBVCBQVT, featuring Resonant Grip for enhanced ergonomics. Luna + D-Wolf combinations let them adapt roles based on map characteristics.
Streaming personalities demonstrate Stinger synergy with aggressive playstyles – rapid healing enables sustained position holding.
Emerging strategies use EMP grenades from Raptor operators to disable enemy optics and laser attachments. It's a direct counter to laser-enhanced builds that's gaining traction.
Counter-Meta Strategies That Work
Against AWM teams: employ smoke grenades, rapid repositioning, multi-angle approaches. EMP grenades disable optics/lasers for aggressive pushes.
Against SMG-45 rushing: maintain 10m+ engagement distances, use M250 LMG suppression, coordinate overlapping fire from multiple teammates.
Budget SR-3M loadouts surprise opponents expecting meta weapons – cost-effective alternatives in stealth-focused strategies.
Your Progression Path from Noob to Competent
Phase 1 (Weeks 1-2): Complete tutorials, establish 15-minute daily aim practice. Master M4A1 with code6FINC4G0CQTV1IBVCBQVT. Focus purely on movement and recoil control.
Phase 2 (Weeks 3-4): Develop sprint-slide techniques, memorize recoil patterns. Practice in Hot Zone (3v3v3 no-loss) before jumping into Hazard Operations.
Phase 3 (Weeks 5-6): Master team communication through concise callouts, coordinate operator abilities. Learn landmark-based position sharing.
Phase 4 (Weeks 7+): Analyze professional content, track extraction rates/K/D ratios. Specialize in specific operators like Luna for reconnaissance.
Implement Tactical Stance mechanics using laser-activated recoil reduction. Test configurations in custom games before competitive deployment.
What's Coming Next
Season 6's suppressor rework increased survival rates 15-20% with enhanced recoil reduction and +9% range bonuses. Raptor operator introduction provides EMP capabilities that directly counter laser builds.
Season 7: Gizmo (November 18, 2025) introduces Engineer mechanics with crawler nests and exploding spider corrosion. SKS buffs are planned: base damage 44→48 for improved semi-automatic viability.
Here's my take: quarterly meta shifts require adaptable loadout libraries over single-weapon mastery. Versatile weapons like M4A1 and M7 remain relevant across updates.
FAQ
What are the best assault rifles for Operations Mode in 2025? CI-19 (9.5% pick rate) for long-range precision with 60-round capacity, M4A1 (10.1% pick rate) for balanced versatility and beginner-friendly recoil.
How do I import loadout codes? Gun Customization Station > select weapon > Preset > Import > paste code > confirm attachments > save.
Which weapons work best for close-quarters combat? SMG-45 with 6.1% pick rate and 40m range. Use code 6HLOBLC09MFFCME3G7LT2 with SMG Echo Suppressor.
What attachments should I prioritize for recoil control? Sandstorm Vertical Compensator (+9 Control), Resonant Ergonomic Grip (+16% moving stability), DBAL-X2 for Tactical Stance reduction.
How often does the weapon meta change? Quarterly with seasonal updates, monthly patches for fine-tuning. Season 6 (September 23, 2025) changed suppressors, Season 7 launches November 18, 2025.
What's the difference between S-tier and A-tier weapons? S-tier: 6%+ pick rates, excel across scenarios (CI-19, M4A1, SMG-45, AWM). A-tier: reliable performance with specific trade-offs (M7, SCAR-H, SR-3M).