

Chamet's AI face clarity system processes profile photos in 3-8 seconds, rejecting over 70% of submissions failing technical standards. Success requires: 720p minimum resolution, 40-60% facial frame coverage, half-length composition, strategic lighting. Optimal photos use 5-10 degree upward angles, Duchenne smiles with raised cheeks, daylight-balanced lighting at 5000-5500K. Proper execution with face verification boosts acceptance to 60-75%, while updates every 6-8 weeks maintain 20-30% higher approval consistency.
Understanding Chamet's Face Clarity AI Detection System
Chamet's automated system analyzes profile photos through multiple parameters within 3-8 seconds. The AI evaluates facial clarity, feature recognition, lighting quality, and composition simultaneously. Photos either meet all thresholds or trigger immediate rejection before human review.
The algorithm prioritizes facial feature visibility and natural appearance. Photos must display clear eye contact, recognizable facial structure, and unobscured features for identity confirmation. The system cross-references uploads against database patterns to detect excessive manipulation, poor quality, or policy violations.
For premium features, Chamet Diamonds recharge through BitTopup provides secure transactions and competitive pricing.
How Chamet's AI Analyzes Profile Photos
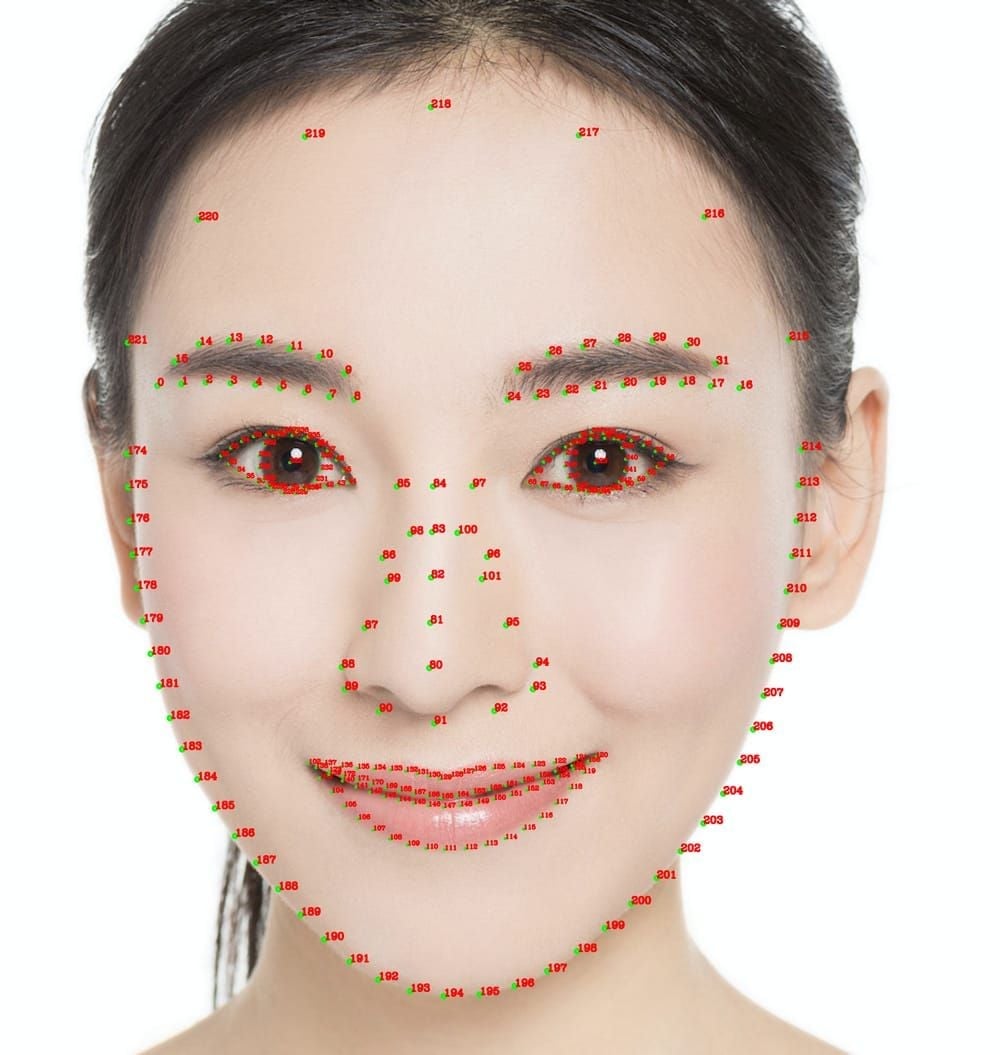
The system employs facial recognition mapping key points: eye position, nose bridge, mouth corners, jawline definition. It calculates frame space occupied by your face, requiring 40-60% coverage. Photos outside this range trigger automatic rejection.
Resolution analysis scans for minimum 720p (1280x720 pixels). The system flags images below this threshold as insufficient for mobile display, where 85% of Chamet usage occurs. High contrast between facial features and background improves detection accuracy.
The algorithm evaluates photo compression quality, accepting files between 500KB-2MB at 85-90% quality. Over-compressed images lose facial detail necessary for feature mapping, while excessively large files suggest unprocessed professional photos containing potential manipulation layers.
Key Detection Parameters
Facial clarity centers on sharp focus across all primary features. The AI measures pixel definition around eyes, which must show clear iris detail and natural eye shape. Blurred or softened eye areas from heavy beauty filters trigger rejection flags.
Lighting evaluation focuses on even illumination across facial planes. Optimal setup: key light at 45 degrees from one side at eye level, fill light opposite at 50% intensity. This eliminates harsh shadows while maintaining natural facial contours for feature mapping. Backlight positioned behind and slightly above adds depth separation.
Daylight-balanced lighting at 5000-5500K produces most consistent approval results. Ring lights positioned 12-18 inches from face at eye level create even illumination for close-up and mid-range shots. Golden hour natural lighting—60 minutes after sunrise or before sunset—provides soft, directional light working for 70% of outdoor situations.
Why the AI Rejects Photos
Group photos increase rejection rates by 40-60% because the AI can't reliably identify which person represents the account holder. Multiple faces confuse facial recognition mapping.
Extreme camera angles above 10 degrees or below eye level distort facial proportions beyond recognition parameters. The system expects 5-10 degree upward angles, creating natural perspective while maintaining accurate feature spacing.
Beauty filters smoothing skin beyond natural appearance eliminate micro-details the AI uses for authenticity verification. Filters removing all skin texture, reshaping facial structure, or adding artificial features like enlarged eyes trigger manipulation flags.
Common Reasons for Profile Photo Rejection
Technical specification failures account for most rejections. Photos from older smartphones often fall below 720p minimum, appearing pixelated during feature mapping. Files under 500KB indicate over-compression destroying facial detail.
Composition errors create the second-largest rejection category. Photos framing only face without shoulders lack context for half-length shot requirements. Full-body shots from distance reduce facial coverage below mandatory 40% minimum.
Verification system updates occur regularly, meaning previously approved photos may not meet current standards. Profile scores recalculate within 24-48 hours after updates, making refreshes every 6-8 weeks essential for maintaining 20-30% higher acceptance rates.
Excessive Beauty Filter Application
Heavy filter use remains the primary avoidable rejection cause. Filters dramatically lightening skin tone, slimming facial structure, or enlarging eyes beyond natural proportions create inconsistencies the AI flags as potential fraud. The system compares uploads against typical human facial ratios.
Skin smoothing filters eliminating all texture trigger specific detection algorithms identifying artificial manipulation. Natural skin displays pores, minor tone variations, and subtle texture the AI expects. Complete removal signals processing that may hide true appearance.
Color grading filters shifting skin tones toward unnatural hues—excessive pink, orange, or gray casts—fail color balance verification. The system expects skin tones within normal human ranges under standard lighting.
Poor Lighting and Resolution Issues
Underexposed photos create shadow areas where the AI can't map facial features. Dark regions around eyes, under nose, or along jawline prevent complete feature recognition. The system requires visible detail across entire face without significant shadow obscuration.
Overexposed images wash out facial contours and eliminate contrast necessary for feature mapping. Blown-out highlights on forehead, cheeks, or nose remove dimensional information the AI uses to verify face structure.
Low-resolution photos from older devices or heavily cropped images fail the 720p minimum. When users crop photos to adjust composition, they often reduce pixel dimensions below acceptable levels. Optimal 1080p (1920x1080 pixels) provides buffer room for minor cropping while maintaining clarity.
Obscured Features and Angle Problems
Sunglasses, masks, hats, or hair covering significant facial areas prevent feature mapping completion. The system requires clear visibility of eyes, nose, mouth, and jawline simultaneously. Even partial obscuration triggers rejection.
Side-angle photos showing only facial profile lack frontal feature arrangement necessary for verification. The AI expects direct eye contact with camera, requiring face-forward positioning. Three-quarter angles work only when both eyes remain clearly visible.
Extreme close-ups framing only chin to forehead exclude shoulder reference points the AI uses for composition verification. The system expects half-length shots framing from mid-torso upward.
Background Distractions and Policy Violations
Busy backgrounds with multiple people, text, or branded elements distract AI focus from facial features. The system performs best with clean, simple backgrounds providing contrast without competing visual elements.
Inappropriate content in backgrounds—alcohol, weapons, suggestive imagery—triggers policy violation flags separate from technical verification. The AI scans entire image composition, not just primary subject.
Inconsistent lighting between subject and background suggests composite images or heavy editing. The AI evaluates whether lighting direction and quality match across full frame.
Beauty Filter Strategies That Pass AI Verification
Strategic filter application focuses on subtle enhancement rather than dramatic transformation. Filters should enhance existing attributes—evening skin tone, brightening eyes, defining features—without altering fundamental facial structure or removing identifying characteristics.
Test filter effects before submission. Apply filters at various intensity levels and examine results at mobile screen size, where 85% of Chamet users view profiles. If filtered features appear noticeably different from natural appearance at thumbnail size, the AI will likely flag manipulation.
Natural lighting provides best foundation for minimal filter application. Photos captured in optimal lighting require less digital enhancement, reducing over-processing risk. Starting with quality source material allows filters to refine rather than rescue poor photos.
Optimal Filter Intensity (30-50% Range)
Moderate filter strength maintains facial authenticity while improving presentation. Keep adjustments between 30-50% to preserve natural skin texture and feature definition. This range smooths minor imperfections without creating artificial uniformity triggering rejection.
Skin smoothing should preserve visible pores and natural texture variation. Complete texture removal signals heavy manipulation, while moderate smoothing (35-45%) evens tone without eliminating identifying skin characteristics.
Eye enhancement filters work best at minimal intensity (25-35%) to brighten whites and define iris detail without enlarging eye size. Dramatic eye enlargement changes facial proportions beyond acceptable variance. Subtle brightening improves clarity for AI feature mapping.
Natural Enhancement vs Over-Processing
Natural enhancement preserves relationships between facial features while improving overall presentation. This includes subtle contrast adjustment to define features, minor exposure correction for even lighting, and gentle color grading achieving flattering skin tones within normal ranges.
Over-processing creates visual inconsistencies the AI identifies as manipulation attempts. Warning signs: perfectly uniform skin texture, unnaturally bright eye whites, exaggerated facial symmetry, or features appearing painted rather than photographed.
Compare filtered photos to unfiltered versions to identify over-processing. If you can't recognize yourself at first glance, or facial features appear significantly different in size, shape, or position, the AI will likely reject the image.
Filters That Maintain Feature Recognition
Portrait mode or background blur filters work well because they don't alter facial features directly. These effects separate subjects from backgrounds through depth simulation, improving composition without touching facial structure.
Color correction filters adjusting overall image tone perform better than selective facial editing. Global adjustments to warmth, saturation, or exposure affect entire image consistently, avoiding localized manipulation patterns the AI flags.
Lighting adjustment filters simulating better illumination work when applied moderately. Filters brightening shadows, reducing highlights, or adding fill light digitally can improve facial visibility for AI mapping.
Testing Filter Compatibility
Create multiple filtered versions at different intensity levels for comparison before submission. Export 3-5 variations ranging from minimal (20-30%) to moderate (40-50%) enhancement, then evaluate which maintains most natural appearance while improving presentation.
View filtered photos on mobile devices at profile thumbnail size to reveal how AI and users will see your image. Details visible on computer screens often disappear at mobile resolution, making heavy filtering more obvious.
For premium features, top up Chamet App through BitTopup offers fast delivery and secure payment options.
Step-by-Step Guide to Bypassing Face Clarity Check
Successful approval requires systematic preparation addressing all AI verification parameters simultaneously. Random attempts without understanding detection criteria result in 70%+ rejection rates. Strategic execution targeting specific technical requirements achieves 60-75% acceptance rates.
Verification begins before photo capture, with environment and equipment preparation establishing foundation for AI-compatible images. Proper lighting setup, camera positioning, and composition planning eliminate most common rejection triggers before shooting begins.
The AI processes photos within 3-8 seconds, but profile score recalculation occurs within 24-48 hours, extending to 72 hours during peak periods.
Pre-Photo Preparation
Position primary light source at 45 degrees from one side at eye level, using either ring light 12-18 inches from face or natural window light during golden hour. This angle creates dimensional modeling across facial features while maintaining even illumination.
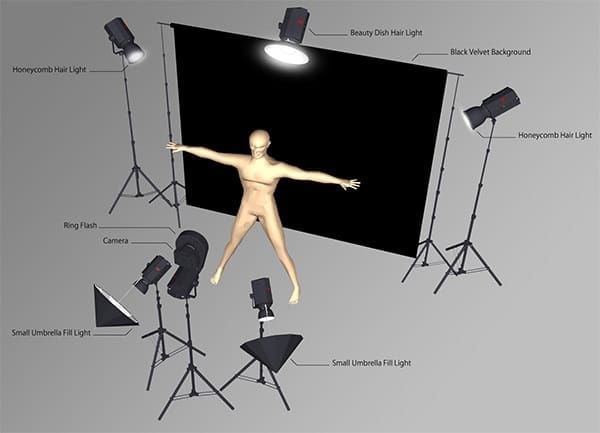
Add fill light opposite key light at approximately 50% intensity to soften shadows without eliminating them completely. A simple white reflector can serve as fill light by bouncing key light back onto shadow areas.
Set up clean, simple background 3-5 feet behind you ensuring proper separation and focus. Solid neutral colors—gray, beige, soft blue—work best, providing contrast without distraction.
Applying Beauty Filters with AI Detection in Mind
Capture base photo in optimal lighting before applying filters. Starting with high-quality source image reduces enhancement needed, minimizing manipulation triggering AI flags. Ensure unfiltered photo meets technical specs: 720p minimum, proper exposure, sharp focus.
Apply filters in layers, starting with global adjustments before facial-specific enhancements. Begin with overall exposure and color correction. Then add minimal skin smoothing (30-40%) and subtle eye brightening (25-35%) while checking that natural texture remains visible.
Export filtered photo at 1080p with 85-90% quality compression, creating files in 500KB-2MB range. Save in standard JPEG format with 4:5 aspect ratio (1080x1350 pixels) for optimal mobile display.
Photo Quality Verification Before Upload
Zoom to 100% magnification and examine facial features for maintained detail. Eyes should show clear iris patterns, skin should display visible texture and pores, facial contours should appear dimensional rather than flat.
View photo at mobile thumbnail size (approximately 150x150 pixels) to simulate how AI and users will see your profile. At this scale, excessive filtering becomes obvious through unnatural smoothness, color inconsistencies, or feature distortions.
Check that face occupies 40-60% of frame using rule of thirds grid. Position eyes in upper third of image, with face centered horizontally. Ensure shot frames from mid-torso upward, capturing shoulders and upper body. Verify direct eye contact and Duchenne smile showing raised cheeks.
Submission Timing and Review Process
Submit photos during off-peak hours when possible to potentially reduce 24-48 hour profile score recalculation period. While AI processes images within 3-8 seconds regardless of timing, lower platform traffic may accelerate full verification cycle.
Complete face verification immediately after photo approval to boost profile score by 25-30%. This verification requires nodding, blinking, mouth movements, and head shaking, processing within 24-48 hours (up to 72 hours during peak periods).
Monitor profile score changes within 24-48 hour recalculation window. If rejection occurs, wait at least 24 hours before resubmitting. Immediate resubmission with similar photos often results in repeated rejection.
Technical Requirements for Chamet Profile Photos
Meeting precise technical specifications eliminates most common rejection causes before subjective quality factors come into play. The AI applies hard thresholds for resolution, file size, composition, and facial coverage—photos failing any single parameter face automatic rejection.
Technical compliance creates foundation for successful verification, but doesn't guarantee approval alone. Photos must meet all specifications while presenting natural, clearly visible facial features the AI can map and verify.
Optimal technical execution provides buffer room for minor variations. Photos exceeding minimum requirements (1080p vs 720p, 60% vs 40% facial coverage) tolerate small imperfections better than those barely meeting thresholds.
Resolution and File Size Specifications
Mandatory minimum: 720p (1280x720 pixels) for acceptable clarity on mobile devices where 85% of Chamet usage occurs. Photos below this appear pixelated, preventing effective AI feature mapping.
Optimal resolution: 1080p (1920x1080 pixels) provides superior clarity with room for minor cropping or digital zoom without quality loss. This ensures facial features remain sharp even when viewed at full screen on modern smartphones.
File size requirements: 500KB-2MB balance image quality with upload efficiency. Files under 500KB suffer from over-compression destroying facial detail, while files exceeding 2MB suggest unprocessed images that may contain manipulation.
Acceptable Photo Formats and Dimensions
Standard JPEG format with 4:5 aspect ratio (1080x1350 pixels) optimizes for mobile profile display. This vertical orientation matches smartphone screens, ensuring proper display without awkward cropping.
Half-length composition framing from mid-torso upward provides context for facial positioning while maintaining focus on features. This includes shoulders and upper chest, giving AI reference points for body position and scale.
Facial positioning in upper third of frame following rule-of-thirds creates balanced composition. Eyes should align approximately one-third down from top edge, with face centered horizontally.
Facial Visibility Percentage Requirements
Face must occupy 40-60% of total frame area for optimal AI recognition. Coverage below 40% reduces facial features to sizes too small for accurate mapping, while coverage exceeding 60% creates extreme close-ups excluding necessary context.

Calculate facial coverage by comparing area from hairline to chin against total frame height, and ear-to-ear width against frame width. Face should span roughly half the frame in both dimensions.
Direct eye contact with camera lens ensures proper facial orientation for AI analysis. The system expects frontal face positioning with both eyes clearly visible and aligned horizontally.
Color Balance and Contrast Standards
Daylight-balanced color temperature at 5000-5500K produces natural skin tones the AI expects. Photos with excessive warm (orange/yellow) or cool (blue) color casts suggest heavy filtering or poor white balance.
Adequate contrast between facial features and background helps AI isolate and analyze your face. Low-contrast images where face and background blend complicate feature detection, while excessive contrast creates harsh edges appearing unnatural.
Even exposure across facial features prevents blocked shadows or blown highlights hiding detail. The AI requires visible information in all facial areas—eyes, nose, mouth, cheeks, forehead—simultaneously.
Advanced Techniques for Consistent Approval
Building comprehensive photo portfolio increases acceptance rates by 20-30% compared to single-image profiles. Optimal 5-photo gallery includes: one main face-forward shot, two lifestyle images showing personality, one full-body photo, one close-up.
Strategic photo diversity proves you're a real person rather than bot or fake account. Lifestyle shots frame from waist or mid-torso up in natural settings, while full-body shots frame head-to-toe in environmental context.
Regular profile updates every 6-8 weeks maintain 20-30% higher acceptance rates by demonstrating active account management and current appearance. The AI favors recently updated profiles.
Multi-Angle Photo Testing Strategy
Capture photos from optimal 5-10 degree upward camera angle at three different horizontal positions: straight-on, 15 degrees left, 15 degrees right. This creates subtle variety while maintaining proper facial orientation.
Photograph in three different lighting conditions: golden hour natural light, indoor ring light setup, diffused window light. Comparing results across lighting scenarios reveals which conditions best suit your features.
Create variations with different expressions while maintaining Duchenne smile showing raised cheeks and crow's feet. Subtle expression changes—slight head tilts, varying smile intensity, different eye engagement—provide options while keeping core facial features consistent.
Professional Photo Editing Tips
Edit in layers, saving each adjustment separately so you can reduce or remove excessive changes. Start with exposure correction, then color balance, followed by selective sharpening on eyes and lips. Add skin smoothing last at minimal intensity (30-40%).
Use frequency separation to smooth skin tone without destroying texture. This advanced method separates color information from detail, allowing you to even skin tone while maintaining pores and natural texture.
Apply selective sharpening to eyes, eyebrows, and lips to enhance facial features without over-sharpening skin. Increased definition in these key areas improves AI feature mapping while maintaining natural skin appearance.
Understanding AI Learning Patterns
The verification system updates regularly as it processes millions of photos, learning to identify new manipulation techniques and filter patterns. Photos approved six months ago may face rejection today as AI detection capabilities evolve.
The AI develops pattern recognition for specific filter applications, learning to identify popular beauty filter signatures. As filters gain widespread use, the system becomes better at detecting them.
Verification success correlates with overall profile quality signals. Accounts with completed phone verification (15% score boost), email verification (10% boost), and face verification (25-30% boost) receive more favorable photo review.
Seasonal and Lighting Variation Considerations
Natural lighting quality varies seasonally. Adjust shooting schedule to capture golden hour light year-round, which occurs at different times across seasons.
Indoor lighting becomes more critical during winter months with shorter daylight periods. Invest in quality daylight-balanced lights at 5000-5500K to replicate natural light conditions regardless of season.
Update profile photos seasonally to reflect current appearance and demonstrate active account management. Seasonal updates every 6-8 weeks align with optimal refresh schedule for maintaining 20-30% better acceptance.
Troubleshooting Repeated Photo Rejections
Persistent rejection patterns indicate specific issues the AI consistently flags. Analyzing which photos fail reveals whether problems stem from technical specifications, composition errors, excessive filtering, or policy violations.
Profile tier significantly impacts acceptance rates. Tier 1 profiles (Level 10 VIP with all verifications) achieve 70-75% acceptance with 3-8 minute match times, while Tier 4 profiles (incomplete, no verification) face under 50% acceptance with 45+ minute matches.
Face verification boosts profile scores by 25-30%, often tipping borderline photos from rejection to acceptance. The verification process requiring nodding, blinking, mouth movements, and head shaking confirms your photo matches live appearance.
Identifying Your Specific Rejection Pattern
Review all rejected photos for common elements—similar lighting, consistent filter application, repeated composition errors, or shared background types. Patterns reveal systematic issues in your photo creation process.
Compare rejected photos against technical specifications checklist: resolution above 720p, file size 500KB-2MB, 40-60% facial coverage, half-length framing, 5-10 degree upward angle, direct eye contact, Duchenne smile. Identify which specifications your photos consistently fail.
Test AI response to dramatically different photo styles. If filtered photos face rejection, submit unfiltered photo meeting all technical specs. If close-ups fail, try mid-range shots.
Resubmission Best Practices
Wait 24-48 hours between submission attempts to allow complete profile score recalculation. The AI may flag rapid resubmission of similar photos as suspicious behavior.
Make substantial changes between submissions rather than minor adjustments. If filtered photo fails, try unfiltered version. If indoor photo fails, submit outdoor shot.
Complete phone verification (2-3 minutes via OTP) and email verification before resubmitting photos. These quick verifications boost profile score by 15% and 10% respectively.
When to Try Completely Different Photos
After three rejections of similar photos, completely change your approach. Switch from indoor to outdoor lighting, change backgrounds, alter expression, or modify angle significantly.
Consider whether your natural features or typical expressions create AI recognition challenges. Some facial structures, skin tones, or feature combinations may require specific lighting or angles for optimal AI mapping.
Enlist help from friends or photographers familiar with portrait photography. External perspective identifies issues you may not notice—unflattering angles, distracting backgrounds, or subtle filter artifacts.
Contacting Chamet Support Effectively
Document rejection pattern before contacting support: number of attempts, photo specifications, verification status, specific error messages received. Detailed information helps support staff diagnose issues quickly.
Request specific feedback on why photos fail rather than general troubleshooting advice. Ask whether rejections stem from technical specifications, policy violations, or quality concerns.
Remain patient and professional in support interactions. Provide requested information promptly and implement suggested changes systematically.
Frequently Asked Questions
Why does Chamet keep rejecting my profile photo? Chamet's AI rejects photos failing technical specifications (below 720p resolution, improper 40-60% facial coverage, wrong composition), excessive beauty filter application removing natural skin texture, poor lighting creating unreadable shadows, or obscured facial features. The system processes photos within 3-8 seconds, automatically rejecting images not meeting all verification parameters.
What is Chamet's face clarity AI check? The face clarity AI check is automated verification analyzing profile photos for resolution quality, facial feature visibility, natural appearance, and composition standards. It maps key facial points including eyes, nose, mouth, and jawline, requiring clear recognition of all features simultaneously. Processing occurs within 3-8 seconds.
Can I use beauty filters on Chamet profile photos? Yes, but only at moderate intensity (30-50% range) maintaining natural skin texture and facial features. The AI accepts subtle enhancement evening skin tone and brightening features while preserving visible pores, natural contours, and authentic appearance. Heavy filtering creating uniform texture, reshaping features, or removing identifying characteristics triggers automatic rejection.
How long does Chamet photo approval take? Initial AI processing occurs within 3-8 seconds, issuing immediate acceptance or rejection. Profile score recalculation takes 24-48 hours, extending to 72 hours during peak periods. Face verification, which boosts approval rates by 25-30%, processes within 24-48 hours after completing required actions.
What photo quality does Chamet require? Minimum 720p (1280x720 pixels) resolution, optimal 1080p (1920x1080 pixels), file size 500KB-2MB at 85-90% compression quality, 4:5 aspect ratio (1080x1350 pixels), 40-60% facial frame coverage, half-length composition from mid-torso up, 5-10 degree upward camera angle, direct eye contact, and daylight-balanced lighting at 5000-5500K.
How to increase Chamet photo approval rate? Meet all technical specifications (1080p resolution, proper file size, correct composition), use moderate lighting with key light at 45 degrees and fill light opposite, apply minimal beauty filters (30-50% intensity), complete face verification for 25-30% profile score boost, maintain 40-60% facial coverage, update photos every 6-8 weeks for 20-30% better acceptance, and build 5-photo portfolio including face-forward, lifestyle, full-body, and close-up shots.
Ready to enhance your Chamet experience? Visit BitTopup for instant Chamet coin top-ups and exclusive deals. Power up your profile with premium features today!