

Blood Strike MENA Season 9 is live — and it's one of the meatiest updates in recent memory. The headliners are Striker ALONDRA (March 12, 2026), The Valley map (February 27, 2026), and a weapon balance pass that's genuinely reshaping ranked. S-tier has settled around Volt, Nacho, and Ran, but how you build around them has changed. Here's everything that matters, with official confirmations separated from community-observed trends.
What's Actually New — At a Glance
Season 9 isn't a single patch drop. It's a rolling content window that started late February and runs through April 2026. The Valley arrived first, ALONDRA followed two weeks later, and the Starship Cruise Strike Pass launched March 15. If you've been away even a few weeks, you're behind on multiple layers.
Returning Players: Do This First
Don't touch gacha until you've redeemed every active code and manually claimed your Strike Pass tiers — MENA servers have a known issue with automatic Pass reward delivery. Redeem MARCH21ST first, then BSTT2MPLAYERS, then TYSTRIKERS before running Hot Zone. That order matters: TYSTRIKERS stacks with Hot Zone for a 2.25x effective XP multiplier on Pass progression.
New Operator: ALONDRA
ALONDRA is the most mobility-focused Striker added in several seasons, and she's genuinely viable at launch — not just a cosmetic unlock. Her kit rewards aggressive solo play and punishes enemies who cluster in open ground.
Arc Snare (Primary): Throws a device that forms a spherical snare zone on impact. Enemies inside take damage and are slowed — strong for disrupting doorway pushes or forcing enemies off high ground. Punishes grouped squads more than isolated targets.
Jetpack (Passive): Hold jump while airborne to ascend using fuel. The tank replenishes on landing, so the ability resets between engagements. On The Valley's vertical terrain, this is a real advantage — she reaches high ground other operators simply can't contest without ziplines.
The combination is what makes her interesting. Arc Snare locks down a zone; Jetpack lets her reposition before the enemy recovers. Community testing confirms she's a strong solo-ranked pick, especially on The Valley.
How to Unlock ALONDRA
The Starship Cruise Strike Pass (520 Gold, March 15, 2026) is the primary path. At 520 Gold cost with a 520 Gold refund at Tier 50 after 50,000 XP, the Pass effectively pays for itself if you complete it — making ALONDRA free for disciplined players. If you're planning to grab the Pass, checking the Blood Strike MENA Gold top up cheapest price April 2026 before recharging can save real money on that 520 Gold entry cost.
Tier Placement
Community consensus puts ALONDRA in the aggressive solo-friendly category alongside Volt — she doesn't displace established S-tier, but she's a high-skill-ceiling pick that rewards fuel economy and Arc Snare placement. For squad play, Volt + ALONDRA + Kraken is emerging as a strong aggressive option.
The Valley: Drop Spots & Rotation
The Valley is built around vertical combat in a way Blood Strike's existing maps aren't. Ziplines, high-ground positions, and vertical climbs are core to how it plays — not optional routes.
Best Drop Spots
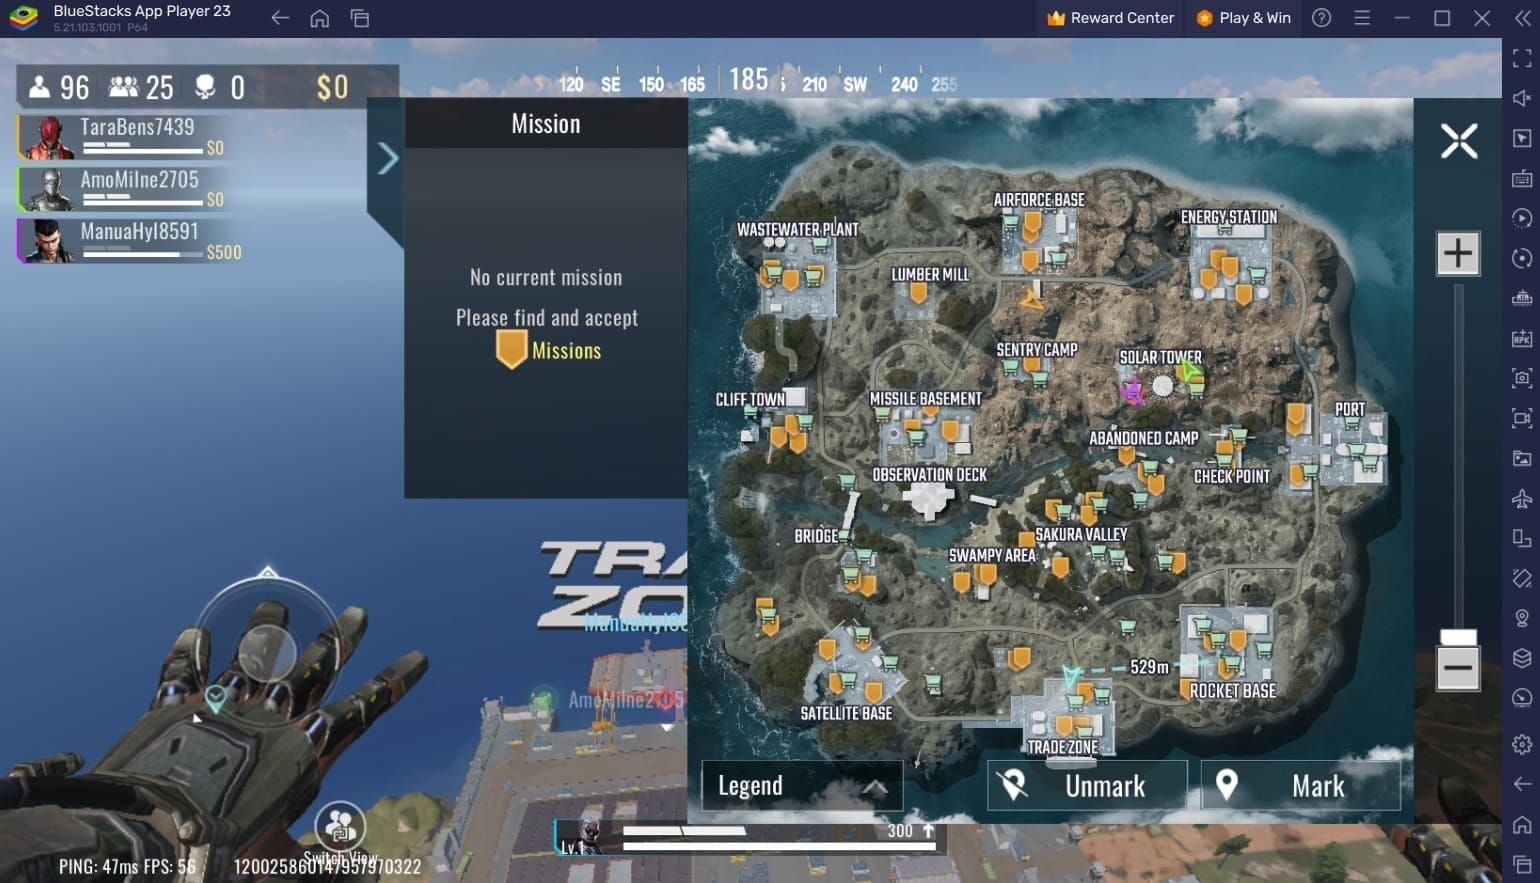
Swampy Delta looks tempting because it's isolated — but that isolation works against you. You'll win the drop fight and spend the next two circles pushing uphill with no zipline access.
Rotation Timing
The Valley punishes late rotators. Move to side-paths or stairways roughly 30 seconds before zone shift — not when it's already closing. Central warehouses are multi-angle flank traps if you're caught in the open; use them as ambush positions, not transit corridors. Port, Outskirt Warehouses, and Rocket Base are the three high-ground positions worth contesting. Secure one early and use ziplines to hold it. ALONDRA's Jetpack makes her the best operator for these spots — she can reposition vertically when flanked.
Weapon Balance: What Changed
Season 9's weapon changes are targeted, not sweeping. But a few of them matter a lot.
MP7 hipfire damage: 34 → 44. That's a 29% jump. It's now a legitimate close-range threat rather than a panic option, and it directly benefits aggressive operators like Volt and ALONDRA who are frequently in hipfire range during pushes.
New weapons added:
Thompson SMG — 100-round drum magazine; changes how you approach sustained warehouse firefights where reloading at the wrong moment gets you killed
S868 Shotgun — close-range specialist
M82 — long-range option
Bizon SMG — added December 15, 2025, now fully integrated into Season 9 loot tables
Weapon Tier Summary
Season 9 Meta: What MENA's Top Players Are Running
The meta has consolidated around area-denial and mobility — exactly what The Valley rewards. This isn't coincidence; the map and meta are designed to push players toward vertical control and zone disruption.
S-Tier Operators
Volt is still the best aggressive pusher in the game. His EMP deals 40 armor damage in a 40-meter radius. Coursing Currents adds +50% ADS speed and +10% movement speed — compounded with the MP7 buff, that's an oppressive push package.
Nacho is the squad map-control anchor. Hellfire creates a 30-meter long, 4-meter high wall that disrupts vision for 20 seconds and blinds enemies for 1.5 seconds on contact. His Penitent Effect passively detects enemies below 40% HP within 66 meters — he knows when to push without guessing.
Ran is the ranked defense specialist. Ice Barrier at 1,000 HP blocking damage for 25 seconds is the highest-value defensive ability in the game right now. Cryomancy adds +30% shield recovery in a 30-meter radius for the whole squad. In ranked, where surviving the final circle matters more than kill count, Ran is irreplaceable.
Squad Compositions
The Nova + Volt pairing deserves specific attention: Nova's Toxic Grenade (7-meter radius explosion plus persistent poison) combined with Volt's EMP creates an armor-strip-then-retreat-denial combo that's extremely hard to counter without a Ran barrier. Nova's Poison Master passive makes her immune to her own poison and applies it to ammo — she maintains pressure while Volt clears armor.
What's No Longer Viable
Pure passive camping is significantly weakened by Wildcard mechanics. The Damage Amplifier Wildcard (+25% damage vs. enemies below 50% HP) means sitting in cover and healing actively punishes you — the moment you drop below half health, every enemy with this Wildcard hits harder. Fortified Armor (+20% damage reduction) rewards players who push through damage rather than retreating.
Battle Pass: Rewards & XP Farming
Two active passes this window: Lava Realm (ending March 28-30 GST maintenance) and Starship Cruise (March 15 onward). Both cost 520 Gold, both refund 520 Gold at Tier 50.
Lava Realm Pass Highlights
Fastest XP Routine
Redeem TYSTRIKERS (24-hour XP boost)
Run Hot Zone immediately — stacks for 2.25x effective multiplier
Target 2,250 XP per session
Manually claim Pass tiers after each session — don't rely on auto-delivery on MENA servers
At this pace, 30,000–50,000 XP for Tier 50 is achievable within the season window at 45–60 minutes daily. And don't forget: Timed Gold from the Pass refund expires. Convert it or spend it on Pass/Wildcards at least 24 hours before any scheduled maintenance.
F2P Gold: Realistic Numbers
Active Codes — April 2026
Redeem in the Event tab → megaphone icon → ALL CAPS, no spaces → Confirm:
MARCH21ST — 3 Geometric Skin Chests (~300–500 Gold equivalent) — redeem first
BLOODSTRIKEFB — 100–300 Gold + skins — active early-to-mid April
TYSTRIKERS — 90–150 Gold + 24h XP boost — use before Hot Zone
BSTT2MPLAYERS — 10 Gold Stash Vouchers (~900–1,500 Gold value)
5MSTRIKERS — MP155 Chrome Gun Skin (Level 5 account required)
BSREWARD10K — conflicting reports: some sources cite 200–800 Gold, others report 10K Currency from a December 2025 version; expiry unconfirmed — attempt redemption but don't count on it
Requirements: Level 5+ account (8–12 matches), one-time per account, daily redemption cap of 3–5 resets at 00:00 UTC.
For players who want to accelerate beyond F2P limits — particularly for the SCAR Stellar Ultra skin (8,000–12,000 Gold, no-rerun window March 6–30) or stacking Wildcards — buy Blood Strike MENA Gold discount Season 9 recharge offers competitive rates for MENA players who need to top up efficiently.
The Wildcard Economy: What Most Guides Miss
Wildcards aren't just passive buffs — they have a death-drop mechanic that changes squad positioning decisions. When you die, one equipped Wildcard drops randomly for enemies to loot. Running three Wildcards isn't always optimal; you're potentially gifting the enemy team a Damage Amplifier mid-fight.
Experienced MENA ranked players are deliberately running two Wildcards and leaving the third slot empty to minimize what they hand over on death. Wildcards cost 3,000–40,000 Gold depending on tier, so the economy decision matters. Damage Amplifier is the highest-priority pickup — it directly counters heal-and-hold. Fortified Armor is better if you're running an aggressive composition where you expect to absorb damage during pushes.
One more thing: don't gacha before you have 100 Gold Stash Vouchers accumulated. Community data shows duplicate rates exceed 50% before the pity threshold, and the pity Ultra at 100 pulls averages 6,000–7,500 Gold total spend. For no-rerun skins like the SCAR Stellar, direct purchase beats gacha math every time.
Season 9 Game Plan Checklist
Operator:
Solo-ranked → Volt or ALONDRA
Squad-ranked → Volt anchor + Ran defense + Nacho control
Objective-focused → Nacho + Nova + Emma
Weapons:
Replace your CQC secondary with the buffed MP7 — 34 to 44 hipfire damage isn't marginal
Run Thompson SMG for warehouse/indoor fights on The Valley
Map:
Drop Village Center or Cliffside Outpost
Rotate 30 seconds early, not when the zone forces you
Use ziplines aggressively — faster than any ground rotation
Economy:
Redeem all codes before spending a single Gold
Manual-claim Pass tiers every session
Spend Timed Gold before permanent Gold, always before maintenance windows
Don't gacha until you have 100 Stash Vouchers
FAQ: Blood Strike MENA Season 9
What are the new operators in Season 9? ALONDRA, released March 12, 2026. Arc Snare creates a spherical damage/slow zone; Jetpack passive enables vertical mobility. Unlockable via the Starship Cruise Strike Pass (520 Gold, March 15).
Which weapons got buffed? MP7 hipfire damage went from 34 to 44. New additions: Thompson SMG (100-round drum), S868 Shotgun, M82, and Bizon SMG (now fully in Season 9 loot tables).
Is there a ranked reset in Season 9? No specific ranked reset announcement is confirmed for Season 9 on MENA servers. Check official Blood Strike patch notes directly rather than relying on community speculation.
Fastest way to level the Battle Pass? Redeem TYSTRIKERS, then immediately run Hot Zone — 2.25x effective XP multiplier. Target 2,250 XP per session, manually claim tiers. At 45–60 minutes daily, Tier 50 is achievable within the season window.
Best drop spot on The Valley? Village Center for squads (high loot, central position), Cliffside Outpost for solos (elevation, defensible). Avoid Swampy Delta — low loot and no rotation access make it a trap regardless of how isolated it looks.
Is the Strike Pass worth buying? Yes, if you complete it. Both passes cost 520 Gold and refund 520 Gold at Tier 50 — effectively free for players who hit the XP threshold. Starship Cruise also unlocks ALONDRA, which adds value well beyond cosmetics.
The players dominating MENA ranked right now aren't running anything exotic. They're on Volt/Ran/Nacho with the buffed MP7, dropping Village Center or Cliffside Outpost, and managing Gold carefully enough to stack Wildcards without touching gacha prematurely. Get those fundamentals right before experimenting with ALONDRA or the new weapons — you'll climb faster than players chasing shiny additions without a plan.