

Quick Answer: Tenacity provides 20% ATK buffs, Instructor offers 120 EM for reactions, Scroll delivers 40% Elemental DMG for Natlan characters. Choice depends on team composition and damage scaling.
Support Artifact Mechanics
Here's where things get interesting. Support artifacts don't just add numbers—they fundamentally reshape how your team operates. ATK scaling multiplies your base ATK (which is why Bennett's buff feels so good), EM enhancement creates exponential reaction damage curves, and direct damage amplification hits your final output like a freight train.
The math gets spicy when you start stacking these effects. ATK% buffs hit diminishing returns fast—trust me, I've seen too many players stack four ATK% sources and wonder why their damage plateaued. EM buffs? They scale exponentially in reaction teams, which is why Kazuha feels broken. Elemental DMG buffs multiply your final output but stack additively with each other.
Timing matters more than most guides admit. Tenacity needs those 3-second refresh cycles, Instructor gives you an 8-second window (use it wisely), and Scroll extends a generous 20 seconds with that juicy 40% bonus potential.
For reliable Genesis Crystals during artifact farming, BitTopup offers competitive pricing and instant delivery. Understanding the refund policy Genesis Crystals secures your artifact optimization investment.
Tenacity of the Millelith
Set Effects: 2-piece grants 20% HP. 4-piece triggers 20% ATK and 30% Shield Strength for 3 seconds when skills hit opponents.

Refreshes every 0.5 seconds and works with off-field damage—this last part is crucial.
Optimal Users: Zhongli's pillar resonance procs this constantly. Kuki Shinobu's ring hits every 1.5 seconds. Fischl's Oz is basically a Tenacity machine. Kokomi's jellyfish pulses reliably. Layla's projectiles fire frequently enough to maintain uptime.
The catch? Your skills need to hit at least once every 3 seconds. Diona struggles in single-player content but becomes viable in co-op where enemies cluster better. (Personal observation: I've seen too many Diona mains frustrated by inconsistent procs in overworld.)
Instructor Set
EM Mechanics: 4-piece delivers 120 EM team-wide for 8 seconds after reactions, plus 80 EM from 2-piece.
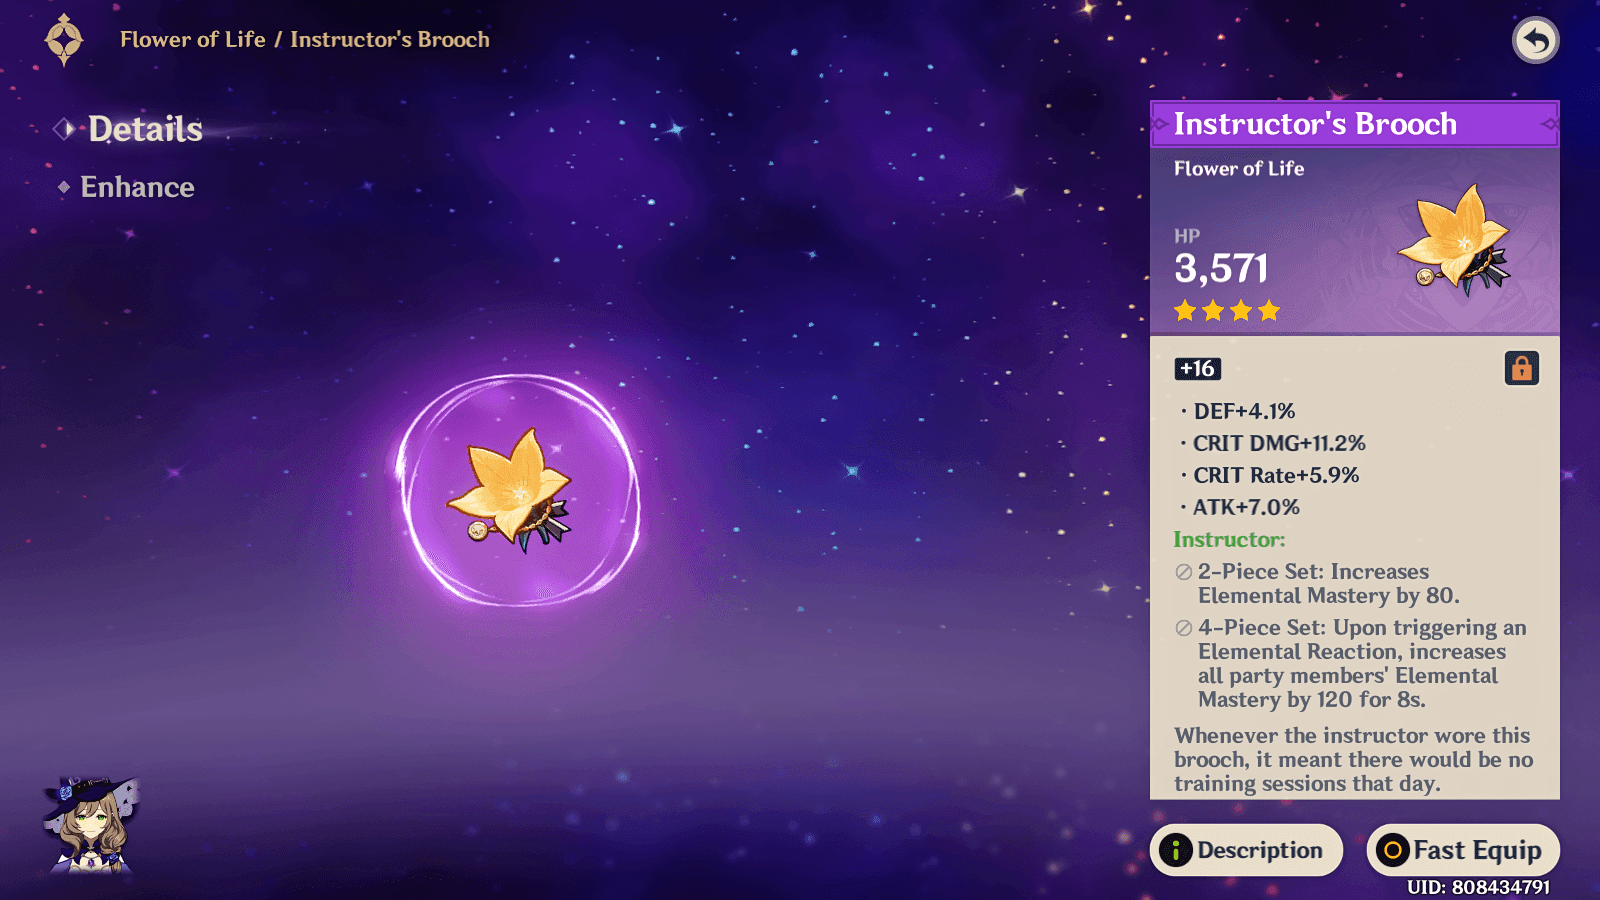
That's 200 total EM for the wearer—not shabby for a 4-star set.
Here's the thing about Instructor that most guides miss: it requires on-field activation with strategic swap timing. You can't just slap it on a character and forget about it.
Optimal Teams: Vaporize Bennett is the classic choice. Hyperbloom Kuki makes excellent use of both the personal EM and team buff. Melt teams with Collei or Dendro Traveler benefit enormously. Bloom variants with Lisa or Sucrose create reaction cascades.
Despite the 4-star stat limitations, that 120 EM team buff often outweighs the stat sacrifices. Energy Recharge becomes your lifeline since you're losing substats.
Scroll of the Hero of Cinder City
Revolutionary System: 12% Elemental DMG for 15 seconds after reactions. But here's where it gets wild—Natlan characters in Nightsoul's Blessing gain an additional 28% for 20 seconds.
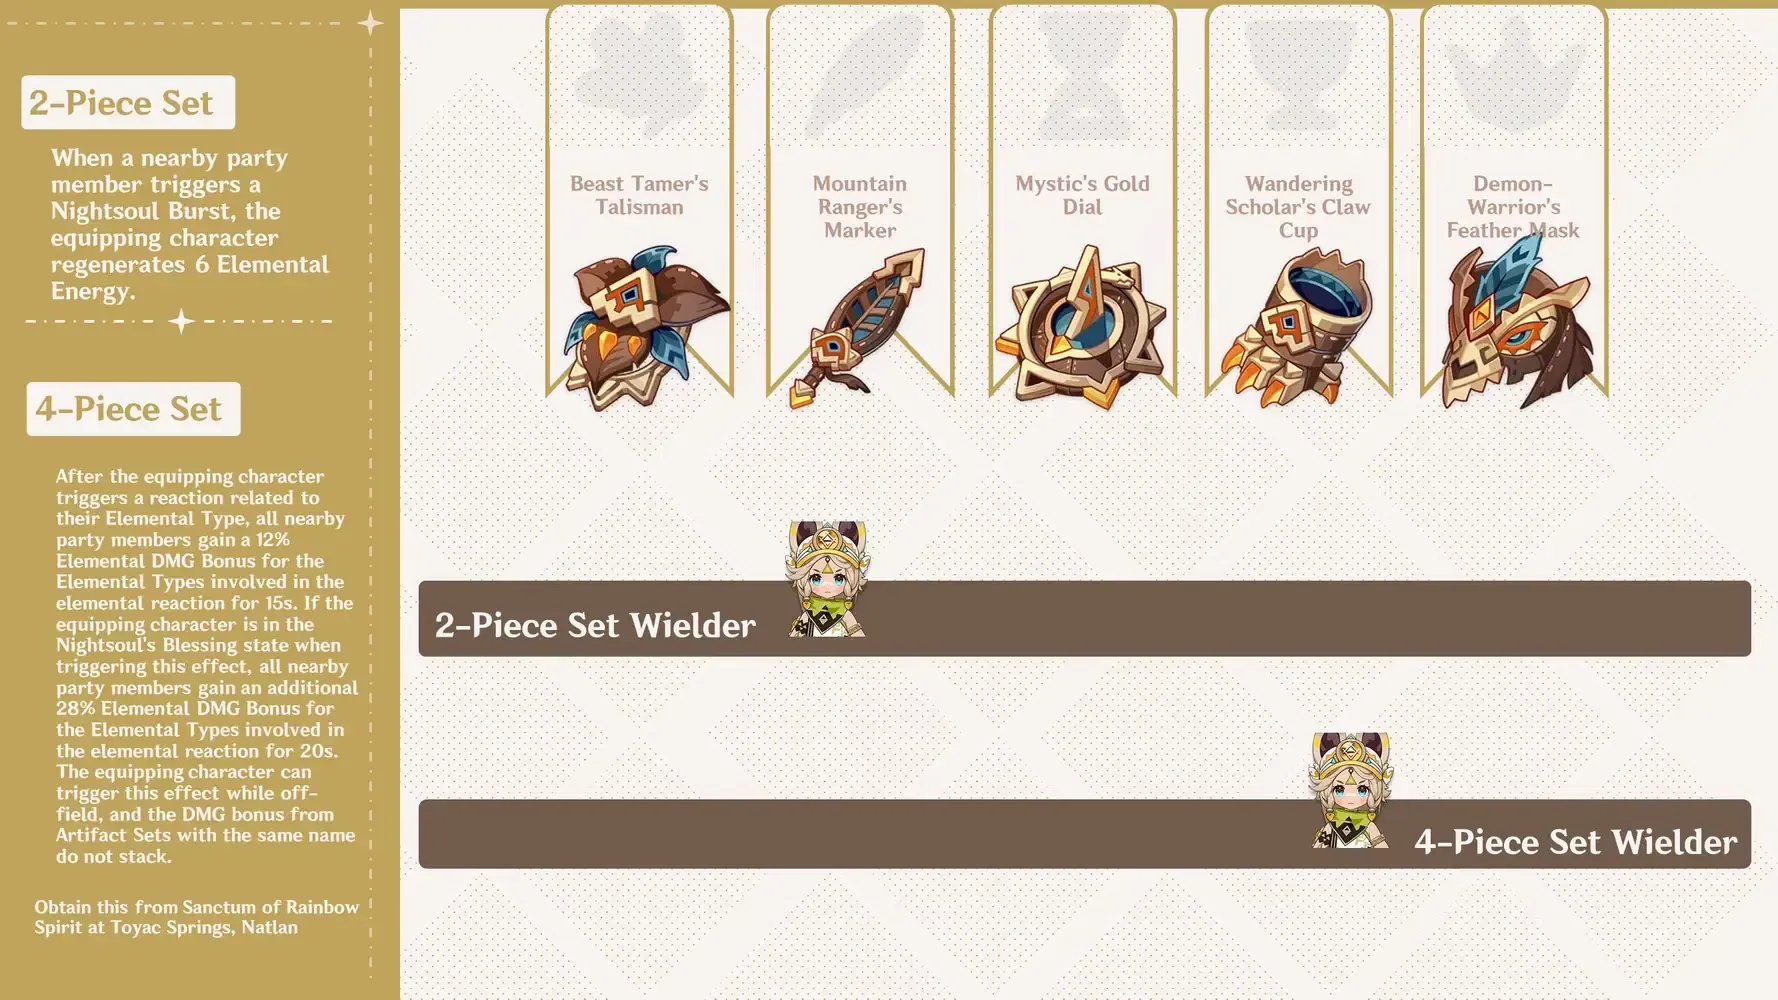
That's 40% total.
The 2-piece regenerates 6 Energy from Nightsoul Burst triggers, which sounds minor but adds up during rotations.
Natlan Synergy: Kachina triggers consistent reactions. Xilonen brings Geo resonance into the mix. Citlali scales with both Cryo and EM. Ororon provides Electro support. Mavuika works as both DPS and support hybrid.
Non-Natlan characters only access the 12% bonus, which feels limiting. The community's already ranking this SS-tier, rivaling Viridescent Venerer's 40% resistance shred. Bold claim, but the math checks out.
When encountering charging issues during farming, troubleshoot Genshin top up through BitTopup's support system for minimal downtime.
Performance Analysis
Let's talk numbers. Scroll's 40% Elemental DMG typically outperforms 20% ATK buffs by 15-25% in most scenarios. Why? Different buff types stack multiplicatively—this is fundamental team building.
Uptime rankings tell the real story: Scroll (20s) > Instructor (8s) > Tenacity (3s refresh required).
Situational Advantages: Tenacity excels in single-target scenarios where consistent ATK buffs matter. Instructor shines in multi-target reaction spam. Scroll maintains the longest duration for complex rotations where you're juggling multiple characters.
Character Recommendations
Anemo: Kazuha and Sucrose love Instructor for Swirl damage and EM sharing. Venti prioritizes Energy Recharge with Instructor since his burst costs 60 energy.
Pyro: Bennett uses Instructor in Vaporize teams, Tenacity for general ATK scaling. Thoma uses Tenacity for shield strength—his shield scales with HP, making the 2-piece valuable.
Hydro/Cryo: Kokomi uses Tenacity for healing and ATK buffs. Layla uses Tenacity for shields. Citlali follows this priority: Scroll > Tenacity > Instructor.
Team Optimization
National Variants: Bennett on Instructor for EM enhancement, Kazuha with full EM builds. Childe National prioritizes Xiangling's Vaporize damage through smart EM distribution.
Reaction Teams: Hyperbloom Kuki on Instructor creates reaction cascades. Burgeon Thoma with Instructor amplifies explosion damage. Freeze teams use Tenacity since they don't rely on transformative reactions.
Mono-Element: Mono-Pyro leverages Scroll's damage bonus effectively. Mono-Geo benefits from Tenacity's ATK scaling since Geo reactions are limited.
Farming Guide
Domain Efficiency: Ridge Watch (Tenacity) offers consistent 5-star drops with Pale Flame as a bonus. Sanctum of Rainbow Spirits (Scroll) pairs with Obsidian Codex. Instructor accumulates naturally through World Boss farming—don't waste resin on dedicated domains.
Investment Priority: Scroll for Natlan teams > Tenacity for general supports > Instructor for reaction specialists. Use the Artifact Strongbox for Tenacity pieces, natural boss farming for Instructor, and dedicated domains only for Scroll.
Optimization Tips
Substat Priorities: Energy Recharge > HP%/EM > CRIT Rate (Favonius weapons only). Tenacity users need HP% for stronger shields. Instructor users require ER for burst uptime. Scroll users prioritize EM for reaction triggers.
Synergy Rules: Identical effects don't stack—avoid redundancy. Different buff types multiply together. Don't stack four ATK% sources when you could diversify into EM, Elemental DMG, and CRIT.
Maintain flexible artifact inventories. Spiral Abyss meta shifts every cycle, and having options beats having perfect pieces for outdated strategies.
FAQ
Which set provides the highest team DPS? Scroll delivers the highest potential with 40% Elemental DMG (25-35% team DPS increase) for Natlan characters. Tenacity provides 15-20% through ATK scaling. Instructor offers 20-30% in reaction-heavy teams.
Tenacity vs Instructor for Bennett? Depends on your team. Instructor excels in Vaporize/Melt teams through that 120 EM buff. Tenacity suits general support without reaction focus. Simple rule: reactions favor Instructor, raw ATK scaling favors Tenacity.
How does Scroll compare to Viridescent Venerer? Both provide roughly equivalent power levels. VV offers 40% resistance shred (27-30% damage increase), Scroll provides direct 40% Elemental DMG bonus. Scroll scales consistently without resistance diminishing returns but requires Natlan characters for full potential.
Best characters for each set? Tenacity: Zhongli, Kuki, Fischl, Kokomi, Layla. Instructor: Bennett, Collei, Dendro Traveler, Sucrose, Kazuha. Scroll: Kachina, Xilonen, Citlali, Ororon, Mavuika.
What's the farming priority order? Start with Instructor through World Boss farming during character ascension—efficient resource usage. Transition to Tenacity via Strongbox crafting. Reserve direct domain farming for Scroll when building Natlan teams.
Current Abyss performance? Instructor excels in reaction-heavy floors (Hyperbloom, Vaporize, Melt). Scroll dominates with Natlan characters against elemental shields. Tenacity provides consistent performance across all content but lacks specialized advantages.
The meta's constantly evolving, but these fundamentals remain solid. Choose based on your roster, not theoretical maximums.