

Quick Answer: Top Lunar-Bloom teams center on Lauma as core enabler with Hydro applicators like Nilou or Aino, plus Dendro supports like Nahida. Optimal compositions: Lauma-Nilou-Kokomi-Nahida for dual-core Bloom systems, and Lauma-Nahida-Yelan-Kuki for enhanced Hyperbloom. These leverage CRIT-scaling Lunar-Bloom reactions with damage from EM, character level, and CRIT stats.
Version 6.0's dropping a bombshell on Genshin's elemental system with Lunar-Bloom mechanics. After weeks of testing on the beta servers, I've got to say—this isn't just another transformative reaction. It's a complete game-changer that makes me rethink everything I thought I knew about Bloom teams.
Let me walk you through the optimal Natlan teams that'll make the most of this new system, complete with rotations that actually work in practice (not just on paper).
Understanding Lunar-Bloom Mechanics
Here's where things get interesting. Lunar-Bloom fundamentally breaks the mold of transformative reactions by incorporating CRIT scaling—something we've never seen before. Base 15% CRIT Rate and 100% CRIT DMG right out of the gate.
The trigger? Dendro and Hydro combining with Nod-Krai characters like Lauma present. The damage formula's pretty straightforward: Base Damage × (1 + EM Multiplier) × (1 + CRIT Multiplier) × Talent Multiplier. Nahida's C2 sweetens the deal with an extra 10% CRIT Rate and 20% CRIT DMG to reactions.
But here's the kicker—instead of standard Dendro Cores, you're generating Lunar Cores that create Verdant Dew stacks. Think of these as currency for ability amplification. Lauma automatically converts all Bloom to Lunar-Bloom (no exceptions), ensuring you're never missing out.
The cherry on top? A hefty 25% Dendro/Hydro RES reduction for 10 seconds at max talent level. That stacks with other resistance shreds, by the way.
ICD and Energy Systems
The modified Internal Cooldown rules are where this gets technical. More frequent powerful reactions through Verdant Dew generation—it's like the game's rewarding you for playing optimally. Lauma's Elemental Skill deals AoE Dendro every 2 seconds, with Hold E consuming 3 Verdant Dew for massive damage (we're talking 1404% of her EM here).
Energy requirements are steep though. Lauma needs 140-160% ER, Nahida wants 120-140% in dual-Dendro setups, and your Hydro supports are looking at 160-180% ER. Plan accordingly.
Top Natlan Characters for Lunar-Bloom
Lauma Analysis
This 5-star Dendro Catalyst user is basically the entire Lunar-Bloom ecosystem wrapped into one character. Her +315.2 EM ascension bonus isn't just nice to have—it's essential.
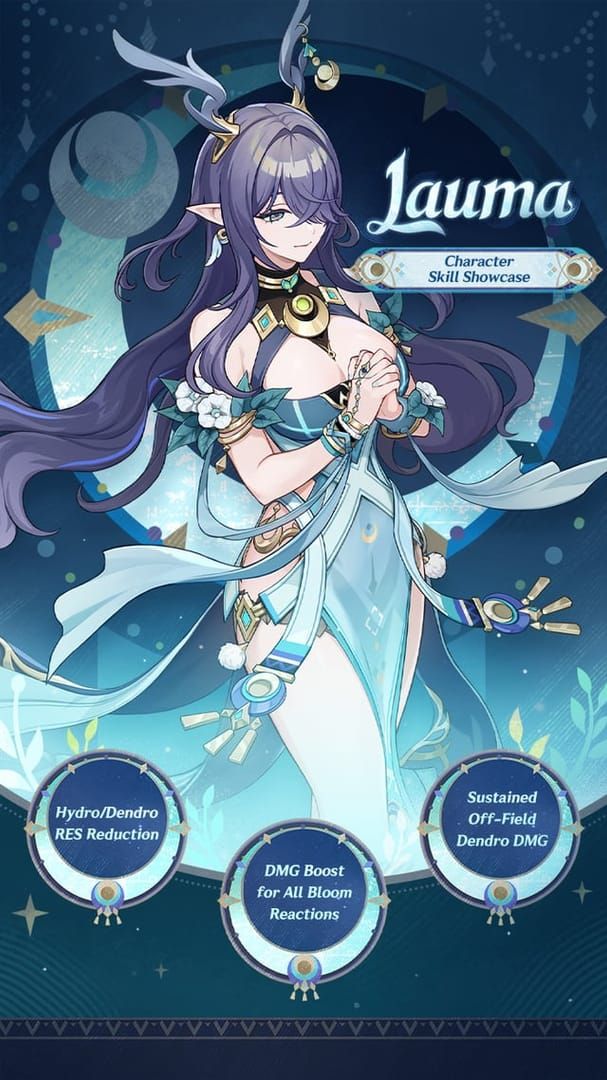
Her Elemental Skill Runo: Dawnless Rest of Karsikko creates a 15-second Frostgrove Sanctuary (12s cooldown). Tap for consistent AoE Dendro, Hold to transform Verdant Dew into devastating damage. Her Burst grants 18 Pale Hymn stacks, strengthening all Bloom reactions team-wide.
Now, about her signature weapon Nightweaver's Looking Glass—542 ATK, 264.6 EM, boosting nearby party Bloom DMG by 120%, Hyperbloom/Burgeon by 80%, Lunar-Bloom by 40%. Without this weapon? You're looking at 25-40% damage loss. Ouch.
Aino Integration
Here's something refreshing—a free 4-star that's actually good. This Hydro Claymore user from Nod-Krai provides consistent off-field Hydro application. Her C6 offers an independent Lunar-Bloom damage multiplier, and she synergizes perfectly with Lauma's Dendro field timing.
Finally, a welfare character that doesn't feel like a consolation prize.
Best Lunar-Bloom Team Compositions
Lauma-Nilou Dual-Core Teams
This is where things get spicy. Lauma, Nilou, Kokomi, Nahida creates a dual-core system where Bountiful Cores and Lunar-Blooms operate simultaneously. It's beautiful chaos.
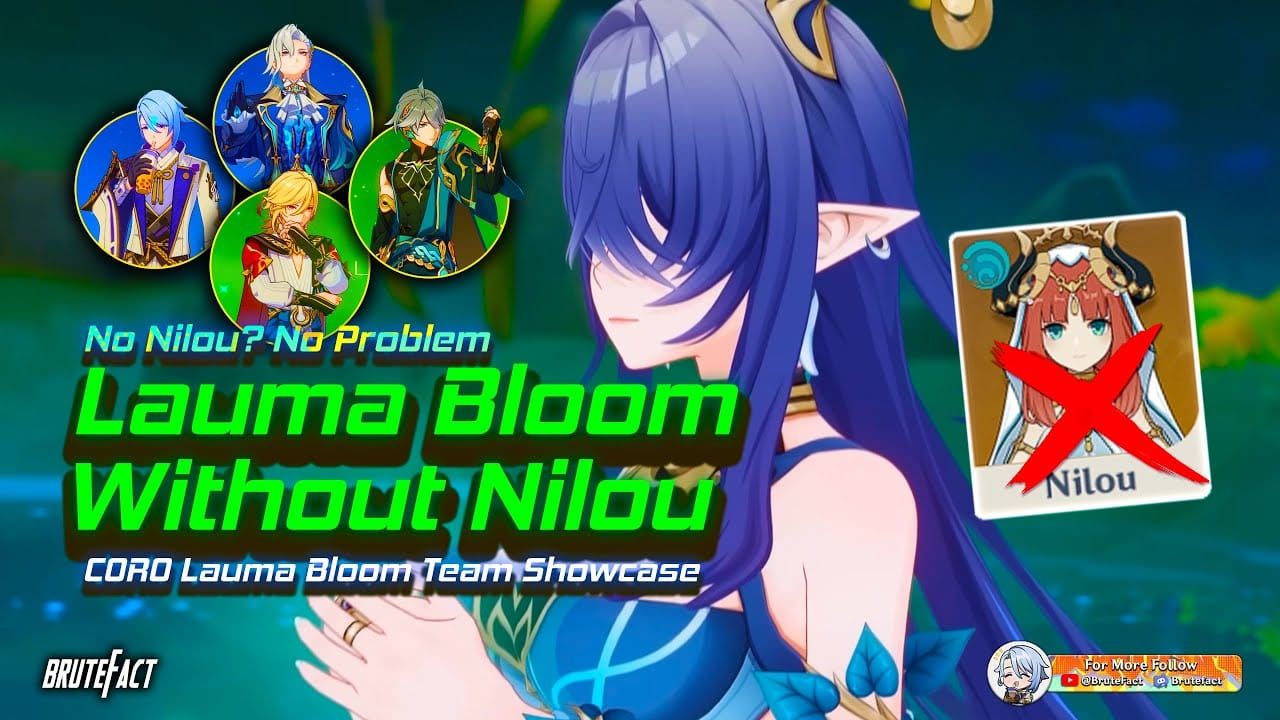
Nilou generates those instant-exploding Bountiful Cores with larger AoEs while Lauma converts standard cores to Lunar-Blooms. The rotation's pretty smooth:
Nahida E (mark) and Q for Dendro
Nilou E three times for Bountiful Core activation
Lauma E and Q for conversion and buffs
Kokomi Q then E for Hydro and healing
Kokomi Normal Attacks to trigger reactions
This comp absolutely destroys in AoE scenarios with multiple simultaneous detonations. Single-target? Not so much.
Enhanced Hyperbloom Compositions
Lauma-Nahida-Yelan-Kuki takes a different approach, leveraging Electro-triggered cores enhanced by Lunar-Bloom mechanics. Lauma's signature weapon boosts Hyperbloom by 80%, with her burst strengthening all transformative reactions for multiplicative damage increases.
The rotation flows like this:
Yelan E and Q for Hydro and damage buff
Lauma E and Q for Dendro and reaction enhancement
Kuki E and Q for Electro and healing
Nahida on-field for driving and triggering
Future Meta Predictions
Mark my words—the optimal team will be Columbia-Nefer-Lauma-Aino representing complete Nod-Krai synergy. Columbia's shaping up to be a 5-star Hydro Catalyst Lunar Reaction Engine with extensive application. Nefer functions as a dedicated Lunar-Bloom sub-DPS consuming cores for concentrated damage.
For those looking to invest in premium compositions, Genshin Top Up Deals provide excellent value with competitive pricing and instant delivery. BitTopup offers secure transactions and comprehensive support—something you'll appreciate when you're pulling for multiple limited characters.
Optimal Rotations and Gameplay
Energy Management and Skill Priority
Let's talk numbers. Lauma requires 140-160% ER with the recommended Silken Moon's Serenade providing 20% ER in 2-piece. Talent priority's straightforward: Burst > Skill > Normal Attack for team buffs and personal damage.
Timing's everything here. You want to stack multiple buffs before triggering reactions during those Pale Hymn windows.
The 4-star Etherlight Spindlelute provides 45.9% ER with 200 EM after skill use—perfect for energy-hungry builds. Your burst sequence should be: apply auras, activate Lauma burst for buffs, then trigger enhanced reactions during the buff window.
Artifact Sets and Stat Priorities
Lauma Optimization
Silken Moon's Serenade 4-piece is Best-in-Slot, no contest.
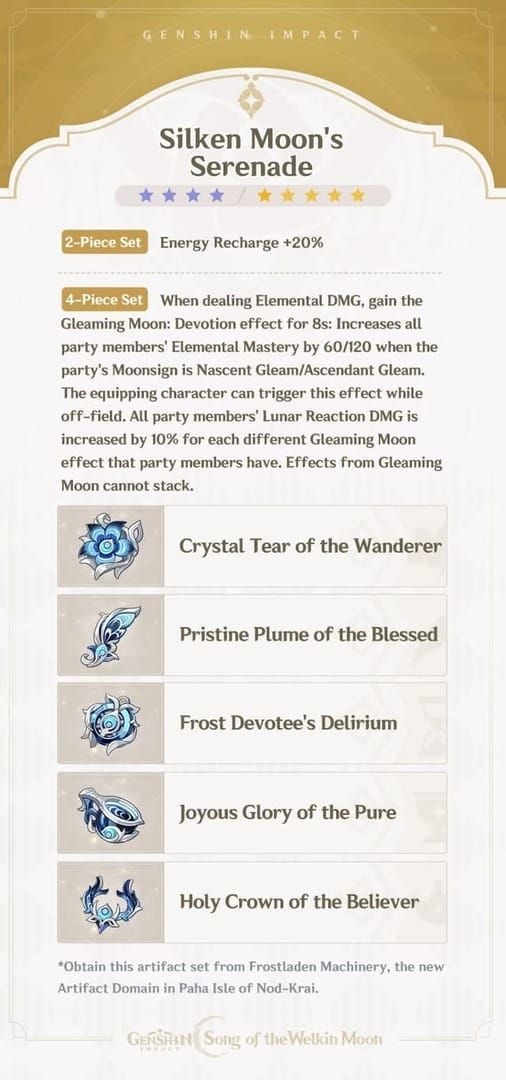
20% ER, party EM +60-120 (Moonsign dependent), +10% Lunar Reaction DMG per Gleaming Moon effect.
Main stats: EM/EM/EM or EM/EM/CRIT. Substats priority: EM > ER > CRIT > ATK%. You're targeting 800-1000 EM total, with her signature weapon providing 264.6 EM base.
Support Builds
Nahida wants Deepwood Memories or Gilded Dreams for EM sharing and Dendro application. Kokomi's flexible—Ocean-Hued Clam for healing or Tenacity for team buffs. Nilou can run Tenacity or Gilded Dreams for EM scaling.
F2P players, don't sleep on Instructor's 4-piece. That 120 team EM after reactions is nothing to scoff at.
Weapon Recommendations
5-Star Rankings for Lauma
Nightweaver's Looking Glass - 542 ATK, 264.6 EM, irreplaceable team buffs
Lost Prayer - CRIT Rate for Lunar-Bloom optimization
Skyward Atlas - High base ATK scaling
Memory of Dust - Shield synergy (if you're running Zhongli)
4-Star Alternatives
Blackmarrow Lantern R5 - 454 ATK, 220.5 EM, 96% Bloom DMG (craftable!)
Etherlight Spindlelute - 510 ATK, 45.9% ER, 200 EM after skill
Sacrificial Fragments - EM with skill reset potential
The Widsith - CRIT DMG with rotating buffs
F2P priority? Craft and refine Blackmarrow Lantern. You'll achieve 90% signature weapon efficiency, which honestly isn't bad at all. Use Favonius weapons for energy support across the team.
Lunar-Bloom vs Traditional Reactions
Damage Comparison
Here's where I get excited about the meta implications. Lunar-Bloom combines EM + CRIT scaling with enhanced base damage and team buffs, completely surpassing traditional Bloom's pure EM scaling.
That base 15% CRIT Rate and 100% CRIT DMG gets enhanced through character kits. Lauma's C2 increases reaction damage by 500% EM for Bloom, 400% for direct Lunar-Bloom damage. These numbers are insane.
Scaling Comparison:
Vaporize/Melt: 1.5x/2x multipliers, CRIT scaling, ICD limited
Traditional Bloom: Pure EM, consistent triggers, no CRIT
Lunar-Bloom: EM + CRIT, enhanced base, team buffs, RES shred
The multi-target scenarios are where this really shines. AoE core detonation with 25% RES shred? That's multiplicative damage we're talking about.
Spiral Abyss Performance
Clear Time Analysis
Early testing shows competitive Floor 12 performance within 10-15% of top-tier teams. Not bad for a brand new reaction system.
Lauma-Nilou dual-core averages 90-120s. Enhanced Hyperbloom hits 80-110s with optimal rotations. Traditional Bloom baseline sits at 120-150s for comparison.
Optimal Matchups:
Grouped enemies (multiple core AoE damage)
High HP targets (sustained reaction scaling)
Dendro/Hydro weak enemies (RES shred multiplication)
Challenging Scenarios:
Mobile enemies (unreliable core placement)
Immune enemies (ineffective reaction system)
Single bosses (reduced generation efficiency)
Common Mistakes and Optimization
Critical Errors
The most frequent mistake I see? Neglecting energy requirements in multi-burst rotations. Players consistently underestimate those 160-180% ER needs, causing inconsistent uptime.
Improper buff stacking loses significant damage. Trigger reactions AFTER Pale Hymn activation, not before. I can't stress this enough.
Investment Priority Framework:
1 Gold Budget: C0R0 Lauma with F2P weapon
2 Gold Budget: C1R0 for healing utility (500% EM scaling)
3 Gold Budget: C1R1 complete optimization
Lauma's C1 provides crucial 4,500 HP heals every 2s with 900 EM. Higher priority than her signature weapon if you're working with limited resources.
Pre-6.0 Meta Predictions
Expected Changes
September 10, 2025 release introduces the complete Nod-Krai region and Lunar system. Lauma's Phase 1 banner enables early adoption, Aino's Phase 2 provides F2P access.
Columbia as Lunar Reaction Engine and Nefer as dedicated DPS will shift compositions toward full Nod-Krai synergy. I'm calling it now—this'll be the new meta standard.
Strategic Timeline:
Pre-6.0: Secure Lauma and basic components
6.0 Launch: Evaluate Aino integration
Post-6.0: Consider Columbia/Nefer for complete synergy
For significant character and weapon investments, Genshin Impact Top Up services provide convenient Genesis Crystal access. BitTopup offers competitive pricing, instant delivery, and secure transactions for meta preparation.
Frequently Asked Questions
Which Natlan characters work best with Lunar-Bloom reactions? Lauma's essential—she converts all Bloom to Lunar-Bloom with team buffs. Aino provides excellent free 4-star Hydro application. Future Columbia functions as Lunar Reaction Engine while Nefer consumes cores for concentrated damage.
How does Lunar-Bloom compare to Vaporize and Melt? It uniquely combines EM scaling with CRIT scaling (base 15% Rate, 100% DMG). Unlike Vaporize/Melt's 1.5x/2x ICD-limited multipliers, it provides consistent triggers with enhanced base damage plus 25% RES shred for multiplicative team benefits.
What artifacts should I use for Lunar-Bloom teams? Lauma requires Silken Moon's Serenade 4-piece: 20% ER, team EM buffs 60-120, +10% Lunar Reaction DMG. Use EM/EM/EM or EM/EM/CRIT with EM > ER > CRIT substats. Supports use Deepwood (Nahida), Ocean-Hued Clam (Kokomi), Emblem (burst-focused).
How much Elemental Mastery for optimal damage? Target 800-1000 EM on Lauma through signature weapon (264.6), EM artifacts (558 main stats), team buffs. C1 healing scales 500% EM making 900+ valuable for damage and utility. Balance with 60%+ CRIT Rate, 120%+ CRIT DMG for maximum effectiveness.
Can F2P players build effective teams? Absolutely. You'll achieve 90% performance using Blackmarrow Lantern R5 (96% Bloom DMG boost), mixed artifacts, free Aino for Hydro. Core team: Lauma-Aino-Nahida-Barbara provides functional access without premium investments, though optimization requires eventual upgrades.
Is this better than traditional Pyro reactions? Lunar-Bloom offers higher damage ceilings through dual scaling, consistent triggers, and team-wide RES shred. Traditional Pyro maintains single-target burst advantages, but Lunar-Bloom excels in AoE scenarios with multiple core detonations and sustained damage scaling.