

Quick Answer: NRE Menu-30 takes the crown for combat healing, Portable Waypoint dominates exploration, and Wind Catcher rules vertical mobility. This trio forms your essential loadout—with Treasure Compasses and Red Feather Fan rounding out the top-tier toolkit.
Here's the thing about Genshin's 120+ gadgets: they're not just fancy toys cluttering your inventory. These specialized tools genuinely transform how you explore and fight. Version 3.7's Gadget Quickswap was a game-changer (pun intended), letting you hotswap between four pre-selected tools instantly. No more fumbling through menus mid-combat or missing that perfect gliding opportunity.
Need crafting materials fast? Crystals for gadget events through BitTopup gets you instant access without the grind. Their pricing's competitive, delivery's quick—basically everything you want when you're itching to craft that next essential tool.
Top Tier Gadgets (S-Rank): The Holy Trinity
NRE Menu-30: Your Combat Lifeline

This little beauty sits at #1 for good reason. Instant healing and revival food access during active combat? Yes, please. No inventory diving, no panic scrolling—just pure, life-saving efficiency. (Spiral Abyss doesn't count, unfortunately.)
Getting It: Mondstadt Reputation Level 5 → Blacksmith crafting (30 seconds flat) What You'll Need: 20x Lizard Tail, 20x Chaos Circuit, 50x Electro Crystal
Pro Setup: Load it with Matsutake Meat Rolls and Sweet Madame for healing, Teyvat Fried Egg for revival. The auto-switch to revival mode when characters drop? Chef's kiss.
Portable Waypoint: Fast Travel Revolution
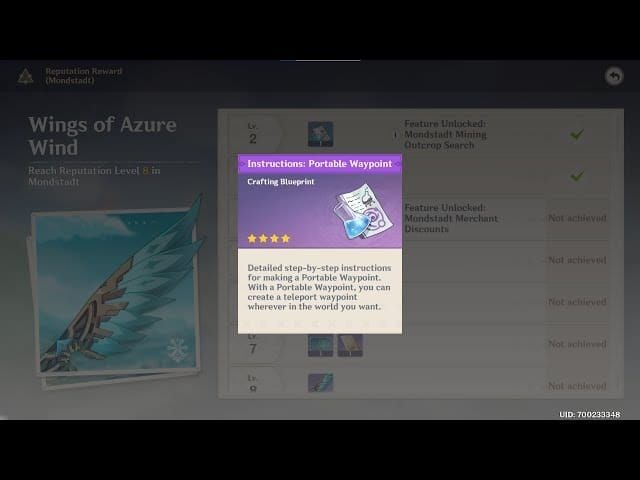
Seven days of custom teleportation anywhere on the map. This thing has saved me countless hours of running back to remote farming spots or that one boss fight tucked away in the middle of nowhere.
Unlock Requirements: Mondstadt Reputation Level 6 Materials: 1x Dead Ley Line Branch, 2x Luminescent Spine, 5x Crystal Chunk The Catch: Only one active at a time, and you can't place them mid-air, in domains, or underwater
Smart Placements: North of Qingce Village for Glaze Lily runs, that annoying Geo Hypostasis island, seasonal event zones. Trust me on this one.
Wind Catcher: Vertical Mastery Made Easy
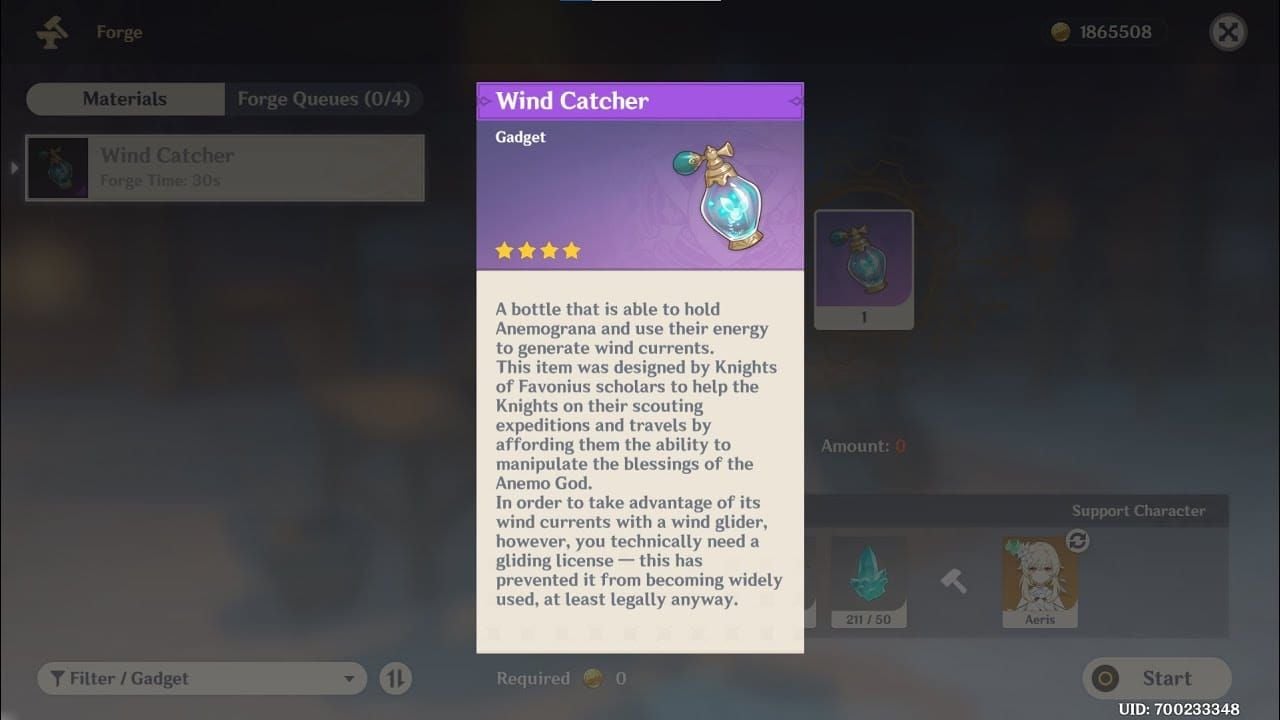
Nine seconds of on-demand wind currents from stored Anemograna. Five charges, 100-second cooldown—and honestly, it's changed how I approach cliff faces and tall structures entirely.
Reputation Gate: Mondstadt Level 3 Investment: 10x Hurricane Seed, 30x Windwheel Aster, 50x Crystal Chunk, 50,000 Mora
Synergy Gold: Pair with Venti or Amber's gliding passives, stack with Red Feather Fan for ridiculous distance, combo with Kazuha or Xiao's mobility skills for maximum air time.
High Value Gadgets (A-Rank): Seriously Good Stuff
Red Feather Fan: Speed Demon's Dream
30% gliding speed boost for 30 seconds. Inazuma Reputation Level 5 requirement, but worth every reputation point.
Treasure Compass Series: Chest-Hunting Champions
These directional light streams pointing to unopened chests? Brilliant design. Smart cooldowns too—30 seconds when you find something, 5 seconds when the area's clear.
Regional Breakdown:
Anemo/Geo: Reputation Level 6
Electro/Dendro/Hydro: Level 9 (ouch)
Pyro (Natlan): Level 3 (refreshingly reasonable)
Standard Recipe: 10x Golden Raven Insignia, 50x Crystal Chunk, 30x region-specific materials
Parametric Transformer: The Weekly Jackpot
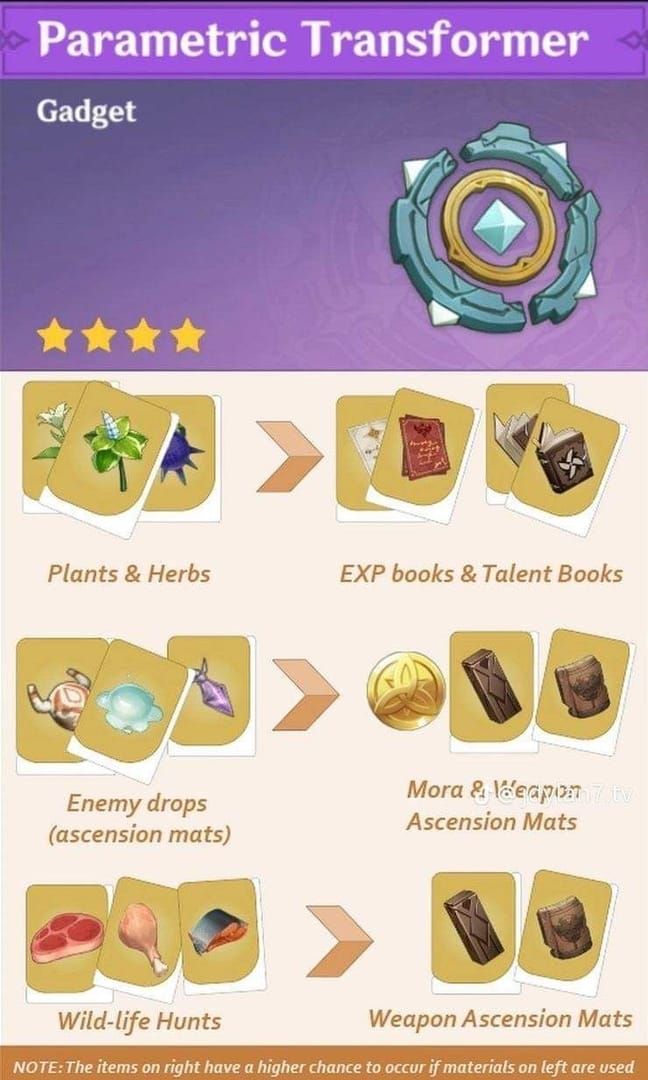
150 quality points of random materials go in, valuable rewards come out every seven days. Unlocked through Tianqiu Treasure Trail at AR 31.
The Process: Feed materials → blast with 18 elemental attacks → collect your randomized goodies Quality Math: Common (1 point), Uncommon (2), Rare (3), Epic (4) Strategy: Plants typically yield EXP/Talent Books, enemy drops lean toward Mora/weapon materials
For instant crafting access, Genesis Crystal instant checkout through BitTopup eliminates those frustrating just need five more crystals moments.
Solid Choice Gadgets (B-Rank): Situational Stars
Memento Lens: Inazuma's Investigation Essential
Mandatory for Earth Kitsune Statue puzzles and 100% exploration completion. Niche, but absolutely necessary when you need it.
Warming Bottle: Dragonspine's Best Friend
Creates 5-second Warming Seelie for Sheer Cold protection. Frostbearing Tree Level 4 unlock—basically essential for comfortable Dragonspine exploration.
Kamera: Achievement Hunter's Tool
Captures those perfect combat moments for achievements. Snapshots quest in Liyue Harbor gets you started.
Specialized Gadgets (C-Rank): One-Trick Ponies
Resonance Stone: Oculi Hunting Assistance
Consumable gadgets marking nearest Oculi. Level 2 for Anemo/Geo, Level 8 for Electro/Hydro. Helpful but expensive.
Seed Dispensary: Teapot Gardening Enabler
Passive plant farming in Serenitea Pot. Wild plant harvesting yields seeds for 70-hour growth cycles—patience required.
Crafting Priority Guide
Reputation Level Roadmap:
Level 2: Basic Resonance Stones
Level 3: Wind Catcher, Natlan Pyro Compass
Level 5: NRE Menu-30, Red Feather Fan
Level 6: Portable Waypoint, Mondstadt/Liyue Compasses
Level 8-9: Advanced regional compasses
Return on Investment:
High ROI: NRE Menu-30, Portable Waypoint, Wind Catcher (the holy trinity) Moderate ROI: Treasure Compasses, Red Feather Fan, Parametric Transformer Low ROI: Warming Bottle, Memento Lens, Kamera
Advanced Combo Strategies
Maximum Mobility Chain:
Wind Catcher for updraft → Red Feather Fan mid-glide → character abilities for extended air time → Portable Waypoint for strategic landing
Exploration Efficiency Loop:
Treasure Compass scanning → Portable Waypoint base camp → NRE sustain → Wind Catcher for vertical access
Co-op Coordination:
Portable Waypoints work for all party members, designate compass operators by region, coordinate healing through NRE systems.
Common Pitfalls (Learn From My Mistakes)
Critical Limitations:
Wind Catcher: Actually 100-second cooldown, not 80s—and needs solid ground
Portable Waypoint: No mid-air, domain, or underwater placement
Parametric Transformer: Full 7-day cycle, no shortcuts
Inventory Management:
Prioritize permanent gadgets, maintain crafting stockpiles, master Gadget Quickswap for seamless switching.
Looking Ahead
Version 5.6+ Improvements:
Auto-swapping Treasure Compasses by region, expanded tracking for Warrior Challenges and Tribe Spaces, enhanced Gadget Quickswap functionality.
Investment Strategy:
NRE Menu-30 → Portable Waypoint → Wind Catcher → Regional Compasses → Specialized tools
Focus reputation grinding on essential regions first. Stockpile universal materials. Always prioritize permanent over temporary gadgets.
FAQ
What should new players craft first? NRE Menu-30 at Mondstadt Level 5 for combat safety, then Wind Catcher at Level 3 for mobility. These provide immediate quality-of-life improvements without brutal reputation requirements.
How do you handle gadget cooldowns efficiently? Rotate between utilities using Gadget Quickswap. Plan exploration routes around that 100-second Wind Catcher cooldown, use Compasses during travel time, always have backup mobility options ready.
Which gadgets create the best synergies? Wind Catcher + Red Feather Fan + Portable Waypoint + regional Treasure Compass covers mobility, positioning, and treasure hunting comprehensively.
Can you place multiple Portable Waypoints? Nope—one active maximum. Each lasts 7 days, but placing a new one destroys the previous waypoint.
What's the difference between Treasure Compasses and Resonance Stones? Compasses locate chests with directional streams (reusable, smart cooldowns). Resonance Stones mark Oculi areas (consumable, single-use only).
How does Parametric Transformer's quality system actually work? You need exactly 150 quality points: Common materials (1pt), Uncommon (2pts), Rare (3pts), Epic (4pts). Material types influence what reward categories you'll get.