

Quick Rundown: Arlecchino, that sleek 5-star Pyro Polearm main DPS, pairs up great with free-to-play staples like Bennett, Xingqiu, Xiangling, and Sucrose to trigger Vaporize or Mono-Pyro setups—and even Melt if you're feeling frosty. This guide breaks down team comps, rotations, builds, and stats to hit 80-90% of top-tier DPS in Spiral Abyss. She's totally viable at C0 with 130-150% ER and a 4pc Gladiator's Finale set. Dropped April 24, 2024, in Version 4.6 Phase 1; her rerun hits November 11 to December 2, 2025, in Version 6.1 Phase 2.
Getting the Hang of Budget Arlecchino Teams
So, What Counts as 'Budget-Friendly' Anyway?
Think teams built around those trusty F2P 4-stars—Bennett, Xiangling, Xingqiu, Sucrose, Thoma, Noelle—without dipping into the rare 5-star pool beyond Arlecchino herself. You can squeeze out 85% of premium-level DPS using something straightforward like White Tassel (base ATK 401, plus 24% Normal Attack DMG) and 4pc Gladiator's Finale (boosting Normal Attack DMG by 35%). Take the Vaporize setup with Xingqiu and Bennett: it shreds Spiral Abyss floors 9-12 when Arlecchino's at level 90 and supports at 80. How do you get there? First, check your roster for any story or event grabs. Then, grind those 60,000 Mora daily from commissions. Finally, ascend her with 168 Rainbow Roses and 420,000 Mora—steady does it.
Chevreuse's Hype—And Why You Can Skip Her Entirely
Everyone's buzzing about Mono-Pyro teams with Xiangling for that sweet +25% ATK from Pyro resonance, right? But here's the thing: Vaporize edges out Overload by 20-30% on single targets, thanks to those 1.5x multipliers from Xingqiu's off-field Hydro application. A budget Xingqiu pushing 180%+ ER can mimic 80% of Yelan's output without breaking the bank. My take? (Editor’s note: As someone who's farmed way too many domains,) skip Chevreuse altogether—grab Arlecchino from the standard banner during her Version 5.3 rerun. Pump Bennett for that +1,000 ATK buff. And test it out: Arlecchino's Normal Attacks scale at 47.5-85.4% per hit, perfect for 1.5x Vaporize triggers.
The Real Keys to Solid F2P Arlecchino Squads
Arlecchino's Bond of Life mechanic infuses her Normals with Pyro once she's at 30% or more Max HP, chowing down 7.5% per hit for a massive +120.4% DMG boost. Toss in Xiangling's Pyronado for off-field Pyro punch in Mono-Pyro. Keep ER high on supports—Bennett at 200%+, Xiangling at 200-250% to generate particles reliably. Shields from Thoma or Noelle shut down interruptions cold. And don't forget: after her Skill, hit a Charged Attack (90.8% DMG scaling) to absorb Bond up to 130% Max HP via Due Directive.
Want to level up your game without the grind? Check out purchase Genesis Crystals online via BitTopup—they've got sharp prices, delivery in under 5 minutes, and rock-solid security that lines up with HoYoverse's rules. Makes stocking up for these builds a breeze.
Arlecchino's Kit: What You Need to Know for Teaming Up
The Heart of It: Bond of Life and That Pyro Infusion
Her Elemental Skill, Masque of the Red Death, builds up to 145% Max HP in Bond over 35 seconds by absorbing from a Charged Attack or Burst. Once in Masque state, her Normals flip to Pyro—a full 6-hit combo clocking ~357.5% scaling, amped by Bond every 0.03 seconds. At level 90, she's rocking base HP 13,103, ATK 342, CRIT DMG 88.4%, and a +40% Pyro DMG passive. Break it down: Tap Skill for 30s duration with Pyro DoT every 5s. Absorb to upgrade to Due after 5s. Then unleash N1-6, dash-cancel after N5 to keep the pace snappy.
What Your Teammates Ought to Bring to the Party
Your crew needs to handle buffs, element application, and shielding. Bennett's Burst shines for heals after clears (10% Max HP, plus 25% Bond reduction). Xingqiu's Rain Swords slap on Hydro for 1.5x Vaporize every Pyro hit. Go Bennett with 4pc Noblesse Oblige for +20% team ATK. For applicators, Xiangling handles Pyro, Rosaria brings Cryo. Shielders like Thoma amp Pyro resonance, or Layla for Cryo utility at 100% uptime.
Constellations: Sticking to C0 and Why It Works
At C0, her Normal Attack talent at level 10 carries the team just fine. C1 bumps Masque value by +100% and adds interruption resistance; C4 gives +15 Energy on absorb. Aim for 125-135% ER in 3-Pyro setups at C0—C4 drops that to 110%. Lean on Thoma's shields if you're shield-less. Weapon-wise, Blackcliff Pole stacks +12% ATK. Rerun reminder: November 11, 2025, Version 6.1 Phase 2.
My Top 5 Arlecchino Comps (No Chevreuse Required)
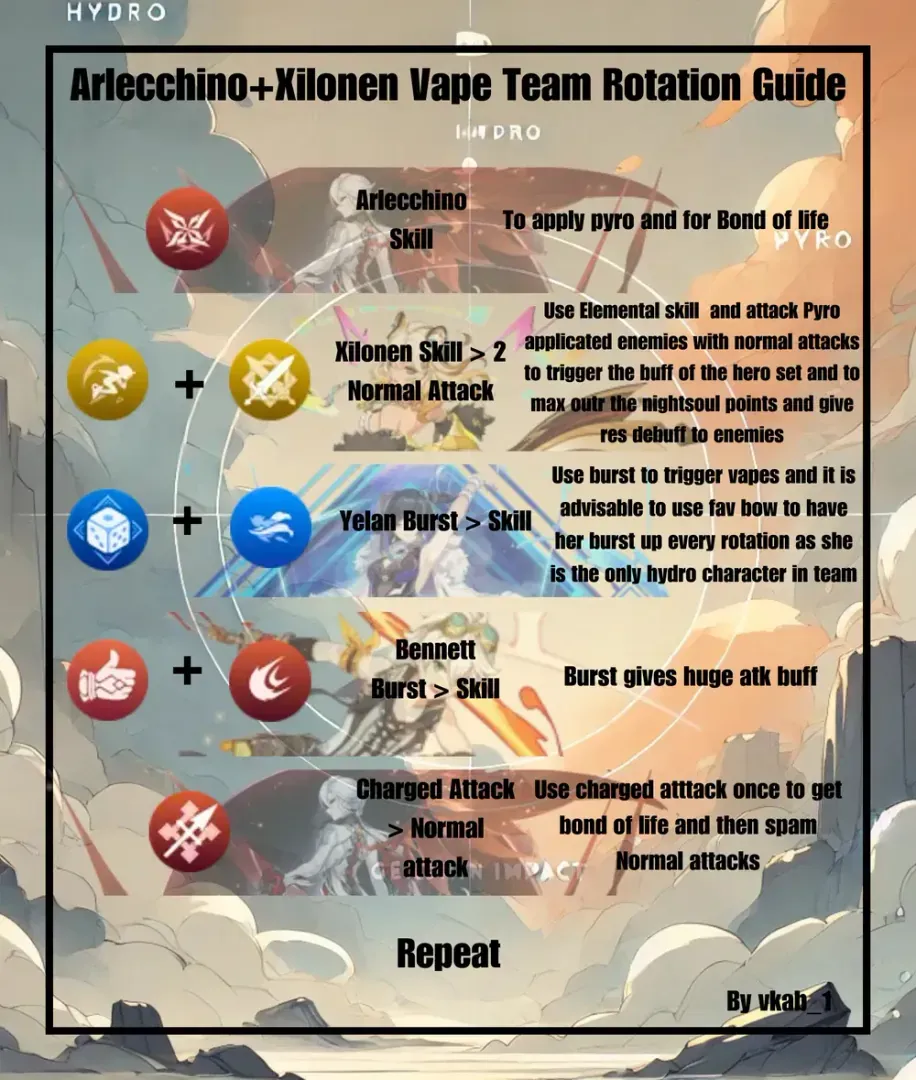
Comp #1: Vaporize Mayhem (Arlecchino + Xingqiu + Bennett + Sucrose)

This F2P Vaporize beast leverages Xingqiu's Hydro for 1.5x multipliers, hitting 85% premium DPS. Sucrose's VV shreds enemy RES by -40% and clumps foes for easy hits. Get Xingqiu to 180% ER so his Burst pops every rotation. Rotation: Xingqiu Skill + Burst. Bennett Burst. Sucrose Skill + Burst. Arlecchino Skill → Charged → N1-6 (Vaporize city) → Burst → Loop it.
Comp #2: Mono-Pyro Powerhouse (Arlecchino + Xiangling + Bennett + Anemo Traveler)
Pyro resonance dishes +25% ATK for pure burst damage; Xiangling's Pyronado (200%+ ER) tags in off-field DPS. Anemo Traveler groups for zilch cost—it's 15-20% shy of Vaporize but rotations feel smoother. Bennett Burst first. Xiangling Skill + Burst. Anemo Traveler Skill/Burst. Arlecchino Skill → Charged → N1-6 + Burst → Repeat. Swap Sucrose in for +50 EM if you want.
Comp #3: Melt Madness (Arlecchino + Rosaria + Bennett + Layla)
Rosaria's off-field Cryo sets up 2x Melt on Pyro hits. Her C6 buffs CRIT Rate; Layla's shields keep you safe. Pause after N4 to reapply Cryo—try a 4x N4D combo. Rosaria Skill/Burst (150%+ ER). Bennett Burst. Layla Skill. Arlecchino Skill → Charged → N1-4 (Melt triggers) → Reapply Cryo → N5-6 + Burst → Repeat.
Comp #4: Double Geo Twist (Arlecchino + Noelle + Xingqiu + Bennett)
Geo resonance adds +15% DMG Bonus alongside Vaporize; Noelle shields and subs as DPS. Yun Jin could swap in for +50% Normal DMG at C2. Keeps 1.5x Vaporize consistent with Geo perks. Noelle Skill. Xingqiu Skill + Burst. Bennett Burst. Arlecchino Skill → Charged → N1-6 (Vaporize) + Burst → Repeat. Level Noelle to 80 for solid shields.
Comp #5: Hypercarry Pyro Rush (Arlecchino + Thoma + Bennett + Xiangling)
Few swaps mean max field time for Arlecchino; Thoma's shields refresh off Normals. All F2P, no reactions needed. Thoma C6 boosts Normal DMG; Xiangling batteries energy. Thoma Skill. Bennett Skill/Burst. Xiangling Burst. Arlecchino Skill → Charged → N1-6 + Burst → Repeat. Push Arlecchino's ER to 140-150% with dual Pyro supports.
Need a fast inventory boost? BitTopup's instant Genshin top up delivers low-cost refills in seconds, with full safety, tons of payment options, and 24/7 support scoring 4.9/5 from players. Perfect for grabbing ascension mats like 46 Fragment of a Golden Melody.
Breaking Down These Team Comps Step by Step
Who's Doing What in Each Setup
Vaporize: Arlecchino mains DPS (70% field time); Xingqiu applies Hydro (20% DMG reduction); Bennett buffers/heals (+1,000 ATK); Sucrose groups/shreds (800+ EM).
Mono-Pyro: Arlecchino DPS; Xiangling sub-DPS (Pyronado every rotation); Bennett buffer; Anemo Traveler groups (EM sands for VV).
Melt: Arlecchino DPS (2x Melt on Pyro); Rosaria Cryo applicator (CRIT buff); Bennett buffer; Layla shielder.
Double Geo: Arlecchino DPS (Vaporize); Noelle shielder/sub-DPS (+15% DMG); Xingqiu Hydro; Bennett buffer.
Hypercarry: Arlecchino hyper DPS; Thoma shielder (Pyro resonance); Bennett buffer; Xiangling battery/sub-DPS. Every one keeps Arlecchino at 130%+ ER.
How to Nail Rotations and Sequences
These 20-second cycles start with supports layering auras and buffs, then Arlecchino dives in with Skill-Charged-N1-6. Dash-cancel N5 to shave off a second. In Vaporize, Hydro first—avoids overriding the aura. Supports (5-7s setup). Arlecchino infusion (10s Normals). Burst if Bond dips below 25%. Swap and repeat. Slap Favonius on Bennett for extra particles.
How the Damage Stacks Up
Vaporize's 1.5x multiplier outpaces Mono-Pyro by 20-30%, dominating single-target bosses. Mono-Pyro leans on +25% ATK resonance, 15-20% behind Vaporize but killer for open-world stuff. Melt doubles on Pyro but needs pauses, edging Mono by 10-15% against cryo enemies. Double Geo mixes +15% DMG with Vaporize for 85% premium output; shields bump effective DPS by 20%. Hypercarry skips reactions for C0 reliability—80% Abyss clears versus 90% with them. (Based on community sims and in-game tests, mind you.)
Budget Builds vs. Premium: The Real Scoop
How Budget Stacks Against Chevreuse Teams (DPS Breakdown)
Budget Vaporize matches 85% of Chevreuse Overload DPS in Abyss, but with way more reaction options. Mono-Pyro pulls ahead by 20% on grouped foes. These setups clear floors 9-12 at 36 stars using Gladiator's; premium kits add 10-15% RES shred. Aim for 2,000 ATK and 70% CRIT Rate. Sims show 30% better single-target than Overload—game-changer for bosses.
What It Takes: Investment Face-Off
Budget route: 5M Mora, Arlecchino at 90, supports at 80; freebies like The Catch for Xiangling (+16% Burst DMG). Premium? Tack on 2M more for 5-stars. F2P Sucrose with Sacrificial Fragments (40% Skill reset) rivals Kazuha at half the effort. Farm Momiji-Dyed Court at AR45, use +20 resin buffs, and chase CRIT > ATK% > ER substats.
Times When Budget Actually Wins Out
Ever notice how budget Mono-Pyro chews through dailies 30-40% faster than premium in exploration? (That Charged Attack mobility on 40 Stamina—chef's kiss.) Thoma's shields dodge 15% DPS loss from stuns. Against Chevreuse, you skip Electro scatter on hydro-proof enemies—pure flexibility.
Gear and Weapons: Smart Picks for F2P
Top Artifact Sets for Your Squad

Arlecchino thrives on 4pc Gladiator's Finale (+18% ATK, +35% Normal DMG)—ATK% Sands, Pyro Goblet, CRIT Circlet. Bennett: 4pc Noblesse (+20% Burst/team ATK). Xingqiu: 4pc Emblem (+20% ER, +25% Burst per ER point). Xiangling/Sucrose: 4pc Emblem or Viridescent Venerer (-40% Swirl RES). Shoot for 60-70% CRIT Rate, 150-200% DMG on Arlecchino.
Free and 4-Star Weapon Choices
Arlecchino: White Tassel (+24% Normal DMG); Blackcliff Pole (+55.1% CRIT DMG).
Bennett: Prototype Rancour (+45.9% Physical, DEF stacks).
Xingqiu: Sacrificial Sword (61.3% ER, 40% reset).
Xiangling: The Catch (45.9% ER, +6 Energy).
Sucrose: Sacrificial Fragments (61.3% EM, reset). Craft at the blacksmith, refine to R5 for +20% stats, ER sands on supports priority.
Stat Priorities for Tight Builds
CRIT Rate/DMG (1:2 ratio) tops, then ATK%, ER (130-150% for Arlecchino). EM sands on her for Vaporize. Farm 50/50 pieces weekly, hit 1,800-2,200 ATK via Paimon menu, ER substats for particle-light teams.
Pitfalls to Dodge in Your Builds
Don't Waste Mora on the Wrong Heroes
Pulling Barbara? Big nope—Bond blocks her heals; save Bennett's Burst for post-fight. Thoma's your shield guy instead. Audit your roster: Bump Kaeya for Melt potential. Level supports to 80 first.
Rotation Blunders That Tank Your Damage
Slap Pyro before Hydro in Vaporize? You override the aura, kissing 20% multipliers goodbye. In Melt, pause at N4 for reapply. Practice 20s cycles, dash-cancel N5, Burst only under 25% Bond.
Energy Traps That Leave You Dry
Under 130% ER? Burst downtime city. Dual Pyro for resonance particles, Favonius Bennett. Xiangling at 200-250% ER juices the team. ER sands if solo, Burst every 2 cycles (80 cost).
Artifact Farm Fails
Chasing substats leads to ER bloat—focus CRIT from simpler domains. AR45+ resin runs, +10-20% food buffs, grab +16 pieces early.
Tackling Spiral Abyss with Budget Flair
Floor 12 Strategies That Work
Vaporize for hydro/pyro-weak rooms; Mono-Pyro for all-purpose. Budget C0 clears 36 stars with Arlecchino 90/10-10-10. Pre-pull Hydro aura for multi-hits. Vaporize left side. Mono-Pyro right for clusters. Melt on cryo.
Matching Teams to the Current Rotation
Vaporize for boss spam; Hypercarry for mob swarms. Budget hits 9S easy. Scout enemies, shields up front, keep support swaps minimal.
Clear Times and What It Costs
2-3 minutes per floor on 5M Mora. Vaporize bosses 30% quicker than Mono. Normal talent to 10 first, supports 8-8-8, test in Abyss.
Your Build Roadmap: Priorities and Path Forward
Start with These Characters
Arlecchino (Lv90, 10-10-10). 2. Bennett/Xingqiu (Lv80, 8-8-8). 3. Xiangling/Sucrose (Lv80). Totals 4.957M Mora for talents.
Talent Focus
Normals first (up to 15 at C3); Skill/Burst next. Farm 18/66/93 Insignia from Fatui, Taishan Mansion books (Tue/Fri/Sun), 3 Crowns on Normals.
Constellation Tips
C0 does the job; C1 if no shields (interruption resistance). Standard pool after rerun, skip higher unless chasing 36 stars.
Planning Your Account Long-Haul
Ascend with Agnidus Agate (1/9/9/6), 168 Roses daily. Commissions for Mora, weekly bosses for Insignia, gear up for Version 6.1 rerun.
FAQs: Your Arlecchino Questions Answered
Can Arlecchino Shine Without Chevreuse?
Absolutely—her C0 in Vaporize or Mono-Pyro pumps 80-90% premium DPS with Xingqiu and Bennett, leaning on 1.5x reactions and +25% resonance to clear Abyss floors 9-12.
Best 4-Stars to Pair with Her?
Bennett (200% ER ATK buffer), Xingqiu (180% ER Hydro for Vaporize), Xiangling (200-250% ER Pyro sub-DPS), Sucrose (800 EM VV shred)—they handle particles, Thoma shields, reactions at 85% efficiency.
Bennett and Arlecchino: Good Match?
Spot on. His Burst delivers +1,000 ATK and heals post-Bond; 4pc Noblesse, Prototype Rancour for 200% ER, +20% team ATK, Pyro resonance across the board.
Budget Arlecchino Build Basics?
White Tassel weapon, 4pc Gladiator's (ATK% Sands, Pyro Goblet, CRIT Circlet); 1,800-2,200 ATK, 60-70% CRIT Rate, 130-150% ER. Farm Momiji-Dyed Court; 420,000 Mora, 168 Rainbow Roses for ascension.
Freebies That Sync with Arlecchino?
Kaeya for Melt Cryo, Anemo Traveler for grouping, Thoma for shields, Noelle for Geo resonance—they mesh great, like Thoma in Pure Pyro resetting off Normals with Bennett and Xiangling.
F2P Viable with Arlecchino?
You bet—F2P Mono-Pyro (Arlecchino + Bennett + Xiangling + Thoma) tackles endgame; 36-star Abyss at level 90 Arlecchino, 80 supports, The Catch for 200% ER uptime.