

Quick Answer: Beidou + Furina Taser teams combine Beidou's high AoE Electro damage with Furina's massive team-wide DMG% buff through snapshotting mechanics. Optimal rotations require 140-180% ER on Beidou with battery support, team-wide healers for Furina's Fanfare stacks, and precise timing for maximum DPS output.
Here's the thing about Beidou + Furina Taser comps – they're absolutely devastating when you nail the timing, but they'll punish you hard if you mess up the energy management. After testing this combination extensively, I can confidently say it's one of the most rewarding team archetypes in the game, especially if you enjoy high-skill ceiling gameplay.
The magic happens through snapshotting mechanics and Furina's ridiculous DMG% buffs. BitTopup offers cheap Genshin top up offer with competitive pricing and fast delivery for acquiring characters and weapons needed for this composition.
Why This Synergy Actually Works (And Why It's Complicated)
The Electro-Charged Foundation
Electro-Charged reactions let both Hydro and Electro auras stick around simultaneously. That's huge for Anemo characters who can trigger double Swirl effects – basically free resistance shredding on steroids. The reaction itself deals Electro damage over time while jumping between nearby enemies, though honestly? The real damage comes from your raw talent multipliers getting absolutely juiced by Furina's buffs.
Furina's Fanfare Mechanic (The Real MVP)
This is where things get spicy. Furina's Elemental Burst provides team-wide DMG% bonuses through her Fanfare system, and here's the kicker – Beidou snapshots these buffs for her entire 15-second Burst duration. We're talking about potentially 75%+ DMG% bonus that Stormbreaker carries for its full rotation.
But there's a catch. You absolutely need team-wide healers to maximize Fanfare stacks. Characters like Jean, Xianyun, Kokomi, and Baizhu aren't just recommended – they're mandatory if you want to see those big numbers.
The Numbers Game
Furina's DMG% buff operates as a separate multiplier from ATK% and CRIT stats. In practical terms? It's incredibly valuable because most characters are already saturated with ATK% bonuses. When Beidou casts her Burst during peak buff windows, Stormbreaker retains maximum damage bonuses for the full duration – and against 2-3 enemies, the lightning bounces become absolutely ridiculous.
Energy Recharge: The Make-or-Break Factor
Beidou's ER Thresholds (Don't Mess This Up)
Beidou's 80-energy Burst is expensive. Really expensive. In solo Electro setups, you're looking at 200%+ ER requirements, which often forces you into ER Sands territory. With an Electro battery like Fischl or Raiden? That drops to a much more manageable 140-180%.
Here's the particle math: same-element particles give 3.0 energy when absorbed by matching characters versus just 1.0 for different elements. Beidou's Skill generates 2 particles on tap, 4 on perfect counter – so yeah, learning to counter properly isn't just for style points.
Furina's Energy Situation
Furina needs 180-200% ER at C0 with non-ER weapons for consistent uptime. Her C4 constellation changes everything by significantly reducing requirements through energy regeneration, but that's whale territory for most players. ER weapons like Favonius Sword can lower artifact requirements, letting you focus on HP% and CRIT stats instead.
The key insight? Energy funneling during Furina's on-field time maximizes absorption efficiency. Don't waste those precious particles.
Rotation Mastery: Timing Is Everything
The Standard 20-Second Loop

Here's your bread and butter rotation: Furina E→Q (establishes drain/buff), Jean E→Q (heal for Fanfare, VV shred), Fischl E/Q (Oz deployment), Beidou E→Q (particle absorption, snapshot), then Jean drives with Normal Attacks for 12+ seconds.
The timing windows are absolutely critical. Beidou's Burst must cast during peak Fanfare and VV duration – mess this up and you're looking at maybe 60% of your potential damage.
Animation Cancel Mastery
Beidou's Stormbreaker triggers once per second on Normal/Charged hits, so you need fast attack sequences. Kokomi's optimal combo involves two Normal Attacks canceled by dash/walk/jump, completing under one second. Jean and Sucrose are excellent drivers through their fast attack patterns.
Pro tip: the attacks don't need to deal damage to trigger the Burst – they just need to connect.
Adapting to Reality
Mobile enemies? You need early grouping from Kazuha or Sucrose for consistent damage. Energy-draining environments require extended particle generation phases. Specific shields demand rotation adjustments – Hydro shields need Electro priority, while Electro shields benefit from Hydro focus.
Build Optimization (Where Your Investment Matters)
Beidou: The Lightning Queen
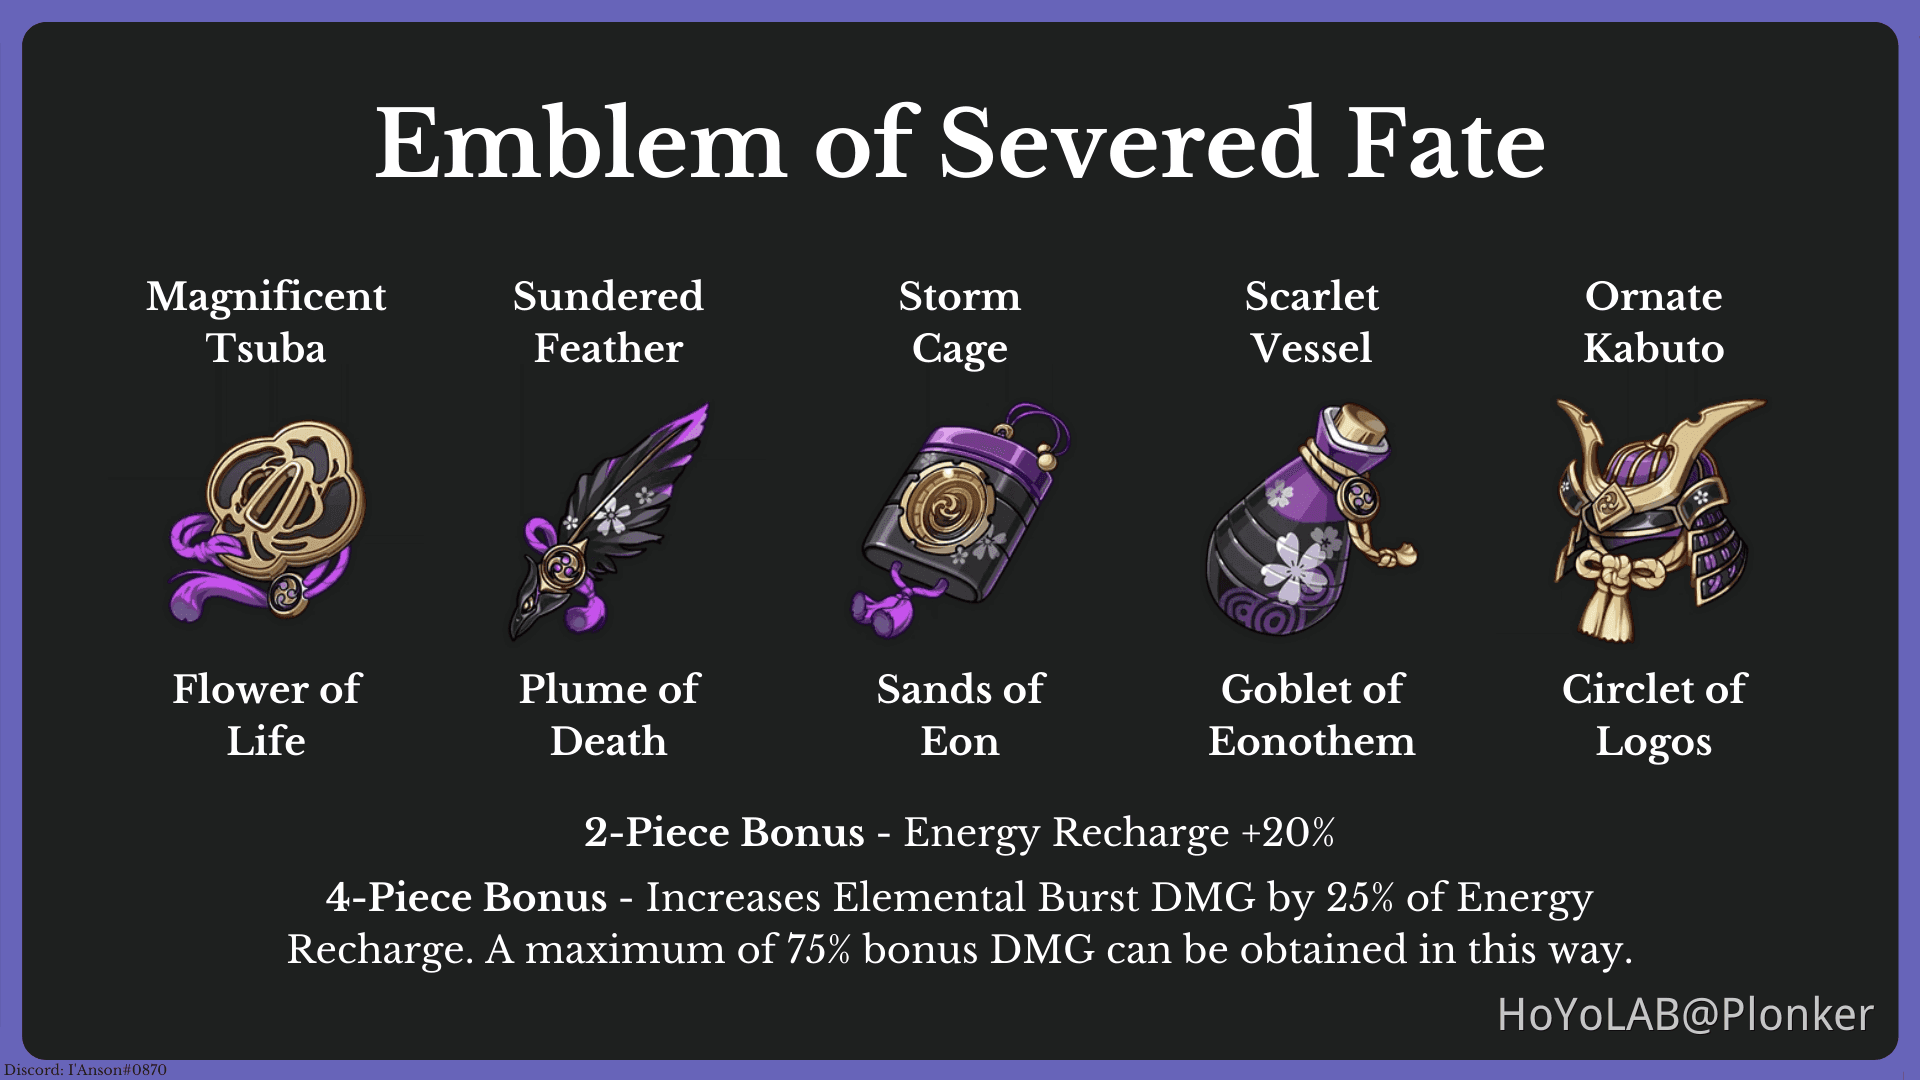
Four-piece Emblem of Severed Fate is your go-to set, providing ER and converting that ER into Burst DMG%. Main stats depend on your ER situation – if you're hitting thresholds with substats, go ATK% Sands. Otherwise, ER Sands it is.
Target stats: 1:2 CRIT ratio (aim for 75% Rate/150% DMG), then stack ER until comfortable. Talent priority is Burst > Skill > Normal Attacks, though honestly, you can leave Normal Attacks at level 1.
Furina: The Hydro Archon
Four-piece Golden Troupe maximizes her personal damage through Skill bonuses. Main stats get interesting – ER or HP% Sands depending on your weapon, HP% or Hydro DMG Goblet (HP% if you need more healing for Fanfare), and CRIT Circlet for personal DPS.
The HP% vs. Hydro DMG debate? HP% affects both damage and healing, while Hydro DMG optimizes personal DPS. Choose based on your team's healing needs.
BitTopup provides safe payment gateway Genshin services for acquiring Furina's constellations – and trust me, her C4 makes energy management so much smoother.
Weapon Considerations
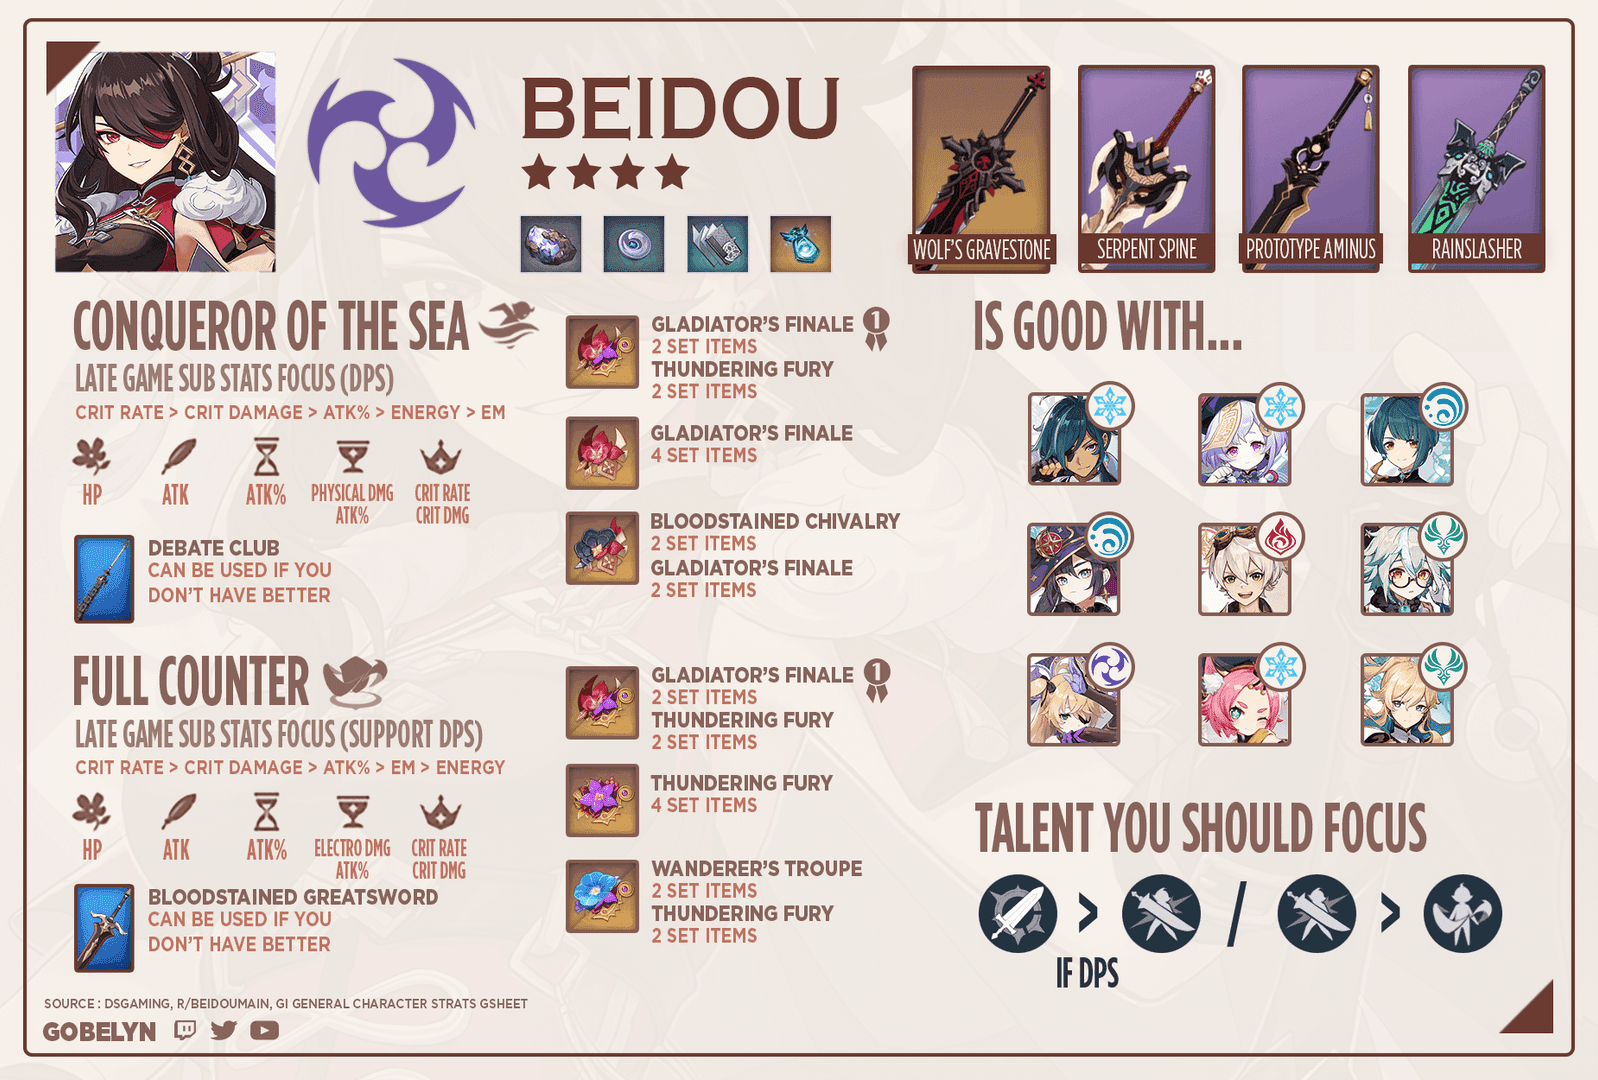
Beidou 5-stars: Skyward Pride synergizes beautifully with ER needs, while Beacon of the Reed Sea or Verdict provide raw CRIT stats. Wolf's Gravestone offers pure ATK% scaling.
4-star options: Serpent Spine at R5 competes with 5-stars, Akuoumaru provides Burst DMG scaling, and Luxurious Sea-Lord remains the best F2P option.
Your weapon choice influences everything else – ER weapons enable ATK% Sands, while CRIT weapons might force you into ER Sands territory.
Team Compositions That Actually Work
Sucrose Driver (The EM Share Variant)

Team: Beidou/Furina/Fischl/Sucrose
Maximizes EM sharing through Sucrose's A4 passive while providing crowd control and VV shred. Sucrose drives with fast attacks and excellent grouping capabilities. Energy management relies heavily on Fischl particles and Favonius procs.
Kazuha VV (The Damage Ceiling)
Team: Beidou/Furina/Fischl/Kazuha
Superior grouping and Elemental DMG% buffs through Kazuha's A4 passive. His Burst creates a large AoE for extended VV duration. This has the highest damage ceiling but requires precise positioning – mobile enemies can ruin your day.
Double Electro Comfort
Team: Beidou/Furina/Fischl/Jean
The most balanced approach. Double Electro provides maximum energy generation, Jean's fast attacks drive Beidou while healing ensures consistent Fanfare generation. If you're learning the rotation, start here.
Advanced Techniques (For the Perfectionists)
Perfect Counter Mastery
Perfect counters generate 4 particles versus 2 from tap – that's huge for energy management. The counter window activates immediately and lasts the full duration, but requires practice against different enemy patterns. Advanced players learn to manipulate aggro for counter opportunities during optimal windows.
Pneuma/Ousia Management
Furina's Arkhe affects her Skill behavior. Ousia provides consistent HP drain for Fanfare generation, while Pneuma offers healing utility. Most teams prefer Ousia for maximum buff potential, but Pneuma provides flexibility in challenging content where you need that extra healing.
Spiral Abyss Applications (Where It Matters Most)
Floor-Specific Strategies
Multiple waves benefit from energy conservation – try to end chambers with full Bursts ready for the next wave. Specific shields require rotation modifications for appropriate element priority. High HP enemies favor extended rotations with multiple Burst cycles rather than front-loaded damage.
Enemy Matchups
Mobile enemies are this team's biggest weakness – you need early grouping priority before Beidou's Burst activation. Shielded enemies don't prevent Burst triggering, but you might need to adjust for shield breaking. Large enemies actually maximize AoE potential through their wide hitboxes.
Common Mistakes (Learn From My Pain)
Energy Management Failures
Insufficient ER is the most common failure point. Double-check your thresholds: 200%+ solo, 140-180% with battery. Make sure you're switching to Beidou when particles are generated – off-field absorption is significantly less efficient.
Rotation Timing Errors
Buff timing misalignment kills your damage potential. Don't cast Beidou's Burst too early or without proper setup time. Driver mistakes during Burst duration waste precious Stormbreaker triggers – every second counts.
Build Optimization Mistakes
Prioritize ER over ATK% to avoid energy problems entirely. A Beidou who can't Burst consistently is useless, regardless of her ATK stat. Maintain that 1:2 CRIT ratio for consistency, and prioritize Beidou's Burst and Furina's Skill talent levels.
Meta Comparisons (The Honest Truth)
vs Traditional Taser Teams
Traditional teams using Xingqiu or Yelan focus on reaction enabling versus buff amplification. Furina variants trade some reaction consistency for massive damage amplification, but require that healer slot. Energy requirements differ significantly – Xingqiu/Yelan teams have lower energy costs, while Furina offers superior scaling potential.
vs Hyperbloom Teams
Hyperbloom provides consistent single-target damage with much simpler execution. Beidou-Furina excels in AoE situations with a higher ceiling against 2-3 targets. Investment requirements generally favor Hyperbloom for newer players, while Taser rewards advanced mechanical skill.
When to Actually Use This Comp
Multi-target content strongly favors this composition. Advanced players benefit most from the high damage ceiling and complex rotations. Resource availability influences viability – key constellations (Beidou C2, Furina C1+) and optimal weapons achieve substantially better performance than baseline builds.
FAQ Section
How much Energy Recharge does Beidou actually need with Furina? 140-180% ER with an Electro battery like Fischl, or 200%+ in solo Electro setups. With Fischl providing consistent particles, 160% ER achieves comfortable uptime. Solo configurations typically need ER Sands to hit that 200%+ threshold.
What's the optimal rotation sequence? Furina E→Q, Anemo healer E→Q, Fischl E/Q, Beidou E→Q, then driver Normal Attacks for 12+ seconds. This maximizes buff overlap for snapshotting while ensuring proper energy generation and Fanfare accumulation.
Is Furina actually better than Xingqiu in Taser teams? Furina provides a higher damage ceiling through her DMG% buff but requires that healer slot. Xingqiu offers more consistent single-target application and utility. Furina excels when you have available healer slots and face multiple enemies.
Which artifacts work best for Beidou in Taser compositions? Four-piece Emblem is optimal for ER and Burst DMG conversion. Run ER or ATK% Sands based on your ER needs, Electro DMG Goblet, and CRIT Circlet. Substats priority: ER first until comfortable, then 1:2 CRIT ratio, then ATK%.
How do you actually manage energy in these rotations? Switch to Beidou when Electro particles are generated for 3.0 energy versus 1.8 off-field absorption. Use Fischl as your primary battery, consider Favonius weapons for additional particle generation. Proper sequencing ensures you're not wasting precious energy.
Who are the best drivers for this team? Jean, Sucrose, and Kokomi excel with fast Normal Attacks that maximize Burst triggers. Jean provides healing and VV shred, Sucrose offers EM sharing and grouping, Kokomi delivers exceptional healing for Fanfare generation. Target attack speeds under 1 second for 12+ Stormbreaker procs per rotation.