

Quick Take: When you're running Aggravate setups in Genshin Impact—think on-field Electro beasts like Cyno or Alhaitham—Baizhu pulls ahead as the Dendro support of choice. He locks in 90-100% Quicken uptime with those 14-second Burst ticks dropping Dendro every 2.5 seconds, plus global heals and shields that soak up 250% Dendro damage. Yaoyao's your solid F2P option, hitting 60-80% uptime from her 10-second Skill radishes, but she demands 200% ER and some careful aiming—perfect for quick-swap vibes with Keqing. Go Baizhu if sustain's your jam; Yaoyao if you're watching the wallet. Slap Deepwood 4pc on either for that sweet 30% resistance shred.
Getting the Basics Down: Aggravate Mechanics and What Dendro Supports Need to Deliver
Breaking Down Aggravate and Quicken Reactions
Ever wonder why Aggravate feels so punchy? It kicks off when Electro smacks into a Quicken aura—that's Dendro plus Electro, lasting a base 7 seconds—and amps your Electro damage by 1.15x, scaled by EM. Stack 1000 EM, and you're looking at about 23% extra oomph. The key for Dendro supports? They lay down off-field Dendro without wiping the aura, so you can spam 100% Aggravate procs through Cyno's 18-second Burst. Here's how it rolls: First, hit 'em with Dendro from your support's Skill or Burst. Then, let your Electro driver infuse and unleash. Finally, trigger away with Normal or Charged Attacks, but keep an eye on that 2.5-second ICD—internal cooldown—to avoid wasting shots.
How Often Do You Need Dendro Hits for Top-Tier Uptime?
To keep Aggravate humming, you want Dendro landing every 2.5 seconds to stretch that Quicken past its 7-second limit, aiming for 90%+ uptime over a 20-second rotation. Toss in Nahida for dual resonance, and you snag +50 EM base, bumping Aggravate damage by 50%. Simple steps: Shoot for one Dendro hit per ICD window. Test it out in-game with your Electro driver. If uptime slips under 80%, loop in a second Dendro unit to patch things up.
ICD's Role in Keeping Reactions Smooth
ICD—that 2.5-second shared timer for Dendro and Electro—means your Dendro has to lead the dance without clashing. Baizhu's Burst nails it with ticks every 2.5 seconds for flawless consistency; Yaoyao's one-radish-per-second setup can falter in crowds. For Alhaitham rotations, nailing ICD lets you blend Spread and Aggravate without dropping the aura. Pro tip: Time Dendro about 0.5 seconds before Electro. Double-check with frame data if you're deep into it. And funnel some ER from Fischl to keep that off-field Dendro flowing.
For more on fine-tuning this, dive into our Complete Dendro Support Optimization Guide—it's a game-changer for chaining reactions right.
Baizhu's Breakdown: How He Handles Dendro in Aggravate
The Smooth Operator: His Skill's Timing, ICD, and Hit Rate
Baizhu's Elemental Skill—10-second cooldown—calls out a sprite that dishes three Dendro hits (79.2% damage at level 1, standard ICD), then tops off the whole party with 8% Max HP + 770 healing and spits out 3.5 particles. That opening hit sets up Quicken off-field, priming Cyno teams for full Electro triggers. (I've run this in Abyss floors where every second counts, and it just clicks.) Steps to make it shine: Pop the Skill before swapping in. Aim for 50k HP to trigger his A4 passive, adding up to 0.8% Aggravate damage per 1k HP (capping at 40% for 6 seconds). Pair him with an Electro sub-DPS to funnel particles, targeting 180% ER.
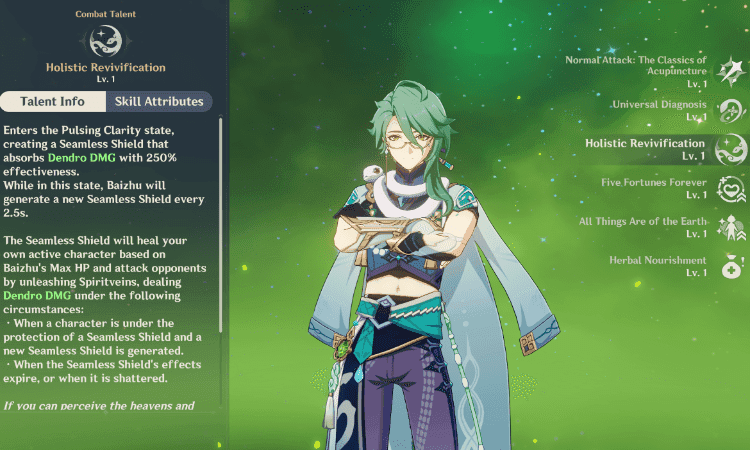
Burst Magic: Those Revivification Ticks and Full Coverage
His Burst costs 80 Energy on a 20-second cooldown but lasts 14 seconds, popping Seamless Shields every 2.5 seconds (they absorb 250% Dendro damage and heal the active character for 5.2% Max HP + 500). Along the way, it triggers six Spiritveins Dendro hits (97.1% at level 1). You get about 90% Quicken uptime here—14 seconds out of 20 is 70% base, but the Skill stretches it further—and those shields keep regenerating for nonstop protection. With Alhaitham, it holds the aura steady through his full combo. Build-wise: Hit 180% ER using Prototype Amber (it regens 4 ER every 2 seconds party-wide). Fire the Burst right after the Skill for overlap. Quick-swap if a shield pops early.
Passives That Boost His Uptime Game
His A4 passive juices Aggravate by up to 40% at 50k HP during heals, while Herbal Nourishment tacks on 2.5% Max HP healing from harvestables. It amps your driver's output while they're on-field; in Abyss, those Burst heals can supercharge Cyno's hypercarry by 40%. (As an editor who's theorycrafted this endlessly, it's one of those underrated gems.) Cap HP at 50k with Deepwood 4pc and HP% substats. Watch the thresholds—the passive sticks for 6 seconds post-heal. Stack it with C4 for +80 EM to the party for 15 seconds, scaling reactions higher.
Crunching the Numbers: Baizhu's Dendro Window in Action
In a 20-second rotation, Baizhu hits 90-100% uptime blending Skill (three hits over 10 seconds) and Burst (six ticks over 14 seconds). It's single-target focused, but Nahida makes it AoE-ready. Those extra hits don't mess with Aggravate—they just reinforce the initial Dendro. Back in v3.6 (May 2, 2023), data showed it holding strong in multi-target scenarios via resonance. Rotation tip: Skill into Burst, then driver. Add Yae Miko for off-field Electro. Test for zero Quicken gaps— that's the goal.
Hey, if you're grinding to snag characters like Baizhu for that third segment of account optimization, reliable top-ups make it smoother. Check out Genshin Impact direct top up on BitTopup—they've got competitive prices, instant delivery, and solid security for global servers, with users raving about the hassle-free vibe.
Yaoyao's Take: Dendro Delivery in Aggravate Setups
Skill Spotlight: Raphanus Cluster's Aim and Pattern
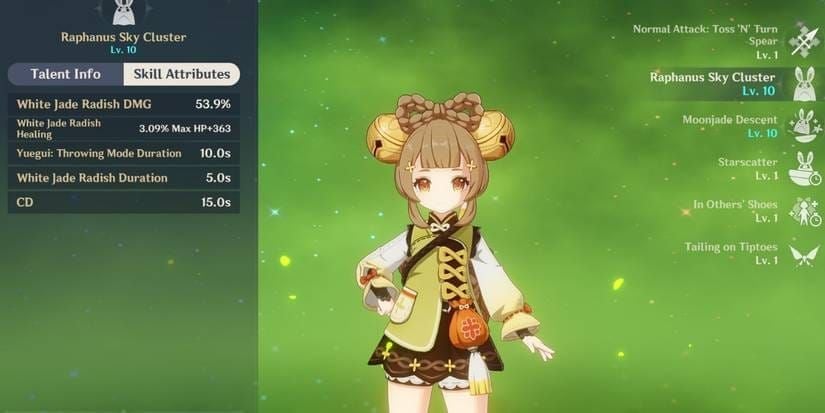
Yaoyao's Skill—15-second cooldown—summons Yuegui for 10 seconds, lobbing up to 10 radishes (29.9% Dendro damage each, healing 1.71% Max HP + 165 per pop), but only two can be active at once, dropping one per second in a tight AoE. It's about 67% coverage, great for Quicken but picky—it heals the lowest-HP ally or nearest foe. In Keqing teams, those radishes push 75% uptime during her Burst. Position Yuegui close to your driver before swapping. Build to 200% ER for Burst synergy. Her passive (In Others' Shoes) adds 0.8% Max HP healing per second for 5 seconds after explosions.
Burst Lowdown: How Moonjade Descent's Radishes Work
The Burst runs 80 Energy on a 20-second cooldown but only lasts 5 seconds, slamming 114.6% Dendro damage and summoning three Yuegui (72.2% damage each, 2.02% Max HP + 194 heal). It bumps Movement Speed by 15% and Dendro RES by 50%, but it ends if you swap. That short window makes it emergency-only, adding 5 seconds of Dendro while throwing radishes at 1 every 0.6 seconds during movement—up to eight total. For Cyno, it helps tank cores in that brief field time. Only pop it if your driver's under 50% HP. Pair with C2 for +3 ER per radish (up to 18), dropping effective cost to 62. Save it for Dendro-intensive phases.
Constellations That Amp Her Dendro Game (C2, C4, C6)
C2 nets +3 ER per radish for a Burst total of +18; C4 drops +120 EM after abilities; C6 unleashes a Mega Radish every two (75% ATK damage, 7.5% Max HP heal, bigger AoE), hiking uptime by 50%. C0 works fine, but C4 or C6 are must-haves for 80%+ consistency in AoE Aggravate—C6 even matches Baizhu's coverage in crowds. Prioritize C2 for ER without Favonius. Splash on C6 for Keqing's dodging (+15% SPD helps). Test in rotations, and lean on C1 for +15% Dendro damage in AoE to buff your driver.
Real-World Uptime: How Yaoyao Performs in Rotations
She clocks 60-80% uptime—10 seconds of Skill over 15 is 67%, plus 5 seconds from Burst. It's stronger single-target thanks to targeting, but AoE dips without C6. Dropped in v3.4 on January 18, 2023, with a rate-up slated for July 8-29, 2025 (v5.7); Nahida pushes her to 75% in Cyno comps. Skill into driver Burst, let radishes trigger. Funnel from Fischl for 200-220% ER. Watch ICD—steer clear of Hydro if you're mixing in Bloom.
Head-to-Head: Uptime Showdown Between Baizhu and Yaoyao
Hits Per Second: Frequency Face-Off

Baizhu averages ~0.3 hits per second from Skill (three over 10 seconds) and ~0.43 from Burst (six over 14 seconds). Yaoyao spikes to 1 per second on Skill (10 over 10) and 1-1.6 on Burst (5-8 over 5, but so brief). Baizhu's even 0.4 per second hugs ICD for 100% Quicken; Yaoyao's bursts can leave 20-30% gaps in multi-target. He fits Cyno hypercarry at 95% uptime; she shines in Keqing quick-swaps at 75%. Compare over a 20-second timer by counting aura extensions. Add EM sands to scale it up. Nahida bridges any weak spots.
Uptime Percentages Across a 20-Second Spin
Baizhu delivers 90-100% (70% from Burst, extended by Skill). Yaoyao lands 60-80% (67% from Skill, 25% from Burst). His 14-second off-field run gives drivers breathing room; she needs C6 to catch up. Tests with dual Dendro resonance back this— in Alhaitham teams, Baizhu avoids total proc losses. Rotate supports first. Track downtime; under 10% is golden. Funnel ER to meet those thresholds.
Single-Target: Baizhu nails 100% with precise ticks; Yaoyao hits 80% via smart targeting.
Multi-Target: Baizhu at 90% (Nahida helps); Yaoyao at 60% sans C6.
Energy Hit: Baizhu's 180% ER keeps him solo; Yaoyao wants 200% plus a battery.
Spotting the Gaps: Downtime Deep Dive
Baizhu's downtime hovers at ~10% (post-Burst holes filled by Skill); Yaoyao's 20-40% (15-second CD plus swap-killing Burst). His shields cut interruptions—v3.6 data proves he's king in long hauls. Spot gaps in replays. Double up with C1 Baizhu's extra Skill. Optimize Yaoyao's Yuegui placement.
Single vs. Multi-Target: Where They Differ
Baizhu dominates single-target (shields lock on the active char); Yaoyao spreads via radishes but can miss. Pair him with Nahida for full coverage; her C6 adds 50% AoE. Abyss waves lean Baizhu for sustain. Pick him for bosses. Yaoyao for mob swarms if you've got C6. Kazuha groups 'em up nicely.
Midway through weighing these supports, beefing your roster with smart resources can really amp things. Scope out discount Genesis Crystals on BitTopup—cost-effective bundles drop instantly, with tight security and 24/7 help, scoring high on reliability and ease.
Comfort Check: QoL and Ease of Use
Targeting and Range: How Reliable Are They?
Baizhu's Skill heals globally, Burst focuses the active char (250% absorb); Yaoyao's radishes target active-only, hitting low-HP allies or close enemies. His off-field style means zero swaps for comfort; hers fits singles but can snag rotations with that small AoE. Baizhu stops Cyno staggers; Yaoyao boosts Keqing mobility (+15% SPD). Build Baizhu's HP for A1 (+25% Dendro damage over 50% HP). Tap Yaoyao's C1 for stamina. Test range in wide-open spots.
Swap Freedom and Rotation Flow
Baizhu's 14-second Burst lets drivers run full combos; Yaoyao's 15-second CD caps at 66% uptime, and Burst dies on swap. His C2 throws in an off-field mini-Skill (250% ATK Dendro, 5-second CD)—he's the top healer for Aggravate comfort, hands down. Alhaitham flows uninterrupted. Full Baizhu kit, then swap. Stick to Yaoyao's Skill for off-field. Skip her Burst mid-driver.
Healing Power and Stagger Resistance
Baizhu blankets the party with Skill and Burst every 2.5 seconds (5.2% HP); Yaoyao's targeted radishes do 1.71% each, plus 50% RES in Burst. His global sustain wins for teams; hers for quick fixes. Five Fortunes adds 20% heal if under 50% HP. Cap Baizhu at 50k HP. Use Yaoyao's Burst for core fights. Zhongli as shield alt works wonders.
Screen Clutter and Visuals
Baizhu keeps it clean with sprite and shield effects; Yaoyao's radish swarm can overwhelm. His QoL passive heals on harvestables perks up exploration—less mess in speedy Aggravate. Disable extra effects. Position summons smart. Go single-target to cut chaos.
For artifact tweaks to amp these, our Baizhu Build Guide has you covered.
Pairing with Drivers: Best Matches
Cyno Aggravate: Synergy Breakdown
Baizhu syncs at 95% uptime with Burst fueling Cyno's 18-second state; Yaoyao at 75% via Skill, helped by C2 ER. His shields block interruptions—team like Baizhu/Cyno/Nahida/Fischl hits 100% procs. Baizhu kit into Cyno Burst. Yaoyao Skill into Cyno NAs. Funnel from Fischl.
Keqing Aggravate: Timing It Right
Yaoyao fits quick-swaps (75% uptime, +SPD Burst); Baizhu's solid at 90% but less zippy. Her C1 adds 15% Dendro AoE for Keqing—try Yaoyao/Keqing/Fischl/Nahida. Yaoyao Skill > Fischl > Keqing combo. Baizhu as sustain swap-in. Kazuha for VV shred.
Fischl as On-Field Driver
Both work; Baizhu for 90% hybrid off-field; Yaoyao budget at 70%. Her battery eases ER—example: Baizhu/Fischl/Alhaitham/Yae. Support Dendro > Fischl Oz. Trigger Aggravate NAs. Rotate every 10 seconds.
Yae Miko and Other Drivers
Baizhu pairs best (high uptime for totems); Yaoyao via C4 EM. Triple Dendro with Alhaitham—Baizhu/Alhaitham/Yae/Nahida. Baizhu Burst > Yae Skill. Driver infuse. Quick heals.
More variants in our Aggravate Team Compositions.
Builds and Investment: What It Takes
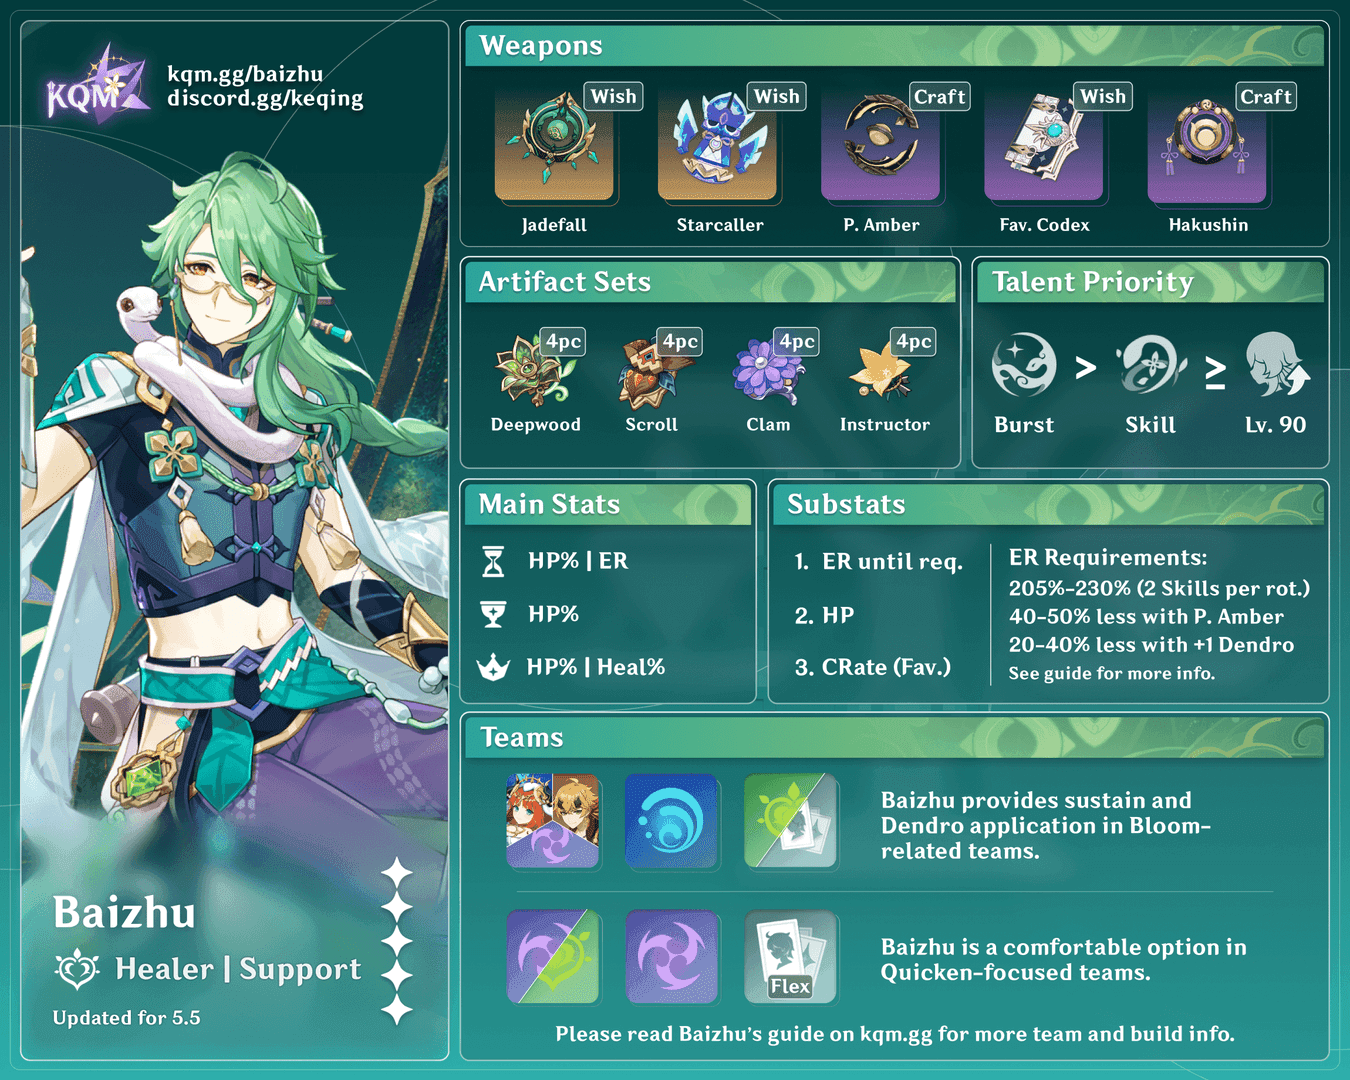
Artifacts: Deepwood, Gilded Dreams, Instructor Picks

Both rock Deepwood 4pc (15% Dendro DMG, 30% RES shred for 8 seconds off-field). Baizhu: HP% or ER sands, HP% goblet, HP% circlet (ER over HP subs). Yaoyao: ER sands, HP% goblet, Healing Bonus circlet (ER > HP/EM). Instructor 4pc alternative (+120 EM party on reaction); Deepwood's non-negotiable for Aggravate. Gilded Dreams for Baizhu's EM share. Farm 5-star pieces. Hit 180%/200% ER first. Test reaction damage.
Weapons: Options and Their Edge
Baizhu: Jadefall's Splendor (608 ATK, +49.6% HP, ER on heal); F2P Prototype Amber (4 ER/2s regen). Yaoyao: Favonius Lance (565 ATK, +30.6% ER, CRIT particles); Black Tassel (46.9% HP). Baizhu needs less ER; Jadefall's maxes A4 at 50k HP. Craft Prototype for him. Pull Favonius for her. Sub ER if low.
ER Thresholds and Battery Support
Baizhu: 180% (3.5 particles per Skill). Yaoyao: 200-220% (1 per radish, up to 5 per Skill). Both 80 Energy; he's self-reliant, she craves Favonius or Raiden. C1 Baizhu adds a Skill charge to ease it. ER sands if under 160%. Funnel from Electro like Fischl. C2 Yaoyao for +18 ER.
Constellation Breakdown: Pull or Pass?
Baizhu C0 is strong; C1 cuts ER, C2 off-field boost, C4 +80 EM. Yaoyao C0 F2P-friendly; C2 fixes ER, C4 +120 EM, C6 +50% AoE. Baizhu's C2/C4 give big returns cheap; Yaoyao's C6 evens uptime. He's on Chronicled Wish January 21-February 11, 2025 (v5.3). Pull Baizhu for hypercarry. Build Yaoyao C0 budget-style. Skip high consts unless AoE's key. Investment: Baizhu needs 420k Mora, 168 Violetgrass, Nagadus Emeralds, 46 Evergloom Rings, 114 Philosophies of Gold. Yaoyao's lighter (168 Jueyun Chili, 46 Quelled Creepers, Diligence talents). Resin-wise, she's F2P efficient.
Team Examples and Swaps
Full Aggravate Squads with Baizhu
Baizhu/Alhaitham/Yae Miko/Fischl: He handles Dendro, heals, shields; Alhaitham drives; Yae/Fischl Electro. 100% uptime, Nahida alt for triple resonance—Baizhu kit > Alhaitham combo. Supports first. Driver NAs. Swap for heals.
Full Aggravate Squads with Yaoyao
Yaoyao/Cyno/Nahida/Fischl: She apps and heals; Cyno drives; Nahida sets up; Fischl batteries. Kazuha sub for VV; 75% balanced uptime. Yaoyao Skill > Cyno Burst. Nahida EM. 15-second repeat.
Hybrid and Flexible Teams
Baizhu/Cyno/Nahida/Kazuha: Healing over Zhongli. Yaoyao/Keqing/Fischl/Nahida: Budget quick-swap. Deepwood on either. Second Dendro slot. Electro battery. Anemo shred.
Swapping in Nahida
Nahida for elite app (Burst marks extra Dendro); pick her if AoE trumps sustain. She's T1 overall—Nahida/Cyno/Fischl/Baizhu hybrid. Nahida Burst > driver. Yaoyao alt heal. EM resonance focus.
Nahida synergies in Understanding Dendro Application Uptime.
Pitfalls to Dodge
Healing Hype Over Dendro Duty
Don't chase heals at uptime's expense—Baizhu and Yaoyao app first. Healing's bonus; skimpy app costs 30% damage. EM subs. Aura watch. Reaction tests.
ICD Mix-Ups and Hit Rates
More hits don't mean better—ICD caps at 2.5 seconds. Baizhu syncs perfect. Time pre-Electro. No reapply mid-trigger. Dual Dendro fix.
Rotation Blunders Killing Uptime
Mid-Burst swaps end Yaoyao; low ER skips turns. Gaps eat 20% uptime. Full kit pre-driver. Particle funnel. C1 Baizhu doubles Skill.
Stat Screw-Ups on Artifacts
ATK builds flop—HP/ER rule. Baizhu HP for buffs; Yaoyao ER for Burst. HP% mains. ER subs priority. Deepwood first.
The Call: Baizhu or Yaoyao for You?
Pick by Scenario
Baizhu for hypercarry (Cyno/Alhaitham, top sustain); Yaoyao F2P quick-swap (Keqing, targeted heals). He's T1 versatile; she's T2 budget.
Your Account's Angle (Roster, Resources)
Got Nahida? Pair with Baizhu. Low resources? Yaoyao's ascension is cheaper. 5-star pull for him vs. 4-star ease for her.
Looking Ahead: Future-Proofing
Both fuel Dendro resonance; Baizhu fits post-v3.6 Electro buffs. They work with new drivers off-field. Build Deepwood now. Watch v5.7 Yaoyao rate-up. EM for scaling.
Tier Verdict for Aggravate
Baizhu A-tier (uptime, comfort); Yaoyao B-tier (F2P solid). Community edges Baizhu for Abyss.
Meta shifts in Best Dendro Supports for Aggravate Teams 2025.
Related Guides:
Dendro Team Building Fundamentals
Electro Driver Character Tier List
Struggling with Aggravate? Our Dendro Support Build Guide or Electro Driver Tier List can unlock that reaction potential.
FAQ
Is Baizhu better than Yaoyao for Aggravate teams?
Yeah, Baizhu takes it with 90-100% Quicken uptime from 14-second Burst ticks every 2.5 seconds, global heals, and shields tanking interruptions—spot-on for on-field drivers like Cyno. Yaoyao manages 60-80% via 10-second Skill radishes but craves 200% ER and C4+ for reliability, shining as F2P targeted healing in quick-swaps like Keqing. Rotation data shows Baizhu pumping Aggravate damage 40% more through A4 passive at 50k HP.
How often does Baizhu apply Dendro compared to Yaoyao?
Baizhu's steady ~0.4 hits per second (three from Skill over 10 seconds + six from Burst over 14) lines up ICD for reliable Quicken; Yaoyao bursts ~1 per second on Skill (10 over 10) but with 15-second CD, it's spottier—20-30% less consistent in multi-target. For instance, Baizhu holds 100% in single-target Cyno; Yaoyao 75% with Nahida. Aim 180% ER for him, 200% for her.
What is the Dendro application uptime for Baizhu's skill?
His Skill covers ~30% over the 10-second CD with three ICD-synced hits, jumping to 90%+ paired with 14-second Burst. It generates 3.5 particles for easy self-sustain. In rotations like Baizhu Skill > Alhaitham infuse > NAs, you get 95% Aggravate procs. Yae Miko funnels Electro best.
Does Yaoyao have better Dendro application than Baizhu?
Nah, her 1-per-second radish rate rules short bursts, but 15-second CD and targeting limit to 60-80% uptime versus Baizhu's 90-100% off-field reliability. C6 ups her AoE 50%, yet his Burst duration wins out. In Keqing teams, she adds mobility (+15% SPD Burst); keep Skill off-field to dodge swap issues.
Which Dendro support is more comfortable for on-field drivers?
Baizhu, no contest—party-wide heals, 250% Dendro-absorb shields every 2.5 seconds, and swap-free Burst make him #1 for hypercarry like Cyno. Yaoyao's active heals and 5-second Burst are emergency clutch but mess with flow. His C2 adds off-field Dendro/heal on 5-second CD. Cap him at 50k HP for buffs; park Yaoyao's Yuegui by the driver.
Who is the best Dendro support for Cyno Aggravate?
Baizhu, hands down—95-100% uptime and shields for his 18-second Burst beat Yaoyao's 75% spotty app. Try Baizhu/Cyno/Nahida/Fischl with Deepwood 4pc for 30% RES shred. Baizhu full kit; Cyno NAs for Aggravate; Fischl ER funnel; C4 Baizhu adds +80 EM party-wide.
👉 Genshin Impact direct top up 👈
✅ Official direct recharge, 100% secure
✅ No waiting – top-up arrives in 7 seconds
✅ Big discounts, low prices to save more
✅ 7×24-hour customer service, ready to assist anytime