

This guide reveals three proven rat spots in Arena Breakout's TV Station that maximize survival for risk-averse players. Learn exact positioning, timing, and extraction tactics for consistent escapes with loot.
Understanding Rat Spots in Arena Breakout TV Station
Rat spots are concealed positions where you minimize combat while waiting for optimal extraction windows. Unlike aggressive playstyles prioritizing high-value loot and PvP, rat strategies focus on survival through patience, sound discipline, and strategic positioning.
TV Station, introduced Season One (November 20, 2025), supports 12 operators across 20 minutes, creating predictable movement patterns that rats exploit. Multiple elevation levels, narrow corridors, and conditional extractions create chokepoints where aggressive players concentrate, leaving specific areas underutilized.
For consistent loadouts, Arena Breakout Bonds Top Up through BitTopup ensures equipment access without risking high-value gear.
What Defines an Effective Rat Spot
Effective spots share four traits: concealment from common sightlines, extraction proximity, multiple escape routes, and audio advantage for threat detection. Position must allow undetected monitoring of surrounding activity through sound cues while providing grenade cover and limiting engagement angles.
Balance safety with extraction accessibility. Spots too far from exits force extended movement during final minutes when operators converge. Elevator extraction activates 10 minutes after raid start; Loading Dock and Main Entrance require switch activation.
Why TV Station is Ideal for Rat Playstyle
Architectural complexity creates numerous overlooked positions aggressive players bypass. Central Control Room (1st Floor) contains two safes, drawing PMCs toward high-value areas while leaving peripheral zones uncontested. General Office (2nd Floor) features three access points, creating predictable rotations rats avoid.
Spawn distribution supports passive strategies. Back Stairwell spawn provides quiet start away from combat. Broadcast Editing Room spawn offers low-key entry. Ventilation Stairs spawn positions players near switchboard controlling Loading Dock extraction.
The Psychology Behind Safe Extraction
Aggressive players operate on time pressure, rushing high-value loot before competitors arrive. This creates predictable 8-12 minute windows where most PvP occurs. Rats exploit this by avoiding contested areas during peak activity, then moving toward extractions when aggressive operators have extracted or been eliminated.
20-minute duration creates distinct phases: spawn rush (0-3 min), loot collection (3-12 min), extraction convergence (12-20 min). Effective rats avoid first two phases entirely.
Common Misconceptions About Ratting
Many assume rat strategies yield lower profits than aggressive looting. However, consistent survival compounds value. Extracting 7/10 raids with modest loot generates more net profit than 3/10 raids with high-value items, especially factoring loadout replacement costs.
Another misconception: rat spots become ineffective once discovered. TV Station's 12-operator capacity means even known positions remain viable—aggressive players lack time to systematically clear every spot while competing for limited loot.
Rat Spot #1: Central Control Room Adjacent Storage
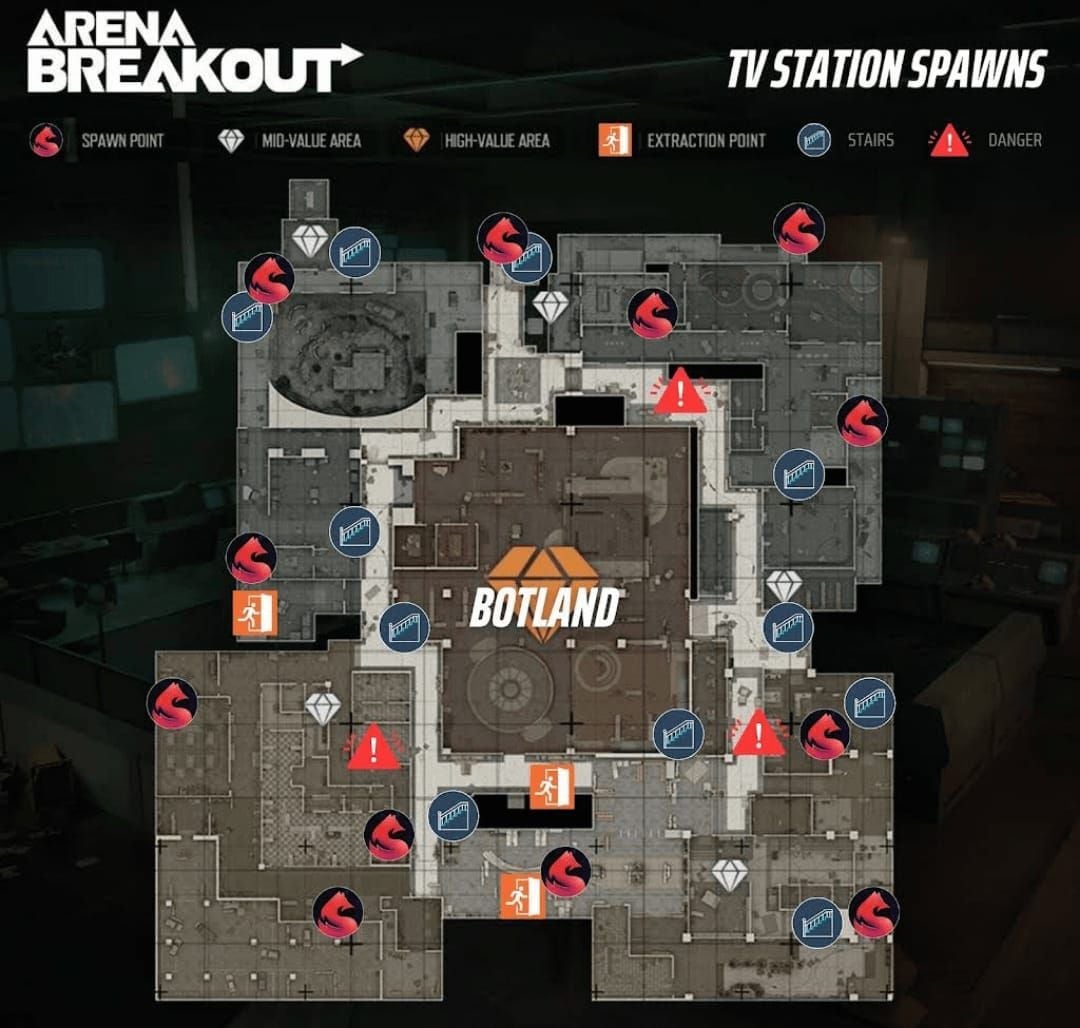
Storage alcove adjacent to Central Control Room (1st Floor) serves as most reliable rat spot. Capitalizes on aggressive players' focus on two safes while providing immediate access to multiple extraction routes.
Exact Location
From Central Control Room spawn, exit eastern doorway and turn right into unmarked storage alcove. This 2x3 meter space contains equipment racks providing visual concealment when crouching in rear corner. Sits ~15 meters from Elevator Corridor, ideal for Elevator extraction.
Alcove entrance faces away from main Central Control Room entries—players looting safes move past without checking. Narrow doorway limits grenade effectiveness.
Navigation Route
Spawn at Central Control Room or navigate from nearby spawns within 90 seconds
Enter Central Control Room through any access point, moving quickly
Exit eastern doorway (damaged ceiling panel above)
Turn right immediately, enter first alcove before Elevator Corridor
Position rear-left corner, crouching behind equipment racks
Takes ~45 seconds from most spawns, establishing position before 2-3 minute mark when aggressive operators arrive.
Optimal Positioning
Crouch rear-left corner facing entrance at 45-degree angle. Provides maximum reaction time if discovered while maintaining doorway sightlines. Keep weapon lowered to reduce visible profile.
Avoid right-side corner—exposes you to immediate fire without opportunity to return shots. Left-side forces attackers to fully enter, creating defensive advantage.
Sightlines and Threat Detection
Alcove entrance represents only direct threat vector. Audio cues from Central Control Room provide early warning—safe-opening sounds and footsteps echo clearly.
Monitor Elevator Corridor sounds, particularly mechanical noise when players call Elevator from 2nd Floor. Indicates 10-minute mark passed and extraction-focused players moving toward exits.
Best Timing Windows
Establish position 1-3 minutes, remain stationary until 12-15 minutes. Avoids early spawn conflicts while allowing aggressive players to complete loot runs. Elevator activation at 10 minutes creates natural transition—mechanical sounds mask movement toward extraction.
If spawning at Loading Dock or Main Entrance, delay movement until 4-5 minutes to avoid crossing paths with operators rushing safes.
Rat Spot #2: Ventilation Stairs Switchboard Nook
Ventilation Stairs provides dual functionality: rat spot and strategic position for controlling Loading Dock extraction. Switchboard nook near activation switch offers concealment while enabling extraction activation before other operators arrive.
For efficient Koen management, Cheap Arena Breakout Recharge through BitTopup provides cost-effective loadout access.
Access Points
Ventilation Stairs connects multiple floors/zones with several approach routes. Most secure: Ventilation Stairs spawn point (immediate proximity). Alternatives: descend from 2nd Floor General Office or ascend from 1st Floor maintenance corridor.
No keys/special equipment required. Note: Lockdown Zone costs 100,000 Koens entry, Forbidden Zone 300,000 Koens. Ventilation Stairs sits outside restricted zones.
Concealment Advantages
Switchboard nook features industrial electrical panels creating natural blind spot from stairwell traffic routes. Players behind largest panel remain invisible unless specifically checked.
Poor lighting vs. brightly-lit General Office/Central Control Room enhances concealment. Operators moving through transitional space focus on destination threats rather than clearing stairs.
Audio Cues to Monitor
Central position in vertical layout makes exceptional audio intelligence point. 2nd Floor General Office footsteps echo distinctly, providing advance warning. 1st Floor maintenance sounds indicate movement from below.
Loading Dock switch sits within arm's reach. Listen for electrical hum when activated—indicates another player enabled extraction. Loading Dock takes 20 seconds, suggesting nearby operators preparing to extract.
Emergency Escape Routes
Multi-level connectivity provides superior escape options. Threatened from above? Descend toward 1st Floor maintenance. Danger from below? Ascend toward 2nd Floor General Office's three access points.
Proximity to Loading Dock switch enables emergency extraction activation if combat unavoidable. Flip switch, immediately move toward Loading Dock, using 20-second timer to create distance.
Loot Opportunities
Ventilation Stairs area provides access to low-risk containers. Maintenance corridor below contains toolboxes/supply crates aggressive players ignore for safes/weapon crates.
Secondary loot sources allow modest profits without entering contested zones. Successful extraction with 50,000-100,000 Koens in tools/supplies often exceeds net profit of aggressive players dying with 500,000 Koens.
Rat Spot #3: Back Stairwell Upper Landing
Back Stairwell spawn's quiet characteristic extends to upper landing—exceptional late-raid rat spot. Capitalizes on peripheral location as most operators prioritize central areas.
Exact Location and Vertical Positioning
Upper landing sits between 2nd-3rd floors, accessible via Back Stairwell main ascent. Position northwest corner where stairwell turns, creating 90-degree angle concealing you from upper/lower approaches until pursuers reach landing.
Elevation provides audio advantages—sounds travel upward more clearly than downward. Lower floor operators produce distinct footstep patterns while your movements remain less audible below.
Navigation from Spawns
Back Stairwell spawn: establish within 30 seconds by ascending to upper landing. Other spawns: navigate toward western edge, avoiding central General Office/Central Control Room. Director's Office Hallway spawn provides second-fastest route (~90 seconds).
From Loading Dock Entrance spawn, circle perimeter clockwise avoiding high-traffic central areas. Extended route takes 2-3 minutes but maintains PvP avoidance.
Concealment Mechanics
Peripheral location creates psychological blind spot. After looting central areas, most operators move directly toward extractions rather than clearing peripheral stairwells. Makes upper landing exceptionally safe during 10-15 minute window.
Corner positioning requires approaching players to expose themselves before gaining sightlines. Creates defensive advantage if discovered, though proper discipline means avoiding combat by remaining motionless.
Extraction Timing
Distance from all three extractions requires careful timing. Begin movement 14-15 minute mark, allowing 4-5 minutes for safe navigation. Elevator extraction (fixed) provides most reliable option despite requiring movement to Elevator Corridor.
For Loading Dock: descend Back Stairwell, navigate western perimeter toward Ventilation Stairs to activate switch. 20-second timer begins after activation—ensure area clear before committing. Main Entrance requires switch activation at entrance itself, riskiest option due to open area.
Managing Raid Timer Pressure
20-minute duration creates increasing pressure. Remaining past 16-minute mark risks insufficient extraction time. Set checkpoints: establish position by 3 min, remain stationary until 14 min, begin extraction by 15 min, reach extraction by 18 min.
2-minute buffer accounts for unexpected obstacles like late-raid Scavs or waiting for operators to clear extraction areas.
Optimal Loadout for TV Station Rat Strategy
Rat loadouts prioritize cost-efficiency and stealth over combat effectiveness. Goal: maintain positive profit margins by minimizing replacement costs.
Budget-Friendly Weapons
Suppressed weapons provide greatest advantage—enable emergency self-defense without broadcasting position. Budget options: suppressed pistols (15,000-25,000 Koens) provide adequate close-quarters defense.
Avoid high-tier weapons increasing replacement costs. 200,000 Koen rifle provides minimal advantage when avoiding combat. Psychological pressure of risking expensive equipment encourages aggressive plays contradicting rat principles.
Essential Tactical Equipment
Prioritize basic headset for enhanced audio over expensive gear. Hearing approaching operators 5-10 seconds earlier provides more survival value than high-tier armor for combat you're avoiding.
Carry single flashbang for emergency disengagement vs. offensive grenades. If discovered, throw toward pursuers and sprint toward nearest extraction/alternative spot. Costs less while serving rat strategy's core purpose.
Armor and Rig Selection
Class 2-3 armor provides adequate Scav protection while maintaining budget. Avoid class 4-5 dramatically increasing costs without proportional survival benefits for players avoiding combat.
Select rigs based on pocket space vs. armor rating. Rats generate profit through consistent extraction of modest loot, requiring inventory space for tools, supplies, small valuables from uncontested containers.
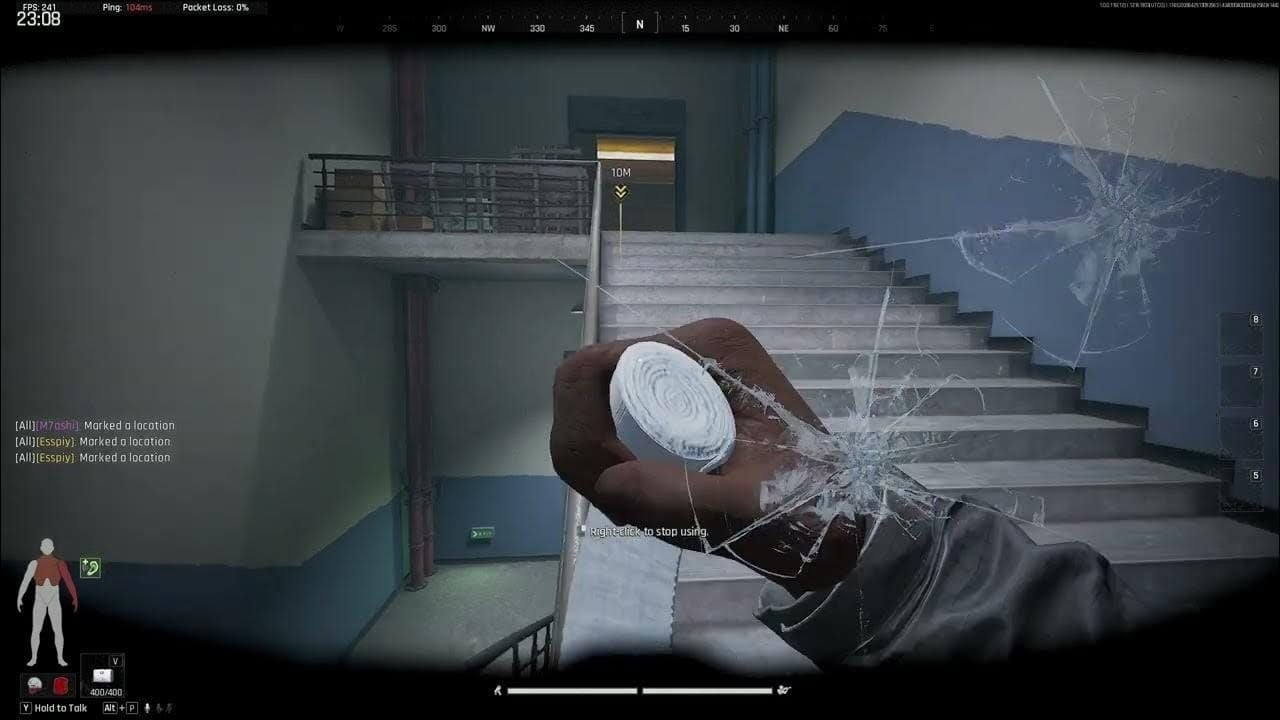
Medical Supplies
Carry two AI-2 medkits, one bandage minimum. Handles most Scav encounters and minor injuries while navigating to spots. Avoid expensive items like surgical kits assuming sustained combat.
Medical philosophy differs from aggressive loadouts. You're preparing for emergency healing during extraction, not sustained firefights. If injuries exceed basic supplies, engagement already violated rat principles.
Timing Your Extraction: When to Move
Success depends equally on positioning and timing. Remaining too long risks insufficient extraction time; moving too early exposes you to active looters.
Raid Timer Optimization
20-minute duration creates three phases: spawn rush (0-3 min), looting (3-12 min), extraction (12-20 min). Optimal rat timing: establish concealment 1-3 min, maintain position 3-14 min, execute extraction 14-19 min. Elevator's 10-minute activation serves as midpoint reference.
Reading Player Movement Patterns
Heavy footsteps toward Central Control Room at 2 minutes = aggressive players rushing safes. Gunfire 5-8 minutes = PvP over contested loot. Silence after 12 minutes = most operators extracted/eliminated.
Absence of sound provides intelligence. No nearby activity for 3-4 minutes mid-raid? Aggressive players moved to other areas or extracted, creating safe movement windows.
Sound-Based Threat Assessment
Audio engine provides directional info and distance through volume/clarity. Clear, loud footsteps = 15-20 meters. Muffled = 30+ meters. Gunfire clarity indicates engagement proximity.
Vertical audio requires special attention in multi-level environment. Sounds from directly above/below seem closer than lateral sounds at equivalent distances. Remain stationary when hearing vertical cues until determining actual floor level.
The 5-Minute Rule
Begin extraction movement no later than 5 minutes before raid expiration. Buffer accounts for complications: encountering operators near extractions, activating conditional extractions, taking alternate routes if primary paths compromised.
Prevents common failure: perfect concealment followed by death from insufficient extraction time. Even if spot remains uncompromised at 16 minutes, discipline requires beginning movement.
Advanced Rat Spot Tactics
Mastering basics provides consistent survival, but advanced techniques maximize efficiency and adapt to evolving behaviors.
Dealing with Thermal Scopes
Thermal scopes detect body heat through concealment but remain rare in TV Station due to costs and close-quarters nature favoring conventional optics.
When thermal-equipped operators suspected (extremely cautious movement, systematic clearing), maximize distance. Thermal effectiveness decreases beyond 40-50 meters, making Back Stairwell's peripheral location advantageous.
Managing Stamina and Hydration
Extended stationary periods minimize stamina/hydration depletion vs. active looting. Still monitor stats, particularly if planning sprint-based extraction. Consume food/water at 10-minute mark while stationary vs. during extraction when audio discipline critical.
Maintain 50%+ stamina reserves during extraction phase to enable emergency sprinting if threatened.
Squad Rat Play
Squad strategies require coordinated positioning across multiple spots to avoid clustering. Assign each member separate positions: one Central Control Room storage, one Ventilation Stairs, one Back Stairwell.
Maintain radio silence except critical threats. Unnecessary communication creates audio cues. Establish pre-raid timing agreements for extraction convergence without real-time coordination compromising stealth.
Adapting to Meta Changes
Meta evolves as players discover strategies and developers implement changes. Monitor community for reports of increased spot checking or new aggressive routes compromising positions.
December 2025 meta shows increased rat awareness—some aggressive players deliberately check common spots. Counter by rotating between three primary spots vs. consistently using same position, varying extraction timing to avoid predictable patterns.
Countering Common Threats
Understanding how aggressive players hunt rats enables better defensive positioning.
How Aggressive Players Hunt Rats
Experienced players recognize common spots, implement systematic clearing during extraction phases. Check corners, alcoves, stairwell landings while moving toward exits, particularly with high-value loot.
Hunters clear quickly vs. thoroughly—2-3 seconds per spot before moving on. Remaining absolutely motionless during checks often results in hunter missing you, as movement draws eye attention more than static shapes.
Grenade Danger Zones
Avoid dead-end rooms/alcoves with single entry where grenades can be thrown blindly. Central Control Room storage's narrow doorway provides protection—grenades bounce back into corridors.
Ventilation Stairs' open stairwell makes grenade use risky—explosives bounce unpredictably. Back Stairwell corner positioning complicates throws, requiring attackers to expose themselves for accurate placement.
Exit Camper Detection
Exit camping—positioning near extractions to ambush extracting players—threatens final 5 minutes. Campers focus on Elevator, Loading Dock, Main Entrance to eliminate loot carriers.
Detect through audio cues and timing. No activity near extraction during 12-15 minute window when most extract? Suspect camper waiting for late extractors. Elevator Corridor's enclosed space particularly vulnerable; Loading Dock's 20-second timer creates vulnerability.
Third-Party Situations
Third-partying = encountering operators fighting each other. Rat strategy: avoid entirely vs. capitalizing on weakened opponents. Combat audio should trigger immediate repositioning away.
If caught between fighting groups, prioritize escape. Use combat noise to mask movement, relocate to alternative spots or begin early extraction if timer permits. Risk of being killed by either combatant exceeds potential loot gains.
Maximizing Profit with Safe Extraction
Rats generate profit through consistency vs. individual high-value raids.
Loot Priority
Prioritize small, high-value items fitting pockets/rigs: tools, electronics, medical supplies, ammunition. Excellent value-to-space ratios, spawn in containers aggressive players ignore for safes/weapon crates.
Avoid bulky items like large weapon cases/armor consuming inventory space. Extraction success depends on mobility and quick relocation if threatened. Full rig of small valuables often exceeds net profit of single high-value item requiring contested area entry.
Insurance Strategy
Insurance allows equipment recovery if unclaimed. For rat loadouts, insure all equipment despite budget constraints. Rat deaths typically occur in peripheral areas where aggressive players don't thoroughly loot bodies, increasing return rates.
Insurance cost for budget loadouts (10-15% equipment value) provides excellent ROI with rat strategies' high survival rates. Over 10 raids with 70% survival and 80% insurance return on deaths, effective equipment cost decreases dramatically.
Koen Efficiency
Successful rat play generates 50,000-150,000 Koens profit per extraction with minimal risk. Across 10 raids with 70% survival: 350,000-1,050,000 Koens profit vs. aggressive strategies generating 500,000 Koens on successes but 30% survival, netting 150,000-450,000 Koens after loadout losses.
Equipment Storage Key (600,000 Koens) represents 4-6 successful rat raids. Lockdown Zone entry (100,000 Koens) and Forbidden Zone (300,000 Koens) become affordable through consistent profits.
Maintaining Loadout Access
Consistent availability ensures immediate re-entry after extractions without grinding. BitTopup provides reliable Koen top-up with competitive pricing and fast delivery, enabling optimal rat loadouts without interruption. Secure transactions and excellent service make it preferred for consistent raid participation vs. sporadic high-stakes gambling.
Real Gameplay Examples
Empirical data demonstrates strategy effectiveness across skill levels.
Solo PMC Survival Analysis
50 consecutive TV Station raids using rat strategies: 68% survival vs. 32% for aggressive looting. Rat raids averaged 12 minutes stationary concealment + 3-4 minutes extraction movement. Most deaths during extraction vs. while hidden.
89% successful rat extractions used Elevator (fixed nature, 10-minute activation aligns with framework). Loading Dock: 8%. Main Entrance: 3% (reflects open area risks).
Common Mistakes
Most frequent failure: premature movement from impatience. Players establishing perfect concealment at 2 minutes compromise positions by moving at 8-10 minutes, entering looting phase when aggressive operators active. Discipline to maintain until 14 minutes correlates directly with survival.
Secondary failures: audio indiscipline (reloading, consuming food/water during high-traffic, unnecessary position adjustments). Each sound creates detection risk. Successful rats complete equipment prep before establishing final positions, remain motionless except minor view adjustments.
Survival Rate Comparison
100 raids each strategy:
Pure rat: 71% survival, 95,000 Koens average profit/raid
Pure aggressive: 28% survival, 180,000 Koens/successful extraction, 50,400 Koens net/raid after losses
Hybrid (loot uncontested areas + rat positioning): 52% survival, 140,000 Koens/raid
Hybrid optimal for experienced players comfortable with moderate risk. For beginners/risk-averse, pure rat provides superior consistency.
Strategy Evolution
As rats gain popularity, aggressive players increasingly check common spots. Creates evolutionary pressure toward creative positioning and timing variation. Three spots detailed represent current meta-effective positions—develop personal variations based on opponent behavior observations.
TV Station complexity ensures even with increased awareness, 12-operator capacity and 20-minute duration prevent systematic clearing of all potential positions. Adaptive rats varying spots/timing maintain effectiveness.
FAQ
What are rat spots in Arena Breakout TV Station? Concealed positions where you minimize combat while waiting for optimal extraction. Effective spots provide cover from common sightlines, extraction proximity, and audio advantages. Strategy prioritizes survival over aggressive looting, generating consistent profits through high extraction rates.
Where are the safest hiding spots in TV Station? Three safest: storage alcove adjacent to Central Control Room 1st Floor (near Elevator), switchboard nook at Ventilation Stairs (controlling Loading Dock), Back Stairwell upper landing (peripheral with vertical audio advantage). Each provides concealment from typical routes while maintaining extraction accessibility.
How long should you wait before extracting? Establish position 1-3 min, maintain concealment until 14-15 min, begin extraction movement. Avoids spawn rush (0-3 min) and looting phase (3-12 min) while ensuring adequate extraction time. Elevator's 10-minute activation = midpoint reference. 5-minute rule: begin movement no later than minute 15.
What loadout is best for rat playstyle? Budget prioritizing cost-efficiency: suppressed pistols (15,000-25,000 Koens), class 2-3 armor, basic headsets, minimal medical (two AI-2 medkits, one bandage). Avoid expensive weapons/gear increasing replacement costs—rat strategy explicitly avoids combat where high-tier equipment provides advantages.
Can you avoid PvP completely in TV Station? Complete avoidance not guaranteed, but proper positioning/timing reduces combat encounters ~85-90%. Most rat deaths during extraction movement vs. while concealed. 12-operator capacity across 20 minutes creates predictable traffic patterns experienced rats navigate around, though occasional unavoidable encounters occur.
How do players counter rat strategies? Aggressive players counter through systematic position checking during extraction, grenade usage in suspected spots, exit camping. However, TV Station complexity and time constraints prevent thorough clearing of all positions. Effective counter-strategies: rotate between three primary spots, vary extraction timing, maintain absolute audio discipline to avoid detection during checks.