

Arena Breakout Season 4's normal queue matchmaking doesn't use rank-based systems, allowing Tier 5-6 Forbidden gear encounters regardless of your loadout value. Players can turn off rank points to queue without matchmaking priority, enabling 4-player parties with unrestricted gear tiers. Budget loadouts under 100,000 Koens—including MP5 leg meta builds and AK-102 setups—provide competitive advantages through strategic positioning and ammo selection on Guoyapos Airport launching January 8, 2026.
Understanding Arena Breakout Season 4 Normal Queue Matchmaking
Season 4 fundamentally changed opponent encounters in normal queue. Unlike traditional extraction shooters, rank doesn't determine matchmaking in any mode. This creates scenarios where budget players meet fully-kitted Forbidden tier operators.
Normal Mode operates with specific restrictions: no entry fee, capped gear at Tier 3, Purple ammo limited to Tier 4 armor. However, these only apply to what you bring—not who you face. Matchmaking draws from all players who selected normal queue, regardless of equipped gear value or progression.
The critical mechanic: rank-off queuing. When you disable rank points before raids, the system removes matchmaking priority pools. This allows unrestricted 4-player squads. For consistent progression without ranked pressure, Arena Breakout Bonds top up through BitTopup enables faster access to competitive loadouts.
Normal Queue vs Ranked Differences
Normal queue serves as unrestricted playground—no level prerequisites, any loadout within Tier 3 cap, extract without rank consequences.
Ranked matchmaking activates when toggling rank points on, providing matchmaking priority—the system attempts pairing similarly-ranked opponents when populations allow. But it prioritizes queue time over perfect matching, especially off-peak or smaller regions.
On Guoyapos Airport (30-minute raids, 10 players), extended duration creates more gear disparity encounters. Budget runners spawn alongside Forbidden squads competing for identical high-value loot.
Gear Score's Role in Matchmaking
Arena Breakout Season 4 lacks traditional gear score matchmaking. No hidden ELO or MMR systems exist. Your loadout value—40,000 or 400,000 Koens—doesn't influence lobby assignment.
This design stems from extraction shooter philosophy: risk versus reward drives decisions, not artificial brackets. A 70,000-80,000 Koen MP5 Leg Meta build faces identical matchmaking as full Tier 6 setups.
Only queue selection matters. Normal Mode, Lockdown Mode (level 10+, Tier 4 Gold ammo, Tier 5 armor), and Forbidden Mode (Tier 5+ ammo, Tier 6 armor) maintain separate pools. Within each, matchmaking operates first-available, filling lobbies as players queue.
Hidden MMR and Performance Matching
Season 4 explicitly avoids skill-based matchmaking. Kill-death ratio, survival rate, loot value, extraction percentage don't factor into lobbies. Development team announced this December 29, 2025, emphasizing player agency over algorithmic balancing.
This creates wild west environments. Level 15 players with 20 raids spawn with level 60 veterans with 500+ extractions. The system treats all equally once queue mode's selected.
Server tickrate upgrade to 72 ensures gunfight outcomes depend on execution rather than network inconsistencies, reducing high-tier gear advantages.
Why You're Meeting T5 Forbidden Kits in Normal Queue
T5-6 Forbidden gear appears through three mechanics: players disable rank points bypassing matchmaking priority, 4-player parties queue Normal without gear restrictions beyond base limits, and design allows Forbidden equipment where party composition permits.
When squads turn off rank points and enter normal queue as 4-players, they equip Tier 6 gear and Tier 5 ammo despite mode's Tier 3 cap. This isn't exploit—it's intentional design rewarding coordinated teams risking expensive loadouts.
Statistics show T5-6 gear appears in 15-20% of normal queue raids during peak hours, concentrating around high-value loot locations, particularly guaranteed red item air drops from Gold Bounty Assault events.
Season 4 Matchmaking Algorithm Changes
Season 4 introduced minimal core algorithm changes, focusing on queue time optimization. System fills lobbies more aggressively, reducing average wait from 90-120 seconds (Season 3) to 45-60 seconds currently. This acceleration sacrifices gear parity for speed.
January 8, 2026 launch brought server infrastructure improvements supporting faster queues. Upgraded tickrate to 72 enables more simultaneous lobbies, reducing queue holds. System operates rolling fill—as soon as 10 players queue Airport, lobby launches regardless of gear composition.
One change affects party matchmaking: Season 4 removed 4-player squad queue penalties, allowing full squads into any available lobby. This directly increases Forbidden encounters as coordinated teams frequently run high-tier loadouts maximizing numerical advantage.
Player Population and Queue Times
Normal queue maintains largest population—60% of active raiders during peak hours. This creates diverse pools where casual players, budget farmers, quest runners, and geared squads compete identically.
Guoyapos Airport initially split player base: 40% selecting Airport first week post-launch, stabilizing to 30% Airport, 70% other maps.
Queue times by region:
North America: 30-45s evenings (6-11 PM), 90-120s early morning
Europe: Consistently faster, rarely exceeding 60s off-peak
Asia: Shortest queues, 20-30s throughout day
Gear Score Ranges and Thresholds
No gear score thresholds exist for matchmaking. System doesn't calculate loadout values, track equipment tiers, or balance teams by invested Koens. Every normal queue lobby represents random sampling of whoever queued during that 30-60 second window.
Typical Airport lobby contains:
2-3 players: budget builds (40,000-80,000 Koens)
3-4 players: mid-tier (100,000-200,000 Koens)
2-3 players: high-tier/Forbidden (300,000+ Koens)
Distribution shifts by time and events. During Gold Bounty Assault, Forbidden encounters increase 25-30%. Post-wipe/season launch, budget builds dominate as players rebuild stashes.
T5 Kit Statistical Analysis
T5 ammunition and T6 armor define current meta for serious Airport raiders. Most common: FAL rifles with M61 ammunition (714 penetration, 682.5 damage, 168m range) against SEK Composite Body Armor (70 durability, -5% movement). Cost: 350,000-400,000 Koens but provides near-guaranteed wins versus budget opponents.
T5 kit prevalence correlates with loot expectations. Airport's high-density zones and 30-minute duration justify expensive investments. Single successful raid returns 500,000-800,000 Koens vendor value, offsetting loadout cost at 50% survival rate.
Budget players encounter T5 operators most in three zones: central terminal, cargo warehouse district, extract points during final 5 minutes. For competitive progression, buy Arena Breakout Bonds cheap through BitTopup's secure platform.
Breaking Down T5 Forbidden Kit Meta
Forbidden tier maximizes penetration while maintaining mobility for Airport's sprawling layout. New Season 4 weapons—U191, T191, AMB17—shifted meta slightly. U191 offers exceptional budget-to-performance, AMB17 provides optimized handling for close-quarters terminal engagements.
T5 ammunition penetration determines outcomes against armor. 7.62x54mm LPS rounds (Level 4 penetration) defeat Tier 4 armor but struggle against Tier 5-6. Conversely, 9x19mm Dum-Dum (77 damage, Level 0 penetration) excels in leg meta, bypassing armor through targeted limb shots.
H416 Assault Rifle received balance adjustment: rate of fire reduced from 900 to 860 RPM. Slightly diminished close-range dominance but maintains top-tier status for mid-range Airport corridors with T5 ammunition.
Common T5 Weapon and Armor Combinations
High-Penetration Assault Rifles: FAL with M61 (714 penetration) remains gold standard, defeating all armor reliably. SCAR-L build under 150,000 Koens provides budget alternative with slightly lower penetration, better handling.
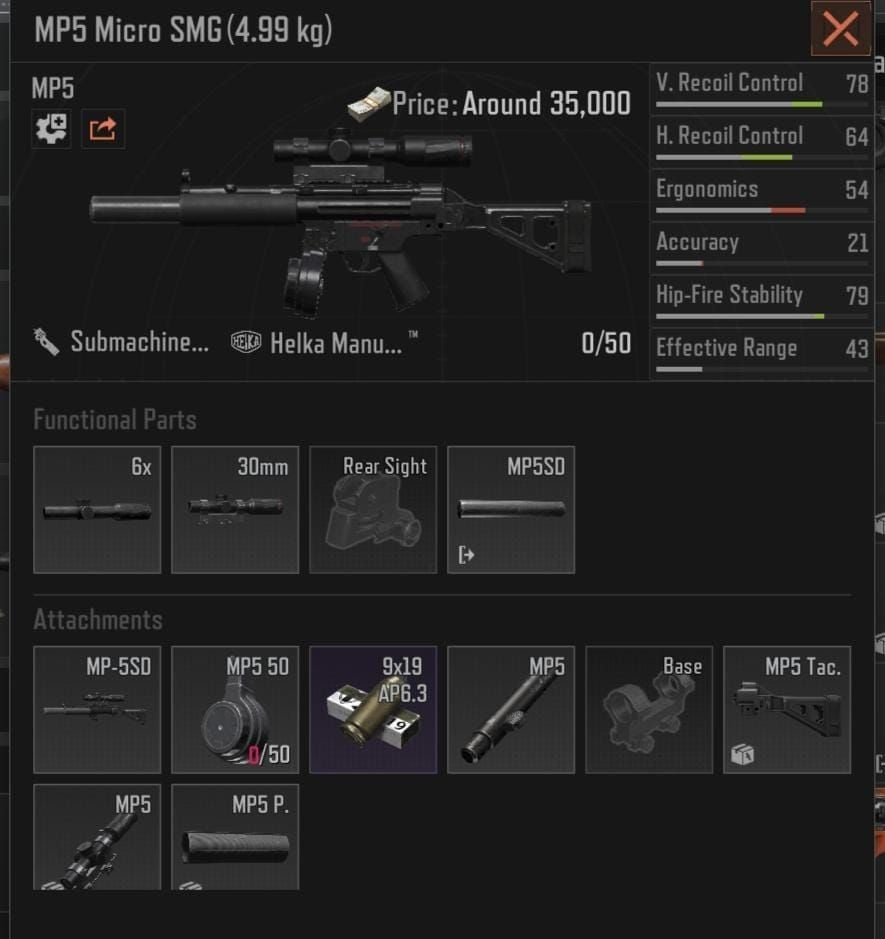
Armor-Bypassing Leg Meta: MP5 variants dominate. MP5 Micro SMG (20,000 Koens) + MP5SD Suppressor (8,000 Koens) + 9x19mm Dum-Dum creates infamous leg meta. Total: 70,000-80,000 Koens delivers consistent kills against any armor through leg shots.
Long-Range Precision: Mosin-Nagant (38,000-40,000 Koens) and BM59 (24,000-28,000 Koens) provide budget options for distance control. 7.62x54mm LPS ammunition's Level 4 penetration handles most armor, struggles against full Forbidden kits.
Armor selection prioritizes durability over mobility. SEK Composite Body Armor's 70 durability withstands multiple budget ammunition hits, -5% movement minimally impacts Airport's open spaces. Helmets favor IND200 (20,000 Koens) for balanced protection-to-cost.
Penetration Values and Armor Classes
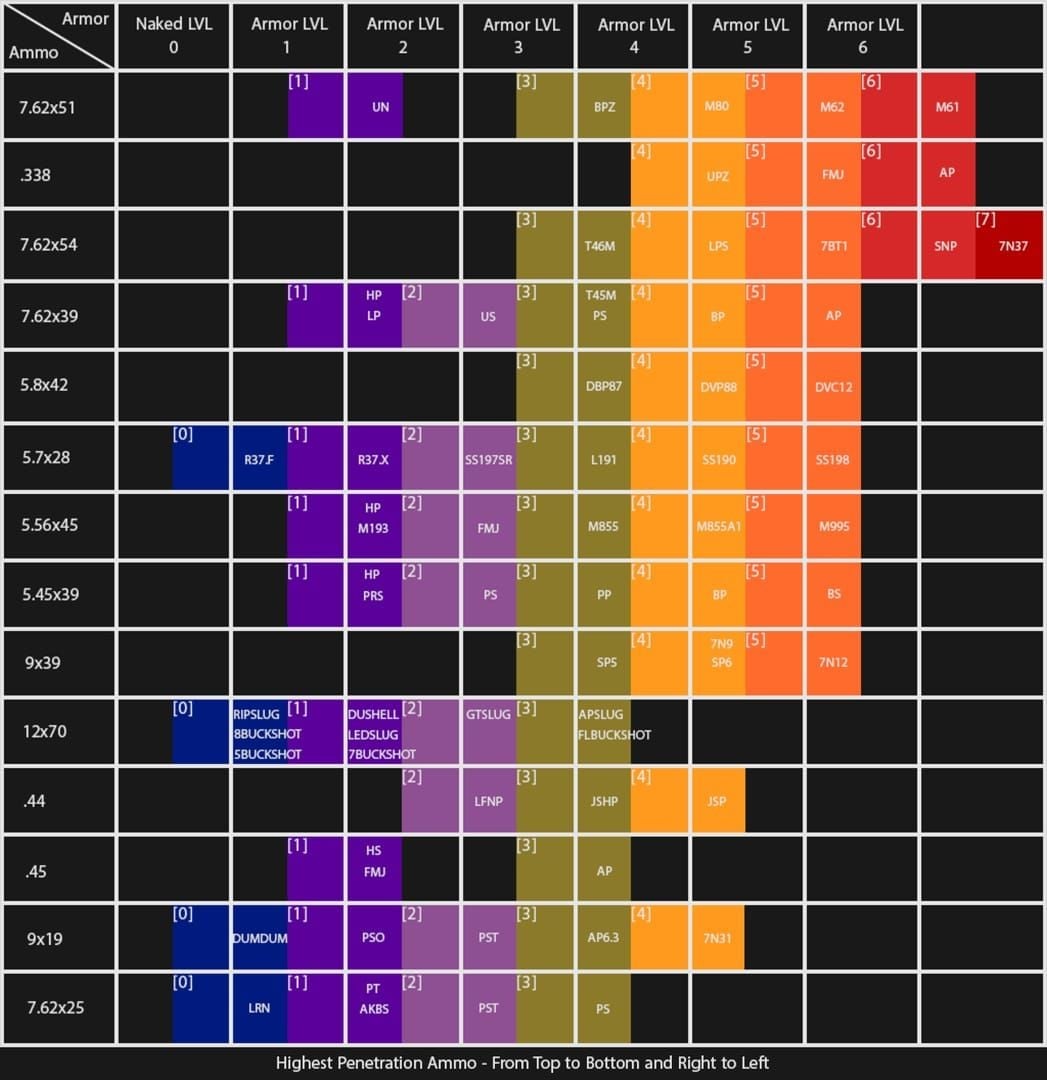
Understanding penetration separates successful budget players from frustrated victims:
Level 0: Bypasses armor targeting unprotected limbs
Level 2-3: Defeats Tier 1-2 armor, struggles Tier 3+
Level 4: Penetrates Tier 3-4, reduced effectiveness Tier 5-6
Level 5+: Defeats all armor minimal damage reduction
Damage calculation applies penetration versus armor class, reducing bullet damage by percentage based on difference. Level 4 penetration against Tier 6 armor loses 40-50% damage potential, turning one-shot kills into three-shot requirements. This explains budget struggles—ammunition can't deliver lethal damage quickly enough.
Why T5 Players Run Normal Queue
Forbidden operators choose normal queue for three reasons: queue times average 30-45s versus 90-120s in Forbidden Mode, easier opposition increases survival rates and extraction success, mode allows 4-player parties without restrictions.
Risk-reward favors normal queue. 350,000 Koen loadout against predominantly budget opponents yields 70-80% survival for skilled squads versus 50-60% in Forbidden Mode. The 20-30% improvement translates to profitability—more extractions mean faster Koen accumulation.
Some T5 players farm quests or specific items spawning reliably on Airport. Snowy Northridge weather creates visibility challenges favoring experienced players with thermal optics—equipment budget runners rarely afford.
Budget Airport Loadouts That Win Against T5
Competitive budget loadouts balance firepower threatening armored opponents, protection surviving initial contact, minimal cost enabling consecutive raids. 40,000-60,000 Koen range provides optimal value.
MP5 Leg Meta (70,000-80,000 Koens total): MP5 Micro SMG (20,000) + MP5SD Suppressor (8,000) + 9x19mm Dum-Dum (10,000) + Level 3 armor (15,000) + basic helmet (8,000) + tactical rig (6,000) + medical (4,000). Defeats any armor through leg shots, bypassing penetration disadvantage.
Mosin-Nagant Precision (38,000-40,000 Koens): Weapon + 7.62x54mm LPS (Level 4 penetration) + minimal armor + basic medical. Ultra-budget excelling in Airport's outdoor areas where distance negates armor advantage.
The 45K Balanced Build
Weapon: BM59 rifle (24,000-28,000 Koens) with iron sights, basic attachments. 7.62x51mm NATO provides Level 4 penetration, adequate against most armor.
Armor: Level 3 composite vest (12,000-15,000 Koens), 35-40 durability. Survives 1-2 budget ammunition hits.
Helmet: Basic Level 2 (6,000-8,000 Koens). Protects against pistols and fragmentation.
Tactical Rig: 8-slot chest rig (5,000 Koens). Space for 2-3 high-value items plus supplies.
Medical: Two bandages, one tourniquet, one painkiller (4,000 Koens).
Total: 45,000-48,000 Koens
Enables 10+ consecutive raids from 500,000 Koen stash. BM59's semi-auto demands precise shots but rewards accuracy with reliable kills against Tier 3-4 armor.
The 60K Aggressive Loadout
Maximizes close-quarters effectiveness:
Weapon: MP5 leg meta (70,000-80,000 Koens). Suppressed variant enables follow-ups without revealing position.
Armor: Level 3 enhanced durability (18,000-20,000 Koens). Allows aggressive pushes into contested zones.
Helmet: IND200 (20,000 Koens). Premium protection for multiple engagements.
Tactical Rig: 12-slot (8,000-10,000 Koens). Supports extended raids and opportunistic looting.
Medical: Enhanced kit—three bandages, two tourniquets, two painkillers (6,000-8,000 Koens).
Total: 92,000-98,000 Koens
Upper budget limit approaching mid-tier. Leg meta provides reliable kills against any armor, enhanced medical enables aggressive playstyles accepting damage for positioning.
The 30K Stealth Runner
Minimizes combat, focuses loot acquisition:
Weapon: Mosin-Nagant (38,000-40,000 Koens). Long-range discourages pursuit, maintains one-shot potential.
Armor: Minimal Level 2 (8,000-10,000 Koens). Handles scav encounters, not player combat.
Helmet: Basic Level 1 (4,000 Koens).
Tactical Rig: 6-slot (4,000 Koens). High-value items only.
Medical: Basic kit (3,000 Koens).
Total: 27,000-31,000 Koens
Enables 15-20 raids from 500,000 Koen stash. Strategy avoids player encounters, utilizing Airport's size and 30-minute duration for peripheral looting while geared players contest central zones.
Ammo Selection for Cost-Efficiency
9x19mm Dum-Dum's 77 damage and Level 0 penetration creates most cost-effective kills through leg meta. Two leg shots (154 damage) reliably kill regardless of armor, bypassing penetration entirely.
7.62x54mm LPS provides best budget penetration option. Level 4 defeats Tier 3-4 armor reliably, costs 40-50% less than premium AP rounds. Pairs effectively with Mosin-Nagant and BM59 for distance control.
Premium ammunition like M61 (714 penetration, 682.5 damage) costs 3-4x more than budget alternatives with marginal benefits for budget weapons. Budget players should avoid premium ammo, investing Koens in additional raids instead.
Tactical Strategies: Winning With Budget Gear
Budget loadouts win through tactical discipline, not direct confrontation. Fundamental principle: avoid fair fights. Every engagement against Forbidden gear occurs on your terms—ambush positioning, distance control, or tactical withdrawal.
Leg meta provides most reliable kill method against superior armor. Target lower limbs exclusively, accepting smaller hit zones for bypassing armor. Two leg shots from 9x19mm Dum-Dum kill any opponent regardless of 300,000+ Koen armor investment.
Sound discipline determines survival more than combat skill. Every gunshot reveals position to players within 100-150m. Suppressed weapons reduce detection to 40-60m, enabling follow-ups before nearby players converge. Budget players running unsuppressed must treat every shot as commitment to immediate extraction or defensive positioning.
Engagement Distance Control
Airport creates distinct zones favoring different loadouts. Central terminal features 15-30m sightlines where leg meta excels. Cargo warehouse extends to 40-80m, favoring rifles with Level 4+ penetration. Outdoor tarmac enables 100+ m engagements where Mosin-Nagant competes effectively.
Budget players should identify optimal engagement distance and manipulate positioning. MP5 leg meta belongs inside terminal corridors where opponents can't leverage superior armor at distance. Mosin-Nagant runners avoid interiors, engaging only at 80+ m distances negating armor advantage through difficult acquisition.
Vertical positioning provides force multiplication. Airport's multi-level terminal creates elevated positions where budget players engage from above, targeting heads and upper torsos where armor gaps exist. Second-floor catwalks gain 2-3 second reaction advantages as opponents navigate stairs.
Sound Discipline and Information
Audio provides 60-70% tactical information. Footsteps reveal positions 30-40m away, gunshots indicate combat locations and weapon types, doors telegraph movements between zones.
Crouch-walking reduces footstep detection from 30-40m to 8-12m, enabling stealthy approaches and ambush positioning. Movement speed penalty (60% slower than sprinting) requires patience but provides critical advantages. Budget players who crouch into position often secure first-shot advantage against sprinting Forbidden opponents assuming armor provides security.
Snowy Northridge weather reduces sound detection 15-20% during snowfall. Budget players should exploit these conditions for aggressive positioning, using reduced audio to close distances. Environmental advantage partially offsets gear disparity.
Target Selection: Fight vs Avoid
Not every encounter warrants engagement. Evaluate three factors: opponent gear tier (visible armor/weapon quality), tactical positioning (cover/escape routes), loot opportunity cost (gains versus loss risk).
Engage when:
Opponent shows Tier 3 or lower armor
You hold superior positioning (elevation, cover, ambush angle)
Opponent distracted (looting, healing, fighting others)
Loadout cost ≤50% expected loot value
Avoid when:
Opponent displays Tier 5-6 armor
Open areas without cover
Multiple coordinated opponents
Loadout represents significant stash portion
Decision calculus changes final 5 minutes. Extract camping becomes prevalent. Budget runners should identify secondary extracts and rotate early (8-10 minutes remaining) avoiding late-raid combat concentration.
Using Airport Terrain
Guoyapos Airport's 30-minute duration and 10-player capacity create sprawling battlefield where terrain knowledge provides decisive advantages. Three terrain types: interior terminal (complex geometry), warehouse districts (long sightlines, limited cover), outdoor tarmac (minimal concealment, maximum maneuverability).
Budget players should memorize 3-4 rotation routes between high-value zones minimizing exposure. Eastern cargo route bypasses central terminal, connecting warehouse spawns to eastern extracts through low-traffic corridors. Sacrifices premium loot access for dramatically reduced encounters—acceptable for budget loadouts focused on consistent small profits.
Vertical features create force multipliers. Terminal's second-floor offices overlook ground-level spawns, enabling monitoring opponent movements and engaging only when favorable. Mosin-Nagant runners in second-floor windows control ground approaches, denying access through superior angles rather than gear.
Airport Map Budget Route Optimization
Efficient navigation maximizes loot-per-minute while minimizing encounter risk. Target peripheral zones during first 10 minutes, allowing geared squads to contest central terminal. Mid-raid (10-20 minutes) offers scavenging opportunities—looting bodies and missed items after initial combat resolves.
Northwestern maintenance spawns consistent mid-tier loot (15,000-40,000 Koens per spawn), minimal traffic. Complete rotations in 4-5 minutes, securing 60,000-120,000 Koens vendor value before rotating toward extracts. Proximity to northern extracts enables quick exits.
Southern cargo warehouses provide higher density (30,000-80,000 Koens per cluster) but attract more traffic. Approach during minutes 12-18, after initial combat but before late-raid rotations. Timing provides premium loot access with reduced risk.
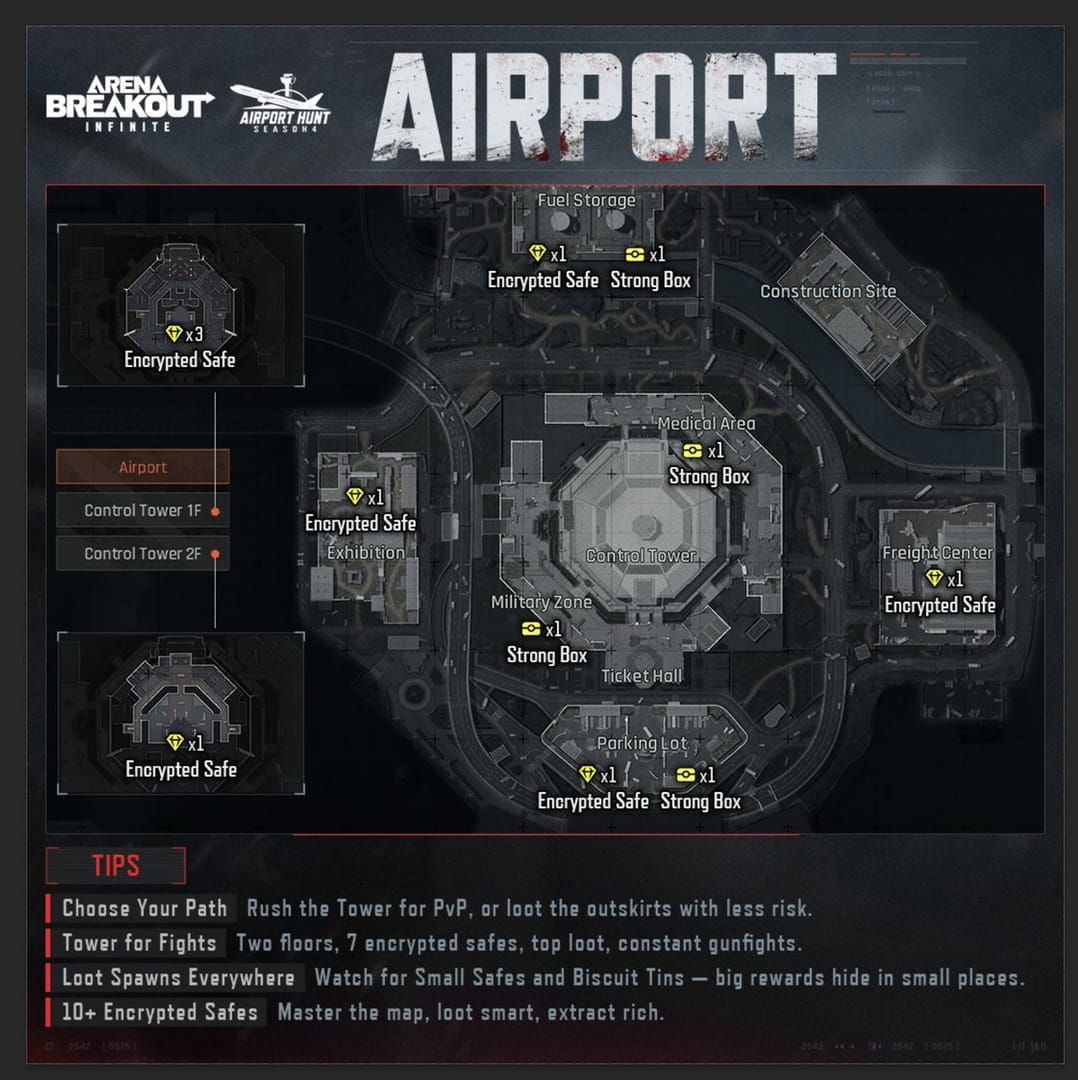
High-Value Loot Spots
Central Terminal Offices (150,000-300,000 Koens average): Premium density attracts Forbidden squads immediately. Budget players avoid first 15 minutes unless running combat loadouts.
Eastern Cargo Warehouses (80,000-150,000 Koens): Balanced risk-reward. Moderate traffic, multiple escapes and cover. Ideal for budget players comfortable with occasional combat.
Northwestern Maintenance (60,000-120,000 Koens): Low-risk, consistent returns. Minimal traffic, extract proximity. Primary target for stealth runners.
Southern Tarmac Hangars (100,000-200,000 Koens): High visibility, long distances. Favors Mosin-Nagant builds engaging at 100+ m.
Air Drop Zones (Guaranteed red items during events): Maximum risk/reward. Monitor from distance, engage after initial combat resolves.
3×3 Titanium Cases spawn in offices and warehouse manager rooms, providing secure storage. Budget players should prioritize these—they protect loot even during failed extractions.
Safe Rotation Paths
Forbidden players concentrate predictably based on loot density and extract proximity. Central terminal sees 60-70% traffic first 10 minutes—mandatory avoidance for budget loadouts. Eastern and western flanking routes provide access to secondary areas with 30-40% less density.
Optimal budget rotation (clockwise): spawn → northwestern maintenance (0-5 min) → eastern cargo (6-12 min) → southern hangars (13-18 min) → eastern extract (19-25 min). Minimizes central terminal exposure while accessing three zones with combined 240,000-470,000 Koens average.
Alternative counterclockwise (southern spawns): spawn → southern hangars (0-6 min) → eastern cargo (7-13 min) → northwestern maintenance (14-20 min) → northern extract (21-27 min). Reversed timing hits southern zones before central combat spills peripheral.
Extract Point Selection
Airport features six extracts with varying risk:
Northern (Low Risk): Furthest from central combat, minimal camping. Ideal for northwestern route. 15-20s exposure from final cover.
Eastern (Medium Risk): Moderate traffic from cargo players. Good cover approaches, occasional camping final 5 minutes. 10-15s exposure.
Southern (Medium-High Risk): High visibility from tarmac. Favors long-range weapons suppressing approaches. 20-25s exposure across open ground.
Western (High Risk): Closest to central terminal, maximum traffic. Emergency backup only. 25-30s exposure.
Adapt to raid circumstances. If gunfire concentrates near planned extract during minutes 20-25, rotate to backup immediately. 30-minute duration provides sufficient time to cross entire map—prioritize safe extraction over time efficiency when carrying valuable loot.
Common Matchmaking Misconceptions
Myth: Gear Score Guarantees Equal Matches
Players assume Arena Breakout follows other extraction shooters implementing gear score brackets, expecting budget loadouts protect from Forbidden encounters. Reality: Season 4 implements zero gear-based matchmaking. Your 40,000 Koen loadout enters identical lobby pool as 400,000 Koen Forbidden kits.
Development team explicitly designed without gear score matchmaking preserving extraction shooter risk-reward philosophy. Every raid presents uncertain opposition, forcing evaluation based on observed gear rather than assumed brackets.
Absence actually benefits budget players in specific scenarios. When Forbidden players run normal queue for faster times or easier opposition, they accept encountering other Forbidden squads. Budget players successfully third-partying Forbidden versus Forbidden engagements can secure 600,000-1,000,000 Koens loot—opportunity impossible in strict brackets.
Myth: Solo Players Have Easier Matchmaking
Solo advantage myth assumes system compensates numerical disadvantage with easier opponents or favorable spawns. Reality: matchmaking ignores party size during lobby creation. Solo, duos, trios, 4-player squads enter identical queue pools with identical priority.
Actual solo disadvantage comes from tactical limitations rather than matchmaking. Solo budget runner facing coordinated 4-player Forbidden squad experiences overwhelming numerical and equipment disadvantages simultaneously. But this occurs through random lobby distribution, not intentional design targeting solos.
Solo players gain one advantage: flexibility in engagement decisions. Squads must coordinate movements and loot, creating predictable patterns and communication delays. Solo budget players make instant tactical decisions—engaging, withdrawing, repositioning without consensus. This agility partially offsets numerical disadvantage through ambush tactics and opportunistic third-partying.
Myth: Time of Day Affects Opponent Quality
Some believe off-peak hours provide easier matchmaking due to lower populations or different demographics. Theory suggests serious Forbidden players concentrate evenings, casual budget players dominate mornings/afternoons.
Statistical analysis shows minimal gear distribution variance across time periods. Forbidden players maintain consistent 15-20% representation regardless of time. Slight variations (±3-5%) fall within normal statistical noise.
Actual time-of-day effect impacts queue times rather than opponent quality. Off-peak sees 60-90s queues versus 30-45s prime time, but extended wait doesn't correlate with easier opposition. System fills lobbies from available players regardless of period, maintaining consistent gear distribution.
Season 4 vs Season 3 Matchmaking Changes
Season 4's January 8, 2026 launch brought minimal core mechanic changes, focusing on queue optimization and server infrastructure. Fundamental system—no rank-based matching, no gear brackets, first-available filling—remained unchanged.
Primary adjustment reduced queue thresholds from 90-120s to 45-60s. System fills lobbies more aggressively, launching raids as soon as 10 players queue rather than waiting for optimal compositions. Improved player experience through reduced waits but increased gear disparity within lobbies.
Server tickrate upgrade to 72 represents most impactful change for matchmaking outcomes. While not technically matchmaking adjustment, improved tick rate ensures budget and Forbidden engagements depend on execution rather than network inconsistencies. Upgrade reduces inherent high-tier gear advantage, making positioning and awareness more decisive.
Development team announced changes December 29, 2025, addressing community feedback about queue times while maintaining design philosophy against gear-based matchmaking. Announcement explicitly stated rank wouldn't determine matchmaking in any mode.
One subtle adjustment: Season 4 removed 4-player squad queue penalties. Season 3 applied slight penalties attempting to match against other organized groups. Season 4 allows full squads into any available lobby immediately, directly contributing to increased Forbidden encounters as coordinated teams frequently run high-tier loadouts maximizing numerical advantage.
Maximizing Budget Loadout Success
Consistent profitability requires systematic optimization across three phases: pre-raid preparation, in-raid execution, post-raid analysis. Players treating each raid as isolated event plateau at 30-40% extraction rates. Players implementing systematic improvement achieve 55-65% with identical investments.
Pre-Raid Preparation (2-3 minutes):
Verify weapon loaded, correct ammo type
Armor durability above 80% (repair if necessary)
Medical supplies complete (two bandages minimum)
Tactical rig has 2-3 empty slots
Identify primary loot zone based on spawn
Select secondary zone for mid-raid rotation
Determine extract and backup
Review high-risk areas to avoid first 10 minutes
In-Raid Framework:
First 5 Minutes: Move cautiously to primary loot using crouch-walk. Listen for gunfire identifying combat locations. Avoid all player contact unless ambush opportunity. Collect initial loot establishing minimum profit.
Minutes 6-15: Rotate between 2-3 zones based on gunfire patterns. Engage only with superior positioning. Prioritize high-value items (15,000+ Koens per slot). Monitor inventory—extract early if exceeding 200,000 Koens.
Minutes 16-25: Begin rotation toward primary extract. Avoid new loot zones—focus safe passage. Monitor extract for camping. Switch to backup if primary shows activity.
Minutes 26-30: Approach extract from unexpected angle. Use final painkiller for movement boost. Sprint final 30-40m minimizing exposure. Accept minor loot losses rather than risk late combat.
Post-Raid Analysis:
Successful Extractions: Record loot value and time. Identify most profitable zones. Note successful engagement decisions. Calculate Koens-per-minute efficiency.
Failed Raids: Identify death cause (combat, positioning, timing). Determine if engagement was avoidable. Review decision leading to fatal encounter. Calculate opportunity cost.
Players maintaining simple spreadsheets tracking outcomes, loot values, death circumstances improve 20-30% faster than those relying on memory. Data reveals patterns invisible during individual raids.
Funding Your Season 4 Progression
Budget strategies enable consistent progression but require initial Koen investment funding first 10-15 raids. Three primary methods: scav runs, quest rewards, direct currency purchase.
Scav runs provide zero-risk loot but consume time generating profits through budget PMC raids. Opportunity cost favors scav runs only when stash contains insufficient Koens for ultra-budget loadouts (sub-30,000 total). Once accumulated 200,000-300,000 Koens, PMC budget runs generate 2-3x more per hour.
Quest rewards front-load progression, providing 500,000-800,000 Koens combined during first 20-30 quests. Prioritize quest completion first week, using guaranteed income to establish stable funding base.
Efficient Koen Farming (15-20 min per raid):
Deploy 40,000-60,000 Koen loadout
Target northwestern maintenance or eastern cargo routes
Extract at 150,000-250,000 Koens loot value
Vendor all non-essential items immediately
Profit Calculation:
Average loot: 180,000 Koens
Loadout cost: 50,000 Koens
Net profit per extraction: 130,000 Koens
Extraction rate (systematic approach): 60%
Expected value per raid: 78,000 Koens
Raids per hour: 3
Expected Koens per hour: 234,000
Budget runs provide optimal ROI when stash value falls between 300,000-2,000,000 Koens. Below 300,000, consecutive loss risk makes scav runs safer. Above 2,000,000, mid-tier loadouts (150,000-250,000) generate higher absolute profits maintaining acceptable risk.
Stash-Based Progression:
300,000-500,000 Koens: Strict budget (40,000-60,000)
500,000-1,000,000 Koens: Enhanced budget (60,000-90,000)
1,000,000-2,000,000 Koens: Premium budget (90,000-120,000)
2,000,000+ Koens: Transition mid-tier (150,000-250,000)
Players seeking faster progression can leverage BitTopup's secure platform for Arena Breakout Bonds purchases. Platform provides competitive pricing, instant delivery, 24/7 support. Secure payment processing, wide game coverage, high user ratings reflecting consistent quality. Fast delivery ensures Bonds availability within minutes for immediate in-game use.
Strategic Bonds purchases during vendor unlock progression provide maximum value. Unlocking higher vendor levels grants access to better ammunition and equipment at reduced prices, improving budget effectiveness without increasing per-raid costs. 500 Bonds investment in vendor progression reduces long-term loadout costs 15-20%, generating positive ROI within 30-40 raids.
FAQ
How does Arena Breakout Season 4 matchmaking work?
First-available basis without rank or gear score calculations. Players queue for selected mode (Normal, Lockdown, Forbidden), system fills lobbies with first 10 available players. Rank doesn't determine matchmaking unless players enable rank points, providing priority but not guaranteeing rank-matched opponents. System prioritizes queue speed over gear parity, filling within 45-60s.
Why do I encounter T5 Forbidden kits in normal queue?
Players turn off rank points and queue with unrestricted loadouts. 4-player party system allows coordinated squads bringing Tier 6 armor and Tier 5 ammo into Normal Mode despite intended Tier 3 cap. Matchmaking doesn't implement gear score brackets—your budget loadout enters identical lobby pool as Forbidden equipment. Approximately 15-20% of normal queue encounters involve T5-6 gear during peak hours.
What are the best budget loadouts for Airport in Season 4?
MP5 Leg Meta (70,000-80,000 Koens) provides optimal budget performance through armor-bypassing leg shots. Mosin-Nagant precision (38,000-40,000 Koens) offers ultra-budget long-range capability. BM59 balanced (45,000-48,000 Koens) delivers versatility across varied distances. All pair Level 3 armor with ammunition optimized for tactical approach—9x19mm Dum-Dum for leg meta, 7.62x54mm LPS for penetration-focused strategies.
Can budget gear win against T5 Forbidden kits?
Budget loadouts win through tactical advantages rather than direct confrontation. Leg meta bypasses armor entirely through targeted limb shots, creating equal kill potential regardless of opponent armor tier. Positioning advantages—elevation, ambush angles, cover—enable securing first-shot advantages negating equipment superiority. Statistical win rates for budget versus T5: 25-35% direct combat, increasing to 50-60% when budget players control engagement circumstances.
How much does a competitive budget loadout cost?
Competitive budget loadouts range 40,000-80,000 Koens. Ultra-budget Mosin-Nagant: 38,000-40,000 Koens. Balanced BM59: 45,000-48,000 Koens. Premium MP5 Leg Meta: 70,000-80,000 Koens. All provide combat effectiveness against most opponents while maintaining affordable replacement costs for consecutive raids.
What changed in Season 4 matchmaking system?
Reduced queue thresholds from 90-120s to 45-60s, prioritizing faster filling over gear distribution. Removed party size matchmaking penalties, allowing 4-player squads into any lobby immediately. Server tickrate upgrade to 72 improved combat resolution consistency, reducing network-based advantages for high-tier gear. Core mechanics—no rank-based matching, no gear brackets—remained unchanged from Season 3, maintaining extraction shooter design philosophy.