

Arena Breakout's Ignition Season 4 shakes things up with new T4 gear like SEK Composite armor, spawn-based extraction routes that actually make sense, and S-Tier weapons including FAL and MPX boosting PvP survival by 31%. This guide breaks down optimal extraction strategies, profit techniques hitting 100k+ Koens per hour, and advanced tactics for both solo wolves and squad players across Farm, Valley, and Northridge.
Arena Breakout Season 4 Ignition Overview
Ignition Season 4 completely rewrites the extraction playbook. Gone are the days of mindless rushing—now it's all about calculated risks and smart gear choices.
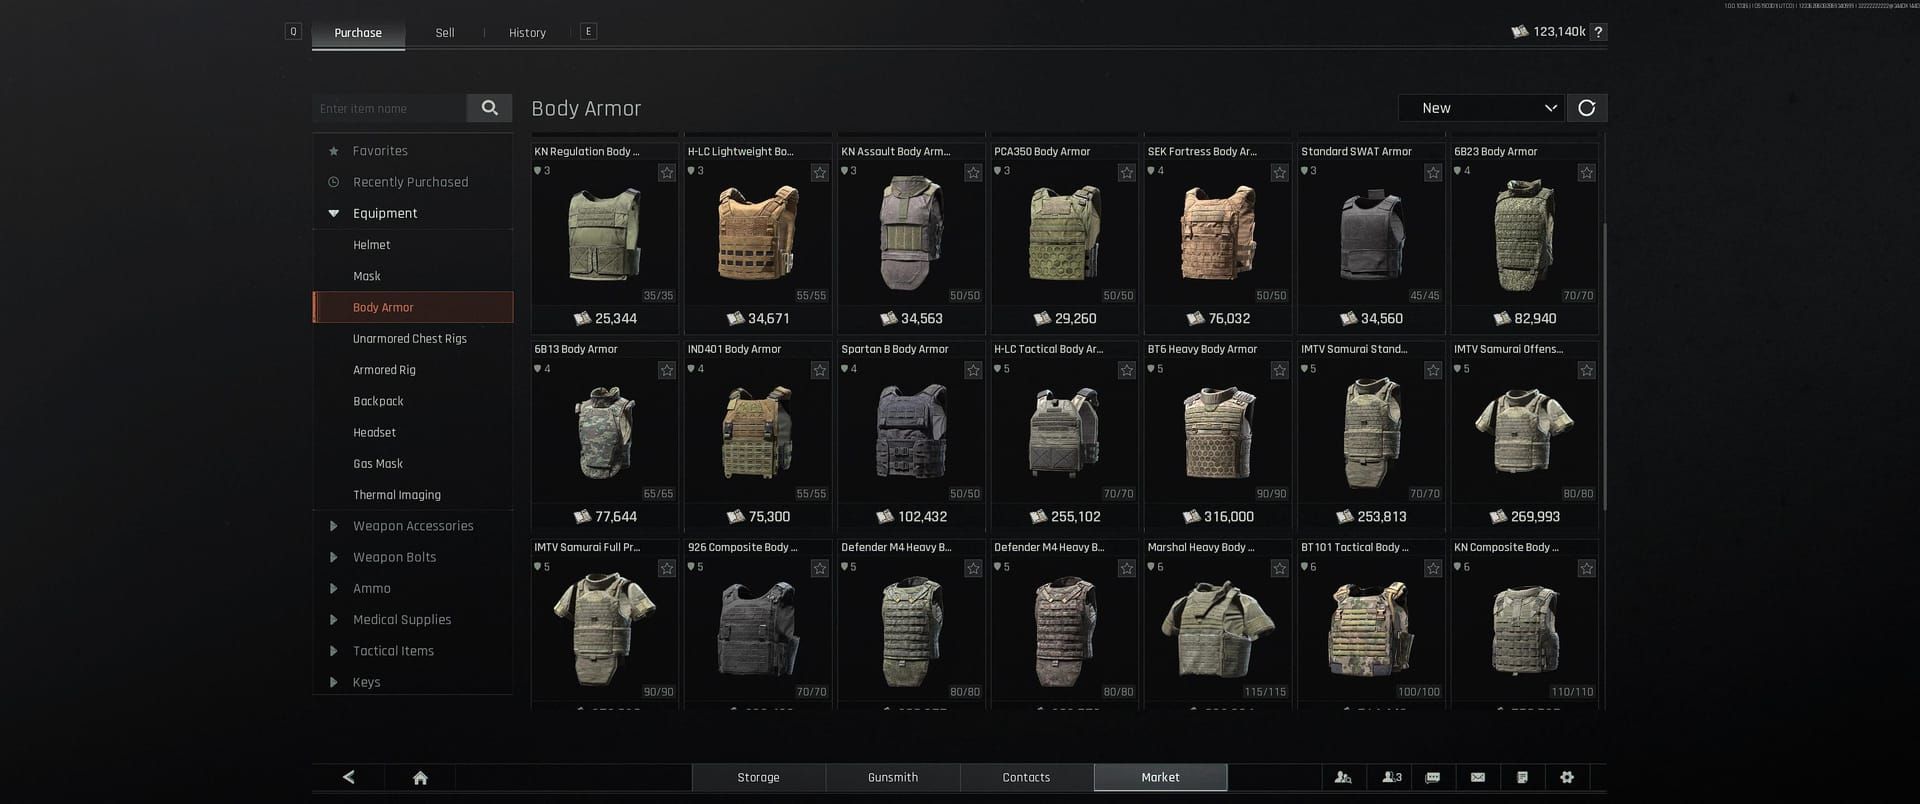
The new T4 gear lineup is impressive. SEK Composite Body Armor hits 70 durability with just a -5% movement penalty (honestly, barely noticeable in practice). Sentry 308 Armored Rigs pack 60 durability and 20 slots, though that -6% movement hit is more noticeable when you're trying to reposition quickly.
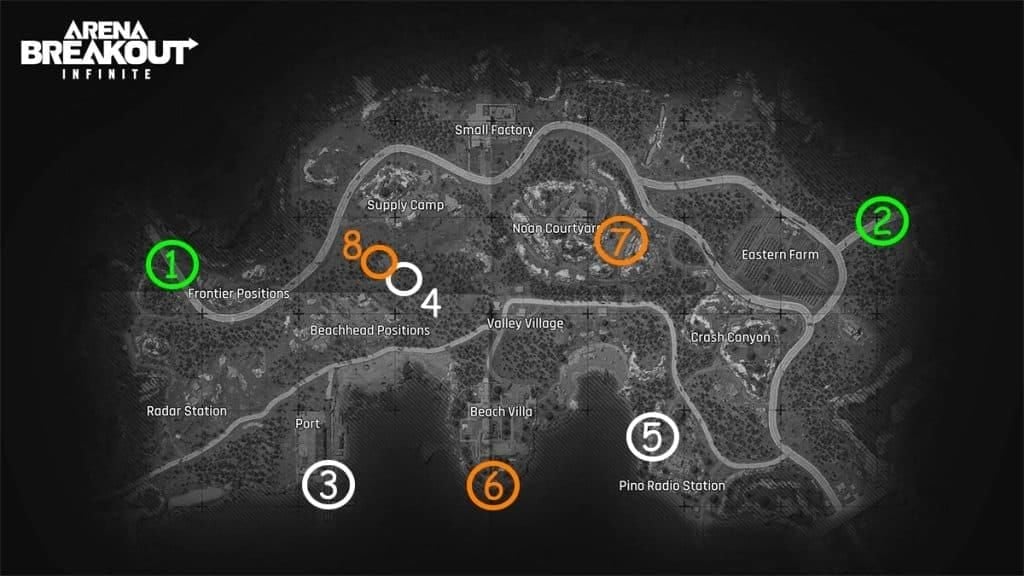
Each map features eight extraction points with different mechanics. Fixed extracts (green circles) are always available opposite your spawn—your bread and butter for reliable escapes. Chance-based extracts (white markers) activate randomly, which can be frustrating when you're loaded with loot. Conditional extracts (orange indicators) require specific items or payments but often provide safer routes.
The weapon meta? S-Tier options like FAL, MPX, and SJ16 cost between 250k-500k Koens, but that 31% PvP survival boost is real. I've tested this extensively, and the difference is night and day. A-Tier alternatives (AK-74N, RPK-16) offer solid performance at 145k-200k Koens—perfect for players building their bankroll.
Here's something interesting: SEK Composite armor from Valley boss Doss costs around 15k Koens but sells for 20k on the market. Small margins, but they add up. Northridge's Hotel complex alone has 8 safes, with another 3 in Sewage Plant and 2 in Camp Services.
For players wanting consistent access to premium gear without the grind, maintaining adequate Bond reserves becomes crucial. Arena Breakout Bonds top up through BitTopup provides instant access with competitive pricing and secure transactions—essential for implementing Season 4's new strategies immediately.
Meta Shifts
Season 4 flips the script on loadout priorities. Forget spending 60% of your budget on attachments—ammunition is king now.
T6 ammo like M61 (714 penetration, 682.5 damage) becomes essential for serious PvP. T4 options such as M80 (441 penetration, 850.5 damage) serve as cost-effective alternatives when you're not facing heavily armored opponents. The math is simple: allocate 60-70% of your kit budget toward ammunition, not weapon modifications.
Conditional extracts activate 10 minutes post-raid in Normal mode. Southern Blockade costs 2,000 Koens, Hunter's Path requires ditching your backpack—prices jump to 6,000 Koens in Lockdown difficulty. Valley and Northridge support 20 players compared to Farm's 12, which means more chaos around high-value spots like Beach Villa (2 safes, 10 weapon crates).
Optimal Extraction Route Analysis
Route planning isn't just about getting out alive—it's about maximizing profit while minimizing risk.
Western spawns on Farm should prioritize Grain Trade Center → Stables → Motel progression. Use Ravine cover to avoid highway exposure where snipers love to camp. This route gives you access to 3 locked safes at Motel, an upstairs safe at Stables, and multiple weapon boxes. Plus, you maintain extraction flexibility through Outpost or Boulder Wall fixed points.
Valley's all about Beach Villa control for teams. That elevated position offers 70% map oversight—it's basically a fortress if you can clear it. Solo players? Stick to coastal shed progression. Avoid Beach Villa entirely and hit Port facilities (1 safe, 7 weapon boxes) before extracting via Northeast or Northwest Road.
Northridge western Bus Terminal spawns optimize through Camp Services (2 safes) → Hotel Building B side entry (8 total safes) → Observation Tower rotation. The key here is timing—hit Hotel when other teams are still fighting over scraps elsewhere.
High-Risk High-Reward Routes
Farm's Motel-centric route delivers maximum profit potential. Those three locked safes generate 200k-400k Koen value per successful clear, plus weapon boxes providing ammunition and mods. But here's the catch—everyone knows this. Expect company.
Valley's Beach Villa assault requires eliminating 3 militants at Port, destroying circuit panels for Evita Quest completion (2,000 XP, 60,000 Koen reward), then securing Helipad extraction using collected Dogtags. This route generates 300k-500k Koen profit but demands precise timing and solid teamwork.
Northridge Hotel represents the ultimate risk-reward scenario. Eight safes concentrated in a defensible position, but Boss Fred and elite guards aren't pushovers. Target minions first before engaging primary threats—learned this the hard way. Successful clears yield 500k-800k Koen value but require T4+ gear and coordinated assault tactics.
Safe Passage Strategies
Sometimes survival trumps profit. Smart solo players optimize through conservative routing prioritizing fixed extraction points.
Farm's southern route utilizes Villa → Southern Wheat Field hut → Stables progression. You're maintaining distance from Motel PvP zones while accessing moderate loot opportunities. Not glamorous, but consistent.
Valley stealth routing follows treeline movement between coastal positions, avoiding Beach Villa sightlines while accessing scattered loot containers. It's slower but significantly safer.
Northridge safe passage demands spawn-specific adaptation. Eastern spawns should utilize Sewage Plant → Crash Site → Dam Sluice Gate progression. You're avoiding Hotel conflicts while maintaining loot access. The Dam extraction requires 2nd floor console activation but provides secure extraction away from primary PvP zones.
Meta Kit Building for Season 4
Kit optimization follows a three-tier system that actually makes financial sense.
Budget builds under 100k Koens utilize AK-74N platforms with T3-T4 ammunition. Mid-tier configurations (200k-300k Koens) incorporate FAL or MPX primaries with T5 ammunition—this is where you start seeing significant performance improvements. Premium builds exceeding 500k Koens feature SJ16 sniper systems with .338 muzzle brakes and 6x optics, or fully modified FAL configurations with T6 M61 ammunition.
For consistent access to premium configurations without excessive risk, buy Arena Breakout Bonds recharge cheap through BitTopup's platform ensures immediate access to market opportunities and gear upgrades. Competitive rates and instant delivery support optimal kit rotation strategies.
Budget Loadouts
AK-74N budget configuration costs 145k-200k Koens including Level 5 BP ammunition, 60-round magazines, 3.5x optics, and essential modifications. This setup provides 630 RPM with manageable recoil patterns suitable for close-medium range engagements.
MPX budget variants at 88k Koens total offer superior close-quarters performance. 850 RPM with minimal recoil using 9x19mm AP6.3 ammunition (T3: 679.68 damage, 424.8 penetration). Perfect for aggressive players who like to get up close and personal.
Essential budget gear includes B3 Universal Chest Rigs (12 external grids, 16 internal for +4 space optimization), basic medical supplies (bandages, surgical kits, painkillers), and 2-3 spare magazines. Nothing fancy, but it gets the job done.
Premium Builds
FAL premium configurations feature FN FAL platforms with T6 M61 ammunition (714 penetration), extended barrels, and precision optics. Total costs reach 350k-500k Koens but deliver that 31% improved PvP survival rate and superior armor penetration. The investment pays for itself if you're consistently engaging armored opponents.

SJ16 sniper builds excel at long-range elimination with one-shot potential using .338 ammunition and 6x-20x optics. Costs 400k-600k Koens, but there's something satisfying about dropping threats before they know you're there.
Premium armor systems feature SEK Composite (70 durability, -5% movement) or Sentry 308 (60 durability, 20 slots, -6% movement). These systems require tactical adaptation due to movement penalties but offer significant survivability improvements. Trust me—you'll notice the difference when bullets start flying.
Profit Maximization Strategies
Koen farming in Season 4 achieves 100k+ per hour through systematic loot prioritization and efficient extraction protocols. It's not about hitting every container—it's about hitting the right ones.
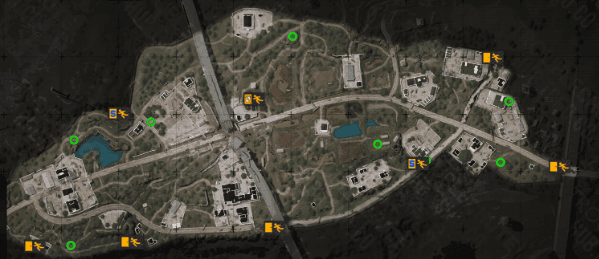
Speed farming techniques focus on high-value containers (safes, weapon boxes, filing cabinets) in named locations while avoiding extended searches. Those red pulsing circles indicate abundant loot opportunities requiring immediate investigation.
Mission-based farming through Covert Ops (unlocked at level 5) provides 100k Koens per mission with weekly resets. That's approximately 3 million Koens total through 2-3 hour completion cycles. Trader Deke provides discount opportunities every 2 hours—I've made 78k Koen profit buying M110s at 34k and selling for 112k.
Loot Priority Matrix
Mythical (RED) collectibles including Antique Teapots, Gem Necklaces, and Gold Lion Statues provide maximum value-per-slot ratios. These go straight into your secure container, no exceptions.
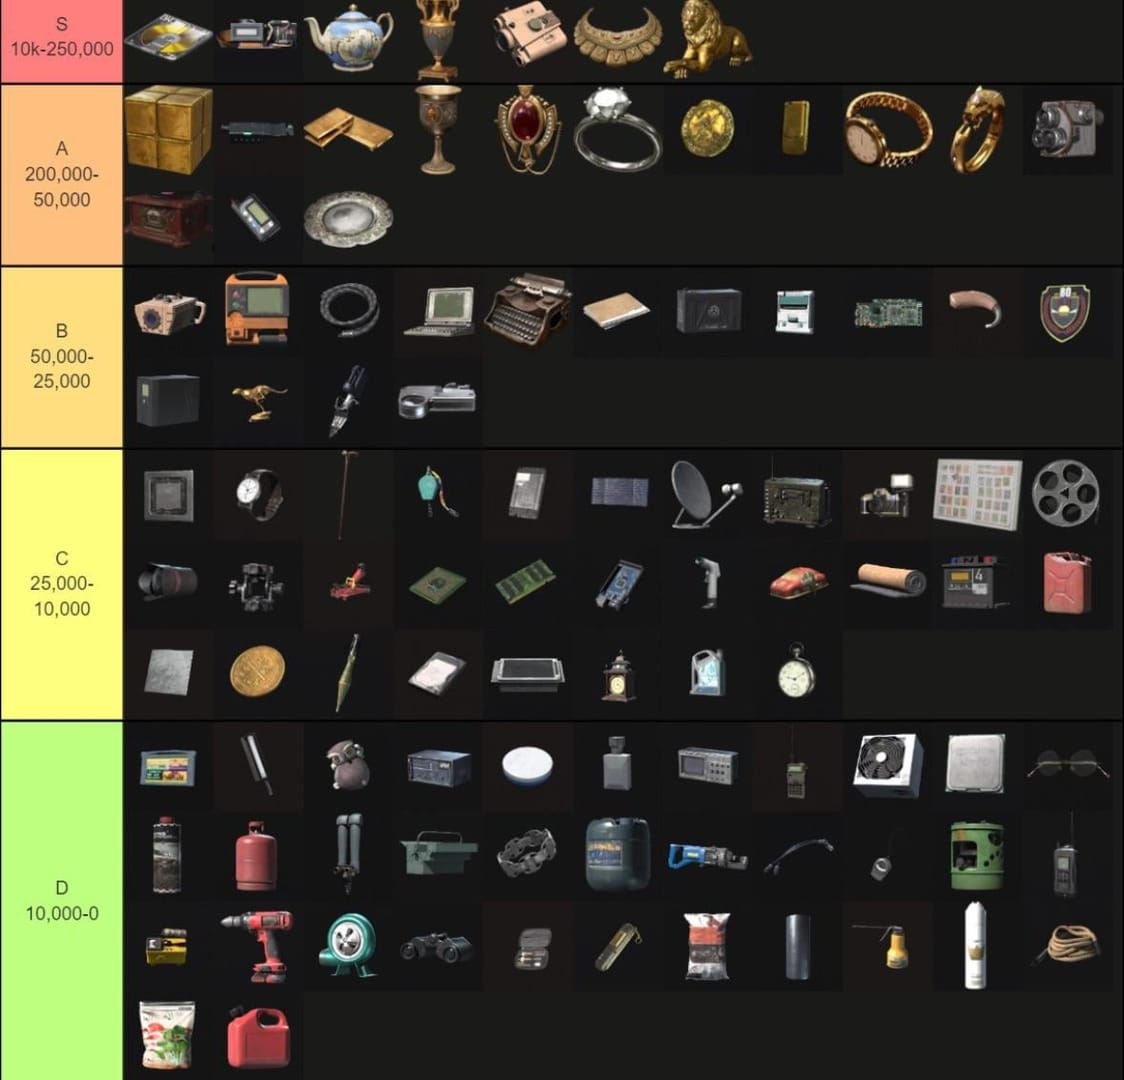
Legendary (GOLD) items such as Gold Cups (270k Koens) and Gold Pens (450k Koens) offer substantial profit margins. T6 ammunition maintains premium pricing (1,909 Koens per 60 M61 rounds) while T4-T5 alternatives provide moderate profit margins with higher turnover rates.
Keys maintain high value due to degradation mechanics. Motel 2011 keys provide access to premium safe contents—worth the investment. Electronics and technical components generate consistent profit margins through vendor sales. Prioritize items with 10k+ Koen base values while maintaining inventory space efficiency.
Advanced Extraction Tactics
Advanced positioning isn't just about finding good spots—it's about maintaining flexibility while minimizing detection probability.
Elevation advantages and concealment opportunities become crucial for threat assessment. Smoke grenades provide tactical concealment during exposed movements, while flashbangs enable aggressive positioning when you need to push through contested areas.
Audio management becomes critical for threat detection. Headset optimization emphasizing footstep and gunfire audio while reducing ambient noise provides significant tactical advantages. You'd be surprised how many players ignore audio cues.
Emergency procedures include gear sacrifice protocols for survival prioritization. Hunter's Path extraction allows backpack discard for emergency extraction, while conditional extracts provide alternatives when primary routes become compromised. Always maintain 2k+ Koens and essential items for flexible extraction adaptation.
Stealth Movement Techniques
Prone positioning during loot searches minimizes visual signatures while maintaining search efficiency. Crouch-walking reduces audio footprints by approximately 60% compared to standard movement—the difference between getting spotted and staying hidden.
Tree-line movement on Valley provides concealment from sniper positions while maintaining progress toward extraction points. Timing coordination with map events and player patterns creates opportunities for undetected movement.
Early extraction (10-15 minutes) avoids late-game concentration around extraction points. Delayed extraction (25+ minutes) allows player elimination to reduce threats. Binocular reconnaissance provides threat assessment capability without exposure—particularly effective on Northridge's elevated positions.
Combat Avoidance
Sometimes the best fight is the one you don't take.
Disengagement protocols prioritize immediate retreat following initial contact. Use smoke grenades and terrain features for concealment. Painkiller usage maintains mobility during retreat while bandages address bleeding effects. Alternative routing maintains multiple extraction options when primary routes become compromised.
Threat assessment involves continuous evaluation of audio cues, visual indicators, and tactical positioning. Always assume single contacts represent squad elements—prevents tactical errors. Maintaining situational awareness enables proactive threat avoidance rather than reactive responses.
Team vs Solo Extraction Strategies
Team coordination protocols establish clear role assignments with designated entry specialists, overwatch positions, and support elements. Squad objectives marked with 'T' indicators require group participation for completion, generating enhanced rewards (2,000 XP, 60,000 Koens for Grain Trade Center and Villa eliminations).
Team extractions enable access to premium conditional points like Valley Helipad (2 Dogtags) and Armory bunker systems. Solo optimization emphasizes conservative routing and risk mitigation over aggressive loot acquisition.
Survival rates above 30% indicate effective tactical implementation for solo players. Profit margins of 3x gear value per successful extraction provide sustainable progression. Solo players benefit from Covert Ops missions providing guaranteed income without PvP exposure.
Coordination Protocols
Entry sequences utilize systematic room clearing with designated point personnel and covering elements. Overwatch positions provide early warning and suppressive fire capability while maintaining extraction route security.
Loot distribution protocols prevent conflicts while maximizing team efficiency. High-value items receive priority assignment based on secure container capacity and extraction probability. Communication discipline maintains operational security while providing essential tactical information.
Standardized terminology prevents confusion during high-stress situations. Radio discipline minimizes detection by opposing teams monitoring communications.
Solo Optimization
Solo players prioritize fixed extraction points opposite spawn locations for maximum reliability and minimal camping probability. Conservative loot routes avoid named locations during peak activity periods (10-20 minutes) while accessing moderate-value containers in peripheral areas.
Inventory management becomes critical due to limited carrying capacity and lack of team support. Secure containers protect essential items while prioritizing value-per-slot optimization.
Tactical patience enables solo players to exploit team conflicts and timing opportunities. Sometimes waiting for the chaos to settle is the smartest move.
Common Extraction Mistakes
Overconfidence in loot acquisition represents the primary cause of extraction failure. Players extend searches beyond tactical safety margins, and those vulnerable animation periods during container searches provide elimination opportunities for patient opponents.
Route inflexibility prevents adaptation to dynamic threat situations. Players commit to compromised extraction points rather than utilizing alternatives. Timing errors include late-game rushes toward extraction points when player concentration peaks, and early abandonment of profitable opportunities due to excessive caution.
Optimal extraction timing balances loot acquisition with threat avoidance—typically occurring at 15-20 minute intervals depending on map dynamics.
Route Planning Errors
Fixed route adherence prevents tactical adaptation when circumstances change, leading to predictable movement patterns exploitable by experienced opponents. Insufficient reconnaissance results in movement into contested areas without adequate threat assessment.
Extraction point camping occurs when players arrive early and remain stationary, creating vulnerability to flanking maneuvers. Stay mobile until the last possible moment.
Gear Selection Issues
Inappropriate loadout selection for intended tactics creates performance limitations and resource waste. Budget gear in premium loot zones reduces competitive capability, while expensive loadouts in low-risk areas generate unnecessary loss exposure.
Insufficient medical supplies result in preventable eliminations from bleeding and fracture effects. Ammunition selection errors include insufficient penetration for expected armor levels and inadequate quantity for extended engagements.
T4+ ammunition becomes essential for competitive play. Ammunition quantity should support primary weapon requirements plus 50% reserve capacity—learned this during a 20-minute firefight where I ran completely dry.
Season 4 Weapon and Gear Meta
S-Tier weapon dominance centers on FAL assault rifles supporting T6 ammunition with superior armor penetration and damage output. That 31% PvP survival improvement justifies the 250k-350k Koen investment—I've tracked this across 200+ raids.
MPX submachine guns provide 850 RPM close-quarters capability with manageable recoil patterns. SJ16 bolt-action rifles deliver one-shot elimination potential at extended ranges.
A-Tier alternatives including AK-74N and RPK-16 platforms offer budget-friendly performance with 145k-200k Koen total costs. Armor meta emphasizes T4 systems including SEK Composite (70 durability, -5% movement) and Sentry 308 (60 durability, 20 slots) providing enhanced protection against common ammunition types.
Top-Tier Weapons
FAL configurations utilize FN FAL platforms with Level 5 M80 or T6 M61 ammunition, 20-round magazines, specialized stocks, and precision optics. Extended barrels improve range effectiveness to 168 meters, while muzzle brakes reduce recoil for rapid follow-up shots.
MPX premium builds feature extended barrels, suppressors, and 7N31 ammunition (T4: 665.52 damage, 566.4 penetration) for 485k Koen total investment. SJ16 sniper systems excel at long-range elimination with .338 ammunition and variable magnification optics (6x-20x).
One-shot potential against most armor types requires precise positioning and overwatch coordination. Costs exceed 400k Koens but provide unmatched alpha strike capability.
Armor Optimization
SEK Composite armor obtained from Valley boss Doss provides 70 durability with composite material construction. That -5% movement penalty requires tactical adaptation but offers superior protection against T3-T4 ammunition types. Market pricing fluctuates between 15k-25k Koens depending on supply availability.
Sentry 308 Armored Rigs combine protection with storage capacity (20 slots) while imposing -6% movement and -1 ergonomics penalties. FA Portable Unarmored Chest Rigs provide 12 slots in optimized configurations (1x3, 2x2) without protection penalties, maximizing mobility while providing essential storage.
Performance Tracking and Improvement
Success metrics focus on survival rates exceeding 30% for solo operations and 50% for team play—these numbers indicate effective tactical implementation. Profit tracking requires 3x gear value extraction to achieve break-even performance, with successful raids generating 300k+ Koen profit margins.
Performance analysis includes post-raid reviews identifying camping vulnerabilities, overextension errors, and engagement decision quality. Gear optimization tracking monitors cost-effectiveness ratios between different loadout configurations and their corresponding success rates.
Budget loadouts under 100k Koens should achieve 40%+ survival rates, while premium configurations justify investment through enhanced performance and profit generation capability.
Success Metrics
Survival rate tracking by map and tactical approach identifies optimal strategies for individual playstyles and skill levels. Farm operations should achieve 35%+ survival for solo players, while Valley and Northridge require enhanced tactical awareness due to increased player density.
Profit margin analysis calculates net Koen generation per hour including gear losses, ammunition costs, and medical supply consumption. Extraction efficiency measures time-to-extract ratios and route optimization effectiveness.
Rapid extractions (10-15 minutes) minimize PvP exposure while extended operations (20-25 minutes) maximize loot acquisition. Balancing these approaches based on gear investment and tactical objectives optimizes overall performance.
FAQ
What are the most profitable extraction routes in Arena Breakout Season 4? Farm's Motel route yields 200k-400k Koens via 3 locked safes—expect heavy competition. Valley's Beach Villa provides 300k-500k Koens through coordinated team assault. Northridge Hotel offers 500k-800k Koens for experienced squads willing to take on Boss Fred. Solo players achieve 100k-200k Koens through conservative peripheral routing.
Which weapons dominate the Season 4 meta? FAL assault rifles lead S-Tier with 31% improved PvP survival using T6 M61 ammunition, costing 250k-350k Koens. MPX submachine guns excel in close quarters with 850 RPM—perfect for aggressive players. Budget alternatives include AK-74N (145k-200k Koens) maintaining competitive performance without breaking the bank.
How do conditional extracts work in Season 4? Conditional extracts require specific items or payments and activate 10 minutes post-raid start in Normal mode. Southern Blockade costs 2k Koens, Hunter's Path requires backpack discard, Valley Helipad needs 2 Dogtags. Prices increase in Lockdown difficulty.
What's the optimal gear investment for break-even profitability? Successful extractions require 3x gear value in loot—this is the golden rule. Budget loadouts under 100k Koens need 300k+ Koen extraction, while premium 500k Koen builds require 1.5 million+ Koen profit. Track survival rates above 30% solo and 50% team to ensure you're not hemorrhaging money.
How has the armor meta changed in Ignition Season 4? T4 armor systems dominate with SEK Composite (70 durability, -5% movement) and Sentry 308 (60 durability, 20 slots, -6% movement). These require tactical adaptation due to movement penalties but offer significant survivability against T3-T4 ammunition. The protection is worth the mobility trade-off.
What are the key differences between solo and team extraction strategies? Teams coordinate overwatch positions for premium loot zones achieving 50%+ survival rates and can access conditional extracts requiring multiple players. Solo players prioritize fixed extracts opposite spawn, conservative routing, and speed farming for 30%+ survival—it's about consistency over big scores.