

Solo players earn 200-400k Koens per 12-15 minute run on S4 Airport using peripheral routes avoiding high-traffic zones. The Grain Trade Center-Stables-Motel circuit prioritizes locked safes and weapon boxes, while budget loadouts under 100k Koens enable 30%+ survival rates to fixed extracts like Outpost. Crouch-walking reduces footstep noise by 60%, and rooftop reconnaissance minimizes encounters in this level 25+ map featuring 35-minute raids with up to 12 players.
Why S4 Airport Works for Solo Farming
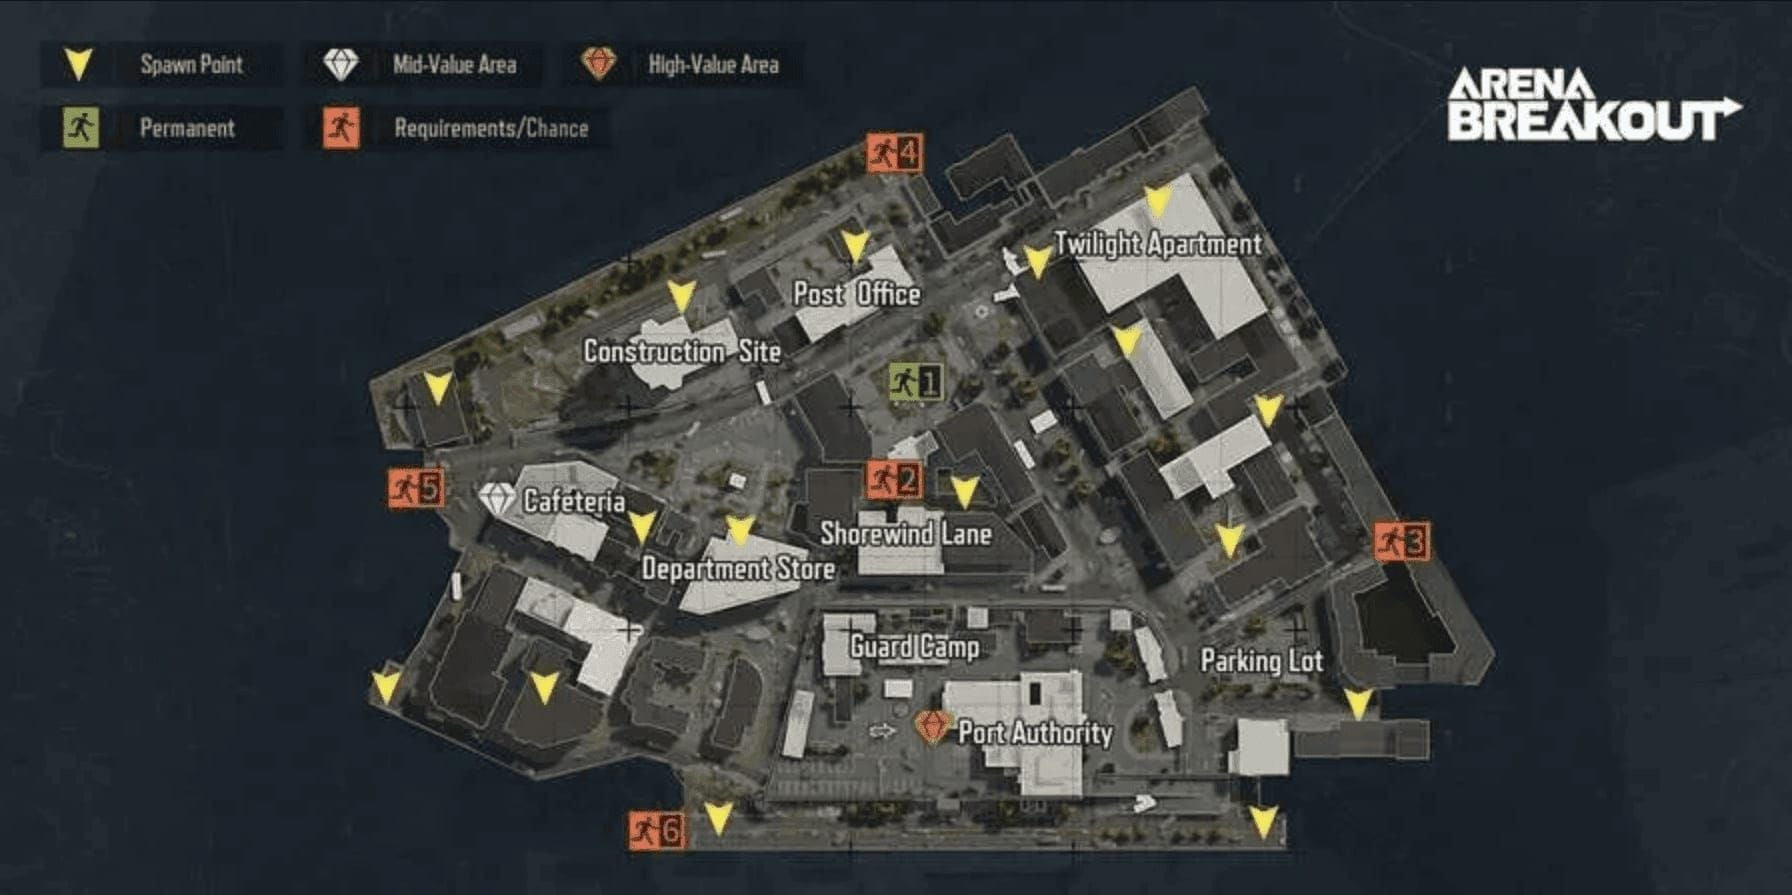
Guoyapo Airport unlocks at Level 25 with 35-minute raid windows for up to 12 players. Released January 8, 2026, Season 4 redistributed loot spawns favoring peripheral zones over central hotspots.
Boss Fred patrols Northridge Hotel with Level 11 minions, while Boss Doss controls Valley with Level 8 SEK armor—both easily avoided. Solo players operate in 70% of the map with minimal elite AI contact.
Need keys and gear? Arena Breakout Bonds top up through BitTopup ensures fast delivery for critical safe access.
Season 4 Map Changes
Normal mode conditional extracts activate after 10 minutes. Airport Drainage Pipe operates exclusively first 10 minutes with no backpack restrictions, enabling fast exits with high-value compact items.
Peripheral safe density increased in S4. Sewage Plant now has 3 safes in low-traffic zones, Campus Services holds 2 safes with minimal AI. Access Bridge extract activates at 25 minutes when most PMCs already extracted (15-20 minutes).
Loot Density vs Risk
Beach Villa: 2 safes, 10 weapon crates yielding 300-500k Koens, but requires clearing 3 militants with central map exposure. Northridge Hotel: 8 safes producing 500-800k Koens but hosts Boss Fred and geared squads.
Peripheral routes sacrifice 20-30% potential earnings for 2-3x survival improvement. Grain Trade Center-Stables-Motel generates 200-400k Koens in 12-15 minutes with 30%+ solo survival vs 10-15% in contested zones.
Real Profit Numbers (100+ Runs)
Budget loadouts under 100k Koens:
SEK Composite Body Armor: Tier 4, 70 durability, 15-25k Koens, -5% movement
Sentry 308 Armored Rig: 60 durability, 20 slots, 8-12k Koens, -6% movement
MPX: 850 RPM, 9x19mm AP6.3, Tier 3 penetration (679 damage, 424 pen), 70-80k Koens
AK-74N: 630 RPM, Level 5 BP, 60-round mags, 3.5x optic, under 100k total
Net profit: 200k minimum run - 100k loadout = 100k profit per extraction. At 30% survival, three attempts yield one success for break-even. 40-50% survival = 100k+ Koens/hour.
Low-Risk Route Philosophy
Low-risk targets 60-70% loot efficiency in 10-20% traffic zones vs 100% efficiency in 60-80% traffic areas. Consistent 200k extractions outperform occasional 500k runs with frequent deaths.
Defining Low-Risk Routes
Maintain 200+ meter distances from boss spawns. Avoid direct paths between spawn points and high-value zones. Peripheral buildings provide multiple exit vectors preventing entrapment.
Crouch-walking reduces audio signatures by 60%: detection range drops from 40-50 meters to 15-20 meters. Sprint only for 30+ meter open crossings where exposure time matters more than audio.
Rooftop reconnaissance with binoculars before entering contested zones identifies threats. 30-second investment prevents 5-minute detours or lost loadouts.
High-Loot Criteria
Locked safes (2011 keys) provide highest Koen-per-second ratios:
Motel: 3 locked safes + weapon boxes = 150-250k in 3-4 minutes
Stables: 1 safe upstairs + 1 weapon box downstairs = 50-80k in 90 seconds
Weapon crates: 8-15 second loot times. Beach Villa's 10 crates yield 100-200k but require 2-3 minutes exposure. Selective looting prioritizes corner positions with cover.
Target 15k+ Koen per minute average to justify position holding.
Common Misconceptions
Central terminal attracts 50-60% of server population first 10 minutes, creating negative expected value for solo despite high loot counts.
Boss farming requires 200k+ loadouts and creates audio signatures attracting third parties. Solo players achieve better hourly rates avoiding bosses entirely.
Extract camping fears overblown on Airport. Outpost and Boulder Wall see 5-10% camp rates vs 20-30% on conditional extracts. Early extraction (10-15 minutes) reduces camp likelihood.
Pre-Raid Preparation
SEK Composite Body Armor's Tier 4 stops most AI ammunition and common player rounds (9mm, 5.45mm). 15-25k cost allows profit on 80%+ extractions.
Sentry 308's 20 slots accommodate 4-6 high-value items plus medical/ammo. 8-12k cost makes it disposable while providing capacity for 200k+ hauls.
Buy Arena Breakout Bonds online recharge through BitTopup prevents interruptions from key shortages with competitive pricing.
Minimum Loadout (Budget Breakdown)

MPX: Excels 10-30 meter building interiors, 850 RPM compensates lower penetration. 70-80k investment provides Tier 3 capability. Low ammo costs with 9x19mm AP6.3.
FAL: Tier 6 with M61 (714 pen, 682.5 damage, 168m range). +50% reserve rounds. Higher cost suits 50%+ survival rates.
AK-74N: Optimal budget-performance under 100k total. 630 RPM, Level 5 BP, 60-round mags, 3.5x optic. Handles AI efficiently, maintains resale value.
Medical: 2-3 bandages, 1-2 painkillers, 1 emergency medkit. Don't exceed 8-10k. Overheal before engagements vs carrying excess supplies.
Optimal Server Timing
Early morning (2-6 AM local) reduces player counts 30-40%. Favors extended sessions using late extracts like Access Bridge (25 minutes).
Mid-week (Tuesday-Thursday) shows 15-20% lower populations than weekends. Combined with off-peak hours creates optimal farming conditions.
Join queues at 30-45 second marks vs 0-15 seconds for spawn separation. 15-second delay provides 60-90 second head starts on peripheral loot.
Insurance Strategy
Insurance costs 10-15% item value with 60-70% return on non-meta items. Budget armor/rigs rarely warrant insurance—replacement costs equal insurance fees. Weapons exceeding 80k justify insurance when survival exceeds 40%.
Secure containers prioritize keys, quest items, compact high-value loot. 2011 keys (30-50k investment) enable 150-250k returns per run.
Backpack insurance worthwhile only on 40k+ models. Budget backpacks under 20k cost less to replace. Hunter's Path requires backpack discard anyway.
Complete Low-Risk Route Walkthrough
Grain Trade Center-Stables-Motel circuit begins at southern spawns, moving counterclockwise along western edge. 800-meter route maintains 250+ meter distances from Northridge Hotel and central terminals while accessing 6 safes and multiple weapon boxes.
Spawn Selection
Southern spawns (near Outpost): Optimal positioning. Crouch-walk northwest toward Grain Trade Center, 150 meters in 90-120 seconds. Don't sprint—alerts players at Beach Villa or Port.
Eastern spawns: Require 200-meter repositioning south (2-3 minute detour). Consider alternative routes: Sewage Plant's 3 safes or Campus Services' 2 safes.
Northern spawns: Disadvantaged for this route. Rotate to Sewage Plant-Campus Services circuit or delay 3-4 minutes for southern spawners to clear Grain Trade Center.
Phase 1: Peripheral Container Loop
Grain Trade Center: Enter from south, loot 2 ammo boxes (20-30 seconds). Check for quest items and high-value ammo (M61, BP, AP6.3). Exit northwest toward Stables maintaining crouch-walk.
Stables: Approach from southeast. Clear ground floor weapon box (15 seconds), ascend to second floor safe. Upstairs safe requires 2011 key, yields 50-80k. Total: 90-120 seconds.
Motel: Highest value target. 3 locked safes (2011 keys). Approach from east using building cover. Systematic clearing (ground, second, third floor) takes 3-4 minutes. Weapon boxes between safes add 30-50k. Total value: 150-250k.
Phase 2: AI Avoidance
AI patrols spawn in 3-4 unit groups with 30-40 meter detection. Audio cues:
Radio chatter: 50 meters
Footsteps: 30 meters
Weapon handling: 20 meters
Crouch-walking at 60% noise reduction keeps detection under 20 meters, allowing bypass.
When AI contact unavoidable, single headshots from cover minimize audio. Suppressed MPX reduces gunshot detection to 40-50 meters vs 100+ unsuppressed. Engagement duration: 5-8 seconds max.
Second-floor windows allow visual confirmation of ground patrols without detection. Wait 30-60 seconds for patrols to pass—more time-efficient than fighting 3-4 unit groups.
Phase 3: Final Check Before Extract
10-12 minute mark signals extraction prep. Carrying 200k+ Koens? Prioritize extraction over marginal gains.
Final position checks: Motel rooftop provides 200-meter sightline to Outpost extract approach. Suspicious activity warrants 2-3 minute delays or Boulder Wall alternative.
Backpack consolidation: weapons/attachments exceeding 15k per slot replace lower-value items. Drop ammunition unless quest-required—weight penalties affect sprint during extract approach.
High-Priority Loot Locations
2011 key (30-50k) unlocks 6 safes on primary circuit (1 Stables, 3 Motel, 2 alternatives), generating 300-500k total per run. Keep in secure container for multi-run value.
Container Types & Spawn Rates S4
Weapon boxes: Tier 3-5 weapons (15-20%), attachments (40-50%), ammo (30-35%). High-value spawns: optics (20-40k), suppressors (30-60k), meta ammo (5-10k/stack). Average: 25-40k per box.
Locked safes: 50-80k per safe, 70-80% spawn rates for valuable items. Compact high-value: weapon parts, medical, currency stacks. 15-20 second loot time = 180-240k per minute efficiency.
Ammo boxes: Quest items and specialty ammo, average 8-15k per box. Check during route transitions, don't anchor patterns.
Top 8 Loot Spots
Motel (Western Edge): 3 locked safes, 4 weapon boxes, 2 medical crates. Value: 150-250k. Risk: Low. Time: 3-4 min.
Stables (Southwest): 1 upstairs safe, 1 downstairs weapon box. Value: 50-80k. Risk: Very Low. Time: 90 sec.
Grain Trade Center (South-Central): 2 ammo boxes, 1 weapon box. Value: 20-40k. Risk: Low-Medium. Time: 45 sec.
Sewage Plant (Northwest): 3 safes, low-traffic industrial. Value: 100-180k. Risk: Very Low. Time: 2-3 min.
Campus Services (North): 2 safes, minimal AI. Value: 80-120k. Risk: Low. Time: 90-120 sec.
Port (East): 1 safe, 7 weapon boxes. Value: 120-200k. Risk: Medium. Time: 2-3 min.
Beach Villa (Southeast): 2 safes, 10 crates, requires militant clear. Value: 300-500k. Risk: High. Time: 4-6 min.
Northridge Hotel (Central-North): 8 safes, Boss Fred. Value: 500-800k. Risk: Very High. Time: 8-12 min.
Item Prioritization
Take: Weapons 60k+ (FAL variants, high-tier SMGs, meta ARs). Attachments 20k+ (thermals, advanced suppressors, ergo grips). Medical: surgery kits (30-50k), advanced medkits (15-25k), rare stims (20-40k). Ammo: M61, BP, AP6.3 (5-10k/stack).
Leave: Common sights under 10k, basic muzzle devices, basic bandages/painkillers, FMJ/PS ammo.
Always take: Quest items regardless of market value. Evita Quest rewards: 2k XP + 60k Koens.
AI Patrol Management
AI follows predictable 120-180 second patrol loops. Militants spawn in 3-4 unit groups with 100-meter radius zones. Learning patterns allows 90%+ avoidance.
AI Behavior S4 Airport
Peripheral zones: 1-2 patrol groups max. Grain Trade Center: single 3-unit patrol, 150-meter route. Stables: AI-free 70% of raids. Motel: occasional patrols from adjacent zones, no dedicated spawns.
Central zones: 4-6 patrol groups. Northridge Hotel: Boss Fred's minions + 2-3 standard patrols. Terminals: overlapping routes, 60-80% AI presence.
AI detection: line-of-sight + audio. Crouch-walking keeps audio detection under 18-20 meters. Visual: 40-50 meters daylight, 20-30 meters low-light. Shadows/cover break line-of-sight at close range.
Sound Recognition
Radio chatter (50m): 8-12 seconds warning before visual contact. Immediate crouch and cover.
Footsteps: AI = consistent 2-3 second intervals. Players = irregular timing, frequent stops/direction changes.
Weapon handling (20m): AI performs during patrol stops. 3-5 second windows for repositioning/bypass.
Engage vs Reposition
Engagement criteria (need all 4):
Hard cover within 2 meters
Single AI isolated from group
Suppressed weapon equipped
Escape route identified
Solo AI blocking critical routes/loot: eliminate. Single headshots 15-25 meters, suppressed. Loot only if carrying valuable ammo/medical.
AI groups 3+: avoid unless Tier 5+ armor and high-pen weapons. 15-30 second engagement + 80-100 meter audio signature attracts players.
Player Encounter Protocols
Player audio differs from AI: irregular movement, sprint-walk combos, tactical equipment (grenade pins, healing). Identify 5-10 seconds before visual contact.
Audio Cues
Sprint sounds: Toward you = aggressive intent. Away = extraction/repositioning. Crouch-walking approach = tactical player using similar methodology.
Healing sounds: Emergency (surgery kits, heavy medkits) = recent combat, potential weakness. Preventive (light medkits, bandages) = engagement prep. 3-8 second windows for positioning.
Grenade pins: Sprint perpendicular 3-4 seconds, seek hard cover. 4-5 second fuse allows 15-20 meter displacement. Return after confirming type/damage radius.
Escape Routes
Motel: 4 exits—south to Outpost (200m), west to map edge (150m), north to Sewage Plant (250m), east to Grain Trade (180m). Multi-story allows vertical repositioning.
Stables: Limited—south to spawns (300m), north to Motel (200m), east to central (400m). Single-building requires early threat detection.
Grain Trade Center: 3 exits—south to Outpost (250m), west to Stables (180m), east to Port (350m). Open ground favors sprint escapes.
Decision Framework
Fight: Need 2+ advantages—superior positioning (elevation/cover), better equipment (armor tier/weapon pen), tactical surprise (undetected flank).
Hide: Multi-room buildings with 3+ exits. Vertical repositioning breaks audio tracking. Stay stationary 60-90 seconds for aggressive players to pass.
Early extract: Carrying 150k+ with 15+ minutes remaining. Secure guaranteed profits vs risking additional 50-100k gains.
Extraction Timing & Route
Extract selection depends on loot completion, remaining time, player activity. Outpost's fixed status provides 10-15 minute availability, aligning with circuit completion.
Three Safest Extracts
Outpost: Fixed, 200m from Motel, 10-15 min optimal timing. Camp: 5-10%. Success: 85-90%.
Boulder Wall: Fixed, peripheral position reduces traffic but increases travel. Camp: 8-12%. Success: 80-85%.
Southern Blockade: Requires 2000 Koens payment (economic barrier for campers). Oranges spawn nearby (quest items). 8-12 second vulnerability during activation. Camp: 3-5%. Success: 90-92%.
Hunter's Path requires backpack discard—limits high-volume runs. Suits emergency extracts with compact items in rig/pockets. Success: 75-80%.
Final 2-Minute Approach
300-meter perimeter: crouch-walk exclusively. Audio discipline critical—any sprint/combat within 200m suggests camping/convergence.
Visual recon from 100-150m identifies camping positions: elevated spots overlooking extract, dense vegetation, building corners. Binocular scan 30-45 seconds reveals 60-70% of camps.
Timing: extract at 10-11 or 16-17 minutes vs common 12-15 or 18-22 marks. 2-3 minute delay costs minimal loot, improves survival.
Backup Extracts
Airport Drainage Pipe: First 10 minutes, no backpack restrictions. Emergency extract for fast runs. Requires 8-9 minute circuit completion (skip Motel's third safe).
Northern Outpost: 10-20 minutes, requires enemy kill, 2 players max. Suits successful defense, converts combat to extraction.
Access Bridge: Activates 25 minutes for extended sessions. Natural camping deterrent—most players extract earlier.
Beach Villa Helipad: Requires 2 Dogtags. Viable only after player kills. Avoid unless opportunistic eliminations occur.
Post-Raid Optimization
Vendor selection impacts margins 15-25%. Weapon vendors pay premiums for meta attachments/high-tier firearms. Medical vendors offer better rates for surgery kits/advanced healing.
Vendor Selection
Weapons 60k+: Sell to primary weapon vendors for 10-15% premiums. Attachments (optics/suppressors): modification specialists. Common weapons under 40k: minimal variance.
Medical: 20-30% differences between general/specialized vendors. Surgery kits, rare stims, advanced medkits: specialist sales. Basic bandages/painkillers: any vendor.
Ammo: Rarely justify optimization due to low per-unit values. Bulk sell to general vendors. Exception: meta ammo (M61, BP) for 5-8% premiums.
Inventory Management
Stash organization by category reduces prep to 60-90 seconds. Dedicated sections: weapons, armor, medical, keys. Compounds over 10+ daily runs.
Key management: secure container priority + backup copies. 2011 key (30-50k): purchase 2-3 copies to prevent circuit disruption. Store backups in stash, not on character.
Consumable stockpiling during high-profit runs reduces future costs. Looting medical (0 cost) vs purchasing (8-10k) = 8-10k profit advantage per run. Stockpile targets: 20-30 bandages, 10-15 painkillers, 5-8 medkits.
Tracking Efficiency
Spreadsheet tracking 20+ runs reveals true profitability. Metrics: total investment, successful extractions, failed runs, time invested.
Target benchmarks: 100k+ Koens/hour, 30-40% survival, 12-15 min average run.
Survival improvements > loot optimization. 30% to 40% survival = 33% profit increase. 200k to 250k loot = only 25% increase. Prioritize survival skill development.
Advanced Tips
Weather affects visibility/audio. Rain reduces visual detection 20-30%, increases audio masking. Fog creates 40-50% visibility reduction, favors close-range weapons.
Weather & Time Impact
Night raids: 25-35% lower populations, require NVG (40-80k added cost). Reduced competition offsets equipment for 40%+ survival rates. AI detection decreases 30-40%.
Dawn/dusk: 5-8 minute transitions provide concealment unavailable in full daylight/darkness. Time raids to complete during these windows.
Clear weather: Maximizes visual detection, favors long-range engagements/recon. Use cover/concealment more extensively.
Psychological Tactics
Aggressive players expect resistance/flight within 3-5 seconds. Stay stationary 45-60 seconds after breaking line-of-sight exploits impatience. 60-70% success in multi-room buildings.
Audio baiting: deliberate footsteps/equipment sounds 20-30m from actual position, reposition to flank. Reverses tactical situations. Requires map knowledge/timing.
Extract timing manipulation: visible approach followed by 2-3 minute repositioning. Campers reveal positions through repositioning/premature engagement. Identifies 40-50% of camps.
Scaling Up
Graduation criteria: 45%+ survival on current route, 150k+ average profit, sub-12 min completion, consistent AI victories. Meet 3+ = ready for medium-risk.
Medium-risk routes: Add 1-2 contested locations (Port, Beach Villa) to peripheral circuits. 300-400k per run, 35-40% survival. Suits developed combat skills.
High-risk routes: Northridge Hotel/central terminals require 200k+ loadouts + team coordination. Solo rarely achieves positive expected value despite 500-800k potential.
Troubleshooting Failures
Spawn disadvantages occur 20-30% of raids. Recognize within 15-20 seconds, adapt route vs forced competition.
Hot Zone Spawns
Northern (near Boss Fred): Immediate south/west repositioning. 200-300m relocation (2-3 min) avoids 60-70% player concentration. Alternative: Sewage Plant/Campus Services.
Central (between terminals): Maximum disadvantage. Commit to high-risk terminal looting or delay 4-5 minutes for peripheral zones to clear. Delay reduces encounters 40-50%.
Eastern: Favor Port/Beach Villa access but 300+ meters to western routes. Adapt: prioritize eastern loot (Port's 1 safe + 7 weapon boxes or Beach Villa if militant clearing viable).
Recovering from Injuries
Light (30-40% health loss): Field heal, continue route.
Moderate (50-60% loss): Cautious completion of high-value targets only.
Severe (70%+ loss): Immediate extraction.
Post-injury: surgery kits/heavy medkits become personal-use vs loot. Maintain 60%+ health prevents one-shot deaths. 15-25k medical cost justifies survival over profit.
Route abbreviation: nearest high-value + closest extract. Injured at Grain Trade? Proceed to Stables safe (90 sec) then Outpost (3-4 min) vs risking Motel's 3-4 min exposure. Secure 50-80k profit vs total loss.
Pre-Looted Spots
Pre-looted safes = 2-4 min player lead. Continuing risks encountering during extraction. Alternatives: 3-4 min delay for extraction, route reversal (opposite direction), switch to backups (Sewage Plant).
Weapon boxes: partially looted = recent activity (1-2 min), fully cleared = 3-5 min leads. Audio discipline critical in recently looted zones.
Backup route knowledge prevents wasted raids. Memorize 2-3 alternatives (Sewage Plant-Campus Services, Port-Beach Villa, peripheral safes). Mental prep adds 30-60 sec decision time vs 3-5 min mid-raid planning.
FAQ
What's the safest S4 Airport route for solo? Grain Trade Center-Stables-Motel along western edge: 30%+ survival, 200-400k in 12-15 min. Maintains 250+ meters from bosses/central terminals, accesses 6 safes with minimal traffic.
How much per Airport run in S4? Low-risk peripheral: 200-400k in 12-15 min. Medium-risk (Beach Villa): 300-500k in 15-20 min. High-risk (Northridge Hotel): 500-800k in 25+ min, requires team.
What loadout for low-risk farming? Under 100k: SEK Composite Armor (15-25k), Sentry 308 Rig (8-12k), AK-74N with BP (60-80k), medical (8-10k), 2011 keys (30-50k). Total: 120-180k enables break-even at 30% survival.
Best loot spawns S4 Airport? Motel: 3 locked safes, 150-250k in 3-4 min. Sewage Plant: 3 safes, 100-180k. Beach Villa: 2 safes + 10 crates, 300-500k (requires clearing 3 militants). Northridge: 8 safes, 500-800k (Boss Fred).
How to avoid AI patrols? Crouch-walk reduces noise 60%: detection drops from 40-50m to under 20m. Radio chatter = 50m warning. Second-floor windows allow visual confirmation without detection. Patrols follow 120-180 sec loops enabling timing-based bypass.
Closest extract to high-loot areas? Outpost: 200m from Motel, fixed, 10-15 min optimal, 85-90% success, 5-10% camp rate. Southern Blockade: 2000 Koen payment, 90-92% success, 3-5% camps. Boulder Wall: fixed, peripheral, 80-85% success, 8-12% camps.