

Arena Breakout S11's reinforcement mechanism lets squads respawn one fallen teammate per raid via timed events spawning every 15 minutes. These events offer 15-25% higher rare item rates and 1400-2600 bonus points, but require strategic timing, pre-positioned ambushes, and careful risk assessment.
Understanding S11 Reinforcement: Core Mechanics
What is Reinforcement?
S11 reinforcement allows one teammate to respawn during active raids, maintaining squad strength and preserving momentum toward high-value objectives. Costs Koens but provides access to special timed events at predictable 15-minute intervals.
Season 11 (launched December 18, 2025) spawns events at 15, 30, 45, and 60-minute marks—four reinforcement opportunities per raid. Each event contains 3-5 marked containers plus 1-2 unmarked jackpot caches.
Buy Arena Breakout Bonds top up through BitTopup for consistent reinforcement access—competitive pricing and instant delivery.
How Reinforcement Differs from Standard Raids
Standard raids begin with full prep time and optimal spawns. Reinforcement drops you into active combat zones where enemies already established positions and looted primary areas. Critical difference: event-based spawning broadcasts locations to all nearby players, creating immediate engagement pressure.
Reinforcement window opens 60-90 seconds after each event spawns. Audio cues precede events by just 3 seconds. Container interactions take 3-5 seconds each, and opening the first container activates a 60-second defend timer locking your squad into the area.
Event-based loot significantly outperforms standard containers:
Tier-3 items: 40%+ rates (vs 15-20% normal)
Tier-4 items: 40%+ rates
Total value: 75-150K Koen per successful event (vs 50K reinforcement cost)
S11 Updates: New Changes
December 2025 update introduced eight distinct event types:
Timely Support: 5 minutes, 500-1000 bonus points, 30-40% faster travel speeds, helicopter sounds audible from 100+ meters
Easy Pickings: 8 minutes, 200-300 bonus points, distinctive container clanging sounds for locating unmarked caches
Field Hospital: 6 minutes, medical supply focus, ideal for extended post-reinforcement operations
Barn Repair Shop (Farm map): 5-8 minutes, southern barn location, elevated sightlines for defensive advantages
Reinforcement locks completely when less than 5 minutes remain, preventing late-game desperation plays. Forces earlier decisions, balancing loot potential against encountering fully-equipped enemy teams.
Trigger Conditions and Eligibility
Reinforcement available immediately when a squad member dies, provided:
At least one teammate survives
Raid timer shows 5+ minutes remaining
Only one reinforcement per raid regardless of squad size
Reinforced player spawns at active event location, not standard entry points. Each map contains 3-6 primary event spawn zones—experienced squads memorize these for pre-positioned ambushes 2-3 minutes before spawns.
Requirements: sufficient Koens (50,000 cost) plus tactical consumables. Minimum viable: 2+ survivors with adequate ammunition and medical supplies to support incoming teammate through high-risk first 10-15 seconds.
Reinforcement Trigger Conditions & Cooldown Timers
When Can You Deploy?
Deployment follows strict timing windows tied to 15-minute event cycles. Missing a window means waiting up to 15 minutes. Optimal deployment: 30 or 45-minute marks when squads gathered initial loot but retain enough time for post-reinforcement extraction.
Call-back window opens 60-90 seconds after event spawns, closes when event timer expires. Timely Support events: 5-minute windows. Easy Pickings: 8-minute windows. Account for loadout selection time (30-45 seconds).
UI notifications visible from 30-40 meters, alerting all nearby players. First 10-15 seconds after event spawn = peak vulnerability as multiple squads converge.
Cooldown Duration and Reset
No cooldown between raids—limitation is strictly one reinforcement per active raid. Resets completely when squad extracts or gets eliminated. Encourages aggressive use in favorable situations.
Events still spawn at 45 and 60 minutes after 30-minute reinforcement, but can't trigger additional respawns. These subsequent events remain valuable for superior loot rates and bonus points (30-40% of total raid points).
5-minute lockout before raid end creates hard deadline. Reinforcements after 45-minute event carry higher risk as extraction points become contested.
Squad Status Requirements
Minimum viability: 2 survivors with tactical consumables (grenades, medical supplies, sufficient ammunition). Single survivors can technically trigger reinforcement, but 2v1 disadvantage during spawn window results in 70%+ failure rates.
Survivors must maintain positional control near predicted event spawn. Optimal ambush distance: 40-60 meters, providing clear sightlines while maintaining separation to avoid immediate detection.
Squad communication critical during 60-90 second call-back window. Survivors relay enemy positions, available cover, immediate threats while reinforced player selects loadout.
Limitations and Restrictions
One-reinforcement-per-raid limit forces prioritization based on remaining loadout value, player skill, tactical role. Bringing back marksman differs from reinforcing close-quarters specialist.
Fixed 50,000 Koen cost creates break-even threshold. Budget loadouts (30-40K) require extracting ~80-90K loot value for positive returns.
Arena Breakout Bonds recharge online at BitTopup for reliable reinforcement funds—secure transactions and excellent customer service.
Squad Economy Management
Budget Allocation
Baseline 50,000 Koen cost represents minimum commitment. Total investment includes reinforced player's loadout, consumables, opportunity cost.
Budget-tier loadouts (30-50K): 80-100K break-even point. Mid-tier (80-120K): 130-170K break-even. Event loot generates 75-150K average value.
Loot-per-minute rates: 50-75K during events vs 20-30K standard areas. This 2.5-3x efficiency multiplier makes reinforcement economically viable with proper execution.
Shared Cost Models
Progressive squads implement shared economy: surviving members contribute 15-20K equivalent from current inventory toward reinforcement cost.
Reinforced player receives priority on event loot to offset investment and fee. After reaching break-even, loot distribution returns to standard protocols.
Track reinforcement success rates and average returns. Data-driven approach transforms reinforcement from reactive panic button into strategic profit multiplier.
Break-Even Calculations
Formula: 50,000 Koen fee + loadout value - insurance coverage = break-even point
Example: 40K loadout with 20K insurance = 70K break-even (50K + 40K - 20K)
Event bonus points: 200-1000 per event, 1400-2600 total potential. Points convert to additional Koen through Item Exchange (10-15 trader reputation per transaction, 100-point cap).
Time investment impacts break-even. 8-12 minute reinforcement must generate proportionally higher returns than extracting current loot and starting fresh raid.
Balancing Risk vs Reward
Risk assessment begins with evaluating enemy presence near predicted spawns. If hostiles control spawn zone, reinforcement becomes high-probability total loss. 60-second defend timer locks squad into area, preventing tactical retreats.
Squad advantages must outweigh enemy advantages by 2:1 for positive expected value. Advantages: superior positioning, numerical superiority post-reinforcement, better equipment, tactical consumables.
Late-raid reinforcements (under 8 minutes) carry exponentially higher risk. Decline reinforcement in these scenarios to preserve surviving members' accumulated loot.
Optimal Timing Strategies
Early-Game Reinforcement
15-minute mark = earliest opportunity. Benefits: predictable enemy positions, abundant remaining time. However, survivors typically carry minimal loot, reducing opportunity cost.
Early events spawn in areas experienced players avoid during opening minutes, creating temporary safe zones. Barn Repair Shop (Farm map): southern barn sees minimal traffic first 15 minutes, providing 5-8 minute safe looting window.
Disadvantage: committing to specific raid instance when starting fresh might provide better returns. Early reinforcement works best when initial death resulted from isolated mistakes, not systematic squad disadvantages.
Mid-Raid Deployment
30 and 45-minute marks = optimal timing for profit-focused squads. Survivors accumulated 60-120K loot, creating meaningful opportunity costs justifying reinforcement investments.
Mid-raid events benefit from reduced player density as eliminated squads exit and successful squads extract. 30-minute Timely Support: 500-1000 bonus points plus 30-40% faster travel speeds for rapid extraction repositioning.
Tactical positioning: establish ambush points 2-3 minutes before event spawn. One member at predicted zone, others maintain overwatch from 40-60 meters.
Late-Game Reinforcement
After 45-minute mark shifts from profit-focused to extraction-support oriented. Primary goal: safely extracting survivors' accumulated loot.
60-minute event = final opportunity, occurring when most players occupy extraction zones or boss areas. Creates binary outcome: either you control extraction (reinforcement provides minimal value) or enemies control it (reinforcement offers tactical reset).
Mathematically unfavorable when raid time drops below 8 minutes. 5-minute lockout plus 3-5 minutes for loot collection/extraction creates impossible time pressure. Strict cutoff: decline reinforcement under 8 minutes remaining.
Reading Raid Situations
Immediate deployment when:
Survivors hold strong positions near predicted spawns
Minimal enemy pressure
60-90 second window sufficient for loadout selection
Delayed deployment when:
Current spawn location disadvantages squad (open areas, limited cover)
Zones controlled by enemy teams
Waiting for next 15-minute interval allows repositioning
Decision matrix considers: current squad position relative to event spawn, known enemy locations, survivors' loot value, remaining raid time. All four factors favorable = immediate deployment. Two+ factors disadvantageous = wait or decline.
Best Loadouts for Reinforcement
Budget-Friendly Kits (Under 50K)
Viable 40-45K loadout:

Level 3 armor
Reliable assault rifle with 120 rounds
Basic medical supplies (2 bandages, 1 medkit)
1 tactical grenade
Break-even: ~90-95K total value
Weapon selection favors high-capacity magazines over precision optics. Chaotic spawn environment demands suppressive fire capability. 30-40 round magazines allow sustained fire during 60-second defend timer without reload vulnerabilities.
Omit expensive attachments and specialized equipment. Basic red dot sight provides adequate target acquisition during close-quarters event defense (40-60m engagement ranges). Every 5K saved reduces break-even threshold.
Mid-Tier Loadouts (80-120K)
Balanced risk-reward loadout:
Level 4 armor
Primary weapon with quality attachments
Comprehensive medical supplies (3 bandages, 2 medkits, 1 painkiller)
2-3 tactical grenades
Break-even: 130-170K
Additional medical supplies critical for extended event defense. 60-second defend timer frequently extends to 90-120 seconds when multiple enemy squads contest sequentially.
Tactical grenades transform from luxury to essential. 3-5 second container interaction creates predictable vulnerability. Well-placed grenade forces attackers into cover, buying time to complete interactions. Two grenades: defensive during spawn, offensive when pushing jackpot caches.
High-Investment Loadouts (150K+)
Suits scenarios where survivors carry 200K+ accumulated loot requiring maximum extraction security:
Level 5 armor
Premium weapons with full attachments
Extensive medical supplies
Specialized equipment (night vision, thermal optics)
Break-even: 200-250K
Represents insurance rather than profit maximization. Squads carrying 300K+ combined loot accept 200-250K break-even to improve extraction success from 60-70% to 85-95%. Additional 50K investment costs less than expected value loss from failed extractions.
Essential Items
Medical supplies (rule of threes):
3 bandages for minor damage
2 medkits for significant injuries
1 painkiller for mobility during retreats
Handles 3-4 combat engagements
Ammunition: 180-240 rounds for primary weapons (6-8 full magazine dumps). 60-second defend timer involves continuous suppressive fire, consuming ammunition at 2-3x normal rates.
Utilities: Prioritize tactical grenades over smoke/flashbangs. Predictable defend timer creates ideal grenade opportunities. Reserve one for defensive spawn protection, one for offensive cache securing.
Map-Specific Reinforcement
Farm Map
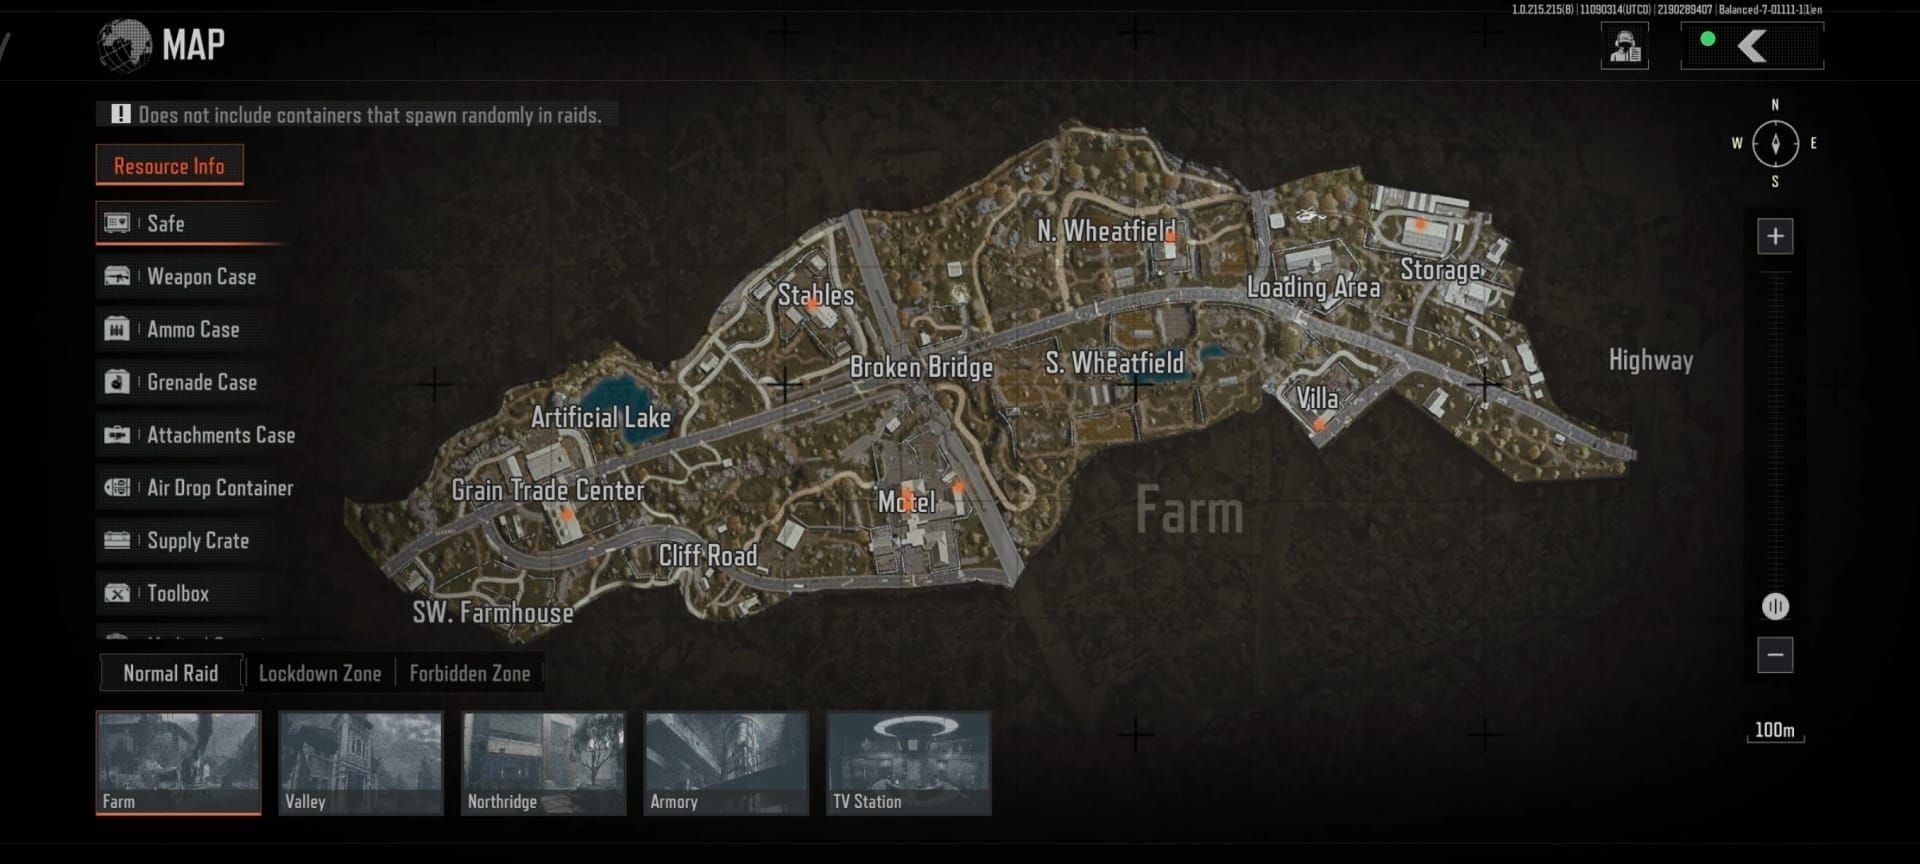
4-5 primary event spawn zones. Barn Repair Shop = most favorable conditions. Southern barn, elevated second-floor positions, 180-degree sightlines, 5-8 minute safe looting window.
Gas Station event: northeast quadrant, 40-60m engagement ranges across open ground. Requires crossfire positions before reinforced player spawns (one northwest, one southeast).
Extraction points cluster western/southern edges. Southern event spawns = 150-200 meters from extraction. Northern spawns = 400+ meter traverses through contested central areas.
Armory
Vertical complexity and numerous interior spaces. Event spawns in multi-story buildings where audio cues critical for threat detection. Container clanging from Easy Pickings helps locate jackpot caches but broadcasts position.
Numerous flanking routes and alternative approaches. Reinforced players approach through building interiors, reducing exposure during vulnerable first 10-15 seconds. Secure 2+ approach routes before calling reinforcement.
Shooting Range facility: completing activities reduces AI detection ranges by 30%. Reinforced players spawning nearby should prioritize quick completion before engaging containers.
TV Station
Compact layout creates intense player density. 3-second audio cue provides minimal warning. Pre-positioning absolutely critical—occupy elevated positions in main broadcast building before event spawns.
Field Hospital events: medical supply-focused loot, 6-minute duration. Synergizes with extended post-reinforcement operations. Prioritize over other event types for late-raid reinforcement.
Central tower offers unparalleled overwatch but attracts immediate attention. Better strategy: one member in tower for reconnaissance, others occupy ground-level positions near containers.
Northridge
Sprawling residential layout creates unpredictable spawns across similar housing clusters. Effective communication specifies precise landmarks: two-story blue house, eastern cluster, near playground vs generic houses near center.
Numerous interior spaces favor reinforced players (immediate hard cover) but complicate container location. 3-5 marked containers spread across multiple buildings. Squads split to cover simultaneously, creating separation vulnerabilities.
Extraction points distribute evenly around perimeter. Geographic flexibility allows prioritizing event completion over extraction positioning. Trade-off: longer average extraction distances, higher likelihood of encountering enemy squads.
Profit Maximization
Identifying High-Value Loot
Event containers display glowing outlines or special icons. 3-5 marked containers guarantee above-average loot (15-25% higher rare item rates). 1-2 unmarked jackpot caches contain true high-value items. Prioritize locating unmarked caches during first 20-30 seconds.
Tier-3/Tier-4 items: 40%+ rates in event containers vs 15-20% standard. 2-3x improvement makes even partially successful events profitable. Extracting 2-3 Tier-3 items typically achieves break-even. Multiple Tier-4 items from jackpots generate 150-250K profits.
Audio cues identify jackpot locations. Container clanging during Easy Pickings emanates from unmarked caches. Quality headsets gain 3-5 second advantages in cache location.
Boss Zone Access
Strategic timing enables access to boss zones survivors couldn't safely approach alone. Reinforced player spawning near boss areas creates 2-3 player advantage against solo farmers or weakened enemy squads.
Optimal execution: survivors scout boss area 2-3 minutes before event spawn, identify enemies attempting boss, call reinforcement to arrive as enemies complete fight but before extraction. Third-party timing allows eliminating weakened enemies and claiming boss loot plus enemy gear.
Higher combat difficulty but proportionally higher loot value. Only attempt when holding significant tactical advantages (knowing enemy positions while undetected, superior numbers post-reinforcement).
Loot Distribution Protocols
Reinforced player receives first priority until reaching break-even threshold. After break-even, distribution shifts to whoever has available space and can most safely extract items.
Real-time value assessment during 60-second defend timer. Verbally confirm high-value finds: Tier-4 weapon attachment in container 3. Prevents survivors claiming high-value items while reinforced player extracts with insufficient loot.
Post-event distribution accounts for extraction route risks. Players following safer routes carry highest-value items. Those taking riskier routes or providing rearguard carry lower-value bulk loot.
Extraction Timing
Optimal window: 3-5 minutes after event completion. Allows quick secondary loot collection while avoiding late-raid extraction congestion (final 5-8 minutes).
Identify extraction routes during event defense, not after completion. 60-second defend timer provides natural planning time. Pre-planning eliminates 30-60 seconds of vulnerable standing around.
Late-raid reinforcement (45+ minute) requires immediate extraction after event completion. Compressed timeline eliminates secondary loot opportunities. Strict protocol: reinforcements after 45 minutes trigger immediate extraction regardless of event loot value.
Risk Assessment: When NOT to Reinforce
Red Flags
Enemies control elevated positions overlooking predicted spawns = reinforced player faces immediate elimination during vulnerable first 10-15 seconds. No loadout overcomes spawning in pre-aimed crosshairs.
Death within 100 meters of extraction = squad already achieved primary objective. Reinforcement only risks accumulated loot. 50,000 Koen saved plus preserved loot far exceeds potential gains.
Multiple sequential deaths (two members within 60 seconds to same enemy squad) = systematic disadvantages, not isolated mistakes. Accept raid loss, analyze what went wrong, apply lessons to next raid.
Cost-Benefit Analysis
Calculate expected value: (potential profit × success probability) - (potential loss × failure probability)
Example: 100K potential profit with 30% success = 30K expected value (100K × 0.3). If failure costs 90K, expected loss = 63K (90K × 0.7). Net expected value = -33K.
Low-probability reinforcement justifiable only when potential profits dramatically exceed losses. Require 1.5:1 expected value ratios minimum to account for intangible factors (time investment, psychological impact).
Squad consensus determines marginal scenarios. If any member expresses strong concerns, those typically reflect valid tactical observations. Overruling skeptics creates team friction and often results in predicted failures.
Alternative Strategies
Fresh raids provide guaranteed optimal spawns, full prep time, no immediate combat pressure. If reinforcement attempts average 8-12 minutes with 50% success, you could alternatively complete 1-2 fresh raids with 70-80% success rates.
Fresh raids preserve psychological momentum. Failed reinforcement creates frustration and tilt negatively impacting subsequent decisions. Starting fresh provides mental reset.
Decision matrix: survivors carry under 50K loot, 20+ minutes remain, positioning unfavorable = start fresh typically better. Survivors carry 100K+, under 15 minutes remain, positioning favorable = reinforce optimal.
Learning from Failures
Conduct brief post-raid analysis identifying specific failure point: poor spawn timing, inadequate loadout, superior enemy positioning, communication breakdown. Transforms failures into learning investments improving long-term success rates.
Common patterns: reinforcing too late, underestimating enemy presence, inadequate medical supplies. Track patterns across raids, reveal squad weaknesses targeted practice can address.
Most valuable lesson: recognizing personal and squad limitations. Some squads excel at aggressive plays, others achieve better results through conservative criteria. Understand capabilities, adjust thresholds accordingly.
Advanced Squad Coordination
Communication Protocols
Standard callout format: event type, spawn location, known enemy positions, recommended approach vector.
Example: Timely Support, southern barn, two enemies northeast 60 meters, approach from west through treeline.
Continuously update enemy positions during 60-90 second call-back window. Real-time updates: enemies now 40 meters east, moving toward containers.
Post-spawn: reinforced player confirms spawn location and immediate cover. Survivors provide covering fire and threat callouts. First 10-15 seconds determine success or failure.
Role Assignment
Three-role framework:
Point (reinforced player): container interactions, minimize combat
Security (survivor): close-range protection within 20 meters
Overwatch (survivor): distance callouts, suppressive fire at 30+ meters
Role flexibility allows adaptation. If Point takes significant damage, swap to Security while healthier member assumes Point.
Synchronizing Movement
Bound and cover principle: one element moves while others provide overwatch, then reverse. Prevents entire squad caught in movement simultaneously.
Reinforced player never moves alone during first 60 seconds—at least one member maintains overwatch during repositioning.
Combat during defend timer emphasizes area denial over aggressive pushing. Tactical grenades force enemies into cover. Suppressive fire prevents advancement. Goal: controlling space and time, not securing eliminations.
Extraction formation: reinforced player (carrying priority loot) occupies middle with security front/rear. Spacing: 15-20 meters for mutual support but loose enough to prevent single grenades eliminating multiple members.
Post-Reinforcement Regrouping
Immediate regrouping 50-100 meters from event location. Creates distance from contested area while remaining close enough to respond if pursued. Allows medical usage, ammunition redistribution, loot organization.
Loot consolidation: high-value items transfer to players with safest extraction routes. 30-60 second organization prevents unbalanced risk distribution (one player carrying 200K, another 30K).
Tactical assessment for extraction: discuss known enemy positions, preferred extraction points, contingency plans if primary routes contested. Transforms extraction from reactive scramble into coordinated operation.
Common Mistakes
Misconception: Reinforcement Always Saves Raids
Most damaging misconception treats reinforcement as automatic recovery rather than calculated tactical option. Poor timing or unfavorable conditions often compound losses. Decline reinforcement in ~40-50% of opportunities based on rigorous assessment.
Stems from psychological desire to do something after death rather than accepting loss. Experienced players recognize optimal action is sometimes inaction.
Five-step risk assessment protocol:
Check raid timer (decline if under 8 minutes)
Evaluate death location (decline if within 100m of extract)
Assess enemy advantages (decline if enemies hold 2+ advantages)
Confirm survivor status (require minimum 2 survivors with consumables)
Compare risk to reward (decline if risk exceeds 2x lost gear value)
Over-Investment in Loadouts
Over-investment: bringing 150K+ loadouts to scenarios offering 100-120K profit potential. Tactical positioning and squad coordination determine outcomes far more than loadout quality beyond basic viability.
Match investment to realistic potential:
Budget (40-50K): early-game reinforcement
Mid-tier (80-120K): mid-raid with 150-200K profit potential
High-investment: late-raid protecting 200K+ accumulated loot
45K loadout achieving break-even generates better long-term returns than 150K loadout requiring perfect execution. Consistent small gains compound more effectively than occasional large gains with frequent total losses.
Poor Timing and Spawn Awareness
Timing mistakes: reinforcing too early (before survivors establish positioning), too late (insufficient time), or during unfavorable event types (Gas Station minimal cover vs Barn Repair Shop strong positions).
Spawn location awareness requires memorizing 3-6 primary event zones per map. Southern barn spawns (Farm) provide elevated defensive positions. Open field spawns create immediate vulnerability.
Study event spawn patterns across multiple raids, build mental maps. After 20-30 attempts, spawn location assessment becomes intuitive.
Lack of Communication
Failures: reinforced players spawning without knowing enemy positions, survivors failing to provide covering fire, squads attempting container interactions without coordinated security.
Most common: survivors focus on own activities rather than supporting reinforced player during vulnerable first 10-15 seconds. Creates scenarios where reinforced player faces 2v1 or 3v1 disadvantages.
Mandatory communication protocols:
Pre-spawn enemy position update
Spawn confirmation from reinforced player
Immediate threat callouts during first 15 seconds
Continuous position updates during container interactions
Practice protocols during low-stakes early-raid reinforcements, building habits persisting during high-pressure late-raid scenarios.
FAQ
How does reinforcement work in Arena Breakout S11? Reinforcement respawns one squad member during active raids via timed events spawning every 15 minutes (15, 30, 45, 60-minute marks). Costs 50,000 Koen, provides access to special containers with 15-25% higher rare item rates. Locks when under 5 minutes remain. One reinforcement per raid maximum.
When is the best time to reinforce? Optimal timing: 30 or 45-minute marks when survivors accumulated 60-120K loot and sufficient time remains for extraction. Avoid after 45-minute mark unless supporting contested extractions. Always decline when under 8 minutes remaining.
How much does reinforcement cost and what's break-even? Fixed 50,000 Koen fee plus reinforced player's loadout. Budget 40K loadout = 90K break-even. Mid-tier 80-120K = 130-170K break-even. Event containers generate 75-150K average value, making reinforcement profitable with proper execution.
Where do you spawn when reinforcing? Spawn at active event location (varies by 15-minute interval and event type). Each map has 3-6 primary zones. Farm's Barn Repair Shop spawns southern barn. Gas Station spawns northeast quadrant. Predictable based on event type.
What loadout for reinforcement? Budget (40-50K): level 3 armor, assault rifle with 180-240 rounds, basic medical (3 bandages, 2 medkits, 1 painkiller), 2 tactical grenades. Mid-tier (80-120K): level 4 armor, comprehensive medical. Match investment to realistic profit potential.
Can you reinforce multiple times per raid? No. One reinforcement per raid regardless of squad size or remaining time. Makes decision of who to reinforce strategically important. After using reinforcement, subsequent events still provide valuable loot but can't trigger additional respawns.