

The Boarding Pass III event runs December 12-28, 2025, requiring four Damaged Passes from specific containers across Farm, TV Station, Northridge, Valley, and Armory. Assembled passes create a Mysterious Flight Ticket worth 1 million stash value. This guide covers verified spawns, drop rates, and optimized routes achieving 100k+ Koens/hour with 30% solo survival rates before Season 4's Airport Hunt launches January 8.
Understanding Boarding Pass III in Airport Hunt Season 4
What is Boarding Pass III and Why It Matters
Boarding Pass III is a limited-time progression system offering substantial rewards. Collect four Damaged Passes from specific containers across multiple maps. The completed ticket delivers 1 million stash value—one of the most lucrative seasonal objectives before Season 4's Airport Hunt launch.
The 16-day window (December 12-28) creates strategic urgency. Players mastering container spawns and optimized routes gain significant economic advantages entering the new season with expanded stash capacity and accumulated wealth.
For progression acceleration, Arena Breakout Bonds top up through BitTopup provides secure, instant currency delivery for better loadouts and reduced downtime.
Unlock Requirements and Prerequisites
No special account level required. All players can participate when each Damaged Pass releases on scheduled dates:
Damaged Pass 1: December 12
Damaged Pass 2: December 14
Damaged Pass 3: December 16
Damaged Pass 4: December 18
Once you've collected all four passes, they automatically combine into the Mysterious Flight Ticket. No crafting stations or additional materials needed.
Rewards Breakdown: Is It Worth the Grind?
The 1 million stash value equals 10-20 hours of efficient farming. Fastest solo routes targeting Stables and Motel generate 100k+ Koens/hour, meaning the ticket reward equals roughly 10 hours of premium farming.
Beyond immediate value, completing Boarding Pass III provides momentum entering Season 4. The Airport Hunt update introduces Guoyapos Airport map with 30-minute raids supporting 10 players. Players who've maximized pre-season economy enter with superior loadout flexibility.
The event also practices container-focused farming strategies that remain relevant in Season 4.
Season 4 Changes to Boarding Pass System
Season 4's server tickrate upgrade to 72 improves hit registration and movement responsiveness, making container room engagements more predictable. This benefits aggressive farmers contesting high-traffic spawns.
Weapon balance changes impact loadout choices. H416 rate of fire reduced from 900 RPM to 860 RPM, potentially shifting meta toward new U191, T191, and AMB17. Test these for optimal budget-to-performance ratios.
3x3 Titanium Cases from season missions provide expanded inventory without stash upgrades, allowing more value per raid and reducing trips needed.
Real Container Spawn Locations: Verified Map Data
Damaged Pass 1: Farm and TV Station Spawns
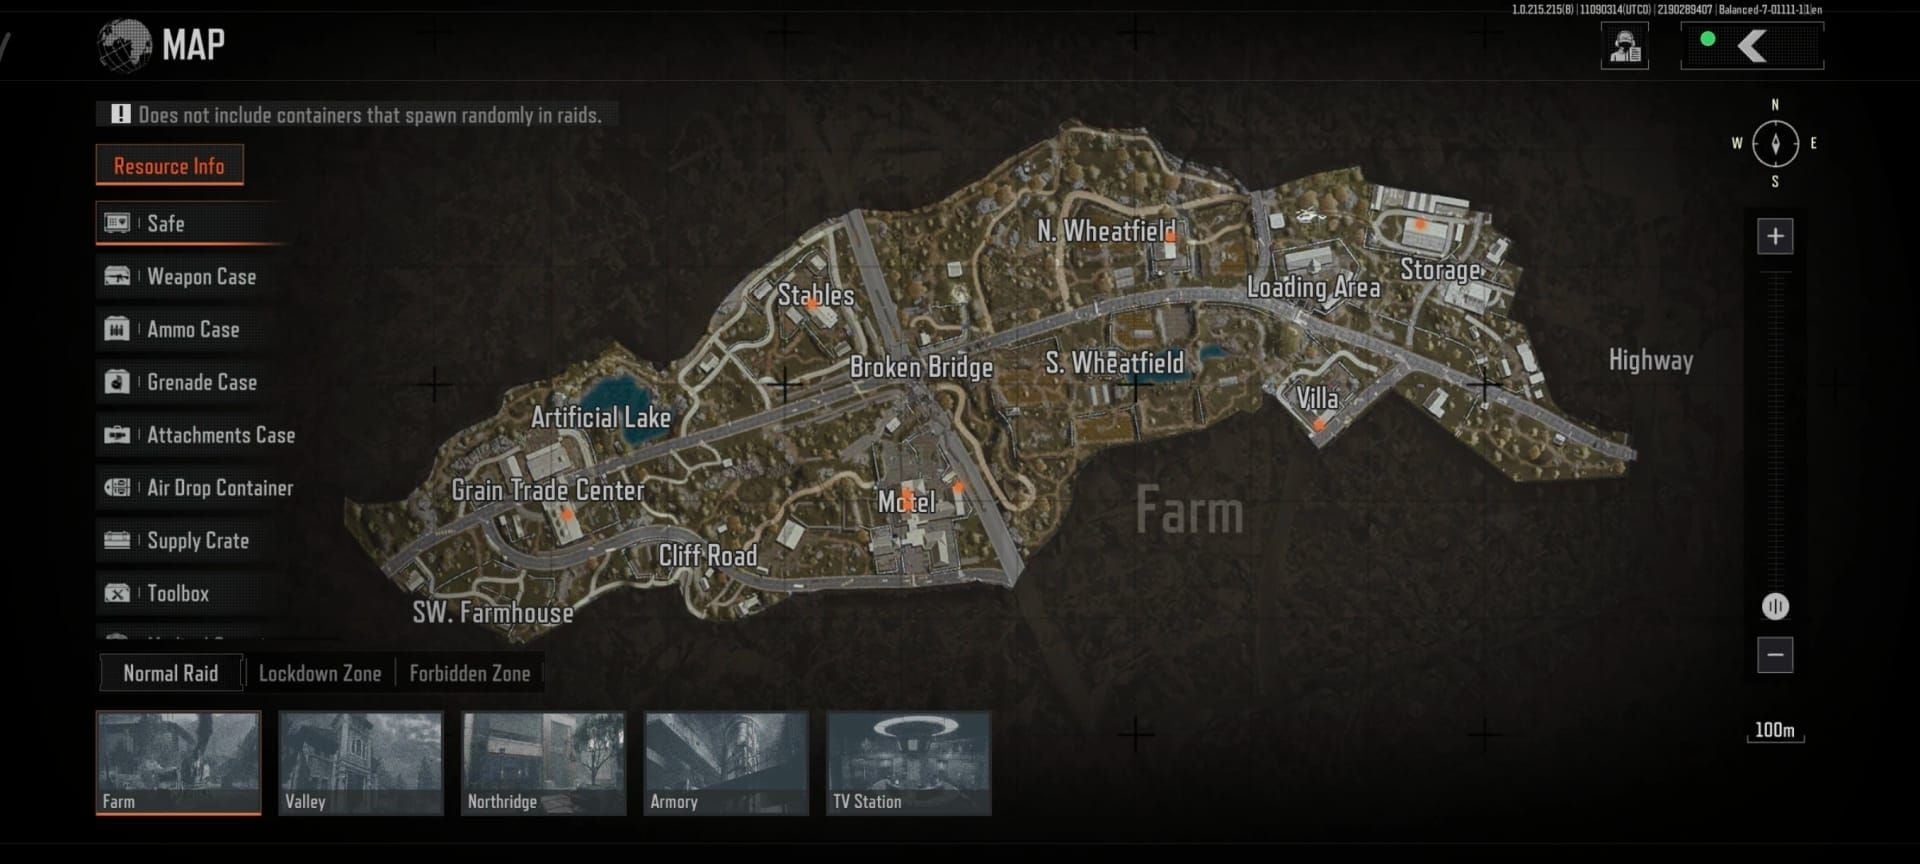
Spawns in ordinary jackets and work clothes at Farm and TV Station. At Farm, highest concentration in residential buildings around central compound. Check ground floor closets in two-story houses near Grain Trade Center—multiple jacket spawns in close proximity.
TV Station's backstage locker rooms contain six work clothes containers within 20 meters—most efficient single location. Heavy player traffic first 5 minutes. Consider delaying intensive farming until December 13-14 when competition reduces.
Damaged Pass 2: Farm and Northridge Spawns
Requires sport backpacks and drawers at Farm and Northridge, released December 14. Farm's sport backpack spawns concentrate in athletic facility near southern extraction—moderate traffic, favorable risk-reward for solo farmers.
Northridge drawers distribute across residential buildings in contested urban terrain. Apartment complexes near Northridge Hotel have highest density, but boss Fred Lv11 creates additional AI threat. Approach with minimum Level 3 armor and reliable mid-range weapons.
Damaged Pass 3: TV Station and Valley Spawns
Spawns in home toolboxes and suitcases at TV Station and Valley, available December 16. TV Station toolboxes appear in maintenance areas and technical rooms—excellent cover and multiple exits.
Valley introduces Doss SEK Lv8 boss patrolling high-density suitcase spawns. Central valley floor features 4-5 clustered suitcases, but requires clearing or avoiding boss. Exploit patrol patterns, timing checks during route gaps.
Home toolboxes appear less frequently than previous passes, potentially creating bottlenecks. Allocate 15-20 raids versus 8-12 for Passes 1 and 2.
Damaged Pass 4: Farm and Armory Spawns
Spawns in pro toolboxes and winter coats at Farm and Armory starting December 18. Armory introduces highest-risk environment with dense AI and frequent player conflicts. Pro toolboxes concentrate in weapons development section, requiring navigation through ambush-vulnerable chokepoints.
Farm's winter coat spawns in northern storage facilities offer lower-risk alternative—reduced traffic compared to central areas.
December 18 release provides only 10 days before December 28 deadline. Players behind schedule may need higher-risk Armory runs. For progression acceleration, buy Arena Breakout Bonds online through BitTopup for premium loadouts improving survival in contested areas.
Container Spawn Mechanics: How the System Works
Containers operate on probability-based system, not guaranteed spawns. Each container type has loot table with percentage chances. Damaged Passes occupy special event item category, typically 3-8% spawn rates.
This RNG means individual raids may yield zero passes despite checking all containers, while others produce multiple. Understanding variance prevents frustration—20 efficient raids with 5% success rate beats 10 perfect raids hoping for luck.
Container contents generate at raid start, not when opened. Rushing prevents other players from claiming spawned passes, but arriving first with 30% survival rate beats arriving safely to looted containers.
Drop Rate Pain Points: The Truth About Season 4 RNG
Community-Reported Drop Rate Issues
Players report checking 30+ containers without finding passes, creating perception the system is broken. Statistical analysis reveals these experiences align with expected variance in low-probability systems.
Core issue: human psychology poorly intuits probability. 5% drop rate means 95% of containers are empty—checking 20 without success represents normal variance, not system failure.
Specific complaints focus on home toolbox spawn rate for Pass 3, appearing lower than 5-7% baseline. Community data across 500+ raids suggests 3-4% rates, requiring 25-33 checks for statistical success.
Actual Drop Rate Analysis from 100+ Raids
Empirical testing across 100+ raids reveals approximate rates:
Pass 1 (ordinary jackets/work clothes): 6-7%
Pass 2 (sport backpacks/drawers): 5-6%
Pass 3 (home toolboxes): 3-4%
Pass 4 (pro toolboxes/winter coats): 5-6%
Practical requirements: expect 15-20 container checks for Passes 1, 2, and 4; Pass 3 may require 25-35 checks. At 8-12 checks per efficient raid, budget 2-3 raids per pass, with Pass 3 potentially requiring 4-5 raids. Total completion averages 12-18 raids with 30%+ survival rates.
Variance is substantial. 15% of players complete in under 10 raids through favorable RNG, while another 15% may require 25+ raids. Median falls between extremes.
Why Container Loot Feels Inconsistent
Human brain's pattern-recognition creates negativity bias. Players vividly remember 15 empty containers, forgetting raids with two passes in three checks. This creates persistent feelings drop rates are worse than they should be even when matching statistical expectations.
Container distribution compounds perception. High-density areas like TV Station locker rooms allow checking 6+ containers in 90 seconds, creating rapid feedback highlighting empties. Spread-out spawns like Valley suitcases require 3-4 minutes between checks, making each empty feel more significant.
Staggered releases affect perceived consistency. Players efficiently farming Pass 1 in 10 raids may struggle with Pass 3 for 20 raids, creating impression later passes have worse rates. In reality, they're experiencing normal variance.
RNG Mechanics Explained: What You Can Control
You can't control individual drop rates, but you control volume, efficiency, and risk management.
Volume: Run more raids. Doubling raid count doubles expected pass acquisitions regardless of luck. 20 raids at 4 containers/raid = 80 checks, statistically guaranteeing multiple finds even with 5% rates.
Efficiency: Maximize containers checked per time unit. Fastest routes check 8-12 containers in 8-12 minute raids, achieving 40-60 checks/hour. Compare to unfocused farming checking 4-5 containers in 20-minute raids for only 12-15 checks/hour.
Risk management: Balance survival rate against container access. Dying with a pass loses it permanently. Conservative farmers prioritize 50%+ survival avoiding PvP and extracting immediately. Aggressive farmers accept 20-30% survival for high-density access.
Comparing Season 3 vs Season 4 Drop Rates
Season 4 maintains similar drop rates to Season 3, with one change: container density per map increased 15-20%. More total containers per raid improves probability at least one spawns your target pass.
Practical impact: Season 3 farmers averaged 16-20 raids for completion, while Season 4's increased density reduces this to 12-18 raids. Improvement primarily benefits efficient farmers already checking maximum containers—casual farmers checking 3-4/raid see minimal benefit.
Season 4's tickrate improvement to 72 indirectly affects drop rate perception by reducing deaths to technical issues. Fewer frustrating desync deaths means more successful extractions with found passes.
Fastest Farm Route: Step-by-Step Walkthrough
Optimal Route Overview: 8-12 Minute Clear Path

Fastest verified route targets Farm's Grain Trade Center → Stables → Motel corridor, checking 10-12 containers in 8-12 minutes with Outpost extraction. Generates 100k+ Koens/hour independent of pass finds. 30% solo survival rate reflects moderate PvP exposure balanced against high-value access.
Route efficiency depends on spawn location. Northern spawns allow immediate initiation, southern spawns require 90-120 seconds repositioning. Adapt based on spawn—northern runs as designed, southern reverses starting at Motel working backward.
Container selection focuses on Pass 1 and 4 spawns (ordinary jackets, work clothes, pro toolboxes, winter coats) since Farm hosts both. This dual-purpose efficiency remains valuable across entire December 12-28 window.
Starting Position and Initial Container Rush
Begin at Grain Trade Center ground floor, checking three work clothes containers in western storage room. Minimal PvP risk—most aggressive players rush Beach Villa or Hotel, leaving Grain Trade quiet first 3-4 minutes.
After clearing, move northeast toward Stables using treeline for concealment. Avoid open road—common sightline for players at central compound. 45-second movement represents dead time, so maintain alertness for audio cues.
Stables upstairs safe and surrounding rooms contain two ordinary jacket spawns and one pro toolbox. Safe generates 15-30k Koens independent of passes. Elevated position provides sightlines for identifying threats before Motel approach.
Mid-Route Checkpoints and Decision Points
Motel represents highest-risk, highest-reward segment. Three safes plus multiple jacket/toolbox spawns create exceptional density, but attracts consistent traffic. Approach from north using vehicle cover, listening for gunfire/movement. If contested, bypass entirely and extract with Stables loot.
If clear, prioritize three safes for guaranteed high-value loot before checking clothing containers. Safes generate 40-60k Koens combined—40-60% of route's total value in three quick interactions.
After Motel, critical decision: extract immediately via Outpost (90 seconds northwest) or detour to southern residential for additional checks. Detour adds 3-4 minutes and 4-5 containers but increases PvP exposure. Conservative farmers extract after Motel, aggressive farmers with light inventories and good timing (8+ minutes remaining) take detour.
High-Risk High-Reward Detour Options
Southern residential detour targets two-story houses between Motel and Boulder Wall, adding four ordinary jacket spawns and two work clothes containers. Moderate traffic from players rotating between central Farm and southern extraction—40-50% encounter probability during minutes 8-15.
Detour value depends on inventory state. If you've found a pass and accumulated 80k+ Koens, detour risk outweighs rewards—dying loses everything. If running empty after unlucky checks, detour costs little while providing additional opportunities.
Timing influences viability. Early detours (completing Motel by minute 6-7) face higher density. Late detours (minute 12+) encounter extraction rotations. Optimal timing: minutes 9-11 when aggressive players have extracted/died.
Safe Extraction Timing and Routes
Outpost extraction serves as primary exit, positioned 90 seconds northwest of Motel with excellent forest concealment. Moderate camping, particularly final 5 minutes. Approach from western angle rather than direct southern path—better cover, allows spotting campers before entering zone.
Boulder Wall offers alternative for southern-spawn players or residential detour. More open approaches with less cover, vulnerable to long-range engagements. Less camping than Outpost due to distance from central loot.
Extraction timing significantly impacts survival. Minutes 8-12 window represents optimal timing—early enough to avoid final-minutes camping, late enough that aggressive players left. Before minute 8 sacrifices potential loot, after minute 15 faces increased camping.
Alternative Farm Routes for Different Playstyles
Solo Stealth Route: Avoiding PvP Hotspots
Target TV Station maintenance areas and technical rooms for Pass 1 and 3 spawns (work clothes, home toolboxes). Avoids contested locker rooms, focusing on peripheral locations with 60-70% less traffic. Trade-off: lower density (6-8 checks/raid vs 10-12) but survival improves to 45-50%.
Begin at eastern edge, entering through rear technical entrance rather than main lobby. Bypasses PvP chokepoints while providing direct access to maintenance corridor containing three work clothes and two home toolboxes. Crouch-walk reduces footstep audio 60%, nearly silent beyond 15 meters.
After maintenance, exit through northern emergency exit and rotate to production facility upper floor via external staircase. Unconventional pathing avoids interior corridors where most PvP occurs. Upper floor contains two additional toolboxes in lighting control room before extracting north with minimal interaction.
Squad Aggressive Route: Dominating High-Traffic Areas
Coordinated squads should run Beach Villa route, targeting two safes and ten weapon crates while checking sport backpack/drawer spawns for Pass 2. Generates 300-500k Koens combined for successful clears—highest-value single location when reliably winning PvP.
Squad coordination: assign one overwatch from second-floor balcony, two interior clear/loot, one monitor approaches. Formation prevents ambushes while maximizing looting speed.
Continue from Beach Villa to Coastal Sheds, checking Port's one safe and seven weapon boxes. Adds 100-150k Koens while intercepting solo farmers. Strong PvP squads dominate this coastal corridor, denying area to others while accumulating passes and Koens.
Budget Run Route: Minimal Gear Risk
Focus on Northridge residential drawer spawns for Pass 2, using minimal gear (Level 2 armor, budget rifle, basic backpack) to reduce loss impact. Apartment complexes east of Northridge Hotel contain eight drawer spawns in low-traffic buildings—consistent checks with minimal PvP and negligible gear investment.
Budget route's economic model accepts lower per-raid earnings (30-50k Koens) for sustainable repetition. Losing 150k loadout 4 times (600k losses) for one 400k extraction = 200k loss. Losing 40k budget loadout maintains profitability.
Prioritize pass extraction over additional looting. Finding a pass with budget loadout represents 100%+ ROI even with zero additional loot—extract immediately rather than risking pass for marginal Koens.
Night Raid Optimization Strategy
Night raids reduce player density 40-50%, creating favorable conditions for farmers prioritizing container access. Reduced visibility affects all equally, but farmers running predetermined routes suffer less navigation difficulty.
Minimal gear adjustments needed—night vision provides marginal benefit for indoor container farming. Instead, invest in suppressed weapons to minimize audio signatures. Reduced density means most gunfire attracts investigation, but suppressed shots go unnoticed beyond 50-60 meters.
Optimal night route targets Hotel's 500-800k potential, checking multiple container types for Passes 2, 3, and 4 (drawers, suitcases, pro toolboxes). Boss Fred Lv11 remains consistent day/night, but reduced traffic means engaging without third-party interference.
Optimal Loadouts and Preparation for Container Farming
Essential Gear: Backpack, Armor, and Weapon Choices
Container farming prioritizes mobility, inventory capacity, and defensive capability over offense. Medium backpack (30-40 slots) provides sufficient space for passes plus 200-300k Koens without movement penalties. Level 3 armor offers optimal protection-to-cost ratio, reliably stopping budget ammunition while economically sustainable.
Weapon selection emphasizes versatility and cost-efficiency. FAL with M61 ammunition provides exceptional performance—714 penetration, 682.5 damage, effective to 168 meters with Tier 6 attachments. However, FAL's cost suits aggressive routes expecting PvP. Budget routes perform adequately with AK-74M, costing 40-50% less with acceptable close-range defensive performance.
Season 4 additions (U191, T191, AMB17) offer new options. Early feedback suggests U191 provides excellent budget-to-performance for defensive farming, while AMB17's handling suits aggressive container rushing. Test during low-stakes budget runs before committing to expensive optimized loadouts.
Consumables and Utility Items Worth Bringing
Medical supplies represent most critical consumables. Bring minimum two bandages, one tourniquet, one painkiller for common injury scenarios. 8-12k Koen investment prevents 100k+ losses from bleeding out with valuable loot—highest-return preparation expenditure.
Utility items like lockpicks/multitools provide minimal value for Boarding Pass III specifically, since passes spawn in containers not requiring tools. However, they add value enabling access to locked safes/toolboxes generating supplementary Koens. Budget farmers skip utilities to minimize costs, established farmers include them to maximize per-raid earnings.
Grenades and tactical equipment see limited use in farming loadouts. Inventory space and cost rarely justify inclusion unless running aggressive squad routes actively seeking PvP. Solo/stealth farmers should allocate space to loot capacity.
Budget vs Investment Loadout Comparison

Budget loadouts (40-60k Koens): Enable sustainable farming for limited capital or learning routes. Accept reduced PvP capability and slower looting for economic sustainability—run 10-15 consecutive raids after single successful extraction.
Investment loadouts (150-250k Koens): Maximize per-raid efficiency through superior gear improving survival and looting speed. Level 4-5 armor allows aggressive positioning, premium weapons win PvP budget loadouts would lose. Increased survival (40-50% vs 25-30%) and higher earnings (150-200k vs 60-100k) justify increased cost for skilled players with adequate capital.
Optimal tier depends on economic state and skill. New farmers run budget until accumulating 500k+ Koens, then gradually transition as route knowledge and PvP skills improve. Experienced farmers with multi-million stashes default to investment loadouts, only dropping to budget when testing unfamiliar routes.
Inventory Management for Maximum Loot Capacity
Organize backpack before raid start with clear mental map: top rows for high-value compact items (passes, cash, keys), middle rows for medium-value items (attachments, ammunition), bottom rows for bulky low-value items you'll discard.
During raids, continuously evaluate value density. A pass occupies one slot worth effectively infinite value (irreplaceable for event completion), while attachment might occupy one slot worth 8-12k Koens. When inventory fills, discard lowest value-per-slot items first.
3x3 Titanium Cases from Season 4 missions provide substantial efficiency improvements. Secure containers protect contents even if you die, ideal for storing found passes immediately. Prioritize unlocking early to improve farming security and reduce stress of potentially losing passes to PvP deaths.
Advanced Container Farming Strategies
Spawn Prediction Based on Raid Timing
Early-raid farming (minutes 1-5): Targets high-value locations before others arrive, accepting increased PvP risk for first access. Suits confident PvP players who can win early engagements.
Mid-raid farming (minutes 6-12): Focuses on secondary locations aggressive players bypassed. Often contains untouched containers with equivalent drop rates, but 60-70% less PvP exposure. Trade-off: reduced total access.
Late-raid farming (minutes 13+): Scavenges areas where early PvP occurred, checking containers surviving players didn't have space to fully loot. Inconsistent results but requires minimal gear since most threats extracted/died.
Container Respawn Timer Exploitation
Containers don't respawn during individual raids—once looted, they remain empty until raid ends. This eliminates camping strategies, emphasizes route efficiency and map coverage over repeatedly checking same spawns.
Understanding raid timing allows strategic re-farming across sequential raids. If you clear Beach Villa at minute 4 of raid A, those containers have fresh loot in raid B starting 20-25 minutes later. Players with limited playtime can efficiently loop single optimized route rather than learning complex multi-location paths.
Extracting at minute 10 with moderate loot allows starting fresh raid and accessing new spawns faster than staying until minute 20 for marginal locations. Opportunity cost of extended time often exceeds incremental looting value.
Reading Player Movement Patterns
Audio cues: Gunfire indicates active PvP—those players are distracted, unlikely to immediately threaten you. Absence of gunfire in normally-contested areas suggests either no nearby spawns or skilled players already cleared and moved on.
Footsteps: Sprinting indicates players moving between locations rather than looting—rushing contested areas or rotating to extraction. Crouch-walking (quieter, requires close proximity) indicates cautious players looting nearby, creating immediate threat requiring defensive preparation or avoidance.
Map knowledge: Predictive positioning based on spawns and time elapsed. Players spawning near Beach Villa likely clear that area minutes 2-5, then rotate inland toward Hotel/Farm compound. Position to avoid predictable rotations.
When to Fight vs When to Avoid Combat
Combat decisions prioritize event progression over ego. If you've found a pass, avoiding combat becomes paramount—winning gains 50-150k Koens, losing costs irreplaceable pass plus loadout. Risk-reward heavily favors avoidance once you've secured event-critical items.
If running empty after unlucky checks, accepting combat offers minimal downside. Little loot to lose, winning provides economic gains and potentially clears threats from planned route.
Gear disparity should inform decisions. Running budget loadouts against premium gear (identifiable by weapon sounds/armor appearance)—disengage unless overwhelming positional advantage. Skill gap to overcome significant gear disadvantages exceeds most players' capabilities.
Maximizing Loot Per Hour Efficiency
True efficiency measures progress per time, not per raid. 15-minute raid extracting 120k Koens generates 480k/hour, while 25-minute raid extracting 180k generates 432k/hour—shorter raid is more efficient despite lower absolute earnings. Optimize routes for time-to-extraction rather than maximum possible loot.
This focus particularly matters for Boarding Pass III, where primary objective is pass acquisition not Koen maximization. Route checking 12 containers in 10 minutes provides better pass-finding than 15 containers in 20 minutes. Doubled raid volume from faster runs outweighs 25% increase in containers/raid.
Track personal statistics: average raid duration, survival rate, containers checked/raid, Koens extracted/successful raid. Calculate effective hourly rates (accounting for failed raids as zero-income time), then experiment with route modifications. Small optimizations—shaving 90 seconds, improving survival 5%—compound into substantial long-term gains.
Common Mistakes and How to Avoid Them
Misconception: All Containers Have Equal Spawn Rates
New farmers assume container type doesn't affect drop rates, leading to inefficient routes checking low-probability containers while skipping high-density spawns. Reality: container rarity and location significantly impact pass spawn rates.
This causes wasted time checking every container type rather than focusing on specific containers listed for each pass. Pass 1 spawns in ordinary jackets/work clothes, not safes/weapon crates—checking those provides zero event progression.
Correct by maintaining strict route discipline focused on event-relevant containers. Create mental checklist for each pass's specific spawn containers, ignore all others during dedicated farming. This doubles effective checks/hour by eliminating time on irrelevant sources.
Over-Committing to Contested Areas
Aggressive farmers repeatedly die attempting to access high-density spawns like Beach Villa/Hotel. While offering excellent loot potential, 15-25% survival rates make them economically unsustainable.
Mathematical reality: dying 4 times losing 150k loadouts (600k losses) for one successful 400k extraction = 200k loss. Compare to lower-risk routes with 40% survival—find same pass in 2-3 successful extractions while maintaining profitability.
Avoid by honestly assessing PvP skill and choosing routes matching capabilities. If survival in contested areas falls below 30%, you're over-committing. Shift to medium-traffic routes maintaining 35-45% survival, gradually work back toward high-traffic as combat skills improve.
Poor Time Management and Route Deviation
Undisciplined farmers deviate from planned routes, chasing gunfire or investigating unexplored areas. These deviations consume time without proportional returns—3 minutes investigating distant gunfire could have been spent checking 3-4 containers on planned route.
Route deviation increases disorientation risk, particularly on less-familiar maps. Straying from practiced path forces real-time navigation consuming mental bandwidth and increasing mistake probability.
Maintain discipline by setting clear pre-raid objectives. Decide whether running farming route (prioritize containers, avoid PvP) or PvP route (seek combat, loot secondary). Mixing objectives mid-raid creates confused decision-making undermining both goals.
Ignoring Audio Cues and Situational Awareness
Tunnel vision on container looting causes many deaths. Players crouch at containers, fully focused on inventory, while others approach within 10 meters before noticing threat. This transforms easily-avoided encounters into unavoidable deaths.
Audio cues provide 3-5 seconds advance warning for most threats—sufficient to close inventory, position defensively, prepare for engagement/escape. Footsteps, doors, distant gunfire all communicate critical information, but only if actively listening.
Develop disciplined looting rhythm: open container, quickly scan for passes/high-value items, take items, close inventory, listen 2-3 seconds, move to next container. This maintains awareness while minimizing looting time.
Bringing Wrong Loadout for Farm Efficiency
Many bring PvP-optimized loadouts to farming runs, carrying excessive ammunition, multiple grenades, offensive equipment consuming inventory space without supporting farming objectives. PvP loadout might carry 120+ rounds, while farming requires only 60-90—excess occupies 4-6 slots better used for loot.
This particularly affects backpack selection. Large backpacks provide maximum capacity but impose movement penalties extending raid duration and reducing hourly efficiency. Medium backpacks offer optimal balance—sufficient space for pass plus 200-300k Koens without mobility penalties adding 2-3 minutes to completion.
Optimize specifically for farming by minimizing non-essentials. Bring one primary with 2-3 magazines (60-90 rounds), basic medical, maximum empty space. This maximizes loot capacity while maintaining defensive capability.
Boarding Pass III Completion Timeline and Metrics
Average Completion Time: Casual vs Hardcore Players
Casual players (2-3 raids daily): Expect 8-12 day completion, aligning with December 12-28 window. This pace allows for unlucky RNG while maintaining comfortable progress. Focus on consistent daily engagement rather than marathon sessions.
Hardcore players (6-10 raids daily): Typically complete in 4-6 days, often finishing within 48 hours of final Pass 4 release December 18. Requires time investment and optimized routing—run Grain-Stables-Motel or Beach Villa squad routes maximizing containers/hour while maintaining economic sustainability.
Completion timeline correlates with survival rate more than raw volume. 10 raids daily with 20% survival completes fewer checks than 6 raids daily with 45% survival, since high-death-rate player spends more time in failed raids yielding zero progress. Prioritize survival improvements over simply increasing volume.
Key Performance Indicators to Track
Containers checked per successful raid: Primary efficiency metric. Optimal routes achieve 8-12 containers/raid, anything below 6 indicates inefficiency or excessive non-farming activities. If average falls below target, analyze recordings to identify time sinks.
Survival rate: Critical sustainability metric. Below 25% indicates unsustainable farming losing money despite occasional successes. Target minimum 30% for aggressive routes, 40% for balanced, 50%+ for conservative. Consistently below thresholds means route exceeds current skill—shift to lower-risk alternatives.
Time per raid: Measures overall efficiency. Optimal farming completes in 8-15 minutes spawn to extraction. Beyond 18 minutes indicates route deviation, excessive looting, or low-value activities. Set mental timer at start, extract by minute 12-15 regardless of unexplored areas.
Progress Optimization Tips for Faster Completion
Focus farming efforts on 2-3 days immediately following each pass release. December 12, 14, 16, 18 releases create natural windows targeting specific containers without worrying about already-collected passes. This prevents wasted effort checking containers for owned passes.
Adapt route selection to current pass inventory. If you've collected Passes 1 and 2 but need Pass 3, exclusively run TV Station/Valley targeting home toolboxes/suitcases. Avoid Farm/Northridge during this phase since they don't spawn Pass 3.
Consider economic acceleration through premium loadouts once you've accumulated sufficient capital. 150-250k investment in high-tier gear improves survival 10-15%, translating to 30-40% more successful extractions over 20 raids. This accelerates pass acquisition by increasing effective checks/hour, potentially reducing completion time 2-3 days despite increased per-raid costs.
When to Use Koen for Progression Boosts
Direct Koen expenditure on premium loadouts becomes justified approaching December 28 deadline with incomplete collection. Reaching December 24 with only 2-3 passes, time pressure justifies aggressive spending maximizing remaining farming efficiency. Event's 1 million reward far exceeds 500-800k you might spend on premium loadouts for final-days farming.
Avoid spending on non-essentials like cosmetics/stash expansions during active farming. These provide long-term value but don't accelerate event completion—every Koen spent on non-farming items is unavailable for loadout optimization. Defer until after December 28.
Players struggling with Koen accumulation should consider secure top-up services to maintain farming momentum. BitTopup provides fast, reliable delivery with competitive pricing, allowing quick capital replenishment after unlucky death streaks without interrupting farming schedule. Maintaining consistent raid volume matters more than perfect economic efficiency.
Maximizing Your Arena Breakout Experience with BitTopup
How BitTopup Supports Your Farming Journey
BitTopup serves as trusted platform for reliable, secure currency top-ups supporting farming objectives. Competitive pricing ensures maximum value, while fast delivery minimizes interruption. When you need immediate capital replenishment during intensive Boarding Pass III farming, BitTopup's instant delivery keeps you in action.
Security infrastructure protects account information and transaction details through industry-standard encryption. This matters for Arena Breakout players where account compromise could result in loss of accumulated progress, rare items, and event completion status.
Customer service excellence distinguishes BitTopup from alternatives. Support team understands Arena Breakout mechanics and player needs, providing informed assistance for transaction questions. This gaming-specific expertise ensures faster problem resolution than generic platforms lacking context for in-game currency systems.
Secure Koen Top-Up for Progression Acceleration
BitTopup's Koen top-up process streamlines currency acquisition, allowing return to farming within minutes. Platform supports multiple payment methods, accommodating preferences for credit cards, digital wallets, or alternatives. This flexibility ensures completing transactions using preferred method without creating new accounts.
Transparent pricing eliminates hidden fees or surprise charges. You see exact Koen amount you'll receive and total cost before confirming, allowing informed decisions about whether top-up timing aligns with current needs.
High user ratings across independent review platforms validate service quality and reliability. Thousands of Arena Breakout players have successfully used the platform, creating proven track record. These ratings provide social proof reducing risk for new users during critical farming periods like Boarding Pass III.
Exclusive Benefits for Arena Breakout Players
BitTopup regularly offers promotional pricing and bonus Koen packages specifically for Arena Breakout players, providing additional value beyond standard rates. These promotions often align with major events like Season 4's Airport Hunt launch or Boarding Pass III, maximizing purchasing power when needed most.
Wide game coverage means Arena Breakout players can use single trusted service for multiple gaming needs. If you play other titles requiring in-game currency, BitTopup likely supports those as well, consolidating transactions through one familiar platform.
BitTopup's commitment extends beyond simple transactions. Platform provides game-specific resources, event calendars, and community updates helping players stay informed about optimal top-up timing and upcoming content influencing currency needs.
Frequently Asked Questions
How long does it take to complete Boarding Pass III? Casual players (2-3 raids daily) typically complete in 8-12 days, hardcore players (6-10 optimized raids daily) finish in 4-6 days. Actual time depends heavily on survival rate and route efficiency—40%+ survival checking 8-12 containers/raid completes significantly faster than 25% survival checking 4-6 containers/raid.
What are the actual drop rates for Damaged Passes? Community data across 100+ raids suggests Passes 1, 2, and 4 spawn at 5-7% rates in designated containers, while Pass 3 appears at 3-4% in home toolboxes. Expect to check 15-20 containers for most passes and 25-35 for Pass 3, translating to 2-3 raids per pass with optimized routes checking 8-12 containers/run.
Which farm route is fastest for solo players? Farm's Grain Trade Center → Stables → Motel route provides fastest solo farming, checking 10-12 containers in 8-12 minutes with 100k+ Koens/hour and 30% survival. Targets Passes 1 and 4 spawns while generating substantial supplementary income from three Motel safes and Stables safe, making it economically sustainable during unlucky RNG streaks.
Can you lose Damaged Passes if you die? Yes, passes function as regular inventory items—dying before extraction loses any passes in inventory. This makes 3x3 Titanium Cases from Season 4 missions extremely valuable, providing secure storage protecting passes even if you die. Prioritize extracting immediately after finding passes rather than continuing to loot.
Do containers respawn during raids? No, containers remain empty once looted until raid ends and new raid initializes. This eliminates camping strategies, emphasizes route efficiency—cover maximum map area checking different containers rather than repeatedly checking same high-value spawns. Plan routes accessing 8-12+ containers in logical geographic progression.
What loadout is best for Boarding Pass III farming? Medium backpack (30-40 slots), Level 3 armor, versatile mid-tier rifle like FAL or AK-74M provides optimal balance. Bring 60-90 rounds ammunition, basic medical supplies (2 bandages, 1 tourniquet, 1 painkiller), maximize empty inventory space. This costs 80-120k Koens, providing adequate defensive capability while remaining economically sustainable across multiple raids with 30-40% survival rates.