

Arena Breakout Season 4's Airport map unlocks at Level 25, featuring 35-minute raids with 12 players and 13 extraction points. This guide details seven optimized loot routes yielding 200-400k Koens in 12-15 minutes, including the proven Grain Trade Center-Stables-Motel path. Learn spawn-specific strategies, extraction timing, and budget loadouts under 100k Koens to maximize profit efficiency in the post-reset economy.
Season 4 Airport Map Changes
Season 4 launched January 8, 2026 at 6PM EST with significant Airport map economy changes. The map runs 72 server tick rate, supporting 12-player raids across 35-minute sessions. Access requires Level 25, positioning Airport as endgame farming territory where efficiency equals profit.
Post-reset economy fundamentally altered loot distribution. High-value safes now yield 50-800k Koens depending on location, with 2011 keys essential for premium loot rooms. Weapon crates require 8-15 seconds to loot completely, making route timing critical for avoiding player encounters.
To maintain competitive progression, many players Arena Breakout bonds top up cheap through BitTopup for fast, secure transactions.
Post-Reset Loot Distribution
Season 4 reset redistributed high-value items across 13 extraction points, creating distinct risk-reward zones. Northridge Hotel contains 8 safes yielding 500-800k Koens—the highest-value single location. However, this attracts aggressive PvP, reducing solo survival rates.
Mid-tier locations like Motel and Sewage Plant offer balanced risk profiles. Motel's 3 safes (requiring 2011 keys) yield 150-250k Koens alongside 4 weapon boxes and 2 medical crates within 200m of Outpost extraction. Sewage Plant's 3 safes generate 100-180k Koens with lower player traffic.
AI patrol cycles operate on 3-5 minute intervals, creating predictable windows for safe looting. Understanding these patterns allows timing movements between high-value containers while minimizing exposure.
New High-Value Spawn Points
Season 4 introduced refined spawn mechanics across 12 distinct locations, each offering unique proximity advantages. Spawning near Grain Trade Center provides access to 2 ammo boxes worth 20-40k Koens within 90-120 seconds.
Valley Beach Villa spawns grant access to 2 safes and 10 weapon crates yielding 300-500k Koens, but require navigating open terrain. Valley Port spawns position players near 1 safe and 7 weapon boxes generating 250-450k Koens with faster extraction access.
Crouch-walking 150m to Grain Trade Center takes 90-120 seconds, establishing baseline movement metrics. Players identifying spawn advantage within 10 seconds gain 2-3 minute leads on contested loot.
Current Meta Priorities
Season 4 meta prioritizes speed-to-extract efficiency over maximum loot capacity. The Grain Trade Center-Stables-Motel-Outpost route exemplifies this shift, generating 200-400k Koens in 12-15 minutes with minimal PvP exposure using 2011 keys to access 4 safes.
Conditional extractions activate after 10 minutes, creating strategic timing windows. Northern Outpost requires 1 enemy kill, accommodates maximum 2 players, activating 10-20 minutes. This aligns with mid-route PvP encounters, turning combat into extraction prerequisites.
The 15-Minute Cluster extractions (Destination Extract, Recycling Station Truck, Road Meet-Up Point, Road to the Port, Western Path) feature 20-second timers, enabling rapid exits. Players now calculate route profitability using Koen-per-minute metrics rather than total raid earnings.
Loot Route Fundamentals: Efficiency Metrics
Successful Airport farming requires understanding three core metrics: Koen-per-minute generation, survival rate percentages, and time investment requirements.
Koen-Per-Minute: Core Profitability Metric
Koen-per-minute (KPM) calculations separate profitable routes from time-wasting paths. The Grain Trade Center-Stables-Motel route generates 200-400k Koens in 12-15 minutes, establishing 13,333-26,666 KPM baseline. Routes below 10,000 KPM indicate inefficient pathing or excessive PvP.
Northridge Hotel's 8 safes yield 500-800k Koens but require 18-22 minutes to loot and extract safely, producing 22,727-44,444 KPM. Higher ceiling comes with proportionally increased risk.
Weapon crate looting requires 8-15 seconds per container, directly impacting KPM. Motel's 4 weapon boxes consume 32-60 seconds, while its 3 safes provide 150-250k Koens. Experienced players prioritize safes when time-constrained, maximizing KPM.
Survival Rate vs Profit Potential
Survival rate directly multiplies effective KPM. A route generating 30,000 KPM with 40% survival produces 12,000 effective KPM, while 15,000 KPM with 80% survival yields identical 12,000 effective KPM. This explains why mid-tier routes often outperform high-value paths.
Campus Services offers 2 safes yielding 40-120k Koens with 70-85% survival rates. Valley Beach Villa's 300-500k Koen potential drops survival to 35-50% due to open approaches and player concentration. The 2-3x loot difference doesn't compensate for halved survival.
Extraction point selection significantly impacts survival. Boulder Wall and Outpost function as fixed extractions with no activation requirements. Conditional extracts like Northern Outpost (requiring 1 kill, active 10-20 minutes) introduce variables reducing survival predictability by 15-25%.
Time Investment by Playstyle
Aggressive playstyles targeting Northridge Hotel or Valley Beach Villa require 20-28 minute commitments, including combat and loot processing. These demand loadouts exceeding 150k Koens to maintain competitive advantage.
Stealth-focused routes like Grain Trade Center-Stables-Motel complete in 12-15 minutes, allowing 2-3 raids per hour. This frequency enables budget loadouts under 100k Koens to remain profitable. Crouch-walking reduces footstep noise by 60%, facilitating undetected movement.
Balanced approaches utilize spawn-dependent routing, adapting to initial positioning. Players spawning near Sewage Plant loot its 3 safes (100-180k Koens) before extracting at nearby fixed points within 10-12 minutes, maintaining 15,000+ KPM with 65-75% survival.
Reading Your Spawn: Route Selection

Spawn location determines optimal route within 10 seconds of raid start. Airport's 12 spawn points create distinct proximity advantages to specific loot clusters.
Identifying Spawn Advantage in 10 Seconds
Visual landmark identification enables instant spawn recognition. Spawning within sight of Grain Trade Center indicates proximity to 2 ammo boxes yielding 20-40k Koens, positioning players 90-120 seconds from Stables' upstairs safe (50-80k Koens with 2011 key).
Motel-adjacent spawns provide direct access to highest-density loot: 3 safes requiring 2011 keys (150-250k Koens), 4 weapon boxes, 2 medical crates within compact footprint. Players recognizing this immediately secure Motel's second-floor safes before rotating to Outpost extraction 200m away.
Valley-area spawns near Beach Villa or Port indicate high-risk, high-reward positioning. Beach Villa's 2 safes and 10 weapon crates yield 300-500k Koens, while Port offers 1 safe and 7 weapon boxes generating 250-450k Koens.
When to Pivot: Contested Spawn Recovery
Hearing gunfire within 30 seconds indicates contested zones requiring route adaptation. AI patrol cycles operate on 3-5 minute intervals, so early gunfire signals player combat. Pivot to secondary loot locations 200+ meters from gunfire, maintaining 12,000+ KPM through uncontested looting.
The 15-Minute Cluster extractions provide pivot-friendly exits with 20-second timers. When primary routes become contested, redirect to Campus Services' 2 safes (40-120k Koens) before extracting at nearby cluster points, salvaging 8,000-15,000 KPM.
Conditional extraction timing creates pivot opportunities. Drainage Pipe activates 0-10 minutes but prohibits backpacks, offering emergency exits for high-value items in pockets and tactical rigs. Northern Outpost's 10-20 minute activation and 1-kill requirement transforms unavoidable PvP into extraction prerequisites.
Route 1: Grain Trade Center-Stables-Motel Speed Run (12-15 Min)
This route balances profit and survival, generating 200-400k Koens in 12-15 minutes with 65-75% extraction success. The path leverages 2011 keys to access 4 safes across 3 locations before extracting at Outpost.
Step-by-Step Pathing
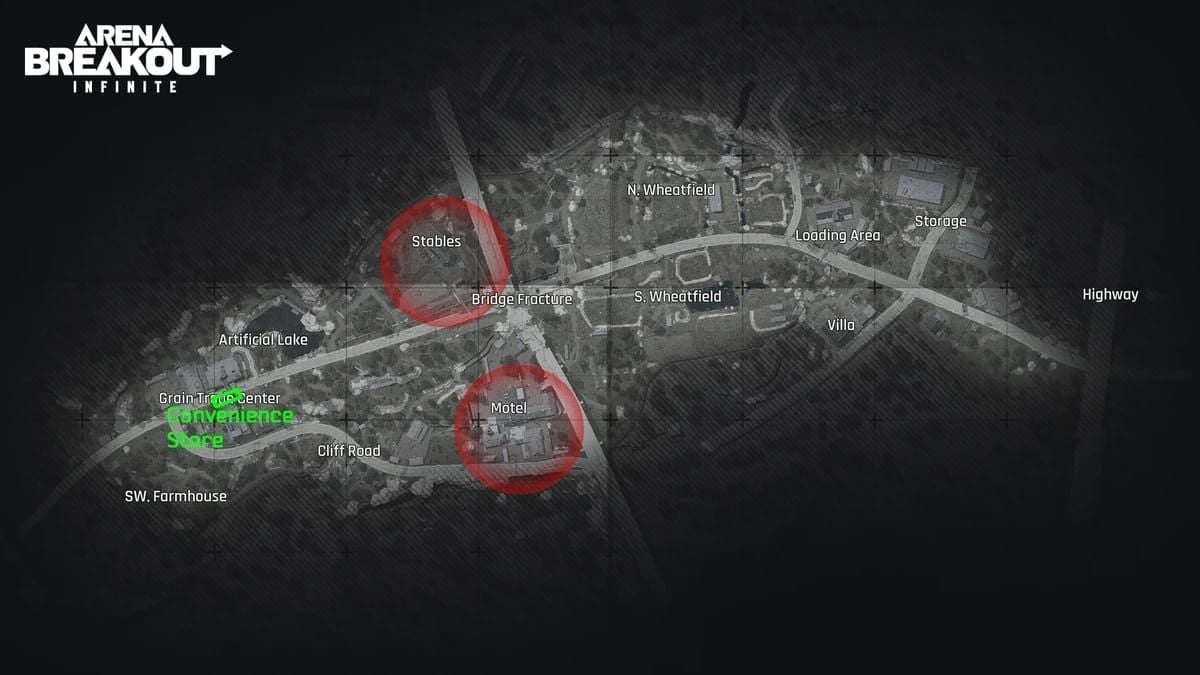
From favorable spawns, crouch-walk northwest 150m to Grain Trade Center in 90-120 seconds. Crouch-walking reduces footstep noise by 60%. Loot 2 ammo boxes in 20-30 seconds, generating 20-40k Koens while scanning for player movement.
Advance to Stables (100m northeast), maintaining crouch-walk through open terrain. Access upstairs safe using 2011 key for 50-80k Koens, then check downstairs weapon box (8-15 seconds). Total Stables time shouldn't exceed 45-60 seconds.
Move to Motel (150m east of Stables), the route's highest-value location. Systematically loot all 3 safes using 2011 keys (150-250k Koens combined), prioritizing second-floor safes. The 4 weapon boxes and 2 medical crates provide supplementary value but only loot if time permits before 12-minute mark. Extract at Outpost, 200m from Motel, activating 10-20 minutes, requiring 1 enemy kill, maximum 2 players.
Loot Priority and Container Sequence
Safes requiring 2011 keys take absolute priority, generating 50-250k Koens versus 15-35k for weapon boxes. At Motel, loot three safes in descending floor order: second-floor safe first (60-90k Koens), then first-floor safes (45-80k each). This positions players near ground exits if PvP emerges.
Ammo boxes at Grain Trade Center provide fast, low-risk opening loot (20-40k Koens in 20-30 seconds). Medical crates at Motel should only be looted with excess capacity, as their 8-12k Koen value produces poor time-to-value ratios.
Weapon boxes require 8-15 seconds each, making Motel's 4 boxes a 32-60 second investment for 60-140k Koens. Skip weapon boxes when approaching 12-minute mark, prioritizing safe extraction. This discipline maintains 65-75% survival by reducing exposure.
Extract Selection and Timing
Outpost extraction activates 10-20 minutes, requiring 1 enemy kill, accommodating maximum 2 players. This timing aligns with 12-15 minute route completion, assuming AI patrol or opportunistic PvP encounters. The 1-kill requirement transforms routine AI engagements into extraction prerequisites.
If Outpost becomes contested or 1-kill requirement unfulfilled at 14 minutes, pivot to Boulder Wall fixed extraction. This backup requires no activation conditions, accepts unlimited players. Additional 2-3 minute travel reduces effective KPM by 10-15% but maintains 60%+ survival.
Access Bridge activates at 25 minutes, creating late-game extraction option. However, remaining beyond 20 minutes exposes players to concentrated PvP as others converge on limited late-stage extractions. This route's 12-15 minute design intentionally avoids this high-risk period.
Route 2: Sewage Plant-Campus Services Mid-Tier Path
This route targets consistent 100-300k Koen earnings in 10-14 minutes with 70-80% survival rates, ideal for budget loadout farming. Avoids high-traffic areas, prioritizing reliable profits.
Optimal Spawn Points
Southwestern map quadrant spawns provide 60-90 second access to Sewage Plant's 3 safes. Immediately crouch-walk toward distinctive industrial structures using 60% footstep noise reduction. Early arrival (within 2 minutes) typically guarantees uncontested looting.
Campus Services spawns position players 120-150 seconds from 2-safe location yielding 40-120k Koens. These spawns work best when Sewage Plant shows early player activity (distant gunfire), allowing pivot to lower-traffic Campus Services while maintaining 10,000+ KPM.
Central map spawns enable flexible routing based on initial player movement. If gunfire erupts near Sewage Plant within 90 seconds, redirect to Campus Services. If southwestern quadrant remains quiet, commit to Sewage Plant's 3-safe loot (100-180k Koens) before rotating to Campus Services.
Stealth vs Speed Clear
Stealth approaches using continuous crouch-walking extend route time to 13-14 minutes but maintain 75-80% survival. The 60% footstep noise reduction prevents detection by players focused on looting, particularly in Sewage Plant's multi-room layout.
Speed clears using standard movement complete route in 10-11 minutes, generating 18,000-27,000 KPM but reducing survival to 60-65%. This works best during off-peak hours when server populations drop below 8 active players, reducing encounter probability by 30-40%.
Hybrid tactics—crouch-walking in open terrain, standard movement inside buildings—balance approaches at 11-13 minutes with 70-75% survival. Crouch-walk between Sewage Plant and Campus Services (250m), then move full speed while looting interiors. This optimizes time-to-value while maintaining above-average survival.
Route 3: Valley Beach Villa-Valley Port High-Risk Path
This aggressive route targets 550-950k Koens in 18-22 minutes with 35-50% survival, requiring loadouts exceeding 150k Koens. Suits experienced players seeking maximum per-raid earnings despite lower extraction frequency.
Why Valley Areas Offer Maximum Koen Potential
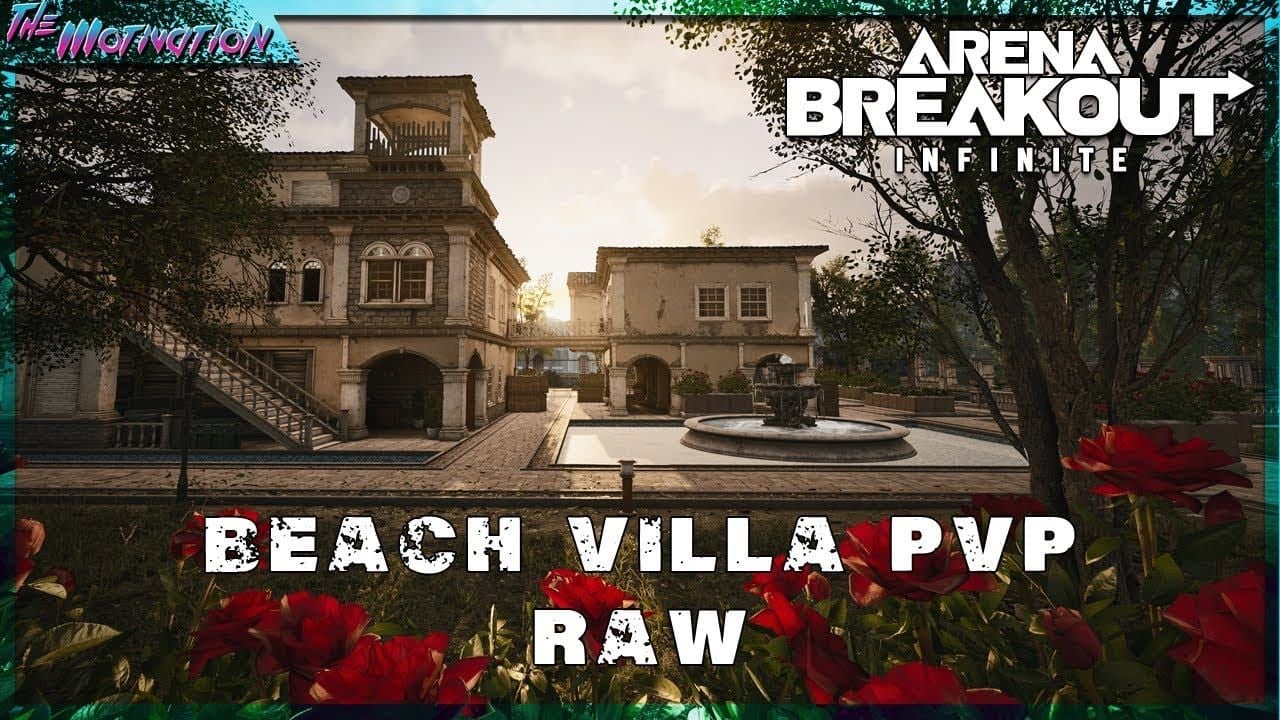
Valley Beach Villa contains 2 safes and 10 weapon crates yielding 300-500k Koens in concentrated area. The 10 weapon crates represent highest container density on Airport map, each requiring 8-15 seconds (total 80-150 seconds for all). This density enables 500k+ Koen raids when uncontested.
Valley Port's 1 safe and 7 weapon boxes generate 250-450k Koens within 200m of Beach Villa, creating combined loot pool exceeding 550-950k Koens. However, this attracts 40-60% of aggressive players, creating consistent PvP encounters demanding superior loadouts and combat proficiency.
The risk-reward calculation favors this route for players maintaining 40%+ survival. At 40% survival with 750k average earnings, effective per-raid profit reaches 300k Koens—exceeding Grain Trade Center-Stables-Motel's 200-400k guaranteed earnings. Below 40% survival, route becomes mathematically inferior.
PvP Hotspot Avoidance
For players seeking to buy Arena Breakout bonds online recharge through BitTopup's secure platform, maintaining competitive loadouts becomes essential when farming high-risk zones.
Arriving at Valley Beach Villa within 3-4 minutes provides 60-70% probability of uncontested looting. Players spawning southeastern quadrant should sprint directly to Beach Villa, accepting increased footstep noise for temporal advantage. Early arrival often means completing 6-8 weapon crate loots before encountering opposition.
Smoke throwables (minimum 1 per loadout) enable tactical repositioning when PvP erupts mid-loot. Deploying smoke near Villa's southern exit creates 8-12 seconds visual cover for retreating to Port's more defensible positions. This salvages 200-350k Koens from contested raids.
Valley Helipad extraction requires 2 dogtags but provides fastest exit from Valley areas. Players securing kills during Villa/Port PvP can extract within 90 seconds of combat conclusion, minimizing exposure to third-party players attracted by gunfire. This extraction's dogtag requirement transforms PvP from obstacle into extraction enabler.
Advanced Loadout Optimization
Loadout efficiency directly impacts route profitability through survival rate multiplication and movement speed optimization. Season 4's post-reset economy makes sub-100k Koen loadouts viable for mid-tier routes, while high-risk paths demand 150k+ Koen investments.
Budget Loadout: Under 100k Koens
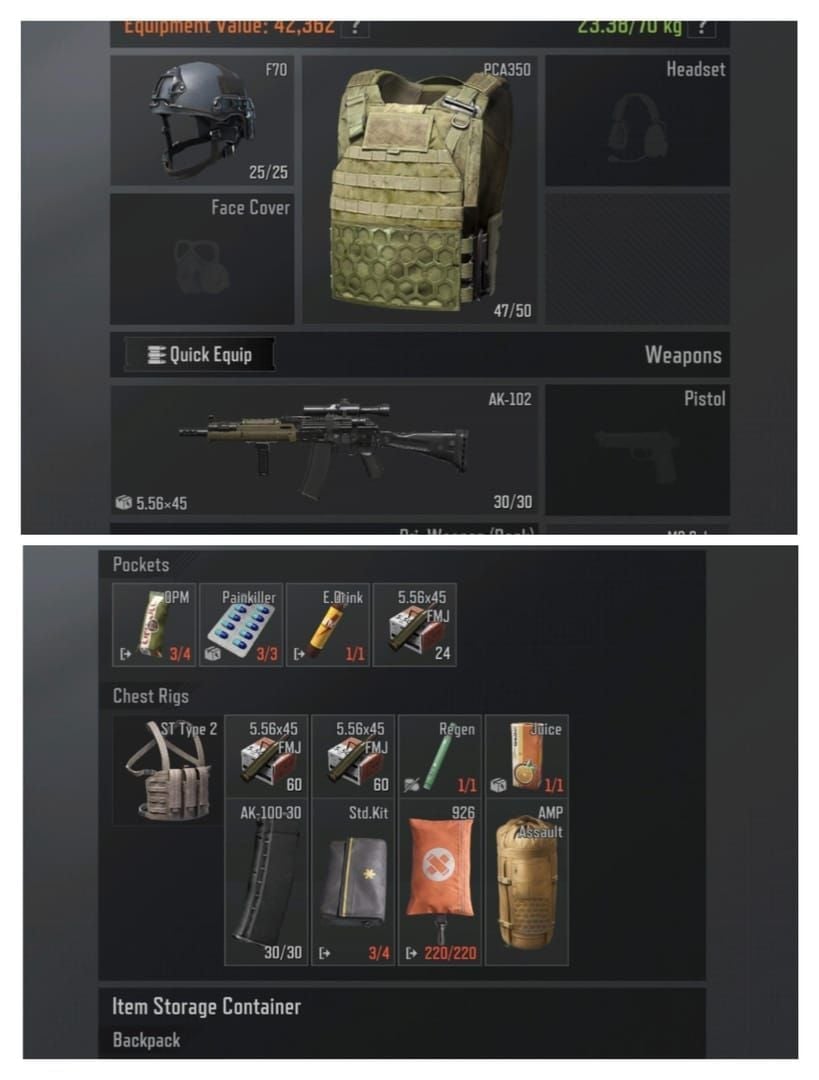
SEK Composite Body Armor: 70 durability, 5% movement penalty, 35-45k Koens. Withstands 3-4 center-mass hits from 9x19mm ammunition
Sentry 308 Armored Rig: 60 durability, 20 storage slots, 6% movement penalty, 25-30k Koens. Combined protection reaches 130 durability
MPX submachine gun: 30-35k Koens, fires 9x19mm AP6.3 T3 at 850 RPM. Generates 679.68 damage, 424.8 penetration. Carry 120+ rounds (8-12k Koens)
Total: 98-122k Koens
Balanced Loadout: Speed and Protection
AK-74N rifle provides superior engagement range, firing 5.45x39mm Level 5 BP ammunition at 630 RPM from 60-round magazines. Costs 55-65k Koens but enables confident engagement at 50+ meters, critical for Valley area routes with extended sightlines.
Upgrading to 80+ total armor durability costs 70-85k Koens but increases survival rates by 12-18% against players using intermediate cartridges. This investment pays for itself after 2-3 successful extractions on routes generating 200k+ Koens.
Medical item allocation: 4+ healing items (2 bandages stopping bleeding, 1 medkit restoring health, 1 painkiller maintaining mobility). This 6-8k Koen investment enables recovery from non-lethal encounters, preventing forced extractions that waste partial loot progress.
Essential Gear: Tactical Rig and Secure Container
Tactical rigs with 20+ storage slots enable single-location loot runs without backpack encumbrance. Motel's 3 safes generate 150-250k Koens in items fitting within 20-slot rigs, allowing Drainage Pipe extraction (0-10 minute activation, prohibits backpacks) for emergency exits with secured high-value loot.
Secure containers protect 4-9 slots regardless of survival outcome, creating guaranteed profit floors. Prioritize placing barter goods and high-value electronics (15-25k Koens per slot) in secure containers first, then fill tactical rig slots with bulkier weapon attachments.
Backpack selection impacts extract availability. Hunter's Path extraction requires backpack discard, incompatible with high-volume loot runs. Players targeting Motel or Valley routes should plan for Outpost, Boulder Wall, or Southern Blockade (2000 Koens payment) extractions accommodating full backpacks.
Common Mistakes That Kill Profit Rate
Inefficient looting behaviors reduce effective KPM by 30-50%, transforming profitable routes into time-wasting activities.
Over-Looting: When Full Bags Become Liabilities
Weapon boxes requiring 8-15 seconds create diminishing returns when tactical rigs already contain 150k+ Koens in safe loot. Players looting all 4 Motel weapon boxes (32-60 seconds) after securing 3 safes reduce effective KPM by 15-20% while increasing exposure.
Carrying excessive weight reduces movement speed by 8-12%, extending route completion and delaying extraction arrival. This proves critical when racing to conditional extractions like Northern Outpost (maximum 2 players) or evading pursuers after PvP.
Optimal loot threshold occurs at 70-80% tactical rig capacity, leaving 4-6 slots for opportunistic high-value finds during extraction movement. This maintains mobility while preventing just one more container trap extending raids into dangerous 20+ minute durations.
Extract Timing Errors
Arriving at conditional extractions before activation windows wastes 2-5 minutes in stationary positions, creating vulnerability to player rotations and extract camping. Northern Outpost activates 10-20 minutes; players completing routes in 12 minutes should continue looting secondary locations rather than waiting.
Access Bridge's 25-minute activation makes it unsuitable for speed-focused routes completing in 12-15 minutes. Players planning routes around Access Bridge inadvertently extend raid durations into high-risk periods when surviving players concentrate around limited late-game extractions, reducing survival by 25-35%.
The 15-Minute Cluster extractions feature 20-second timers, requiring stationary activation. Initiating extraction with hostile players within 50m creates 70-80% death probability. Always clear 75m radius around cluster extractions before activating, even if this requires 30-60 second delays.
Maximizing Long-Term Farming Success
Sustained profitability requires tracking performance metrics, adapting to meta shifts, and scaling loadout investments proportionally to skill improvement.
Tracking Performance: Key Metrics
Record per-raid earnings, survival rates, and completion times for each route. After 10 raids on Grain Trade Center-Stables-Motel, calculate:
Average earnings (target: 250-350k Koens)
Survival rate (target: 65-75%)
Time investment (target: 12-15 minutes)
Effective KPM combines earnings and survival: (Average Earnings × Survival Rate) ÷ Average Time. A route generating 300k Koens in 15 minutes with 70% survival produces 14,000 effective KPM. Compare this across routes to identify highest-value paths.
Death analysis reveals pattern weaknesses. If 60%+ deaths occur during looting, reduce containers looted per location by 20-30%. If deaths concentrate at specific extractions, diversify extract selection or adjust route timing.
When to Upgrade Loadout Investment
Survival rates exceeding 70% on budget loadouts (under 100k Koens) indicate readiness for 120-150k Koen balanced loadouts. Improved armor durability and weapon effective range increase survival by additional 10-15%, creating compounding profit growth.
Consistent 200k+ Koen extractions justify secure container upgrades from 4-slot to 6-9 slot variants. Larger secure containers guarantee 60-135k Koens per raid regardless of survival, creating profit floors offsetting occasional deaths.
Avoid loadout upgrades exceeding 3x your average per-raid earnings. Players averaging 150k Koens per successful extraction should cap loadouts at 450k Koens maximum, ensuring single deaths don't erase 3+ successful raids' worth of profit. This 3:1 ratio maintains positive net earnings despite 40-50% survival on high-risk routes.
Adapting to Evolving Season 4 Meta
Monitor community discussions for emerging route popularity trends. When specific paths gain widespread adoption, expect 20-30% increased player traffic within 1-2 weeks. Proactively develop alternative routes to secondary locations before competition intensifies.
Loot spawn adjustments occur during Season 4 patches, potentially shifting high-value container locations by 15-25%. After each patch, conduct 3-5 test raids on primary routes to verify loot spawns remain consistent. If safe yields drop below 70% of pre-patch averages, investigate alternative locations.
AI patrol pattern changes impact stealth route viability. Current 3-5 minute patrol cycles enable predictable movement timing; if patches alter these to randomized intervals, crouch-walking becomes less effective. Adapt by increasing movement speed and accepting higher PvP risk, or pivot to routes with minimal AI presence.
FAQ
What are the best loot routes in Arena Breakout Airport Season 4?
Grain Trade Center-Stables-Motel route generates 200-400k Koens in 12-15 minutes with 65-75% survival rates. Use 2011 keys to access 4 safes before extracting at Outpost. For higher risk, Valley Beach Villa-Valley Port yields 550-950k Koens in 18-22 minutes with 35-50% survival.
How do I maximize Koen earnings in Airport map post-reset?
Prioritize safes requiring 2011 keys (50-250k Koens each) over weapon boxes (15-35k Koens). Maintain 12,000+ Koen-per-minute by completing routes in 12-15 minutes. Track effective KPM (earnings × survival rate ÷ time) to identify most profitable routes.
Which Airport spawn locations give the best loot advantage?
Spawns near Grain Trade Center provide 90-120 second access to Stables-Motel route's 200-400k Koen potential. Valley Beach Villa spawns offer 3-4 minute access to 300-500k Koens but attract 40-60% of aggressive players. Southwestern spawns near Sewage Plant enable 100-180k Koen earnings with 70-80% survival.
What loadout do I need for budget Airport farming runs?
SEK Composite Body Armor (70 durability, 5% movement penalty) plus Sentry 308 Armored Rig (60 durability, 20 slots) costs 60-75k Koens. Add MPX with 120+ rounds of 9x19mm AP6.3 ammunition (30-45k Koens) and 4+ medical items (6-8k Koens) for total under 100k Koens. Supports mid-tier routes with 65-75% survival.
How long should an efficient Airport loot run take?
Target 12-15 minutes for balanced routes like Grain Trade Center-Stables-Motel, generating 13,333-26,666 Koen-per-minute. High-risk Valley routes require 18-22 minutes but produce 25,000-43,000 KPM at 40%+ survival. Avoid extending raids beyond 20 minutes, as late-game extraction concentration reduces survival by 25-35%.
What's the safest extract point from Airport map?
Boulder Wall functions as fixed extraction with no activation requirements and unlimited player capacity. Outpost offers reliable extraction 200m from Motel, activating 10-20 minutes with 1-kill requirement and 2-player maximum. The 15-Minute Cluster extractions feature 20-second timers for rapid exits with high-value loot.