

Season 4 Airport features 35-minute raids with 12 players and multiple extraction points, but extract camping remains the biggest threat. This guide reveals seven proven low-risk routes, optimal timing strategies, and counter-camping tactics to maximize survival. Learn which extracts have 60-70% camper presence and which alternatives offer safest passage home.
Understanding Extract Camping in Season 4 Airport
Extract camping intensified in Season 4 Airport since launch on January 8, 2026 at 6PM EST. The map unlocks at Level 25 and hosts 12-player raids lasting 35 minutes, creating concentrated traffic at predictable extraction points.
The 15-minute extract cluster—Destination Extract, Recycling Station Truck, Road Meet-Up Point, and Road to the Port—experiences 60-70% player presence, making these the most dangerous zones. Campers position themselves 2-3 minutes before peak times, exploiting predictable player movement.
For gear upgrades, Arena Breakout Bonds top up online through BitTopup provides instant Koen delivery with secure transactions.
Why Airport Became a Camping Hotspot
Airport's layout funnels players through limited pathways. Standard Lockdown requires 150,000+ Koens gear value and 20,000 Koens entry; Premium Lockdown needs 300,000+ Koens gear and 50,000 Koens entry. High costs mean valuable loot, making camping profitable.
The 10-minute lockdown compresses activity into predictable timeframes. When lockdown ends, players simultaneously push toward extracts, creating traffic jams campers exploit. The 72 server tick rate ensures precise hit registration, favoring stationary campers.
Camper Psychology: Predicting Positions
Campers prioritize:
Clear sightlines to extract zones
Multiple escape routes
Cover from incoming approaches
Proximity to high-value loot areas
They arrive 2-3 minutes before peak extract times. Understanding this lets you arrive earlier or delay until the rush passes.
Season 4 Map Changes Affecting Extract Safety
Timed extracts fundamentally changed extraction dynamics. Drainage Pipe activates 10 minutes after raid start but prohibits backpacks. Northern Outpost operates 10-20 minutes, requires enemy operator kill, accepts max 2 players.
Access Bridge activates at 25 minutes, offering lowest player presence. Most players have extracted or died by then, making it safest if you survive extended raid duration.
Complete Airport Extraction Point Risk Assessment
Airport features 11 distinct extracts with varying activation times, requirements, and risk levels.
All Airport Extracts Mapped and Rated
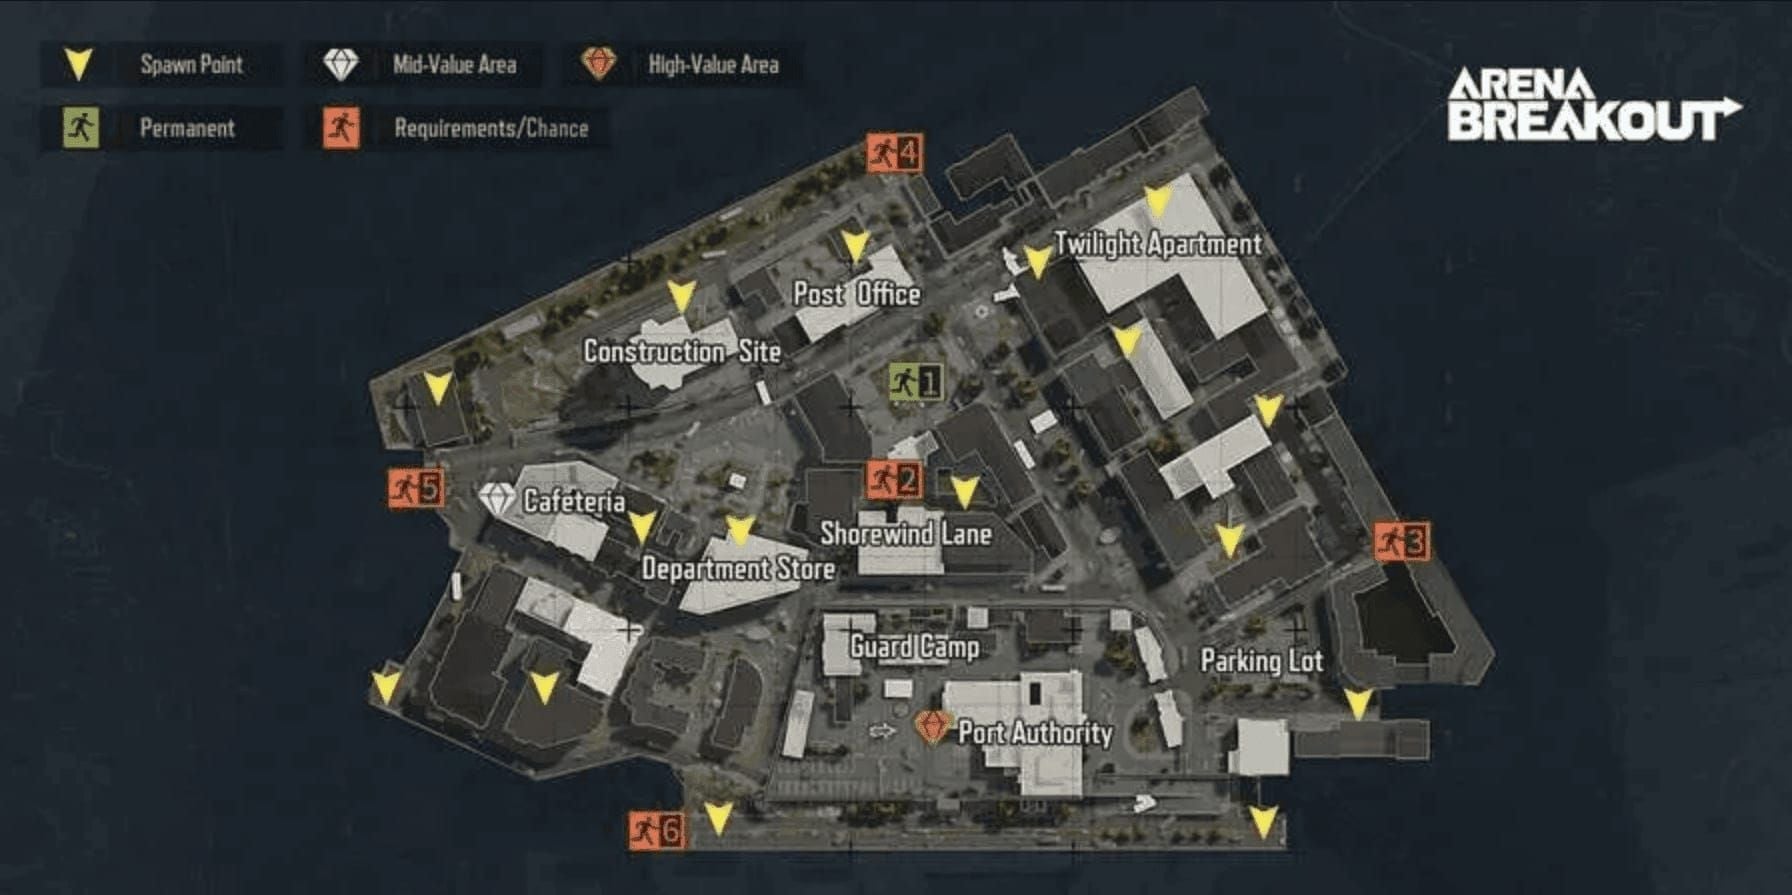
Early Extracts (1-10 Minutes):
Parking Lot Helicopter: Requires 2 dogtags, active 1 minute after start. Extremely high risk.
Drainage Pipe: Active 10 minutes, no backpacks. Low risk for light runs, 3-5 minutes travel.
Mid-Raid Extracts (10-20 Minutes):
Northern Outpost: Active 10-20 minutes, requires enemy kill, max 2 players. High risk.
Standard Extracts (15 Minutes - HIGHEST RISK):
Destination Extract: Fixed, 20-second timer, 2-4 minutes travel
Recycling Station Truck: Fixed, 2-4 minutes travel
Road Meet-Up Point: Fixed, 2-4 minutes travel
Road to the Port: Fixed, 20-second timer, 2-4 minutes travel
Western Path: Conditional, 20-second timer, 2-4 minutes travel
All five experience 60-70% player presence.
Alternative Extracts:
Southern Blockade: Requires 2,000 Koens payment. Moderate risk.
Hunter's Path: No backpack. Low risk for light runs.
Central Elevator: Requires flipping two switches in Control Tower. High risk.
Late Extract (25 Minutes):
Access Bridge: Active at 25 minutes, 4-6 minutes travel. Lowest player presence, safest option.
High-Risk vs Low-Risk Extracts
Highest Risk (Avoid):
15-minute cluster (60-70% presence)
Northern Outpost (attracts PvP players)
Parking Lot Helicopter (early timing, difficult requirements)
Central Elevator (predictable approach)
Moderate Risk:
Southern Blockade (payment filters traffic)
Western Path (conditional status)
Lowest Risk:
Access Bridge (25-minute timing)
Drainage Pipe (10-minute timing, no backpack filters players)
Hunter's Path (no backpack, less popular)
Time-of-Raid Risk Fluctuations
Minutes 1-10: Minimal activity. Drainage Pipe viable at 10 minutes.
Minutes 10-15: Movement intensifies. Campers establish positions at 12-13 minutes.
Minutes 15-20: Peak danger. 60-70% of survivors converge on 15-minute extracts.
Minutes 20-25: Significant player reduction. Survivors extracted or died.
Minutes 25-35: Access Bridge activates. Minimal presence, safest window.
The 7 Safest Low-Risk Extract Routes
Route 1: Southern Blockade Payment Extract
Requires 2,000 Koens payment, naturally filtering traffic and reducing camping.
Step-by-step:
Secure 5,000+ Koens in secure container during raid
Approach from western perimeter, avoiding central structures
At 100+ meters, stop and observe 60-90 seconds
Listen for movement, gunfire, healing sounds
If clear, advance to 50-100 meters and repeat
Final approach uses cover-to-cover, never sprint in open
Activate and maintain 360-degree awareness
Travel time: 2-4 minutes. Payment requirement means rare campers.
Route 2: Hunter's Path No-Backpack Extract
Prohibits backpacks, ideal for high-value pocket items. Restriction dramatically reduces traffic.
Execution:
Plan raid around pocket loot: keys, currency, small valuables
Drop backpack before extract zone
Approach from southern angles using terrain depression
Maintain 20-30m spacing if duo
Final 50 meters takes 90-120 seconds between cover
Activate only after confirming no audio within 50 meters
Travel time: 3-5 minutes. No-backpack restriction means minimal camping.
For Koen optimization, buy Arena Breakout Bonds instant recharge at BitTopup for fast delivery.
Route 3: Access Bridge Late-Raid Extract
Activates at 25 minutes, offering lowest player presence. Requires patience and survival skills.
Strategy:
Avoid early PvP to preserve health and ammo
Complete looting by minute 20
Position 200-300 meters from Access Bridge at minute 22
Use minutes 22-24 for reconnaissance
Approach from northern angles at minute 24
Maintain 30-40m security perimeter during final approach
Activate and defend during timer
Risk: Lowest overall. <20% encounter rate vs 60-70% at 15-minute extracts.
Route 4: Drainage Pipe Early Extract
Activates 10 minutes after start, prohibits backpacks. Early-exit option for speed runs.
Implementation:
Spawn and move toward high-value loot near Drainage Pipe
Loot efficiently, focus on pocket items
Reach vicinity by minute 8
Observe from 100+ meters for 90 seconds
If enemy detected, abort to backup extract (2-3 minutes additional travel)
If clear, advance using 3-5 minute travel time
Drop backpack and activate
Advantages: Early timing means fewer players at extracts.
Route 5: Western Path Conditional Extract
Conditional availability and 20-second timer create uncertainty deterring campers.
Protocol:
Verify Western Path availability
If available, approach from eastern angles
Use 2-4 minutes to reach vicinity by minute 13
Observe during minutes 13-14, before peak rush
If clear, activate during minute 14-15, ahead of main wave
Defend during 20-second timer
If unavailable, transition to Access Bridge strategy
Backup planning: Always identify secondary extract due to conditional availability.
Route 6: Destination Extract Off-Peak Timing
Fixed with 20-second timer, experiences 60-70% presence during minutes 15-18. Off-peak timing (19-22) dramatically reduces risk.
Off-peak strategy:
Complete looting by minute 17
Position 300+ meters from Destination Extract
Wait through peak traffic (minutes 15-18)
Monitor audio for gunfights indicating camper engagements
Approach at minute 19-20 when rush cleared
Use 2-4 minutes for deliberate approach
Activate and defend 20-second timer
Risk reduction: Delaying 4-5 minutes reduces encounters from 60-70% to 30-40%.
Route 7: Emergency Backup - Road to the Port Smoke Deployment
When primary extracts compromised and enemies detected, use smoke for emergency extraction.
Emergency protocol:
If enemy <50 meters at primary extract, disengage with smoke
Deploy smoke between your position and enemy
Retreat 100+ meters and reassess
Move to Road to the Port using alternate angles
Deploy second smoke if available during final approach
Activate 20-second timer and defend
If enemy 50-100 meters, defend and eliminate
Equipment: Minimum 1 smoke grenade, preferably 2-3.
Timing Your Extraction: When to Move, When to Wait
Optimal Extraction Windows
Minutes 10-12 (Early):
Drainage Pipe and Northern Outpost available
Minimal player presence
Best for speed runs and low-gear raids
Minutes 13-14 (Pre-Rush):
Arrive at 15-minute extracts before main wave
Moderate risk, allows extended looting
Minutes 15-18 (Peak Danger - AVOID):
60-70% player presence at 15-minute cluster
Maximum camper activity
Minutes 19-22 (Post-Rush):
Reduced presence (30-40%)
Campers may have extracted or died
Requires patience, significantly safer
Minutes 25-35 (Late - SAFEST):
Access Bridge activation
Lowest presence (<20%)
Optimal for high-value loot runs
Reading the Battlefield: Signs Extracts Are Clear
Positive indicators:
No gunfire within 200 meters for 2+ minutes
Ambient environmental sounds without interruption
No footsteps within 100 meters
No healing or inventory sounds
Warning indicators:
Sudden silence after ambient noise (player suppressing movement)
Single gunshots then silence (camper eliminating target)
Repeated audio from same location (stationary camper)
Healing sounds near extract (injured camper waiting)
2-Minute Pre-Extract Protocol
Stop all movement, observe 60 seconds from 100+ meters
Audio scan: Listen for footsteps, healing, inventory, weapons
Visual scan: Check common camper positions, elevated spots, cover
Health check: Ensure 60+ total durability
Ammo verification: Confirm 120+ rounds available
Medical ready: Have 4+ medical items accessible
Backup identified: Know secondary extract and route
Squad coordination: Confirm spacing (20-30m for 2-player, rotate point for 3-4)
Audio Intelligence: Detecting Campers Before They See You
72 server tick rate delivers precise audio positioning. Sound recognition provides 3-5 second advantage over visual detection.
Critical Sound Cues Revealing Camper Positions
Footstep patterns:
Continuous = moving player, likely not camping
Intermittent (2-3 steps, pause, repeat) = cautious approach or camping setup
Single step then silence = stationary camper adjusting
Weapon handling:
Magazine check = pre-engagement preparation
Weapon switching = preparing for combat
Scope adjustment = sniper positioning
Environmental interaction:
Door sounds near extract = recent arrival
Item pickup = player looting near extract
Grenade pin = 3-4 second warning
Healing/consumption:
Healing sounds = injured player, likely post-combat
Energy drink/food = preparing for extended camping
Painkiller = expecting combat
Using Ambient Noise to Mask Approach
High-noise zones:
Near machinery/generators (masks footsteps within 20 meters)
Under aircraft flight paths (periodic loud noise)
Near ventilation systems (constant white noise)
Movement timing:
Synchronize footsteps with ambient noise peaks
Sprint during loud events, walk during quiet
Crouch-walk within 50 meters of suspected campers
When Silence Means Danger
Unnatural silence indicates nearby players suppressing movement. If ambient sounds suddenly stop, assume hostile within 50 meters.
Response:
Immediately stop and crouch
Scan 360 degrees slowly (45-60 seconds)
Listen for breathing, equipment shifting, minimal movement
If no contact after 60 seconds, retreat 50+ meters
Consider aborting to backup extract if silence persists
Optimal Loadouts for Low-Risk Extraction
Lightweight Stealth Loadout
Armor:
SEK Composite Body Armor: 70 durability, 5% movement penalty
Sentry 308 Armored Rig: 60 durability, 20 storage slots, 6% movement penalty
Combined 11% penalty maintains mobility with protection.
Weapons:
Primary: Lightweight SMG or carbine
Secondary: Compact pistol
Avoid heavy LMGs or snipers
Equipment priorities:
Smoke grenades (1-2 minimum)
Medical items (4+)
Ammunition (120+ rounds)
Secure container: 5,000+ Koens for payment extracts
Essential Equipment: Bring vs Leave
Always bring:
1+ smoke grenade
4+ medical items
120+ ammo rounds
5,000+ Koens in secure container
Lightweight armor with 60+ durability
Leave behind:
Heavy armor exceeding 15% movement penalty
Excessive ammo (200+ rounds)
Multiple weapon systems
Non-essential equipment
Armor and Weapons Maximizing Mobility
Movement penalty thresholds:
0-10%: Optimal mobility
11-15%: Acceptable, moderate repositioning
16-20%: Reduced flexibility
21%+: High risk, minimal adaptation
Target 5-11% total penalty using SEK Composite (5%) + Sentry 308 (6%).
Counter-Camping Tactics: When Extracts Are Compromised
Immediate Response When Spotting Campers
Enemy 100+ meters:
Abort to backup extract immediately
Add 2-3 minutes travel to secondary
Use terrain for concealment
Don't engage unless necessary
Enemy 50-100 meters:
Assess tactical advantage
If advantageous, defend and eliminate
If not, deploy smoke and disengage
Communicate position to squad
Enemy <50 meters:
Immediate smoke deployment
Disengage to backup extract
Avoid engagement unless cornered
Prioritize survival over loot
Alternative Extract Decision Matrix
Time remaining:
20+ minutes: Access Bridge viable
15-20 minutes: Southern Blockade or Hunter's Path
10-15 minutes: Drainage Pipe if can drop backpack
<10 minutes: Nearest with smoke support
Current loadout:
Backpack with loot: Southern Blockade (pay 2,000 Koens)
Light load: Hunter's Path or Drainage Pipe
Heavy armor: Nearest extract
Squad composition:
Solo: Stealth extracts (Hunter's Path, Drainage Pipe)
2-player: Southern Blockade with mutual cover
3-4 players: Can contest camped extracts
Buying Time: Stalling and Repositioning
Stalling techniques:
Retreat to high-loot areas
Continue looting while monitoring extract audio
Wait for camper-victim engagements clearing positions
Use squad rotation (rotate point every 2-3 minutes)
Repositioning:
Move 400+ meters from compromised extract
Wait 3-5 minutes for tactical reset
Approach different extract via alternate route
Maintain 30-40m security perimeter
Common Extract Mistakes That Get You Killed
Misconception: 'Unpopular Extracts Are Always Safer'
Campers specifically target hidden extracts knowing players feel secure. Hunter's Path and Drainage Pipe still attract experienced campers.
Reality: All extracts have camping potential. Always implement 2-minute pre-extract protocol.
The Sprint-to-Extract Trap
Sprinting directly to extracts creates predictable patterns campers exploit.
Why it fails:
Audio alerts campers 100+ meters away
Reduces your ability to hear enemies
Limits tactical response time
Exhausts stamina for emergency repositioning
Correct approach:
Walk within 100 meters
Crouch-walk within 50 meters
Sprint only during emergency with smoke
Ignoring Your Six: Fatal Last-Minute Mistake
Players focus on extract zone, ignoring rear security. Campers position behind approaching players.
Prevention:
360-degree scan every 15-20 seconds
If duo, maintain 20-30m spacing with rear security
Stop periodically to listen for following footsteps
Never assume safety until extraction completes
Advanced Extraction Strategies
Solo Player Tactics
Solo advantages:
Smaller audio signature
Faster decision-making
Can use 2-player max extracts
Lower visibility
Solo tactics:
Prioritize off-peak timing (19-22 or 25+ minutes)
Use payment extracts (Southern Blockade)
Extended observation (90-120 seconds vs 60)
Carry 2+ smoke grenades
Avoid 15-minute cluster during peak
Squad Coordination
2-player protocol:
Maintain 20-30m spacing
Assign roles: point advances, rear secures
Communicate audio immediately
Stagger activation (one covers, other extracts)
3-4 player protocol:
Rotate point every 2-3 minutes
Establish 30-40m security perimeter
Assign quadrant responsibilities (90-degree sectors)
Coordinate smoke for full coverage
Squad extract selection:
Avoid 2-player max extracts
Prefer open extracts allowing perimeter defense
Use numerical advantage to contest camped extracts
Insurance Optimization
High-value runs (300,000+ Koens gear):
Prioritize safest extracts (Access Bridge, Southern Blockade)
Accept longer raid times
Avoid all PvP
Use Premium Lockdown
Low-value runs (150,000-200,000 Koens):
Accept moderate risk at 15-minute extracts off-peak
Insurance provides backup
Use Standard Lockdown
Maximizing Survival Rate
Track metrics:
Extraction success by extract type
Deaths by raid timing
Camper encounters by location
Successful backup extract usage
Average loot value per extraction
Target benchmarks:
Beginner: 40-50%
Intermediate: 60-70%
Advanced: 75-85%
Expert: 85%+
Frequently Asked Questions
What are the safest extraction points in Arena Breakout Airport Season 4?
Access Bridge (25-minute activation) has lowest player presence, followed by Southern Blockade (2,000 Koens payment) and Hunter's Path (no backpack). These show <30% camper encounters vs 60-70% at 15-minute cluster extracts.
How do you avoid extract campers in Arena Breakout Infinite?
Implement 2-minute pre-extract protocol: stop 100+ meters from extract, observe 60 seconds, listen for audio, scan camper positions, approach using cover-to-cover. Avoid peak timing (15-18 minutes) and prioritize off-peak windows or Access Bridge.
When is the best time to extract from Airport in Season 4?
Minutes 25-35 via Access Bridge offers lowest risk. Minutes 19-22 at 15-minute cluster provides moderate risk after initial rush. Avoid minutes 15-18 when 60-70% converge. Early extraction at 10 minutes via Drainage Pipe works for speed runs without backpacks.
Which Airport extract has the lowest camping rate?
Access Bridge due to 25-minute activation. Most players extract or die before this window, resulting in minimal presence. Southern Blockade ranks second due to 2,000 Koens payment filtering traffic.
What should you do if your extract is being camped?
Distance-based response: 100+ meters = abort to backup (2-3 minutes additional travel); 50-100 meters = assess advantage, engage or smoke and disengage; <50 meters = immediate smoke deployment, retreat to backup.
How do solo players safely extract from Airport?
Prioritize off-peak timing (19-22 or 25+ minutes), use payment extracts like Southern Blockade, implement extended 90-120 second observation, carry 2+ smokes, avoid 15-minute cluster during peak. Solo advantages include smaller audio signature and faster decisions.
Need Koen to upgrade gear for safer raids? BitTopup offers instant Arena Breakout Infinite top-ups with secure payment and 24/7 support. Get your Koen now and build the perfect low-risk loadout!