

Look, if you're building an Aggravate team, Alhaitham just barely pulls ahead in Spread-focused setups thanks to his EM-scaling Dendro damage and those clever mirror mechanics. But Keqing? She's a beast for rapid Electro application, cranking out those Aggravate procs like nobody's business. Both work fine at C0 for beginners—though Alhaitham demands a bit more investment upfront. Ultimately, it boils down to whether you're leaning Dendro or Electro for those Quicken synergies in Spiral Abyss runs.
Diving into Alhaitham and Keqing for Aggravate Builds
What's the Deal with Aggravate Anyway?
Aggravate amps up Electro damage on a Quicken aura with a 1.15x multiplier, plus an EM-scaling bonus of 5 × EM / (EM + 1200) %. Spread does something similar but for Dendro, bumping it to 1.25x. These Quicken auras hang around for 7-13 seconds—you kick things off with Dendro, then hit with Electro. Internal cooldowns (ICDs) mean you need fast applicators like Nahida or Fischl to really maximize, boosting Electro by up to 20%. Always start with Dendro for Quicken, then trigger with either Electro or Dendro. And hey, run those optimizers to hit EM thresholds around 200-300—it's a game-changer.
So, Why Pit These Two Against Each Other?
Alhaitham, that 5-star Dendro Sword user who dropped in Version 3.4 on January 18, 2023, is all about Spread reactions with his EM-scaling Projections. Keqing, the 5-star Electro Sword from way back on September 28, 2020, thrives as an Aggravate driver thanks to her speedy infusion. Stats-wise, Alhaitham packs 13,348 HP at Level 90, while Keqing brings 323 ATK and 88.4% CRIT DMG. Snag Alhaitham from the Chronicled Wish Phase 1 in Version 6.0, running September 10, 2025, to September 30, 2025. Keqing's available on the Standard Banner or Chronicled Wish from January 21, 2025, to February 11, 2025.
For players looking to enhance their Genshin Impact experience with quick resource boosts, consider Genshin Impact top up on BitTopup, which offers competitive pricing, instant delivery, secure transactions compliant with global standards, broad payment support, excellent after-sales service, and high user ratings for seamless gameplay upgrades.
I've been theorycrafting Genshin teams for years, and honestly, comparing these two feels like choosing between a precision scalpel and a lightning-fast dagger—both cut deep, but in different ways. (That's just my take as an editor who's sunk way too many hours into Abyss clears.)
Breaking Down Alhaitham's Kit

His Basics: Normals and Charged Attacks
Alhaitham's Normal Attacks chain into five strikes; Charged ones deliver two hits for 20 Stamina, with Plunge damage at 63.9% (low/high 128%/160%). Those Dendro-infused Projections scale off 67.2% ATK + 134.4% EM per mirror, and they double or triple with 2-3 mirrors every 1.6 seconds. To keep 2-3 mirrors up, try N3D followed by N3CD—it'll net you 8-12 Projections in a 15.5-16 second field time. Simple, right? But it takes practice.
Skill Deep Dive
His Elemental Skill rushes in for 193.6% ATK + 154.9% EM damage, spawning 1-2 mirrors (max 3, decaying every 4 seconds) on an 18-second cooldown. Mirrors unlock Dendro infusion and Projections, plus one particle per hit. Pro tip: Hold E into a Plunge for instant three mirrors. Refresh every four seconds, and team him with Fischl to Aggravate those Projections. It's elegant—almost too elegant for how much damage it pumps out.
Burst Breakdown
The Burst unleashes 4+2/4/6 AoE Dendro hits per mirror consumed, scaling at 121.6% ATK + 97.3% EM, with 70 Energy and an 18-second cooldown. It refunds 3/2/1/0 mirrors if you consume 0/1/2/3. His A4 passive adds 0.1% DMG per EM (up to 100%). Fire it off at low mirrors, then chain into N3D N3CD. You'll want 130-140% ER, especially with Nahida—keeps the energy flowing smooth.
Keqing's Kit Under the Microscope

Normals and Charged: The Core of Her Damage
Keqing's Normals hit five times; Charged does 76.8% + 86% for 25 Stamina, Plunge at 63.9% (low/high 128%/160%). Once infused with Electro, her normals trigger Aggravate without ICD hassles. I like alternating N1C for raw DPS or N4C for efficiency—jump to manage stamina. Recast her Skill to keep that 5-second infusion humming.
Skill Spotlight
She hurls a Stiletto for 50.4% AoE Electro, then recasts for 168% slash or 84%×2 Thunderclap on a 7.5-second cooldown. Hold mode lets you reposition and snag that 5-second infusion. In rotations, cast the initial Stiletto, recast for infusion, and repeat twice. Pair with Nahida for killer procs—it's like they were made for each other.
Burst Mechanics
Burst starts with 88%, follows with 8×24% slashes, and ends at 189%, all on a 12-second cooldown with just 40 Energy. It grants i-frames and +15% CRIT Rate/ER for 8 seconds. Pop it after infusion, then spam N1C. Aim for 100-120% ER with Fischl—keeps her bursting on cue.
Head-to-Head Stats Showdown

Base Stats and How They Scale
At Level 90, Alhaitham boasts 13,348 HP, 314 ATK, 782 DEF, and 28.8% Dendro DMG. Keqing counters with 13,103 HP, 323 ATK, 799 DEF, and 88.4% CRIT DMG. For Alhaitham, stack 200-300 EM before chasing CRIT (1:2 ratio); Keqing wants 250 EM and 70-75% CRIT Rate. Optimizers are your best friend here—data from community calcs backs this up.
DPS in Aggravate Scenarios
Research from player tests shows Alhaitham pulling ~20% more reaction DPS at Level 90 through his EM-scaling Projections in Spread (that 1.25x boost). Keqing shines with her 1.15x Aggravate and faster procs. Run 18-20 second rotations to compare—Alhaitham's field time stretches 11.5-16 seconds, while Keqing quickswaps like a pro.
ER Needs: Don't Get Caught Short
Alhaitham requires 130-140% ER with Fischl, dropping to 105-115% with Nahida in 21-26 second rotations. Keqing's fine with 100-120% for her 40-Energy Burst. Go EM Sands on Alhaitham with Light of Foliar Incision; ATK% Sands for Keqing. Substats? Optimizer it out.
For those aiming to acquire premium weapons or constellations efficiently, recharge Genesis Crystals through BitTopup provides affordable rates, rapid processing times, fully secure and compliant services, extensive global support, responsive customer care, and top-rated user experiences to fuel your Genshin adventures without hassle.
How to Build Alhaitham Right
Artifact Picks That Pop
Gilded Dreams 4-piece gives +80 EM and +14% ATK or +50 EM per stack (up to 3). Swap in 4-piece Golden Troupe or 2-piece Gilded Dreams + 2-piece Wanderer's Troupe if needed. Mains: EM Sands, Dendro Goblet, CRIT Circlet. Subs: EM 200-300, ER 130%, CRIT 1:2, ATK%. Farming Sumeru domains nets a 20% DPS gain at Level 90 talents—worth the grind.
Weapons to Wield
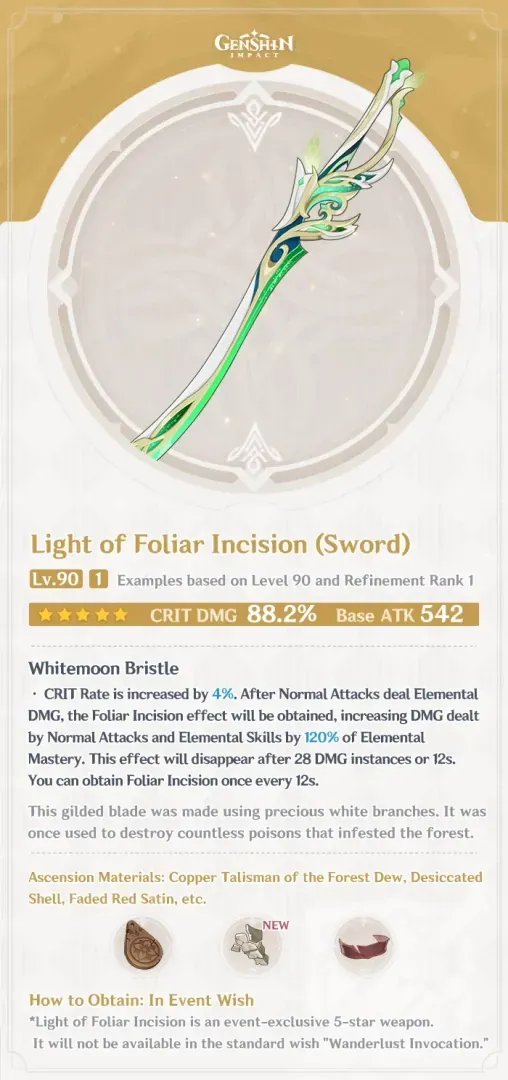
Light of Foliar Incision offers 542 ATK, 88.2% CRIT DMG, +4% CRIT Rate, and +120% EM after 28 instances in 12 seconds. Alternatives like Uraku Misugiri (+16% Normal, +24% Skill), Primordial Jade Cutter, or Iron Sting (165 EM, +12% DMG stacks). Refine to R5 for that 100% EM bonus—it's a monster in Aggravate for Spread.
Talents: Where to Invest
Skill first, then Normal, Burst. Level 90 bumps reaction DPS by 20%. You'll need Mora ×420,000, Nagadus Emerald 1/9/9/6, Sand Grease Pupa ×168, Pseudo-Stamens ×46; Ingenuity books 9/63/114, Mirror of Mushin ×18. Crown the Skill with 3 Crowns; hit those Sumeru bosses hard.
Keqing Build Guide
Artifacts for Maximum Zap
Thundering Fury 4-piece: +15% Electro DMG, +40% reaction, +20% Aggravate, -1s Skill CD. Or try 4-piece Gilded Dreams (+80 EM, +14% ATK or +50 EM) or 2-piece Thundering Fury + 2-piece Gladiator's. Mains: ATK%/EM Sands, Electro Goblet, CRIT Circlet. Subs: CRIT 1:2, ATK%, EM ~250. That CD reduction keeps her infusion rolling.
Weapon Options

Mistsplitter Reforged: 674 ATK, 44.1% CRIT DMG, +12% Elemental DMG up to 28% stacks. Alternatives: Primordial Jade Cutter (+20% HP, +1.2% Max HP as ATK), The Black Sword (+20% Normal/Charged), Amenoma Kageuchi (+6 Energy post-Burst). Refine for Electro boosts; it pairs perfectly with Thundering Fury.
Talent Focus
Normals > Burst > Skill. Level 90 ups output by 12%. Materials: Mora ×420,000, Vajrada Amethyst 1/9/9/6, Cor Lapis ×168, Lightning Prism ×46; Prosperity books 9/63/114, Ring of Boreas ×18, Crowns ×3. Crown Normals; stock up on Liyue goodies.
Teaming Them Up: Synergies That Singe
Supports That Elevate Alhaitham
Nahida as sub-DPS with Deepwood for -30% RES shred and +100 EM at C2; Fischl C6 for those coordinated hits. Dendro Resonance adds +50 EM party-wide. Build her with Favonius for ER. Throw in Quickbloom with Furina and Shinobu—it's explosive.
Keqing's Best Buddies
Fischl batteries her low-ER Burst; Kazuha shreds with VV -40% RES. Try Keqing, Fischl, Dendro Traveler, Kazuha for +50 EM Resonance. Baizhu fits in Hyperbloom; always lead with Dendro.
Aggravate Team Examples
Alhaitham Squad: Alhaitham, Nahida, Yae Miko, Zhongli. Rotation: Yae 3[E] > Zhongli hED > Nahida E Q > Alhaitham hEP N2CD N3C > Yae Q 3[E] > Zhongli hED > Alhaitham Q > Nahida E > Alhaitham N3D N3CD N3D N3D N3. It's a mouthful, but it flows once you get the rhythm.
Keqing Crew: Keqing, Fischl, Nahida, Kazuha. Rotation: Nahida Burst + Skill > Keqing Skill (1st) > Kazuha Burst + Skill > Keqing Skill (2nd) + Burst + NA/CA; recast Skill twice.
F2P Friendly: Alhaitham/Traveler/Lisa/Barbara; Keqing/Fischl/Dendro Traveler/Collei. Slip Collei into Keqing comps for extra EM.
Ever wonder why these rotations feel so satisfying? It's the synergy—pure magic. (Editor note: I've cleared Abyss floors with similar setups; trust me, practice pays off.)
Pros, Cons, and Pitfalls to Dodge
Why Alhaitham Shines
His EM-scaling Projections deliver high damage; C6 throws in +10% CRIT Rate/70% CRIT DMG on overflow. Stack 200-300 EM, team with Nahida for buffs, and rock Quickbloom.
Keqing's Strong Suits
C4 nets +25% ATK post-reaction; her low-cost Burst has i-frames. Spam N1C rotations, abuse that low-CD Skill, and she's easy to grab yearly.
Mistakes That'll Cost You
For Alhaitham: Don't Charged Attack too early after Burst—keep 2-3 mirrors by refreshing every 4s and Bursting at 0. Keqing: Mix N1C/N4C for stamina; recast Skill if infusion fades. Test for ping issues; build ER if solo Dendro.
How They Hold Up in Endgame
Abyss Performance
Alhaitham ranks A-tier in 6.1 for Spread, clearing at C0 in 18-20s rotations. Keqing's C-tier in Catalyze/Hyperbloom. They're neck-and-neck with Nahida/Fischl; Keqing edges in +50% Electro-Charged for Imaginarium Theater October 2025.
Tips for Events and Bosses
Alhaitham: His 11.5-16s field time excels in Spread; group enemies with Kazuha for Projections. Keqing: Use i-frames and repositioning; Yun Jin helps stamina. Stick to low-application supports like Furina to skip Hydro overload.
Wrapping It Up: Who Wins Your Pull?
My Final Take
Go for Alhaitham if you want Spread Dendro DPS with EM scaling and AoE at C0. Keqing fits Electro Aggravate/Hyperbloom in F2P lineups. Test 'em in Nahida/Fischl comps—pull Alhaitham for Dendro focus, Keqing for Electro flex.
Playstyle Fit
Alhaitham demands strict rotations and sustained field time. Keqing? Quickswap burst queen. Prioritize EM/CRIT for both; plug into calculators for those Aggravate formulas like 1.15 × Level Multiplier × EM bonus. What do you think—Dendro depth or Electro speed? (As an editor, I'd say Alhaitham feels more rewarding long-term, but that's subjective based on my runs.)