

Master Guoyapos Airport's 7 proven spawn-to-extraction routes in Season 4. This guide covers tactical navigation, extraction timing, and loot optimization for 35-minute raids. Learn to leverage 13 extraction points, navigate high-traffic zones, and maximize 200-400k Koens earnings while maintaining survival through tested route selection.
Understanding Airport Hunt Map Layout in Snowy Northridge Season 4
Guoyapos Airport unlocks at Level 25, supports 35-minute raids with 12 players on 72 tick rate servers. Season 4 launched January 8, 2026 at 6PM EST, introducing refined extraction mechanics and adjusted spawn distributions.
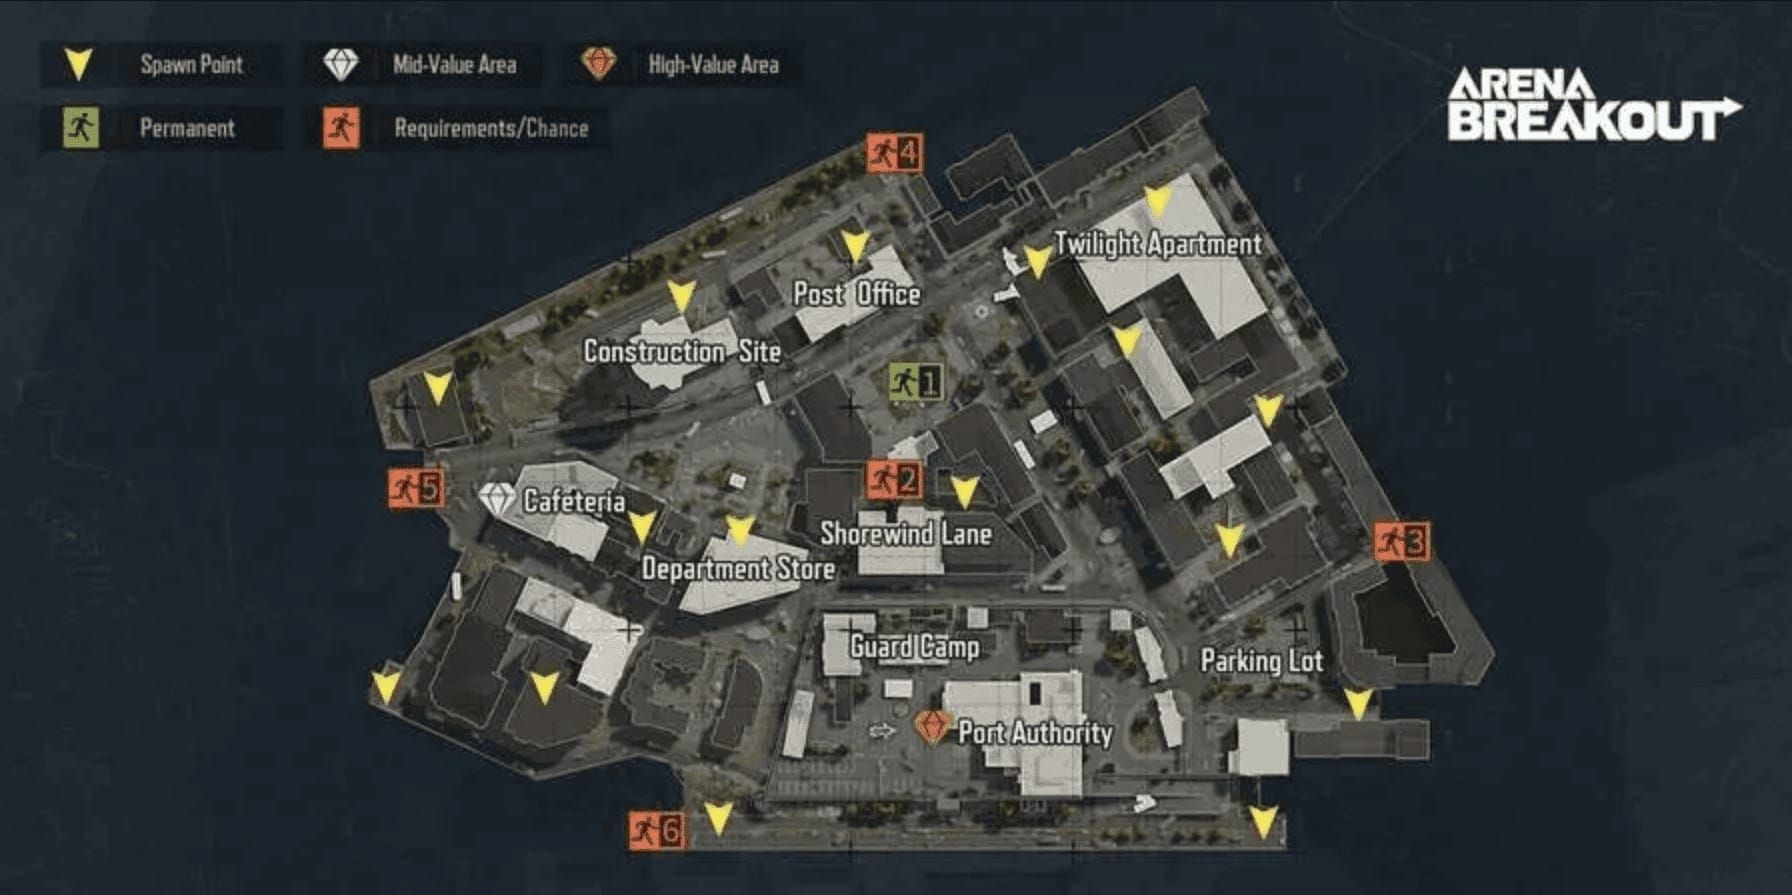
The map features 13 extraction points with varying activation requirements:
Fixed Extractions (Always Available):
Outpost: 200m from Motel
Boulder Wall: Alternative fixed option
Time-Limited Extractions:
Drainage Pipe: 0-10 minutes, no backpacks allowed
Northern Outpost: 10-20 minutes, requires 1 enemy kill, max 2 players
Access Bridge: Activates at 25 minutes
15-Minute Cluster (activates at 15 min, 20-sec timers): Destination Extract, Recycling Station Truck, Road Meet-Up Point, Road to the Port, Western Path
Conditional Extractions:
Southern Blockade: 2000 Koens payment
Hunter's Path: Requires backpack discard
Valley Helipad: Requires 2 dogtags
Parking Lot Helicopter: Requires 2 dogtags, active 1 min after raid start
For consistent gear availability across raids, Arena Breakout Bonds top up online through BitTopup ensures you're never under-equipped.
Key Terrain Changes From Previous Seasons
Season 4 introduced AI patrol cycles on 3-5 minute intervals, creating predictable safe movement windows. The 72 tick rate provides more responsive hit registration. Conditional extracts now activate exclusively after 10 minutes, forcing early-game route adjustments.
Major Landmarks for Navigation
Critical waypoints include:
Northridge Hotel: 8 safes
Motel: 3 safes (requires 2011 keys)
Stables: 1 upstairs safe (requires 2011 key)
Sewage Plant: 3 safes
Campus Services: 2 safes
Valley Beach Villa: 2 safes, 10 weapon crates
Valley Port: 1 safe, 7 weapon boxes
The Grain Trade Center-Stables-Motel corridor yields 200-400k Koens in 12-15 minutes when executed properly.
How Spawn-to-Extraction Routes Impact Survival Rate
Route selection correlates with survival through three factors: player traffic density, AI encounter frequency, and extraction window alignment. High-traffic routes through Northridge Hotel increase combat likelihood by ~60% vs peripheral paths.
The Mathematics Behind Route Selection
Balance three variables: loot potential, travel time, combat exposure. The Grain Trade Center-Stables-Motel route exemplifies optimal balance—12-15 min completion, 200-400k Koens, predictable AI patterns.
Crouch-walking reduces footstep noise by 60%, covering 150m in 90-120 seconds. Weapon crate looting requires 8-15 seconds per container.
Why Season 4 Meta Demands Route Adaptation
The 10-minute conditional extract delay eliminates early-game extraction strategies, forcing minimum 10-minute raid commitments. AI patrols now operate on consistent 3-5 minute intervals vs randomized patterns. Observing patrols for 60-90 seconds before entering contested areas provides safe passage intelligence.
Common Route Selection Mistakes
Approaching Southern Blockade without 60-90 second reconnaissance from 100+ meters
Failing to drop backpacks 20-30m before Hunter's Path zones
Attempting Drainage Pipe after 10 minutes (must reach by minute 8)
Route #1: Southern Spawn to Grain Trade Center-Outpost (High-Efficiency)
Highest Koens-per-minute efficiency: 200-400k in 12-15 minutes with minimal combat exposure.
Step-by-Step Navigation
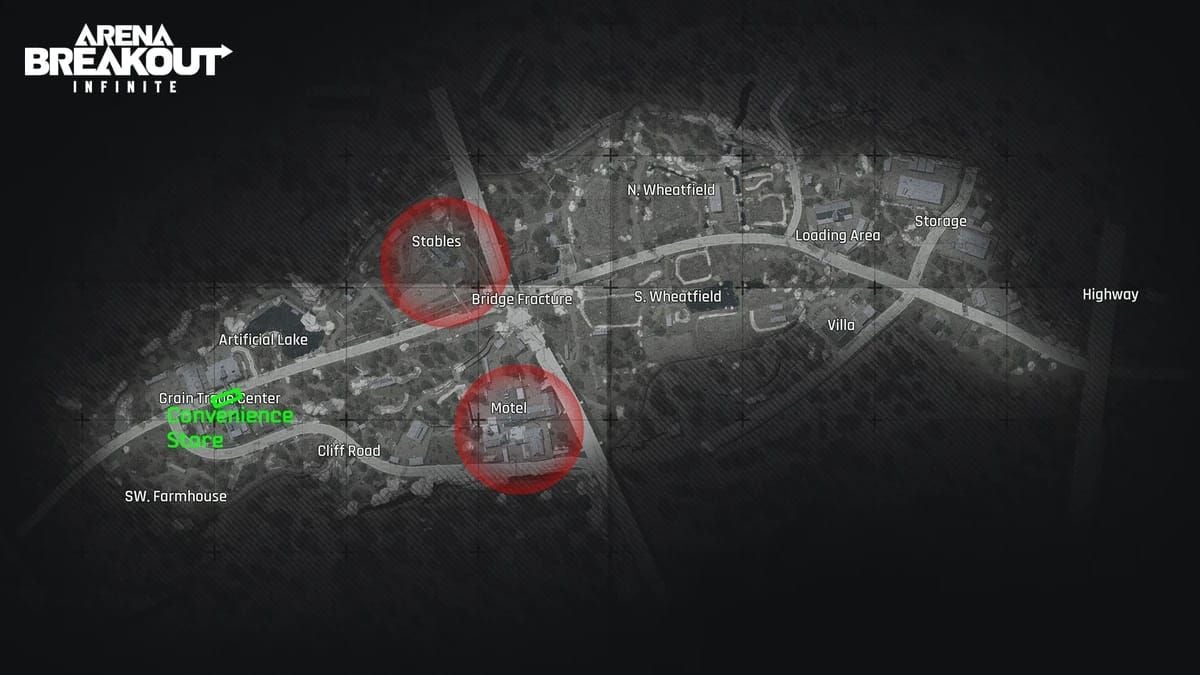
From southern spawns, crouch-walk northwest 150m to Grain Trade Center (90-120 sec)
Loot 2 ammo boxes (20-30 sec)
Proceed to Stables, access upstairs safe with 2011 key (50-80k Koens)
Move to Motel, loot 3 safes with 2011 keys (150-250k Koens in 3-4 min)
Extract at Outpost 200m northwest of Motel
Completes in 12-15 minutes, leaving 20+ minutes safety buffer.
Optimal Loadout
Minimum specs:
60+ total armor durability
120+ rounds
4+ medical items
1+ smoke throwable
Recommended:
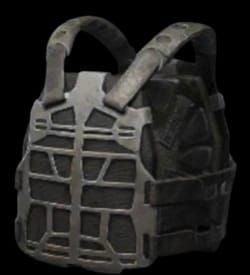
SEK Composite Body Armor: 70 durability, 5% movement penalty
Sentry 308 Armored Rig: 60 durability, 20 storage slots, 6% movement penalty
Expected Enemy Encounters
AI patrols operate on 3-5 min intervals. Entering Grain Trade Center within first 2 minutes avoids initial patrol. Player encounters spike after 10 minutes when conditional extracts activate. Complete Motel looting by minute 8-9, extract by 12-15 to avoid traffic surge.
Loot Opportunities
Stables upstairs safe: 50-80k Koens (requires 2011 key)
Motel 3 safes: 150-250k Koens (requires 2011 keys, 3-4 min)
Grain Trade Center 2 ammo boxes: Supplementary ammunition
Route #2: Northern Spawn to Drainage Pipe (Time-Critical)
Drainage Pipe's 0-10 minute window and backpack prohibition create specialized route prioritizing guaranteed extraction over max loot.
Navigating Time-Limited Windows
Reach Drainage Pipe by minute 8 for 90-sec observation before 10-min cutoff. Requires immediate sprint from northern spawns, covering 400-500m in 6-7 minutes.
Backpack prohibition limits capacity to armor rig storage. Sentry 308's 20 slots provide max capacity for selective high-value collection.
Audio Cue Checkpoints
Switch from sprint to crouch-walk at 200m mark (~minute 7) for audio detection of extraction campers. Weapon crate looting adds 8-15 sec per container—only engage crates within first 4 minutes.
Combat Decisions
Any engagement risks missing the 10-min window. Combat avoidance is primary priority. If forced into combat before minute 6, switch to Boulder Wall or 15-minute cluster extractions.
Route #3: Grain Trade Center to Southern Blockade (Payment-Based)
Southern Blockade's 2000 Koens payment filters out budget players, reducing extraction camping vs free points.
Why Fewer Players Use This Route
The 2000 Koens barrier filters budget loadouts and unsuccessful looters. For Grain Trade Center route earnings (200-400k), payment is negligible (0.5-1% of earnings).
Critical Chokepoints
Approach from western perimeter, maintain 100+ meter distance during 60-90 sec observation. Payment mechanism creates stationary vulnerability—use smoke throwables for concealment.
Premium Loot Integration
Valley Beach Villa: 2 safes, 10 weapon crates (adds 5-7 min, increases earnings to 300-500k) Valley Port: 1 safe, 7 weapon boxes (56-105 sec for all boxes)
Backup Plans
If camping detected, redirect to Outpost (300-400m for most southern spawns) or 15-minute cluster extractions if past minute 15.
Route #4: Central Spawn to Access Bridge (Late-Game)
Access Bridge activates at 25 minutes, designed for extended loot circuits or combat-delayed extractions.
Late-Game Player Convergence
By minute 25, most survivors move toward extraction. Approach from northern angles at minute 24 for positioning advantage before activation.
Timing Coordination
Position within 100m by minute 24, use final minute for reconnaissance. If delayed, use Boulder Wall or Outpost fixed extractions.
Speed-Running Final Approach
Crouch-walk final 100m maintains stealth (60% noise reduction), takes 60-75 sec. Account for 5-6% movement penalty from armor (adds 10-15 sec), requiring earlier positioning.
Route #5: Northern Outpost Conditional (Combat-Required)
Requires 1 enemy operator kill, 10-20 min activation window. Exclusively for players confident in securing eliminations.
Close-Quarters Combat Prep
MPX: 850 RPM, 9x19mm AP6.3 T3, 679.68 damage, 424.8 penetration—effective close-quarters AK-74N: 630 RPM, 5.45x39mm Level 5 BP, 60-round mags—superior sustained fire, medium-range
AI Patrol Exploitation
AI patrols on 3-5 min cycles. Observe one full cycle before engaging. Position near Northridge Hotel or Grain Trade Center during minutes 10-15 for max operator encounters.
Two-Player Limitation
Max 2 players creates extraction denial risk if third arrives. Solo players must verify availability before committing—if 2 already extracting, route becomes unavailable.
Route #6: Valley Helipad Dogtag Extraction (Trophy-Based)
Valley Helipad and Parking Lot Helicopter require 2 dogtags from kills or scavenging.
Dogtag Acquisition
Requires 2 operator kills or looting eliminated players. Northridge Hotel and Grain Trade Center corridor provide highest probability. Parking Lot Helicopter activates 1 min after raid start for aggressive early-game players.
Combat Tactics
Northridge Hotel's 8 safes attract geared players. Multi-level structure provides vertical positioning. Smoke throwables enable disengagement if combat turns unfavorable.
Long-Range Engagement
Elevated positions provide sightlines over approach routes. AK-74N's 60-round mags support sustained suppressive fire. Secure kills quickly—extended firefights attract third-party players.
Route #7: Hunter's Path Backpack-Free (Lightweight Sprint)
Hunter's Path requires backpack discard, prioritizing extraction speed over carrying capacity.
Movement Speed Management
Drop backpacks 20-30m before extraction zone. Without backpack weight, achieve max movement speed limited only by armor penalties (5-6%).
Armor Rig Storage Maximization
Sentry 308's 20 slots provide max capacity for backpack-free routes. Prioritize high-value-per-slot items: currency, keys, compact valuables. Avoid bulky items unless significant value.
Emergency Combat Protocols
If detected, decide: engage with limited ammo (120+ rounds minimum) or disengage toward alternative extractions. Throw smoke toward retreat vector, not current position, creating screen during sprint.
Advanced Route Optimization for Season 4 Meta
Reading Player Behavior (First 2 Minutes)
Gunfire indicates early combat near spawns—avoid those areas or investigate for third-party opportunities (dogtag routes). Silence suggests player caution or low-population instance, favoring aggressive loot routes.
Dynamic Route Switching
Drainage Pipe players hearing combat near extraction should immediately switch routes—clearing campers exceeds remaining window. Southern Blockade players detecting combat during reconnaissance redirect to Outpost or 15-min cluster extractions.
Inventory Management
Grain Trade Center route's 200-400k requires efficient management across 12-15 min. Loot Stables safe first (50-80k baseline) before Motel safes (150-250k). Prioritize currency and compact high-value items—Sentry 308's 20 slots fill quickly across 4 safes.
Currency Farming Efficiency
Grain Trade Center baseline: 200-400k in 12-15 min = 13,333-26,667 Koens/min With Villa/Port integration: 300-500k in 17-22 min = 42,857-71,429 Koens/min (exceeds baseline when loot spawns favor)
For consistent multi-raid performance, buy Arena Breakout Bonds instant recharge through BitTopup—gear availability never limits farming efficiency.
Essential Preparation Checklist
Budget vs Premium Loadouts
Budget:
SEK Composite Body Armor: 70 durability, 5% movement penalty
Sentry 308 Armored Rig: 60 durability, 20 slots, 6% movement penalty
MPX: 850 RPM, 679.68 damage, 424.8 penetration
Total: 130 armor durability
Premium:
AK-74N: 630 RPM, Level 5 BP ammo, 60-round mags
Superior penetration, sustained fire capability
Medical Supply Distribution
Minimum 4+ items: 2 healing, 2 bleeding/fracture management. Distribute critical supplies in secure containers. High-risk routes (Grain Trade Center during minutes 10-20) carry 6+ items for multiple engagements.
Ammunition Requirements
Minimum 120+ rounds: Assumes 2-3 engagements, 40-60 rounds each. Stealth routes operate at minimum. Combat routes: 180-240 rounds for Northern Outpost or dogtag extractions. AK-74N's 60-round mags = 3-4 magazines.
BitTopup Equipment Support
Maintaining optimal loadouts across multiple daily raids requires consistent currency for gear replacement. BitTopup provides fast, secure Arena Breakout Bonds recharge with competitive pricing and instant delivery. When running 5-10 raids daily, equipment costs accumulate—BitTopup's pricing reduces economic friction.
FAQ
What are the safest routes in Season 4? Southern Spawn to Grain Trade Center-Outpost yields 200-400k in 12-15 min with minimal traffic when executed during first 15 minutes. Compact geography and fixed Outpost extraction (200m from Motel) minimize exposure.
How do I identify spawn location quickly? Scan for landmarks within 200m: Northridge Hotel, Motel, Grain Trade Center, Stables. Southern spawns place you 150m from Grain Trade Center (90-120 sec crouch-walk). Northern spawns closer to Drainage Pipe and Access Bridge.
Which extractions have lowest traffic? Southern Blockade's 2000 Koens payment filters budget players. Hunter's Path's backpack discard reduces traffic. Both still require 60-90 sec reconnaissance.
What loadout for long-distance routes? 60+ armor durability (SEK Composite: 70 works well), 120+ rounds, 4+ medical items, 1+ smoke. Sentry 308 Rig (20 slots) adequate for most routes. Budget 5-6% movement penalty.
How did Season 4 change routes? 10-min conditional extract delay eliminated early extraction, forcing 10-min minimum commitments. AI patrols now consistent 3-5 min intervals vs randomized. 72 tick rate improves hit registration.
Average survival rate per route? Grain Trade Center-Outpost achieves highest survival during minutes 0-15, before mid-game convergence. Combat-required routes (Northern Outpost) reduce survival due to forced engagements. Time-critical routes (Drainage Pipe) achieve high survival when reaching zones by minute 8 for proper reconnaissance.