

Last Verified: April 2026
Distorted Valley is the most profitable farming mode in Arena Breakout Infinite right now — and it's not particularly close. Since Season 5 Distortion launched on April 2, 2026, community testing confirms you can turn a profit even on raids where you lose every fight, provided you pick the right spots and exit cleanly. This guide breaks down exactly where to go, what to grab, and how to get out alive.
Why Distorted Valley Is the Top Farming Map in Season 5
The reworked Valley map isn't just a visual overhaul. Distorted Valley runs as a separate mode on that map, layering SCP-inspired anomalies — floating objects, bell tolls that warp battlefield positioning, altered physics — on top of the standard extraction loop. No self-revive. Four operator abilities to choose from before you drop. Higher stakes, but also higher ceilings.
What actually changed the economy: Season 5 introduced Chaotic Matter, a new gold-tier item community testing places as potentially exclusive to Distorted Valley. Red ammo was reduced across the board, first aid kits were removed from standard loot pools, and weapons were rebalanced. The net effect is that raw gunfight wins matter less than loot efficiency. Players scraping 500–800k Koen on light-death runs are consistently reporting positive sessions — which is unusual for a Tier 6 PvP environment.
One thing worth flagging: some players report loot feeling nerfed compared to early Season 5 previews. Official patch notes don't confirm a targeted reduction, so treat high-end yield estimates as variable rather than guaranteed.
Zone Overview
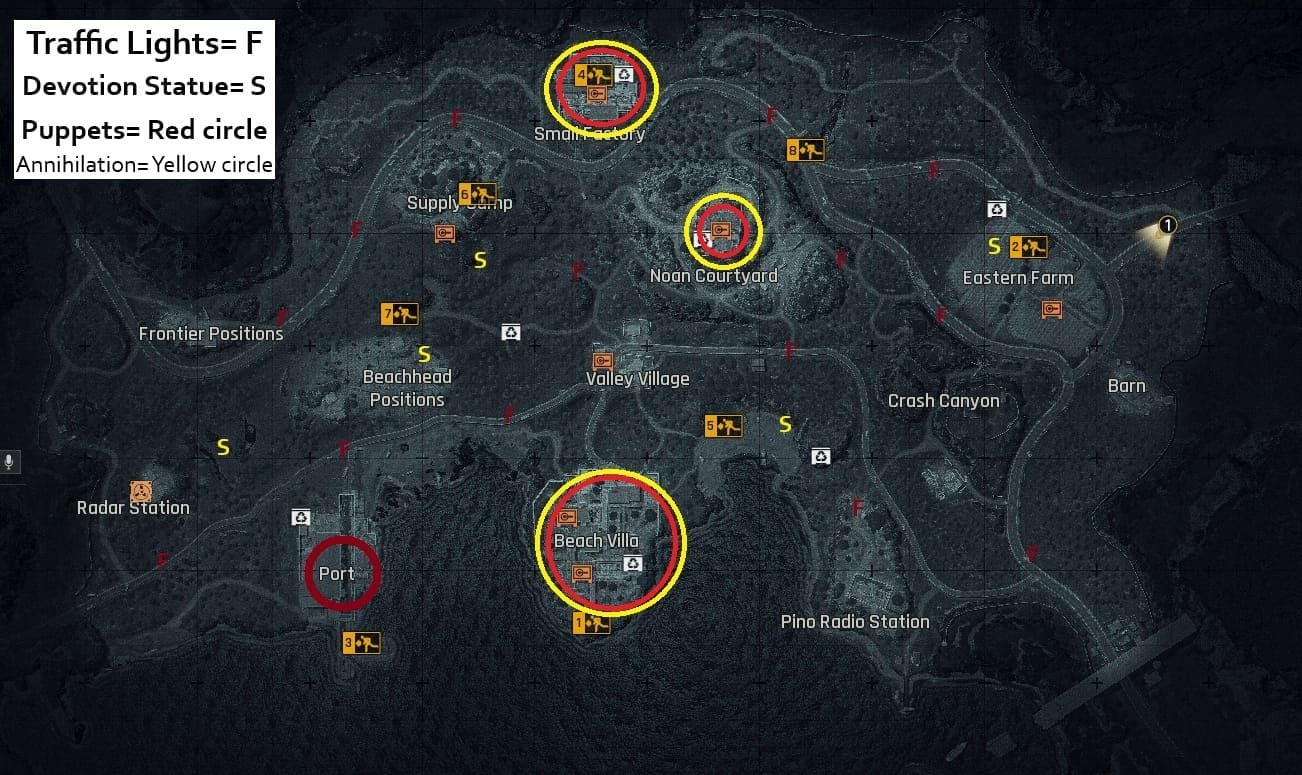
Distorted Valley divides into five navigable sub-zones:
Northern Industrial — warehouses, machinery, high container density, heavy PvP traffic
Central Anomaly Core — anomaly effects strongest here, floating loot clusters, unpredictable
Southern Residential — lower risk, moderate loot, good for budget runs
Eastern Compound — mid-tier, squad-contested, strong extraction access
Western Outskirts — low traffic, hidden stashes, underused by most players
Lockdown and Forbidden Zones on Valley unlock at level 8 — don't attempt those sub-areas before then.
Farm Spot #1: Northern Warehouse Complex — Highest Koen Density
The single best spot for raw Koen per minute if you can hold it. Three large warehouses clustered in the Northern Industrial zone, each with multiple military-grade containers and crate spawns. Community boosting data consistently lists this as the top Koen-per-raid location.
How to reach it: Drop or rotate along the northern perimeter road. Avoid the central path — it funnels traffic directly into contested ground. Hug the fence line.
What to loot: Military containers first, then wooden crates. Skip loose floor items unless your inventory has room. Chaotic Matter can spawn here — always check gold-tier container slots before moving on.
Risk: High. This is the most contested zone on the map. Full-kit squads rotate here early.
Best extraction: Northern exit points. Don't cross back through Central — you'll bleed time and risk contact.
Best for: Full-kit squads, experienced solos who can disengage fast.
Farm Spot #2: Eastern Compound — Mid-Risk, High Consistency
Consistent mid-tier returns with manageable PvP exposure. The Eastern Compound has a mix of residential and light industrial containers, making it reliable across different raid timings.
How to reach it: Eastern spawn edges or a mid-raid rotation from Central. The compound has two entry points — use the southern gate to avoid the main chokepoint.
What to loot: Focus on the two-story building's upper floor containers and the storage room on the ground level. Skip the open courtyard crates — they're low-value and expose you.
Risk: Medium. Traffic spikes mid-raid as squads rotate from Northern Warehouse after clearing it.
Best extraction: Eastern extraction points pair directly with this zone. Clean exit, minimal backtracking.
Best for: Solo players with mid-tier loadouts, small squads wanting reliable income without committing to the highest-risk zone.
Farm Spot #3: Western Outskirts Stashes — Hidden Goldmine Most Players Skip
Most players never rotate here. That's the entire advantage. The Western Outskirts has lower container density than Northern Warehouse, but near-zero PvP pressure means you loot at full speed without burning time on engagements.
How to reach it: Western spawn or a deliberate early rotation before the main player wave hits Central. Takes roughly 90 seconds from mid-map.
What to loot: Hidden stash points along the western fence line. These aren't marked — use the interactive map at arenabreakout-infinite.com/maps to pre-learn positions before your first run. Secondary containers inside the two small outbuildings are consistently overlooked.
Risk: Low. Rarely contested. Occasional solo player, almost never a full squad.
Best extraction: Western exits. Straight shot, no drama.
Best for: Budget loadout runs, beginners building Koen without risking expensive gear, solos who want clean extractions.
Farm Spot #4: Southern Residential — Best Budget-Loadout Safe Zone
If you're running cheap gear and need to protect your profit margin, Southern Residential is your default. Lower loot ceiling than the northern zones, but the risk-adjusted return is excellent.
How to reach it: Southern spawn edges. Straightforward pathing, no major chokepoints.
What to loot: Residential containers, cabinets, and storage units. Don't expect military-grade drops — you're farming volume here, not jackpots. Prioritize electronics and medical items, which retain strong trader value.
Risk: Low to medium. Some traffic late-raid as players rotate toward southern extractions.
Best extraction: Southern extraction points. Time your exit for mid-raid before the late-game rotation surge.
Best for: Budget runs, new players, anyone recovering Koen after a bad streak.
Farm Spot #5: Central Anomaly Core — Squad-Optimized High-Reward Zone
Solo players should think twice here. The Central Anomaly Core is where Distorted Valley's mechanics hit hardest — bell tolls can reposition enemies unpredictably, floating objects obscure sightlines, and the anomaly system creates disorientation that punishes lone operators. But for a coordinated squad, it's the second-best Koen zone on the map.
How to reach it: Central drop or rotation from either Northern or Eastern zones. Don't approach from the west — the terrain funnels you into open ground.
What to loot: Anomaly-adjacent containers tend to have elevated loot quality — community testing suggests the anomaly system influences spawn tables here, though this isn't officially confirmed. Chaotic Matter sightings are common in this zone.
Risk: Very high. Anomaly effects plus heavy squad traffic make this the most chaotic zone on the map. No self-revive means one mistake ends your run.
Best extraction: Central or Eastern exits depending on where the raid traffic is sitting. Have a secondary exit planned before you enter.
Best for: Full-kit squads with coordinated communication. Not recommended for solos or budget runs.
Farm Spot #6: Northern Industrial Perimeter — Night Raid Exclusive Value
During standard raids, the Northern Industrial perimeter is too exposed to farm efficiently. At night, player traffic drops significantly and the anomaly effects become visually disorienting for attackers — which actually works in a careful farmer's favor.
How to reach it: Northern perimeter road, same as Spot #1 but staying outside the main warehouse cluster. The perimeter buildings are separate structures most players ignore entirely.
What to loot: Perimeter storage containers and the small locked rooms along the industrial fence. Lower density than the main warehouses, but you're trading volume for safety.
Risk: Medium at night (low during off-peak hours), high during day raids. This spot's value is conditional on raid timing.
Best extraction: Northern exits. Don't linger — night raids have compressed timers in some configurations.
Best for: Night raid specialists, solos who've memorized the perimeter layout, players who want Northern Industrial value without the full-kit commitment.
Farm Spot #7: Small Factory Basement — Quest Completion + Container Combo
This spot doubles as a quest objective location and a legitimate farm point. Official quest data confirms a task requiring players to stay in the Small Factory Basement for 45 seconds — which means every serious player will pass through here at some point. The containers inside are mid-tier but consistent, and completing the quest simultaneously makes this the highest efficiency spot for players still working through the Season 5 quest chain.
How to reach it: Small Factory is in the mid-northern section of the map. The basement entrance is on the eastern side of the building — easy to miss if you're new.
What to loot: Basement containers first, then the ground floor on your way out. The basement specifically has toolboxes and technical item spawns that sell well.
Risk: Medium. Quest traffic means other players will be here, but the basement's enclosed layout limits engagement angles.
Best extraction: Northern or Eastern exits depending on your next rotation.
Best for: Players with active Season 5 quests, mid-tier loadout runs, anyone wanting to stack quest progress with loot income in a single raid.
Optimal Farm Routes: Connecting Spots in One Raid

Don't treat these as isolated visits. The real efficiency gain comes from chaining spots within a single raid timer.
Solo 3-Spot Loop (recommended for most players): Western Outskirts → Southern Residential → Eastern Compound → Eastern extraction. Low risk, consistent returns, clean exit. Takes roughly 12–15 minutes at a steady pace.
Squad 5-Spot Sweep: Split the squad — two players hit Northern Warehouse while two clear Eastern Compound simultaneously. Regroup at Central Anomaly Core, then push Small Factory Basement for quest credit. Extract via Eastern or Northern depending on remaining timer. This route requires communication but delivers the highest per-raid Koen ceiling.
Time management rule: Spend no more than 4–5 minutes per spot. If you're still looting at the 6-minute mark in any single location, you're over-committing. The extraction death is the most expensive mistake in Distorted Valley — losing a full inventory to a failed exit wipes your entire session profit.
Loadout Guide for Distorted Valley Farming
The 3x3 Secure Case is easier to access in Season 5 — prioritize filling it with your highest-value finds before anything else. If you die, the Secure Case survives. That's your floor.
For high-risk spots, gearing up properly matters. If you're planning extended full-kit runs in Distorted Valley and need Bonds to fund your loadouts, Arena Breakout cheap recharge via BitTopup is worth checking — faster than grinding and straightforward to use.
Night Raid vs Day Raid Farming
Night raids reduce player traffic noticeably, particularly in the Northern zones. The trade-off: anomaly visual effects are more disorienting in low light, and some players find navigation harder without landmarks.
Day raids are better for: Spots 2, 4, 7 — moderate traffic, good visibility, easier navigation for newer players.
Night raids are better for: Spot 6 (Northern Perimeter) specifically, and Western Outskirts (Spot 3) if you want near-zero PvP contact. The reduced player count makes careful farming significantly safer.
No confirmed official data on whether loot tables differ between day and night raids in Distorted Valley. Community consensus is that spawn quality is consistent — the difference is purely player traffic.
Quick-Reference Farm Spot Comparison
Common Mistakes That Kill Your Distorted Valley Profits
Over-looting when the timer is short. The single most common cause of extraction deaths. Set a mental cutoff — if you're not moving toward an exit with 5 minutes left, you're gambling your entire haul.
Ignoring extraction point positioning. Most players pick a farm spot without thinking about the exit first. Plan your extraction before you start looting, not after. Spots 1 and 5 are high-value but have longer extraction paths — factor that into your time budget.
Running budget gear into high-risk zones. Spot 1 and Spot 5 are full-kit territory. Showing up in basic armor because "the loot is good" just means you're funding someone else's raid. Match your gear to the zone's risk tier.
Skipping Western Outskirts because it looks empty. That's the point. The hidden stash locations along the western fence are consistently overlooked and consistently profitable. Learn the positions once and it becomes a reliable low-stress income source.
Not using your ability before dropping. You choose one of four operator abilities before each Distorted Valley raid. This isn't optional flavor — the right ability for your playstyle meaningfully affects survivability in anomaly zones. Pick deliberately, not randomly.
Frequently Asked Questions
What's the single best farm spot for beginners? Western Outskirts (Spot 3) or Southern Residential (Spot 4). Low risk, forgiving if you make mistakes, and you'll extract consistently while learning the map layout.
How much Koen can I realistically earn per raid? Community data puts careful budget runs at 300–600k and full-kit squad runs at 800k–1.5M+. Some players report scraping 500–800k even on raids with deaths — the key word is "careful." Dying with a full inventory on the way to extraction is where most players lose money.
Did Season 5 nerf Distorted Valley loot? Officially, no targeted nerf is confirmed. Some community members report lower yields compared to early S5 previews. The most likely explanation is that red ammo removal and first aid kit changes reduced the per-container value of certain drops, making the overall loot feel lighter without a direct spawn rate reduction.
Can I farm Distorted Valley effectively with a 3-man squad? Yes — the 5-spot sweep route works well with three players. Assign two to Northern Warehouse and one to Eastern Compound simultaneously, then regroup. Three players is actually the sweet spot: enough firepower for Central Anomaly Core without the coordination overhead of a full four-man.
Is the Small Factory Basement worth visiting if I don't have the quest? Marginally. The containers are mid-tier and the location adds travel time if it's not on your natural route. If you're passing through anyway, yes. Don't make a dedicated detour for it without the quest active.
Should I use the interactive map before running Distorted Valley? Absolutely, especially for Spot 3 (Western Outskirts stashes). The official interactive map at arenabreakout-infinite.com/maps shows loot spawn locations, extraction points, and spawn zones. Spending 10 minutes with it before your first run will save you hours of trial and error.
Distorted Valley rewards players who plan their raids, not just players who fight well. Pick your spots based on your gear tier, chain them into a route, and exit before the timer forces your hand. That's the formula — and it works consistently across solo and squad play in Season 5.
If you're scaling up to full-kit runs on Spots 1 and 5, keeping your Bonds topped up for premium gear access makes a real difference. Arena Breakout top up discount options are available if you want to fund those runs without the grind overhead.