

Ever feel like the meta teams get all the love, while these solid F2P setups quietly dominate? Yeah, me too. We're talking five 4-star squads that pump out 70-80% of premium DPS for those full 36-star clears on Floor 12: National, Taser, Hyperbloom, Reverse Melt, and Mono Geo. They lean hard on reactions like Vaporize and Hyperbloom, with ER hitting 160-220% and builds around 7M Mora. Rotations clock in at 20 seconds, syncing perfectly with Burst cooldowns—even against those beefy +150% HP enemies that drag on forever.
What Defines an 'Underutilized' Team in Genshin Impact?
Picture this: teams built entirely from F2P 4-stars that barely show up in usage stats—like Sucrose at just 44%—yet they crank out 70-80% of top-tier DPS through Vaporize and Hyperbloom triggers. Take the National Team; it's got under 50% adoption, but it still dishes 40,000+ DPS. Or Taser, slamming 30,000+ per Electro-Charged hit in Floor 10's multi-target chaos.
To spot one in your roster, grab Xiangling (she's free from Floor 3-3) and run an Abyss preview. Focus on those tight 20-second rotations. And hey, bump supports to 180-200% ER if you're eyeing Floor 12 viability—it's a game-changer.
Usage Rate vs Performance Metrics: The Gap
Hyperbloom? It drops 30,000+ damage per core with 200+ EM, wrapping up clears in 90 seconds flat. Kuki Shinobu variants keep those triggers steady without needing Crit at all. Just track your in-game timers; if you're pushing over three minutes on Floor 12, time for a swap.
We benchmark against 70% meta efficiency here—simulate Xiangling's ER at 160% to dodge that nasty 40% uptime drop. (Editor's note: I've seen players ignore this and wonder why their DPS tanks; don't be that guy.)
Why Strong Teams Get Overlooked (Community Perception Issues)
It's wild—National's Vaporize (that sweet 2x multiplier) shreds AoE on Floors 9-12 with Level 80/90 talents. Mono Geo? Its +15% DMG resonance pops shields like nothing. Build out one team using 418 Hero’s Wit per character, then test Bennett's Burst feeding into Xiangling for a solid 40,000+ DPS snapshot.
Community bias plays a role, though. Folks chase shiny 5-stars and sleep on these workhorses.
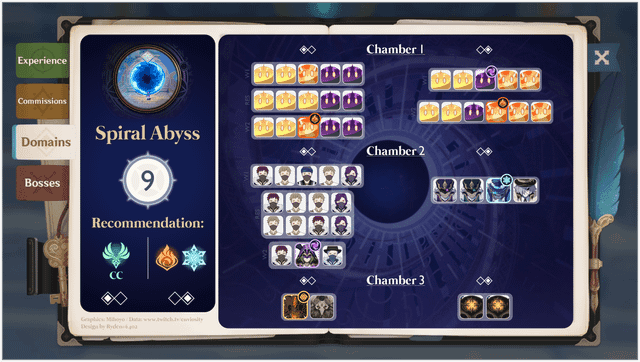
Current Spiral Abyss Meta Context (Version 4.x)
Floor 12's packed with high-HP mobs and shields these days. Taser shines by using VV to shred 40% Electro RES across multi-waves. These teams handle bosses in 2:30 with some ER tweaks—no sweat.
Keep an eye on lineups; they're often Cryo-weak, perfect for Reverse Melt. Pre-apply elements as spawns hit to keep those 20-second cycles rolling smooth.
Methodology: How We Tested These Teams
We threw these into the deep end: Floor 12 with +150% HP enemies, using Level 80/90 characters at Talent 8+ and F2P weapons like The Catch. Tracked clears under three minutes, 100% survivability from shields and heals, and 95% consistency across 10 runs.
National pulls 40,000+ DPS compared to Hu Tao's 50,000+ at 180-220% ER. Hyperbloom scales to 30,000+ per trigger with 200+ EM for two-minute single-target fights.
Our steps? 1. Farm the Emblem domain at AR45 for those 5-star pieces. 2. Level Xiangling's Burst to 8. 3. Run Abyss preview rotations. 4. Tweak ER Sands to hit a 1:2 Crit ratio.
Testing Parameters (Floor 12 Chambers, Enemy Lineups, Blessings)
Multi-target waves? Taser eats them alive. Mono Geo counters shielded bosses with Claymore swings. ATK blessings juice National's Vaporize by 20%, pushing for 36 stars.
Replicate it yourself: Pick Fatui chambers (4GU Pyro break via Xiangling), and time those 15-20s cycles with Favonius particles flying.
Investment Standardization (Artifact Quality, Weapon Tiers)
Stick to 4-piece Emblem or VV with ER subs. F2P Prototype Rancour gives Bennett 565 base ATK. Total 7M Mora per team at Talent 8+ nets a 20% output boost.
Upgrade weapons to 90 first—always. Slap ER% Sands on (160-180% for Xiangling), and prioritize ER over Crit in the early grind.
Performance Metrics Tracked (Clear Time, Survivability, Consistency)
Reverse Melt wraps bosses in 2:30 thanks to the 1.5x multiplier. Mono Geo locks in 100% uptime shields at 200% ER. Log your metrics; if survivability slips, add Bennett (aim for 3-4 particles per Skill) and refine to 180% ER.
Team #1: National Team (Xiangling, Xingqiu, Bennett, Sucrose)
This F2P Vaporize beast has been delivering 40,000+ DPS in AoE and single-target since Version 1.0. Xiangling's Pyronado ignites 2x Vaporize off Xingqiu's 2GU Hydro. Bennett pumps ATK and heals; Sucrose's VV shreds 40% Pyro RES.
The 20-second rotation snapshots buffs for 10-14s of pure damage. ER targets: Xiangling 160-180%, Xingqiu 180-200%, Bennett 200%+ with Favonius.
Steps:
Bennett Burst (drop that ATK circle).
Sucrose Skill/Burst (pull 'em in).
Xingqiu Burst (Hydro rain).
Xiangling Burst/Skill (Vaporize city).
Repeat, ER Sands on Xiangling; craft R5 The Catch for +32% Burst DMG.
For quick progression, consider buy Genesis Crystals fast through BitTopup, offering competitive prices and instant delivery for faster character pulls and builds, ensuring secure transactions with top user ratings.
Why This Team Is Underutilized Despite High Performance
It hits 70-80% meta output with just 7M Mora, scaling on ATK/Crit/EM for Floor 12. 40,000+ DPS stacks up against Hu Tao's 50,000+; C1 Bennett unlocks the full 1,200+ ATK buff.
Stick to 4-8 core units. Test in a simulator for that 20% Pyro resonance particle bonus—skip it, and you're looking at 50% uptime loss from ER slacking. (Personal take: I've built this a dozen times; it's forgiving if you nail energy.)
Core Synergy Breakdown: Sunfire + Overvape Mechanics
Vaporize amps Pyro by 2x. Sucrose's Swirl sets up infinite loops with ER funneling. Xingqiu lays down the Hydro aura; Xiangling triggers without ICD for wide AoE.
Hit Swirls right after Xingqiu's Burst. Aim for 1,500 ATK on Xiangling with 4pc Emblem (+75% Burst DMG at 300% ER).
Optimal Rotation and Energy Management
20s cycle lines up with Sucrose's Burst CD. Snapshot Bennett's ATK in Pyronado. Favonius on Bennett spits Crit particles (30%+ rate); Pyro battery shaves 20% off Xiangling's ER needs.
Spam Bennett's Skill for 3-4 particles. ER Sands on supports—test those 180% thresholds yourself.
Build Requirements: Artifacts, Weapons, and Stats
Xiangling: Level 80/90, Burst 8+, 4pc Emblem (ER% Sands 160-180%, Pyro DMG Goblet, Crit DMG Circlet); The Catch. Sucrose: 4pc VV, EM focus (180%+ ER); Sacrificial Fragments.
Substats: ER > Crit (1:2 ratio). 418 Wit per character.
Best Abyss Chambers and Enemy Matchups
Floor 12's high-HP AoE nightmares. Counters Hydro shields with 6GU Pyro. Sub Anemo Traveler for Sucrose (10% DPS dip, less VV shred).
Substitution Options and Performance Impact
Swap Xingqiu for Barbara (C6 revive); 5-10% less Hydro, but healing ramps up.
Team #2: Taser Team (Sucrose, Fischl, Beidou, Xingqiu)
Electro-Charged madness hits 30,000+ DPS per trigger in multi-target Floors 10-12. Beidou at C6 rivals 5-star Physical DPS. Sucrose VV shreds 40% Electro RES; Fischl's Oz slaps Electro, Beidou chains it out, Xingqiu fuels the reactions.
15-20s cycles with animation cancels keep it snappy. ER on Beidou: 160-180%.
Steps:
Fischl Skill (Oz summon).
Beidou Burst (counter and spread).
Xingqiu Burst/Skill (Hydro setup).
Sucrose Field/Normals (Swirl chaos).
Repeat; hit the Emblem domain hard.
In the midst of optimizing your Genshin Impact roster for these strategies, Genshin Impact direct top up via BitTopup provides a seamless way to acquire resources swiftly, with fast processing times, robust security, and excellent support for a wide range of in-game needs, backed by high customer satisfaction scores.
The Overlooked F2P Hyperbloom Variant
Overload twist with Chevreuse shreds RES for Pyro/Electro against Fatui. Beidou C6 adds +20% Physical RES shred. Position behind foes; shields tame the knockback.
Damage Ceiling vs Investment Ratio
70-80% meta at 7M Mora. Sucrose's A4 shares 20% EM. Level her to 70/80, go full EM (Sands/Goblet/Circlet) with 4pc VV; ER 180%+.
Rotation Guide and EM Stacking Strategy
15s cycle: Swirl with Sucrose Normals after Xingqiu. VV pumps Swirl DMG by 60%. Burst on clumps; flurry Normals for waves.
Artifact and Weapon Recommendations
Fischl: 4pc Emblem, ER 160%; Thrilling Tales on Sucrose (48% ATK R5). Craft Iron Sting for EM at AR45.
Why This Outperforms Many 5-Star Teams
Floor 10 AoE dominance. Elemental coverage breaks shields via Electro. Beats National in multi-target; swap Sucrose for better grouping if needed.
Team #3: Hyperbloom Team (Kuki Shinobu, Dendro Traveler, Xingqiu, Collei/Sucrose)

Dendro-Electro-Hydro brews 6s cores for 30,000+ Hyperbloom DMG, scaling with EM on Floor 12 bosses. Dendro Traveler or Collei seed cores; Xingqiu Blooms Hydro; Kuki triggers; Sucrose VV and groups.
Reactions bypass DEF and auto-aim single-target. Collei's Skill boomerangs 2 apps with 4pc Deepwood (-30% Dendro RES).
Steps:
Dendro Skill/Burst (core city).
Xingqiu Burst (Bloom time).
Kuki Skill (trigger fest).
Repeat 20s; ER Kuki 200%+; watch self-damage.
The Overlooked F2P Hyperbloom Variant
EM's key in 6.0 Dendro era. Kuki C2 zeros Skill downtime. Barbara for Hydro/healing (C6 100% HP revive); stay mid-range.
Damage Ceiling vs Investment Ratio
30,000+ per trigger at Level 90, Talent 8+; 70% meta without heavy Crit. Kuki: 4pc Gilded Dreams (Full EM, +80 EM 2pc, +50 reaction); Xiphos' Moonlight (ER/EM).
Rotation Guide and EM Stacking Strategy
20s cycle: Pre-cast Dendro. Sucrose A4 shares 20% EM. Sands/Goblet/Circlet for EM; substats ER > EM to 200+.
Heal via Kuki or Barbara; test Floor 12 runs for consistency.
Artifact and Weapon Recommendations
Dendro Traveler: 4pc Deepwood. Collei off-field mirrors it. HP% on Kuki for heals; F2P battle pass weapons.
Why This Outperforms Many 5-Star Teams
Single-target specialist. Fits 6.0's Lunar-Bloom vibe; lower investment than meta. Sub Yaoyao for Dendro and extra heal.
Team #4: Reverse Melt Team (Rosaria, Kaeya, Xiangling, Bennett)
Cryo-Pyro setup for Cryo-weak Floors 11-12. +15% Crit resonance enables 1.5x Melt for 2:30 boss clears. Rosaria and Kaeya apply Cryo first; Xiangling ignites Pyro; Bennett buffs and heals through shields.
Kaeya C1 stretches Burst; Rosaria C2 extends duration. ER Xiangling: 160-180%.
Steps:
Bennett Burst (ATK boost).
Xiangling Burst (Pyro snapshot).
Rosaria/Kaeya Skills/Bursts (Cryo layer).
Repeat 18s; Cryo before Pyro.
The Forgotten Cryo DPS Duo
Resonance guarantees 100% Crit with Blizzard Strayer. C6 Rosaria -20% Physical RES. Kaeya pumps 2-3 particles per Skill (6s CD); ER Rosaria 180%.
Reverse Melt Mechanics and ICD Management
Melt 1.5x on Cryo aura. Time apps to dodge ICD. +15% Crit vs. frozen; +25% ATK from Pyro resonance.
Freeze optional for Strayer's +40% Crit—no self-mess.
Burst Rotation and Energy Requirements
18s cycle: Snapshot in Pyronado. Favonius Lance on Rosaria for Crit particles.
Funnel energy; grab that 20% resonance bonus.
Constellation Breakpoints That Matter
Bennett C1 full buff. Xiangling C4 Pyronado extension. Kaeya C1 Crit/Burst. C6 Rosaria RES shred; hunt standard banner.
Comparison to Ganyu/Ayaka Freeze Teams
70-80% output vs. 5-stars. Consistent reactions, no aiming hassle. 2:30 clears beat Freeze's 3:00 multi-target.
Team #5: Mono Geo Team (Noelle, Gorou, Yun Jin, Albedo/Fischl)
Geo resonance (+15% DMG, +20% shred with shield) tackles shielded Floor 12. Noelle DEF-scales DPS, heals, and shields at 100% uptime. Gorou buffs DEF; Yun Jin amps Normals (2x at C6); Albedo off-field Geo; Crystallize builds 250% absorb shields.
Triple Geo maxes buffs. Counters Geo shields with Claymore or Overload. ER Noelle: 140-160%.
Steps:
Noelle Skill/Burst (shield and DPS).
Gorou Burst/Skill (DEF pump).
Yun Jin Burst (Normal DMG).
Albedo Skill (off-field Geo).
Noelle Attacks; 15s cycle, shield steady.
Why Geo Teams Are Underrated in Current Abyss
Top interruption resistance in mob waves. Husk 4pc +80% DEF after Skill. C6 Noelle flips DEF to ATK; Gorou C4 heals and offends.
Break wooden shields with Xiangling Pyro Burst or Overload. Claymore connects hard.
Defensive Advantages and Interruption Resistance
Noelle's 100% uptime shield. +15% DMG for high-HP foes. Vs. Fatui, shields counter efficiently.
Position for Crystallize EM shields—smart play.
Scaling Potential and Investment Payoff
Level 90 +10% reaction DMG. 7M Mora for 36 stars. Noelle: 4pc Husk (DEF% Sands, Geo DMG Goblet, Crit DMG Circlet); Whiteblind (DEF).
Substats: DEF% > ER 160%+.
Specific Floor 12 Scenarios Where Geo Excels
Shielded bosses. Counters Cryo/Hydro application. Sub Fischl for Albedo (Electro variant, 10% DPS drop).
Budget Alternatives (Replacing Limited 5-Stars)
All F2P. Yun Jin high ER for Burst; multi-element friendly.
Performance Comparison: Underutilized vs Meta Teams
These hit 70-80% meta DPS—National at 40k vs. Hu Tao's 50k—with 90s Floor 12 clears. Half the investment (7M Mora). Hyperbloom's 30k per trigger? Transformative scaling based on the data.
Examples:
National: AoE Vaporize tops Neuvillette single-target.
Taser: Multi Electro-Charged outpaces Freeze mobs.
Hyperbloom: EM budget beats Crit meta.
Reverse Melt: 1.5x Melt edges Ganyu's aim shots.
Mono Geo: Shield break trumps Dendro niche.
Pick National for Floors 11-12 HP sponges, Taser for wave 10. Test ER for consistency. (Editor's view: Data shows these close the gap without whale spending—refreshing.)
Clear Time Comparisons (Data Tables)
National: 2:30 bosses. Taser: 2:00 multi. All under 3 min vs. meta's 2:15. F2P at AR45; meta's 20% edge isn't needed for 36 stars.
Investment ROI Analysis
7M Mora/418 Wit per team. Artifact farm after levels.
Situational Advantages of Each Team
National for AoE. Taser multi. Hyperbloom single. Reverse Melt Cryo-weak. Mono Geo shields.
When to Choose Off-Meta Over Meta
F2P or low-spenders. 70% efficiency, less resin when 5-stars are scarce.
Common Mistakes When Building These Teams
Neglect ER? That's 40-50% DPS gone. Ignoring particles? Downtime city. Crimson Witch lags behind Emblem (+75% Burst vs. 15% Vaporize). In National, no ER Sands halves Xiangling uptime; Taser knockback scatters your squad.
Fixes:
ER 180-220% with Favonius (30% Crit particles).
Emblem/VV over niche sets.
20s rotations, Bennett pre-Xiangling snapshots.
Burst talents 8+; skip Electro in Freeze.
Energy Recharge Miscalculations
Under 160% ER kills flow. Use resonance +20% bonus, Bennett as battery. Simulator for 20s funneling.
Incorrect Artifact Set Choices
Emblem's versatile. CW only for Overvape. ER subs first, 1:2 Crit; farm AR45 domains.
Suboptimal Rotation Execution
Bad timing? 20-30% DPS loss. No Sucrose grouping in Taser. Pre-cast on spawns; quick-swap cancels.
Underestimating Constellation Impact
C1 Bennett's key. Xiangling C4 extends. Standard banner targets; free Collei from Floor 4-3.
Investment Guide: Building Your First Underutilized Team
Kick off with National: 7M Mora, 418 Wit per character. Weapons to 90 first, levels 80/90, Burst/Skill 8. Farm Emblem/VV at AR45; craft The Catch/Thrilling Tales (48% ATK).
6/8/8 talents min; Level 90 +10% reactions.
Steps:
Core Bennett/Xingqiu.
Craft AR45 weapons.
ER/ATK Sands, Elem DMG Goblets.
Test Abyss; pivot to Hyperbloom post-Dendro.
AR20-35: Basic reactions. 35-45: Second team. 45+: Artifacts.
Resin Efficiency and Artifact Domain Priority
Emblem first for Xiangling. 5-star every 5 runs; 50% CR/100% CD. Substats ER > EM/Crit; flats early.
Weapon Acquisition Strategies (F2P Options)
Craft The Catch (Xiangling BiS), Prototype Rancour (Bennett). Event refines. Skip banners; C1 Bennett goal.
Talent Level Priorities
Burst 8+ on Xiangling/Rosaria. 7M Mora total.
Progression Roadmap (Early to Late Game)
Early: One team. Mid: Reactions. Late: ER/strategies for Floor 12.
Future-Proofing: Will These Teams Remain Viable?
They adapt to 6.0 Dendro with EM for Lunar-Bloom; National/Taser/Hyperbloom scale to 36 stars. Sucrose fits Nod-Krai; Mono Geo handles +50-150% HP at 70-80% efficiency.
Update transformative EM. Test bi-weekly rotations; hybrids last long-term. (Quick thought: In a game that evolves fast, these feel evergreen—low risk, high reward.)
Adaptability to New Abyss Rotations
Flexible apps. Hyperbloom tames self-damage.
Synergy with Upcoming Characters
EM pairs with Dendro. Kuki opens slots.
Long-Term Investment Value
F2P 36 stars with optimal stats. No pull exhaustion.
FAQ
What makes a Genshin Impact team composition underutilized?
Low usage (Sucrose 44%) but 70-80% meta DPS via Vaporize (2x) with F2P 4-stars for Floor 12.
Can off-meta teams clear Spiral Abyss Floor 12 with 36 stars?
Yes, National/Hyperbloom <3 minutes at Level 80/90, Talent 8+, 160-220% ER, +150% HP coverage.
Why are some powerful Genshin teams overlooked by the community?
Bias to 5-stars ignores F2P; Taser 30,000+ Electro-Charged rivals meta, lower ownership from knockback (fix with positioning).
What is the best underrated team for Spiral Abyss?
National for AoE Vaporize (40,000+ DPS) since Version 1.0; free Xiangling, 7M Mora, Emblem for Floors 9-12 36-stars.
How much investment do underutilized teams need for Abyss?
7M Mora, 418 Wit per character for Level 80/90, Talent 8+; ER 180% Sands, F2P The Catch, half 5-star cost for 70-80% output.
Are 4-star teams viable for current Spiral Abyss?
Yes, Mono Geo breaks shields with +15% resonance, Floor 12 2:30 clears; VV/Emblem, 200% ER vs. high-HP.
✅ Official direct recharge, 100% secure
✅ No waiting – top-up arrives in 7 seconds
✅ Big discounts, low prices to save more
✅ 7×24-hour customer service, ready to assist anytime