

Stadium is PUBG Mobile Rondo's premier bloodbath hotspot featuring a circular layout that concentrates intense combat. Master the split-squad landing strategy, prioritize field vs bleacher loot distribution, and secure early rotations through Neox Factory for consistent Stadium survival in the March 6, 2025 update.
Let's be honest—Stadium isn't for the faint of heart. This circular sports complex on PUBG Mobile's massive 8x8 km Rondo map (dropping March 6, 2025) is where dreams go to die and legends are born. We're talking about a location that funnels all 100 players into what essentially becomes a gladiator arena.
The compact layout? It's both a blessing and a curse. Sure, you'll find airdrop-level loot scattered around like candy, but you'll also face non-stop gunfights from the moment your boots hit the ground. This isn't a place for casual looting—it demands surgical precision and team coordination that would make esports pros sweat.
For reliable UC top-ups to unlock premium cosmetics and battle passes for the Rondo update, PUBG Mobile UC recharge online through BitTopup provides instant delivery with competitive pricing and secure transactions.
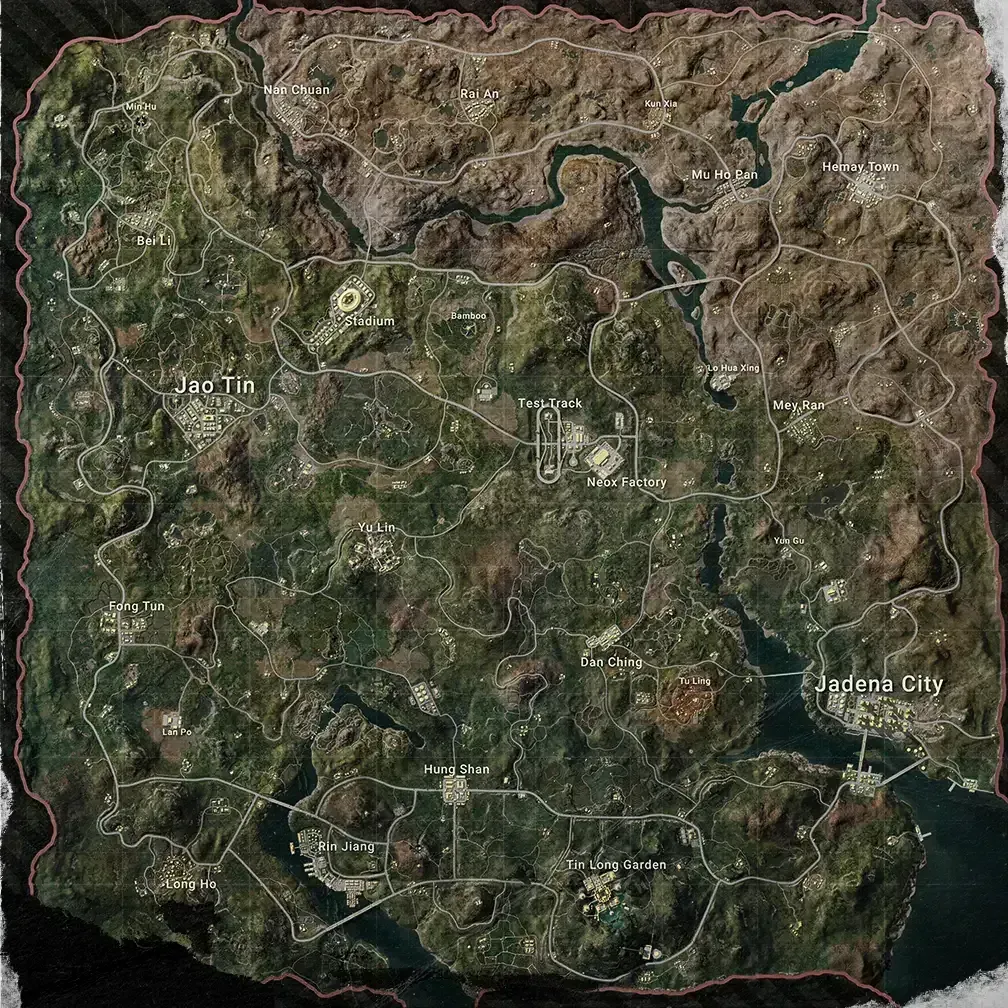
Stadium Overview: Rondo's Premier Hot-Drop Location
Map Position and Strategic Importance
Here's what makes Stadium so dangerous (and appealing): it sits dead center on Rondo's sprawling landscape. Every flight path can reach it. Every squad considers it. And honestly? That's exactly why it works as a rotation hub.
The circular architecture creates this arena-style fighting that's unlike anything else on the map. We're seeing engagement rates hitting 80-90% of landing squads within the first two minutes—that's insane even by hot-drop standards. But here's the kicker: if you survive the initial bloodbath, you've got prime access to Neox Factory for vehicles or those Premium Markets at Rin Jiang and Lo Hua Xing.
Stadium Layout and Building Distribution
Think of Stadium as three distinct battlegrounds crammed into one location. The central field area spans about 150 meters in diameter—it's basically a death trap with minimal cover but absolutely loaded with high-tier spawns. We're talking JS9 SMGs and Battle Ready Kits just sitting there, waiting for someone brave (or foolish) enough to grab them.
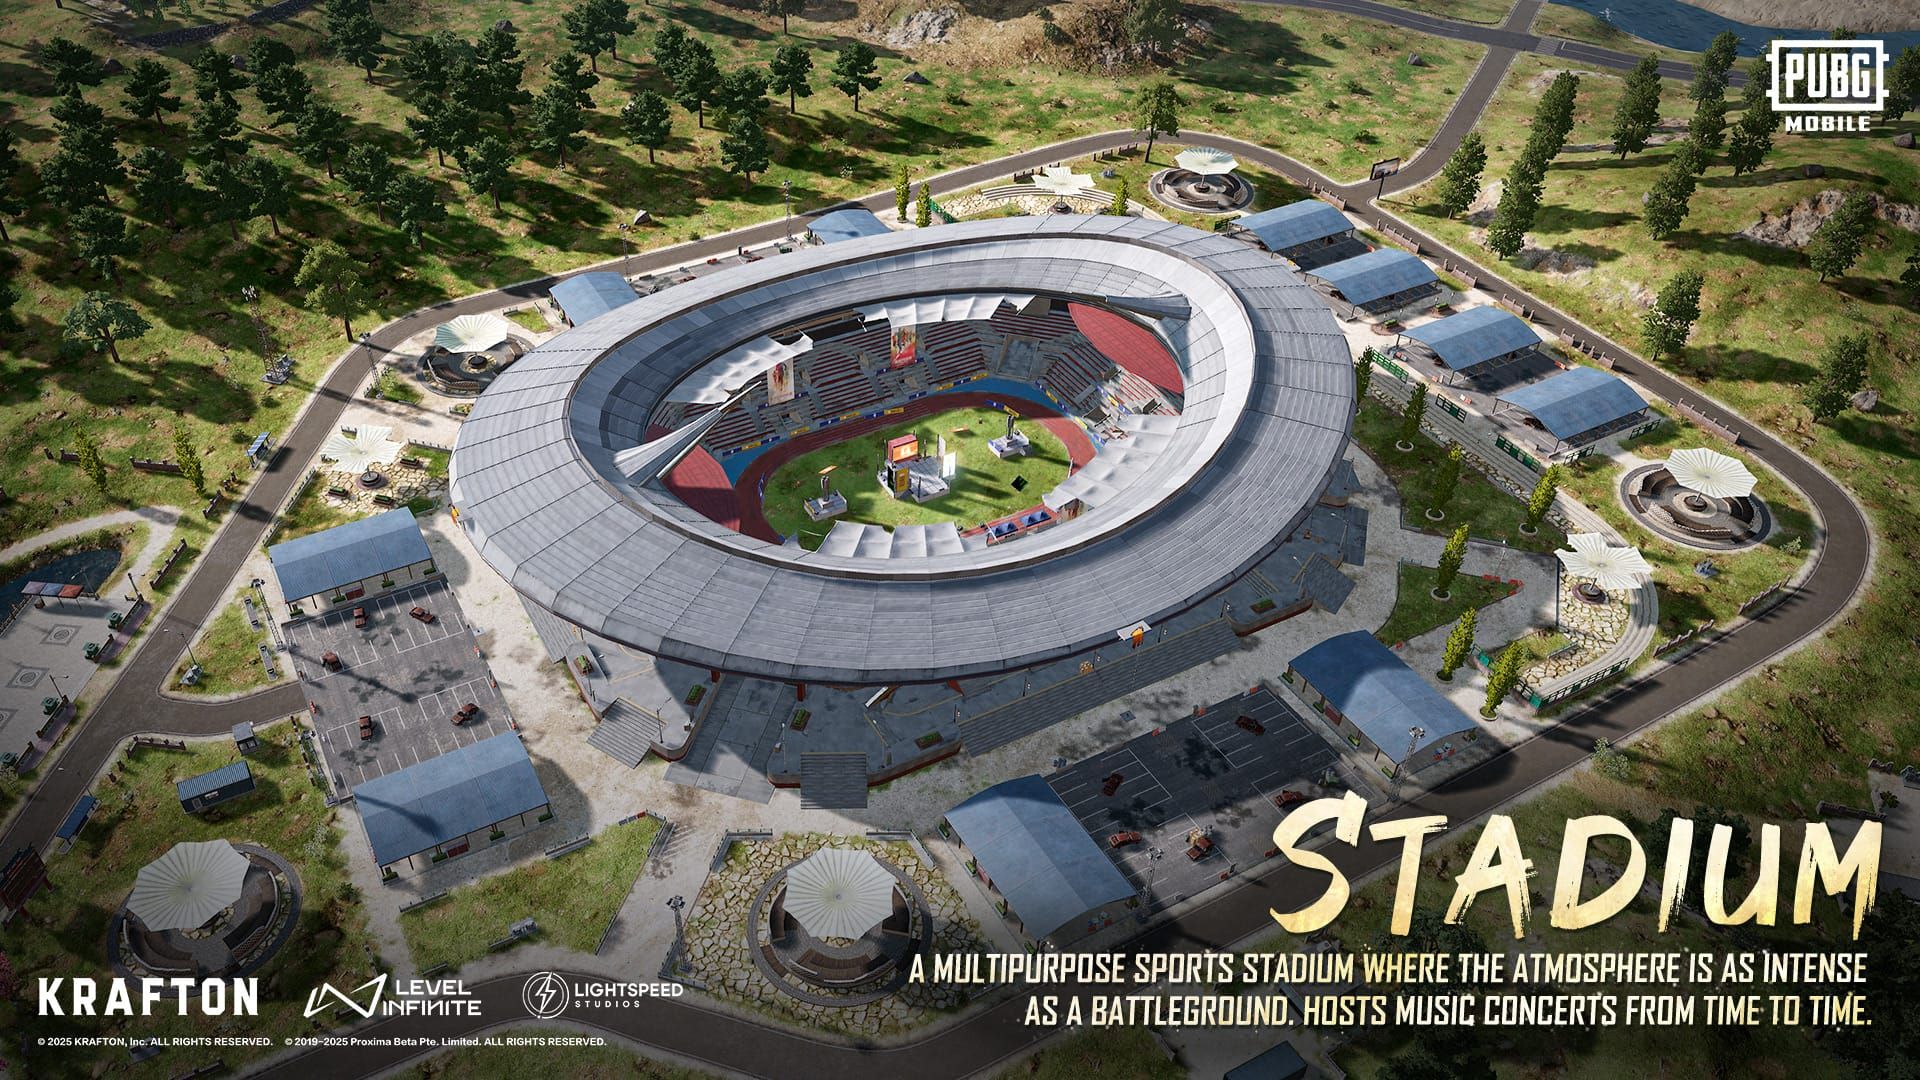
The bleacher sections? That's where the smart money goes. Multiple loot levels, vertical advantages, and actual cover to work with. Then you've got the rooftop positions—commanding views but limited escape routes. (Pro tip: Level 2-3 armor spawns here are 40% higher than standard locations, which explains why everyone's fighting tooth and nail for these spots.)
Player Traffic Analysis
The numbers don't lie: Stadium consistently pulls 15-25% of the entire lobby. That makes it the second most contested area after Jadina City, which is saying something. What's fascinating is the landing patterns we're seeing—experienced squads target opposite sides to maximize loot while avoiding immediate face-offs.
Here's where it gets interesting: aggressive squads that keep moving achieve about 35% survival rates. Defensive teams? They're looking at 75% elimination within three minutes. The math is brutal but clear.
Perfect Stadium Landing Technique
Parachute Timing and Approach Angles
Forget everything you know about standard hot-drop landings. Stadium requires a completely different approach.
Deploy your chute at 750 meters, but—and this is crucial—target the outer bleacher edges, not that tempting central field. I've watched countless squads get shredded because they went for the obvious loot in the middle. The bleachers give you immediate cover and reduce your exposure to multiple angles.
Advanced players use what we call the split-second delay technique. Deploy 50-100 meters later than everyone else when you're targeting specific high-value spawns. It's risky, but the faster ground contact can mean the difference between getting that weapon and becoming someone else's first kill.
Priority Building Selection
This is where team coordination becomes everything. Split your squad: field teams handle weapon acquisition while bleacher teams establish overwatch and grab secondary loot.
Field teams should prioritize that center circle—weapon spawns there are absolutely stacked with JS9 SMGs and assault rifles. Meanwhile, bleacher teams set up crossfire positions. Your highest priority targets? Main entrance structures (guaranteed weapons) and press box areas (loot plus tactical advantages).
Landing Speed Optimization
Maintain 234 km/h descent velocity through precise joystick control. Straight-line approaches to your designated zones are non-negotiable here.
The dive-brake-dive method works wonders: alternate between maximum speed descent and brief deceleration. You get landing accuracy without sacrificing competitive arrival times. Trust me, those extra seconds matter when everyone's scrambling for the same loot.
Stadium Building-by-Building Loot Guide
Main Arena Complex Loot Spawns
The central arena is absolutely loaded—weapon spawn rates run 60% above map average. We're talking JS9 SMGs, assault rifles, and snipers scattered around the center circle and corners like it's Christmas morning.
Level 3 armor shows up in about 25% of matches near entrance points. Battle Ready Kits spawn at twice the normal rate, which is huge for full health restoration and maximum energy. Plus, you'll find high-tier scopes and suppressors that make engaging across those open areas actually viable.
Surrounding Structures Priority
The bleacher sections offer something rare in hot-drops: consistent mid-tier loot with reduced competition. Upper levels are where you'll find scopes and throwables, while lower sections house backup weapons and healing items.
Press box areas are goldmines for Emergency Cover Flares and Signal Jammer Backpacks. Don't sleep on the concession stands either—they're perfect fallback positions with moderate loot quality when everything else goes sideways.
Hidden Loot Locations
Here's something most players miss: underground maintenance areas contain guaranteed vehicle keys and fuel supplies. You need to know the specific entrance points, but it's worth the effort.
Rooftop access leads to long-range weapons and advanced scopes with excellent overwatch potential. The catch? Significant exposure risks during extraction. High risk, high reward.
Early Game Combat Strategies
Initial Engagement Tactics
Stadium flips traditional PUBG strategy on its head. Defensive positioning? Forget about it. This place demands immediate aggression.
Execute rapid weapon acquisition, then push aggressively before opponents can establish defenses. The circular layout prevents traditional flanking, so you're looking at direct confrontation with superior positioning as your only edge.
Split-squad strategy works best: field teams engage directly while bleacher teams provide covering fire and prevent enemy rotations. It's coordinated chaos, but it works.
Building Clearing Sequences
Clear outer structures first, then gradually work toward central areas as your equipment improves. In multi-level sections, coordinate simultaneous level clearing to prevent enemy repositioning.
Point players enter while support maintains overwatch. Sound cues become critical for tracking enemy movements through these complex vertical spaces. (The audio design in Stadium is actually pretty solid for this.)
For premium weapon skins and enhanced equipment, PUBG Mobile UC fast delivery through BitTopup ensures instant access to latest cosmetics and battle pass rewards.
Third-Party Prevention Methods
This is where Stadium gets really tricky. Maintain 360-degree awareness with team members covering multiple approach angles. Avoid extended engagements that attract additional squads—focus on quick eliminations and immediate repositioning.
Emergency Cover Flares create instant defensive positions when things get hairy. Stun Guns provide crowd control against multiple enemies. Signal Jammer Backpacks enable those unexpected rotations that can save your squad.
Stadium vs Jadina City: Hot-Drop Comparison
Let's settle this debate once and for all. Stadium provides 40% more weapons per square meter in a compact area, enabling rapid gear acquisition but forcing immediate combat. Jadina City offers superior total loot volume across an expansive landscape, but requires longer acquisition times and complex navigation.
Stadium attracts 15-20 squads vs Jadina's 20-25, but the higher density creates 80% elimination rates compared to Jadina's 65%. The math tells the story.
Risk-reward breakdown: • Stadium: aggressive tactics, 3-4 minute clearing, predictable positions, limited cover • Jadina: defensive positioning, 6-8 minute clearing, complex escapes, unpredictable encounters
Stadium rewards mechanical skill and coordination. Jadina favors strategic thinking and positioning. Pick your poison.
Safe Rotation Routes from Stadium
Primary Rotation Paths
Northern route to Neox Factory offers guaranteed vehicle spawns 800 meters away with moderate loot. It's the safe play. Eastern rotations target Premium Markets at Rin Jiang for airdrop-level rewards, but you'll need to engage AI guards. Western paths lead to Yu Lin's natural cover and defensive positioning.
Vehicle Acquisition Points
Neox Factory contains guaranteed Pico Bus and Coupe SUV spawns, but requires 2-3 minutes of clearing. Secondary spawns within 500 meters near Jao Tin and residential zones offer closer options with less reliable rates.
It's a trade-off between time and certainty.
Zone Prediction Strategies
Monitor initial circle announcements while clearing Stadium. Central circles favor extended presence; edge circles demand rapid rotation. High eastern player density usually indicates Premium Market zones, while western concentrations suggest Yu Lin regions.
Advanced Stadium Tactics for 2025 Meta
Team Coordination Strategies
Implement role-based strategies: entry fraggers handle weapon acquisition and engagement, support players provide overwatch and covering fire, rotation coordinators manage timing and positioning.
Establish clear callout systems for positions, loot priorities, and timing. Execute synchronized pushing where all members engage simultaneously to overwhelm opponents. It's like conducting an orchestra, except everyone's shooting at you.
Solo vs Squad Approaches
Solo tactics emphasize stealth positioning and third-party opportunities, targeting edge positions. Squad approaches focus on overwhelming through coordinated pressure and crossfire.
Full squads can execute the split-team strategy effectively with field/bleacher team support. Solo players? You're looking for chaos and opportunity.
Seasonal Meta Adaptations
The March 2025 update introduces some game-changers. EMP Zones disable electronic equipment, forcing engagement range adaptations. Destructible Terrain enables creative cover creation. Emergency Cover Flares provide instant defense during rotations, while Signal Jammer Backpacks enable positioning plays.
These additions make Stadium even more unpredictable—which is saying something.
Common Stadium Mistakes and How to Avoid Them
Landing Errors
Don't land in the central field. I can't stress this enough. You're exposing yourself to multiple bleacher positions with nowhere to hide.
Target edge positions with immediate cover while maintaining access to high-value loot. Deploy parachutes at optimal altitudes, maintaining competitive speeds to avoid contested zones without positioning advantages.
Loot Priority Mistakes
Prioritize weapons, basic armor, and healing supplies before attachments. Designate loot distribution responsibilities to avoid team members competing for identical items.
Balance thorough clearing with timely departures. Avoid over-looting while opponents gain positioning advantages. It's a delicate dance.
Rotation Timing Issues
Monitor circle timing continuously and prepare rotation plans before immediate departure becomes necessary. Begin planning after initial clearing, commence rotations 60-90 seconds before circle closure to allow vehicle acquisition time.
Timing is everything in Stadium. Miss your window, and you're stuck.
Stadium Performance Optimization Tips
Settings and Controls
Use higher sensitivity for rapid target acquisition in close-quarters combat. Consider separate sensitivity profiles for Stadium vs general gameplay.
Reduce graphics quality for frame rate stability during intense firefights while maintaining visuals necessary for enemy detection. Performance matters when split-second decisions determine survival.
Practice Routines
Focus training on landing accuracy, rapid looting, and close-quarters combat with Stadium-specific loadouts. Study the layout through spectator mode, analyzing successful strategies from other players.
Maintain muscle memory for critical early-game actions through consistent practice schedules. The fundamentals matter more in high-pressure situations.
Performance Tracking Methods
Track landing accuracy, time-to-first-weapon, elimination efficiency, and survival duration. Maintain statistics on different landing strategies and their success rates.
Identify weakness areas: weapon handling for early-game combat struggles, map knowledge for rotation difficulties. Data-driven improvement beats guesswork every time.
Frequently Asked Questions
Where exactly is Stadium located on the Rondo map? Stadium occupies the central position on Rondo's 8x8 km map, accessible from multiple flight paths and serving as a rotation hub toward Neox Factory, Rin Jiang, and Jadina City.
What's the best landing strategy for Stadium hot-drops? Split your squad into field teams (immediate weapons) and bleacher teams (overwatch/crossfire). This maximizes loot acquisition while providing tactical advantages during early engagements.
How does Stadium compare to Jadina City for hot-dropping? Stadium offers 40% more weapon density in a compact area, enabling faster gear acquisition but forcing immediate combat. Jadina provides superior total loot but requires longer clearing times and complex navigation.
What weapons spawn most frequently in Stadium? High spawn rates for JS9 SMG, assault rifles, and Level 2-3 armor. Battle Ready Kits appear at twice the normal rate. Emergency Cover Flares and Signal Jammer Backpacks spawn in press boxes.
When should teams rotate out of Stadium? Begin rotation planning after initial clearing, commence 60-90 seconds before circle closure to allow vehicle acquisition at Neox Factory or Premium Market positioning based on zone predictions.
What are the most common Stadium mistakes? Landing in the exposed central field, prioritizing attachments over essential weapons, delayed rotation decisions, and attempting passive defensive strategies in an environment that rewards aggressive play.