

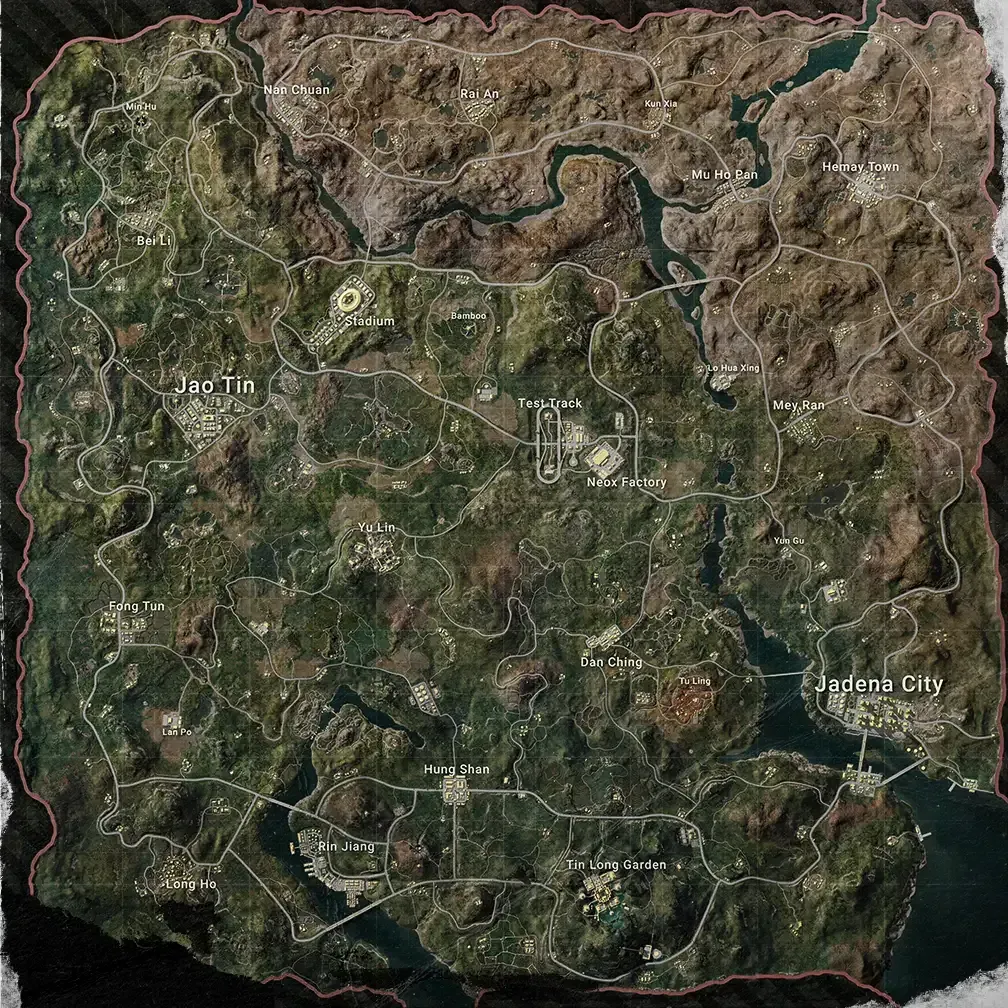
Quick Answer: Rondo's massive 100-player battlefield hides 15+ devastating sniper positions—think desert ridge-to-compound lines stretching 400-600m and those jaw-dropping cross-lake shots from Coastal Cliffs. The money spots? Central Oasis banks for picking off water crossers, surrounding desert ridges for urban compound hunting, and those sneaky elevated positions near Jadina City where you can use escalators to vanish after your shot.
Rondo Map Overview: Why This Terrain Was Built for Snipers
Here's the thing about Rondo—it's PUBG Mobile's largest playground, and whoever designed it clearly had long-range enthusiasts in mind. That Central Oasis isn't just pretty scenery; it's a sniper's dream with vegetation and water creating perfect cross-lake opportunities. Meanwhile, the surrounding desert? Pure gold. Open sightlines everywhere, with strategically placed dunes and rock clusters that give you clean angles into those perimeter settlements at distances that'll make your targets wonder what hit them.
Quick gear note here—if you're serious about dominating these positions, PUBG Mobile UC for room card purchases through BitTopup keep you stocked with premium weapon skins and attachments. BitTopup's got competitive pricing, instant delivery, and customer support that actually knows what they're talking about.
Now, those Coastal Cliffs? Absolutely brutal for long-range picks, but here's the catch—you're basically committed once you're up there. Limited escape routes. Desert ridges offer way more flexibility with multiple extraction paths while still giving you those commanding views of urban compounds. And don't sleep on Industrial Zone warehouses—perfect for DMR ambushes where you can lock down entire container lanes.
Ridge-to-Compound Sniper Lines: 8 Positions That'll Change Your Game
North Ridge: The Crown Jewel
Northwestern desert ridges overlooking urban settlements—this is where legends are made. We're talking reliable eliminations at 500 meters from target compounds. Use that 4x scope's bottom triangle for 300m shots, 400m notch for the longer stuff. Pro tip: motorcycle access via those narrow desert paths, then park behind rock formations. Nobody expects the desert ghost.

Get yourself on the highest dune cluster northwest of major compounds. Peek and Fire is your best friend here—open desert doesn't forgive exposure mistakes. Keep that Emergency Cover Flare ready because when someone counter-snipes, you'll need it. The beauty of this position? Clear sightlines into compound windows and rooftops where players get careless while looting.
East Ridge: The Multi-Target Paradise
This is where things get interesting. Eastern ridges give you angles into multiple compound clusters simultaneously—perfect for squad-based operations. The terrain elevation here is chef's kiss for 400-600 meter shots. Those 4x scope markings with 400m and 600m notches become your bread and butter for bullet drop compensation.
Real talk though—M24 and Kar98K need body shot follow-ups against Level 2+ armor. AWM? That's your one-shot headshot guarantee. Coordinate with teammates running DMRs for those satisfying follow-up shots during mid-game rotations. And always—always—carry extra fuel cans. Plan those extraction routes avoiding EMP Zone areas because nothing's worse than being stranded with a dead engine.
Cross-Lake Long Shots: When Water Becomes Your Ally
Coastal Cliff Mastery
Coastal Cliffs deliver those Instagram-worthy 600+ meter eliminations across water bodies. Here's your range bible: map tile measurements (100 meters per small white tile). 6x and 8x scopes become non-negotiable with these sensitivity sweet spots—6x at 15-25%, 8x at 10-20%. Enable gyroscope for those micro-adjustments when leading moving targets.

Lead running players by one body width at 500+ meters. Use that 600m marking on 4x scopes for maximum-range water shots. Circle management becomes critical here—monitor movement and pre-plan extraction via underground tunnels. EMP Zone activation near cliff positions? You're trapped without engine access.
Central Oasis Banks: The Flexible Option
Central Oasis banks offer something the cliffs don't—options. Multiple escape routes through vegetation cover, palm trees and rock formations for concealment while you scan opposite banks. Water crossings create those beautiful, predictable movement patterns. Pre-aimed shots at emergence points? Chef's kiss.
Suppressor attachments aren't optional here—they're survival tools. Central areas mean high player density, and unsuppressed shots? That's basically sending invitations to every nearby squad for a coordinated push.
Essential Equipment: Your Sniper's Toolkit
Weapon Selection That Actually Matters
AWM dominates with one-shot headshot capability against Level 3 helmets. Worth contesting airdrops despite limited ammo—trust me on this. M24 provides superior damage with 2-shot body elimination against Level 1-2 armor. Kar98K offers common ammo spawns for sustained engagements.
For maintaining that competitive edge, PUBG Mobile UC for name change card and premium purchases through BitTopup ensure uninterrupted access to essential resources. BitTopup's secure payment processing, 24/7 support, and competitive exchange rates maximize your UC purchasing power.
DMRs like MK14 and Mini 14? Absolute monsters in ridge-to-compound scenarios requiring quick finishing shots. Extended magazines prevent those vulnerable reload moments.
Scope and Attachment Reality Check
6x and 8x scopes define Rondo's long-range meta. Availability determines positioning success—secure through compound looting or shop purchases using currency from sold attachments and gold bars. Suppressors reduce audio signature and muzzle flash for position secrecy during multi-elimination sequences.
Pro tip: collect gold bars from compound safes, sell excess attachments at basic stores, then purchase essential scope and suppressor combinations.
Step-by-Step Positioning: The Method Behind the Madness
Safe Rotation Without the Paranoia
Vehicle-based rotations via river paths and bridge crossings minimize exposure while maintaining contingency routes. Approach target ridges from unexpected angles—park vehicles behind natural cover. Motorcycles excel for narrow desert paths; UAZ-type vehicles handle rough terrain for coastal cliff access.
Time rotations during circle transitions when other squads focus on zone movement. Early positioning allows optimal angle selection and range confirmation before target-rich opportunities develop.
Angle Setup That Actually Works
Establish firing positions using natural cover with Emergency Cover Flare as backup. Test range estimation using map tile measurements before engaging priority targets. Use 4x scope markings systematically: top triangle for 100m, bottom triangle for 300m, dedicated markings for 400m and 600m.
Crosshair placement at head level reduces target acquisition time. Combine with Peek and Fire settings for minimal exposure during shot execution.
Pro Tips: The Details That Separate Good from Great
Distance Calculation You Can Trust
Each small white map tile represents 100 meters—memorize this for precise scope marking alignment. Player models appear half-size at 200 meters, quarter-size at 400 meters through 4x scopes. Bullet drop requires significant compensation beyond 400 meters.
Practice scope marking usage in training mode with various weapons. Develop those instinctive compensation patterns.
Advanced Target Leading
Running players require one body width lead at 300 meters, increasing to 1.5 body widths at 500+ meters. Vehicle targeting demands increased lead compensation due to higher movement speeds. Calibrate gyroscope sensitivity to complement scope ADS settings—avoid overcorrection during critical shots.
Common Mistakes (And How to Not Be That Player)
Positioning Errors That Kill
Over-staying exposed positions leads to elimination. Period. Use escalator systems for rapid repositioning after each shot, breaking line-of-sight through alley networks. EMP Zones disable electronic scope reticles and vehicles, forcing iron sight usage and on-foot extraction.
Change firing positions after 1-2 eliminations to prevent enemy triangulation. Use terrain destruction via pickaxe to create new sightlines and escape routes.
Equipment Failures That Hurt
Monitor fuel gauges constantly. Carry extra fuel cans for extended rotations on Rondo's massive terrain. Use recommended sensitivity ranges: 4x scope 20-30%, 6x scope 15-25%, 8x scope 10-20%. Prioritize suppressor acquisition through shop purchases or compound looting before establishing long-range positions.
Counter-Strategies: When You're on the Receiving End
Smoke and Movement Intelligence
Deploy smoke grenades at choke points before crossing terrain vulnerable to ridge snipers. Create multiple smoke screens to obscure movement patterns. Use zig-zag movement combined with Emergency Cover Flare when caught without natural cover.
Underground tunnel networks provide safe rotation alternatives to surface movement, allowing repositioning behind sniper locations.
Aggressive Counter-Positioning
Vehicle-based rushes can overwhelm static sniper positions before reload cycles complete. Coordinate squad approaches from multiple angles using terrain cover. Time aggressive pushes during EMP events to trap snipers without mobility.
Establish counter-sniping from alternative ridges creating crossfire scenarios favoring mobile teams.
Tournament Application: Taking This Competitive
Professional Team Coordination
Establish early ridge control through coordinated drops near vehicle spawns like Neox Factory. Assign specific roles: primary sniper with bolt-action, secondary with DMR, support for close-range pressure. Communicate enemy health status after sniper tags for efficient elimination sequences.
Save Battle Ready Kit consumables for final circle positioning when ridge holds become critical for placement points.
Risk Assessment and Smart Timing
Premium store contestation at locations like Renang provides airdrop-level loot including potential AWM access. Avoid Coastal Cliff positioning when circle trends away from water areas. Plan ridge positioning based on circle probabilities and maintain fuel reserves for emergency repositioning.
FAQ
What's the optimal scope for ridge-to-compound shots on Rondo? 4x scope provides the best balance for 400-600m shots. Use 400m and 600m markings for bullet drop compensation. 6x and 8x work for extreme range but reduce target acquisition speed.
How do I counter EMP Zones when sniping from ridges? Monitor EMP notifications and evacuate preemptively. EMP disables electronic scopes and vehicle engines. Plan escape routes through underground tunnels before activation.
Which weapons work best for cross-lake shots from Coastal Cliffs? AWM provides one-shot headshot capability at any range. M24 offers reliable 2-shot body elimination. Pair with 6x or 8x scopes and suppressor.
How do I safely rotate to desert ridge positions? Use vehicle rotations via river paths and bridge crossings. Approach from unexpected angles, parking behind rock formations. Time rotations during circle transitions.
What sensitivity settings work best for long-range Rondo shots? 4x scope 20-30%, 6x scope 15-25%, 8x scope 10-20%. Enable gyroscope for micro-adjustments and use Peek and Fire for minimal exposure.
How do I estimate range accurately for scope compensation? Each small white map tile equals 100 meters. Players appear half-size at 200m, quarter-size at 400m through 4x scopes. Practice in training mode for muscle memory.