

Master Karakin's 13 underground bunkers with precise sticky-bomb breaching techniques, optimal rat angles, and strategic exit timing. Learn damage values, tunnel identification methods, and advanced positioning tactics for competitive tunnel warfare dominance.
Understanding Karakin's Underground Tunnel System
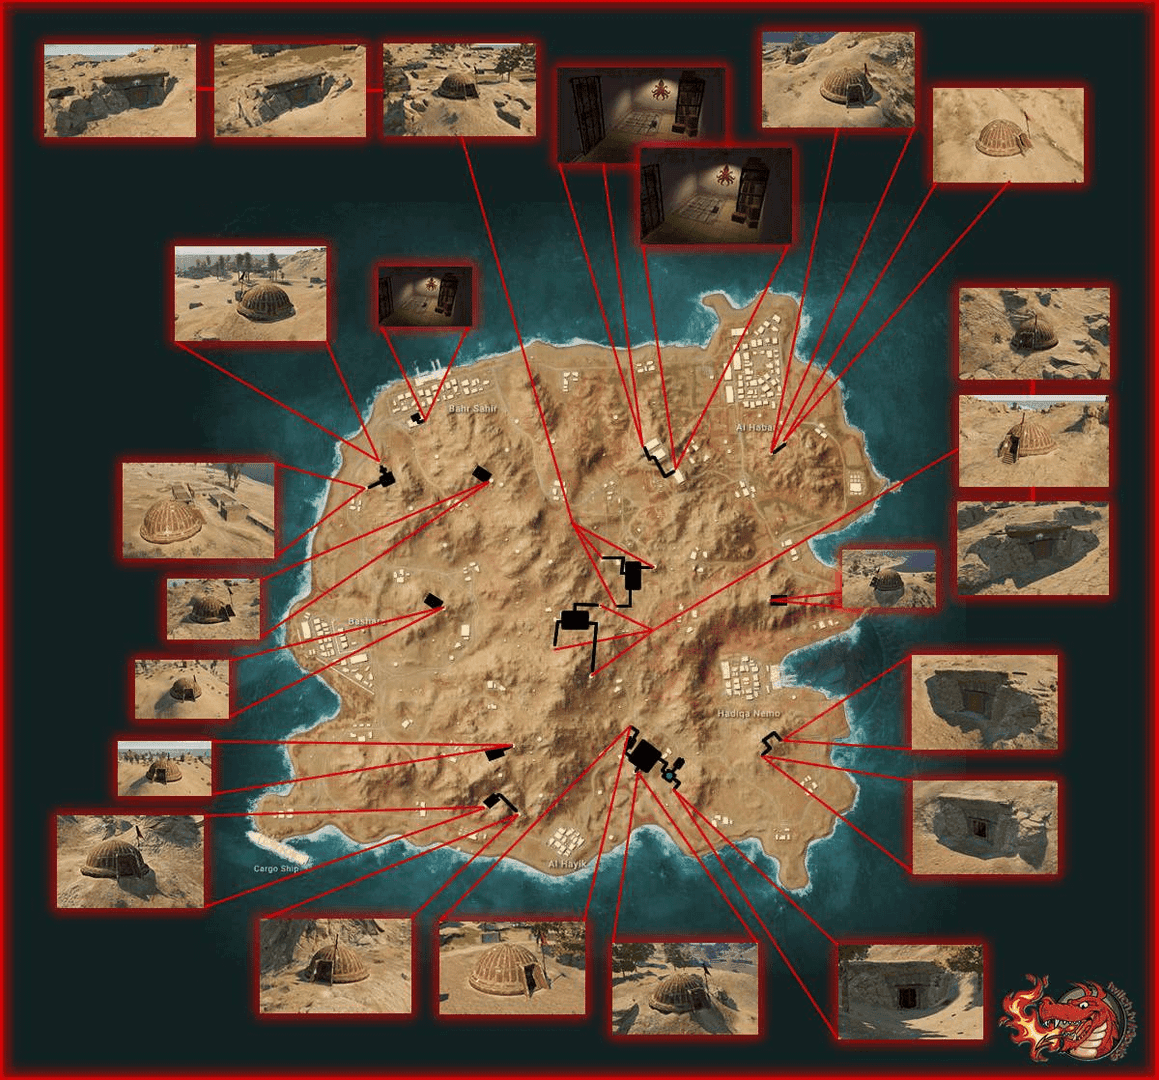
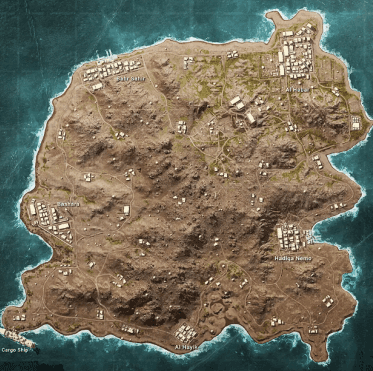
Tunnel Network Layout
Here's what most players miss about Karakin's underground game: this isn't just about finding loot. The 2x2 km map packs 13 underground bunkers that completely change how you approach rotations and positioning.
You've got three distinct tunnel types to master. Three-way networks? These are your goldmines – highest loot concentration plus multiple escape routes when things go sideways. Two-way tunnels offer that sweet spot of dual entry points without overcommitting your team. Then there are the dead-end bunkers. Risky? Absolutely. But they're hiding the best gear, sometimes extending three floors deep with underwater passages that'll either save your match or get you eliminated trying to navigate them.
(Personal note: I've seen too many squads get trapped in those underwater sections during late circles – always have an exit strategy.)
Breach Mechanics Overview
Sticky bombs aren't just grenades with better adhesion. They're precision tools with specific damage falloffs you need to memorize: lethal within 3 meters, 70% damage at 3.5 meters, 25% at 4 meters, and useless beyond 5 meters.
The surfaces you can breach? Look for deteriorated wall sections, those floor panels beneath dome structures, and internal brick walls. Pro tip: Panzerfaust rocket launchers work too, but they're louder and harder to find.
For maximum Karakin performance, Royale Pass UC recharge PUBG Mobile through BitTopup ensures instant delivery and competitive pricing for premium battle pass rewards, exclusive weapon skins, and tactical advantages crucial for underground combat scenarios.
Strategic Importance
Control the tunnels, control the match. It's that simple.
These underground networks aren't just about avoiding surface fights – they're about forcing your opponents into predictable routes while you maintain flexibility. When the Black Zone starts destroying buildings, guess who's sitting pretty underground with multiple positioning options?
Sticky-Bomb Fundamentals for Tunnel Warfare
Damage Values and Mechanics
Let's talk numbers that actually matter in combat. That 3-meter lethal radius? It's not negotiable – anyone caught in there is done. The 3.5-meter range dealing 70 HP damage becomes crucial when you're fighting previously damaged enemies.
The 2-3 second delay isn't a bug, it's a feature. Use it for tactical repositioning or coordinating synchronized breaches that'll overwhelm defensive positions.
Optimal Placement Techniques
Placement separates good players from great ones. Target the center of breachable floor panels beneath those dome structures – you want maximum structural damage, not just noise. For internal tunnel breaches, focus on exposed brick sections. They're usually hiding the good stuff, including Panzerfaust spawns.
Combat applications? Don't throw directly at enemies. Place against walls and use that explosive radius around corners. Tunnel choke points become death traps with proper placement.
Timing Considerations
Early game: speed beats stealth. Get in, grab loot, get out before opponents arrive.
Mid-game timing requires zone awareness. You're not just looting anymore – you're positioning for rotations. Late game? High risk, high reward. With concentrated player populations, every breach could expose you to third parties.
Here's a trick most guides won't tell you: coordinate breaches with natural sound cover. Vehicle engines, gunfire, zone movements – use them to mask your explosive entry.
Complete Breach Path Guide
Northern Tunnel Breach Points
The northern sector is where aggressive teams make their mark. Four primary networks accessible through flagged bunkers and dome formations, with Hadiqa Nemo serving as your central hub.
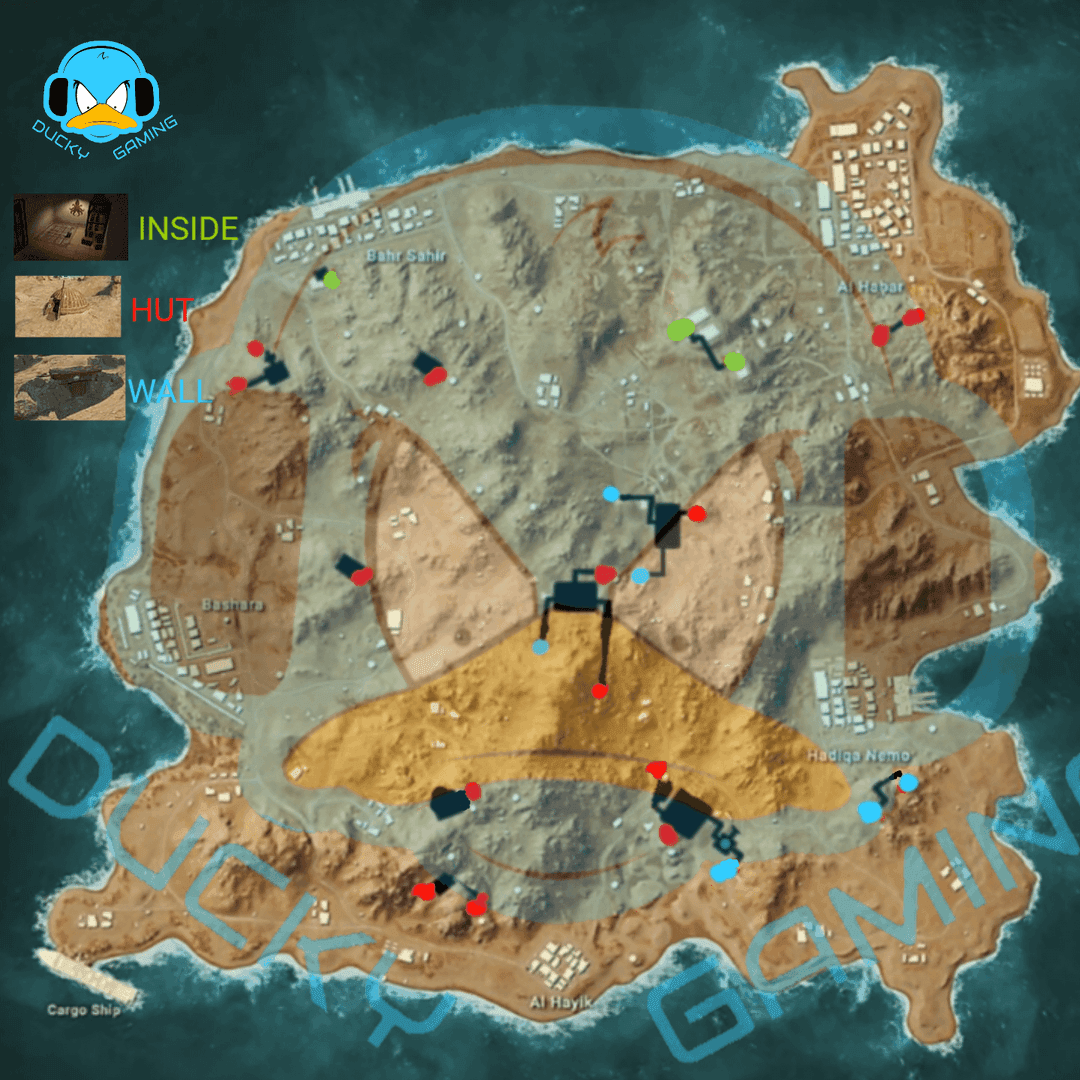
Your priority target: that concrete bunker 200 meters northeast of Hadiqa Nemo. Flag marker, intact dome structure, and usually uncontested in early drops. The northernmost bunker features a three-way network that'll connect you to central positions – perfect for mid-game rotations.
Central Underground Connections
This is where things get complex. The central system offers the most connectivity, but those underwater passages linking northern and southern sectors? They're both opportunity and trap.
Three breach opportunities here: main floor panel (sticky bomb), western wall (Panzerfaust or multiple sticky bombs), and that concealed entrance beneath the eastern compound. Most players miss the third option entirely.
Southern Sector Access Routes
Southern tunnels emphasize dead-end configurations, but here's why you should care: concentrated Panzerfaust spawns in secret brick chambers.
Key breach point sits 150 meters south of central compound – flag indicators, natural rock cover, and a secondary network connecting through underwater passages. Perfect for surprise flanking when the circle forces teams north.
Mastering Rat Angles and Positioning
High-Value Camping Spots
Let's address the elephant in the room: yes, we're talking about camping. But there's smart camping and there's feeding kills to better players.
Exploit bullet penetration on weak drywall surfaces. You're creating unexpected sightlines through walls that opponents don't expect. The most effective angles target tunnel exit points where enemies emerge into open terrain, completely exposed.
Prime locations? Junction points covering multiple entry routes simultaneously, positioned behind destructible walls with pre-made bullet holes for instant firing lanes.
PUBG Mobile UC for Premium Pass through BitTopup provides exclusive scope reticles and weapon attachments significantly improving rat angle effectiveness with instant delivery for immediate premium content access.
Angle Holding Techniques
Position at tunnel bends where opponents expose themselves before spotting you. Those narrow corridors limit escape options – use that to your advantage.
Pre-aim common peek angles while maintaining destructible wall cover. Sound cues become everything down here: footsteps, equipment usage, even breathing sounds for proximity determination. Learn to distinguish them.
Visibility Optimization
Stay in darker sections while maintaining sightlines on illuminated areas. Opponents become silhouettes against lighter backgrounds.
Red dot sights for close-quarters, 2x scopes for longer tunnel sightlines. And here's something most players ignore: adjust your brightness settings specifically for underground visibility. It makes a difference.
Exit Timing Strategies by Game Phase
Early Game Tunnel Usage
Get in within the first 2-3 minutes, secure high-tier equipment (especially Panzerfaust weapons and level 3 gear), then get out. Exit timing should align with initial zone announcements to maintain optimal rotation positioning.
Monitor surface activity through audio cues. Time your exits during reduced opponent presence, and always have smoke grenades ready for cover.
Mid-Game Rotations
This phase is about efficiency, not loot. Enter during zone transitions to avoid surface engagements and third-party situations. Use underground networks to reach optimal circle positions ahead of surface opponents.
The Black Zone becomes your friend here – you're safe from building destruction while maintaining rotation flexibility.
Late Game Positioning
Extreme caution required. Concentrated populations and limited circle space make extended tunnel occupation dangerous.
Use tunnels for final positioning adjustments rather than extended camping. Exit timing becomes critical – coordinate with zone movements and opponent positioning, staying concealed until the last possible moment.
Advanced Tunnel Combat Techniques
Close-Quarter Engagement
Pre-firing around corners gives you engagement advantages in narrow corridors where escape options are limited. Shoulder peeking gathers intel while minimizing exposure.
SMGs and shotguns dominate confined spaces. But here's the secret weapon: Panzerfaust offers devastating close-range potential with 4-meter lethal radius and only 25 HP self-damage. Risk-reward ratio heavily favors aggressive plays.
Throwable Usage
Cook grenades for precise timing that prevents escape. Use wall bounces to reach corners and concealed positions. Molotov cocktails excel at area denial in narrow passages – one well-placed molly can control an entire corridor.
Smoke grenades serve dual purposes: concealing repositioning movement and blocking sightlines during healing operations.
Sound Management
Audio awareness becomes paramount where visual information is limited. Learn to distinguish footstep surfaces for positioning and movement direction intel.
Crouch-walking minimizes audio signatures while maintaining reasonable speed. Designate one team member as primary audio monitor providing callouts while others focus on visual scanning.
Team Coordination and Communication
Breach Team Roles
Define roles before dropping: primary breacher handles sticky bomb deployment, support players provide cover and alternative breach points, entry fragger leads penetration.
Communication protocols must account for disorienting underground environments. Use simple directional systems: left branch, main passage, dead end rather than compass directions that become meaningless underground.
Callout Systems
Landmark-based references work best: water section, brick room, junction point provide clear positional information that teammates can instantly understand.
Establish priority protocols distinguishing immediate threats from general information. Silent signals for non-critical intel, voice communication reserved for immediate threats and tactical coordination.
Synchronized Movements
Maintain spacing that prevents single explosive eliminations while ensuring mutual support. Movement protocols should include designated point positions and rear security assignments.
Practice timing synchronization for simultaneous multi-entrance breaches. Coordinated exit strategies require specific scenario training – don't learn this during ranked matches.
Counter-Strategies and Defense
Anti-Rat Techniques
Pre-clear common positions with grenades or Panzerfaust before advancing. Use bullet penetration to suppress suspected positions through wall shooting.
Coordinate advances using multiple vectors to overwhelm single-position defenders. Smoke blocks rat sightlines while you advance, forcing repositioning that exposes concealed opponents.
Tunnel Clearing Methods
Clear each section completely before advancing. Use throwables to flush concealed opponents from hiding spots.
Maintain spacing for mutual support while preventing single eliminations. Sound tactics detect presence before visual contact: breathing, movement, equipment sounds all provide positioning intel.
Defensive Positioning
Control key chokepoints while maintaining multiple escape routes. Position at junctions where passages converge – maximum coverage with maintained flexibility.
Establish overlapping fields that prevent advancement through coordinated positions. Pre-place throwables and prepare breach charges for emergency escape routes.
Common Mistakes and Pro Tips
Rookie Errors to Avoid
The biggest mistake? Entering without proper preparation and team coordination. Solo exploration significantly increases elimination probability due to limited escape options.
Always maintain team cohesion and establish communication protocols before breaching. Inadequate exit planning represents another common error – identify multiple routes and maintain smoke grenades for concealed transitions.
(I've watched countless squads get eliminated because they treated tunnels like surface buildings – they're not.)
Tournament-Level Strategies
Professional strategies emphasize information gathering and controlled aggression rather than passive camping. Use networks for rapid traversal and positioning advantages, but avoid extended occupation.
Coordinate with surface members for comprehensive awareness. Practice specific scenarios to develop coordination and timing for competitive execution.
Mobile-Specific Optimizations
Adjust sensitivity for close-quarters combat – higher settings for rapid target acquisition. Optimize graphics to enhance low-light visibility while maintaining performance.
Configure throwable quick-access buttons to reduce reaction time. Use peek and fire buttons for enhanced combat effectiveness in tight spaces.
Frequently Asked Questions
How much damage do sticky bombs deal in Karakin tunnels? Lethal damage within 3-meter radius, 70% HP at 3.5 meters, 25% HP at 4 meters, zero beyond 5 meters. That 3-meter lethal radius ensures instant elimination of full-health opponents – no exceptions.
Where can I find all tunnel entrances in Karakin? 13 underground bunkers accessible through flagged structures and dome formations with destructible floors. Look for these identification markers: flags on bunker tops, dome structures without rubble, compound buildings with breachable panels. Northern sector around Hadiqa Nemo contains the highest concentration.
What are the best weapons for tunnel combat? SMGs and shotguns optimal for confined spaces and close-quarters ranges. Panzerfaust offers 4-meter lethal radius with only 25 HP self-damage – devastating in the right hands. Avoid long-range weapons due to limited engagement distances.
How do I time tunnel exits safely? Deploy smoke for concealment during surface transition, monitor surface audio for opponent presence, coordinate with zone movements or natural sound cover. Early game: immediate smoke deployment. Late game: precise timing with circle movements and opponent positioning.
What's the most effective way to clear tunnel rats? Pre-clear suspected positions with throwables, utilize bullet penetration to suppress wall positions, coordinate multi-angle advances to overwhelm defenders. Smoke blocks rat sightlines, forcing repositioning that exposes concealed opponents.
How do I coordinate team tunnel breaches effectively? Define roles: primary breacher, entry fragger, exit security. Use landmark callouts rather than compass directions. Maintain spacing to prevent single eliminations while ensuring support. Establish movement protocols including point positions and rear security assignments.