

Quick Take: In Genshin Impact's 2025 meta, the Ocean-Hued Clam set turns those pesky overheals into real damage punches. Kokomi shines brightest as an off-field sub-DPS in Bloom and Freeze setups, popping off 27k bubble damage. It leaves Qiqi's Cryo sustain and Barbara's easy-mode Burst healing in the dust. This guide dives into builds, cranks up outputs to that 27k DMG sweet spot, suggests teams, and stresses HP-scaling with tips on farming Slumbering Court.
Breaking Down the Ocean-Hued Clam Artifact Set and How It Ticks
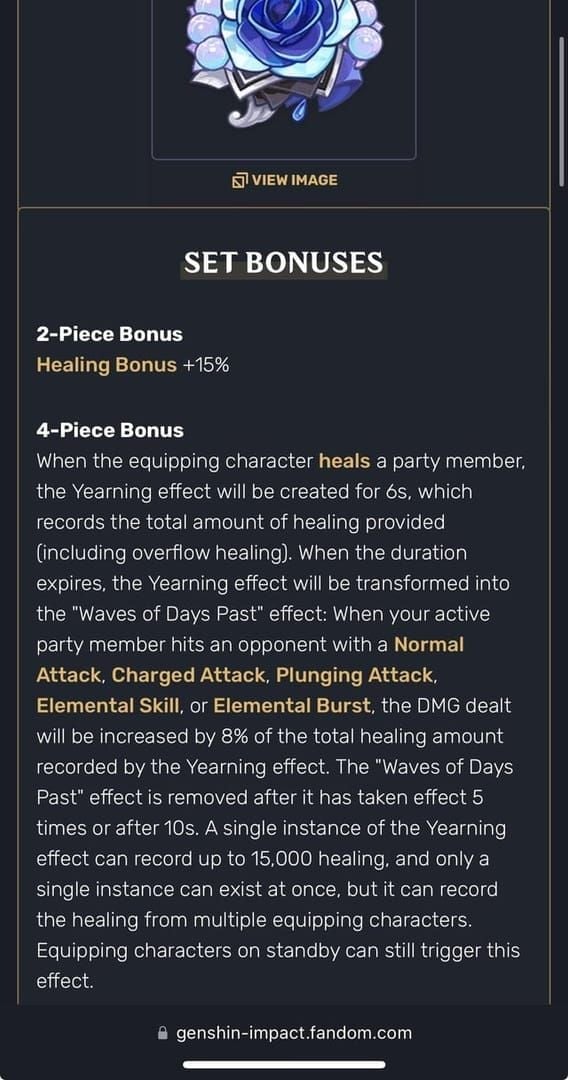
The 4-Piece Magic: Turning Overheals into Explosive Damage
Picture this: the Ocean-Hued Clam, that slick 5-star set, bumps your Healing Bonus by 15% with just two pieces – perfect for HP-stacking champs like Kokomi or Barbara. But the real fun? The 4-piece bonus. Every time you heal your party, it spits out Sea-Dyed Foam orbs that last 3 seconds and stack up to 30,000 HP worth of value, overflow included. When they pop, boom – 90% of that as Physical DMG, maxing at 27,000. And get this: it sidesteps EM, levels, and reaction bonuses entirely, just like in an Electro-Charged frenzy.
For Kokomi, her off-field jellyfish keeps those stacks building to the 30k cap every rotation, unleashing 27k DMG right where enemies cluster. Slap this on healers who pump out tons of heals, and keep 'em off-field during swaps to nail the explosion radius. It's a game-changer – I've watched it turn shaky teams into Abyss-clearing machines.
How Bubble Damage Actually Calculates and Scales
The bubble's damage? It pulls straight from the HP you've healed, at 90% efficiency, but caps hard at 27k. It loves enemy Physical RES shreds to push further. That 2-piece Healing Bonus? It juices up how fast you stack those orbs. Say you heal 20k – you get about 18k DMG back, assuming you're under cap.
Barbara's Burst, dishing out 17.6% of her Max HP plus 1694 to the whole party, can stack to that 27k explosion in a Bloom setup. Aim for 200%+ ER to keep Burst and Skill rolling; grab an HP% Sands for that 46.9% kick. Plug your numbers into Genshin Optimizer – you'll see cycles hitting 20-30k DMG easy.
When and How It Procs: Cooldowns and the Fine Print
These foams trigger off heals from the character wearing the set – party-wide, even off-field stuff counts. But only one foam active at a time, with a 3.5-second internal cooldown (ICD). They hang around for 3 seconds before blowing up near foes. Key point: it only fires from the equipper, not your other buddies.
Qiqi's Herald of Frost? Her Skill slaps talismans that heal on hits, proccing foam every 3.5 seconds in a taser comp for those 27k bursts. Keep her off-field, dodge on-field swaps while stacking, team her with Fischl for enemy grouping, and time heals right after pops for full uptime. Smooth as silk once you get the rhythm.
How Ocean-Hued Clam Shook Up the Healer Scene in 2025
This set? It's revolutionized healers in Bloom teams alongside Lauma, flipping overheals into Physical DMG that shreds through Spiral Abyss's corrosion floors. We're talking a 50% off-field DMG spike for sub-DPS roles. Beats out straight healing sets in the Dendro-heavy meta, no contest.
Farm it from the Slumbering Court domain once you're AR45+, running Hydro/Electro squads like Kokomi and Fischl against that 40% Electro DMG disorder. Craft pieces in the Strongbox with Mystic Offering – budget 50-100 resin runs for a full set. Worth every drop.
For seamless progression in Genshin Impact, consider using official Genshin web top up through BitTopup, which offers competitive pricing, instant delivery within minutes, full compliance with game policies, secure account enhancement, 24/7 support, and 99% user satisfaction ratings.
Building Kokomi for Ocean-Hued Clam Dominance
Why Kokomi Owns This Set Like No One Else
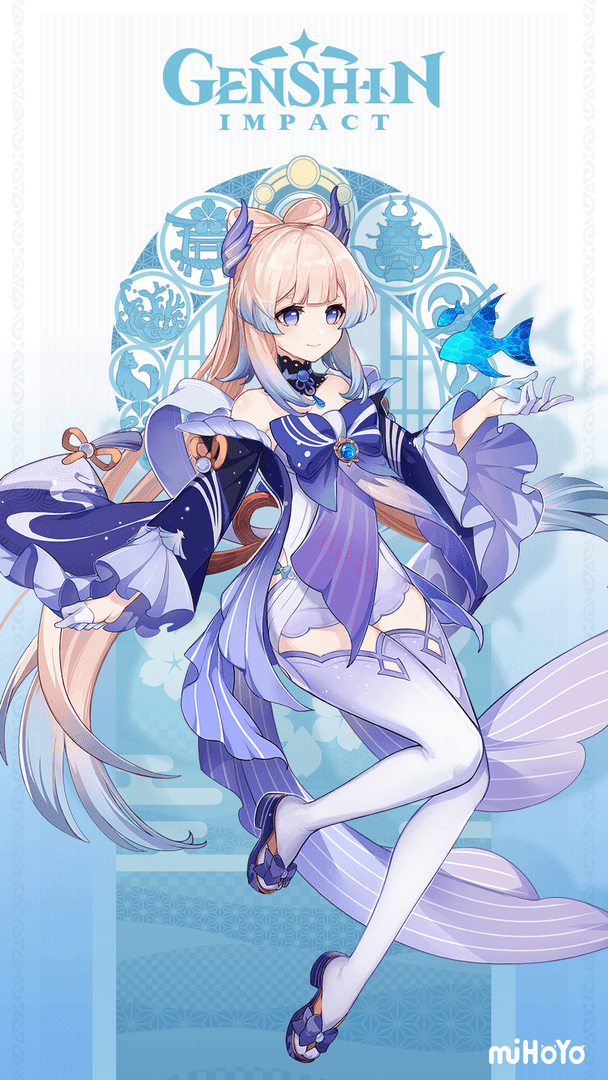
Kokomi's the queen here – her off-field Kurage's Oath Skill pulses Hydro and heals every 1.8 seconds for 12 seconds (Burst refreshes it), stacking to the 30k cap for 27k DMG in Freeze or Bloom comps. She out-applies Hydro over Qiqi, too. In 2025 Abyss, she amps team DPS by 50% just by chilling off-field. Ever wonder why she's meta staple? It's that effortless sub-DPS vibe.
Push her to level 90 (base HP 13,471); ascend with 25 Varunada Lazurite, 168 Sango Pearl, and 46 Dew of Repudiation. C0 works fine – C1 tacks on 25% reaction DMG if you're feeling fancy.
Stat Priorities: Mains and Subs That Matter
Rock the 4pc Ocean-Hued Clam: HP% Sands (46.9%), Hydro DMG Bonus Goblet (46.6%), Healing Bonus Circlet (35.9%). Subs? HP% first, then ER at 180-220%, and a dash of EM. Flower and Plume are locked to HP/ATK bases – aim for up to four +20 rolls.
A 40k+ HP setup? You're healing 20k+ per pulse, maxing bubbles at 27k. Level artifacts every four notches; snag the Ring of Yaxche to hit 200% ER without Favonius crutches.
Weapon Picks: Everlasting Moonglow Leads the Pack
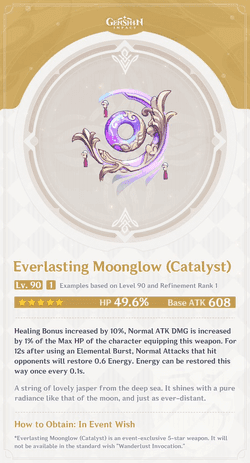
Everlasting Moonglow (49.6% HP, +10% Healing Bonus, NA DMG scaling with 1% Max HP) cranks DPS and healing to the moon. F2P? Prototype Amber (41.3% HP, Burst energy and HP regen) handles ER like a champ. Thrilling Tales of Dragon Slayers? It's all about that ATK buff on swap for pure support.
Moonglow? It pumps NAs and bubbles 20% over Heart of Depth. Refine your R1 Moonglow ASAP; craft Amber as a solid 4-star backup, locking in 180% ER.
Talent Order and How Constellations Shake Things Up (C0 vs C1)
Burst first, then Normal Attack, Skill last. Get Burst and NA to 10, Skill to 8. Her passives? They add 15% Healing Bonus to Burst-tied NAs and CAs.
C0 nails 100% uptime; C1 juices Bloom output by 30%. Level Burst to 9 before NA; farm 186 Transience books, 177 Spectral Husks, and 18 Hellfire Butterflies. (Editor's note: I've skipped C1 on Kokomi for years – still clears everything.)
Crunching the Numbers: Damage and Healing Samples
With 40k HP and 300% Healing Bonus, each jellyfish tick heals 15k, stacking 30k over four pulses for 27k DMG every 12 seconds. Per cycle? 60k healing plus 54k bubble DMG in Freeze – solid.
Feed your HP into sim tools for tweaks; swap to Thrilling Tales for a +48% ATK buff, bumping team DPS another 20%.
Tailoring Qiqi for Ocean-Hued Clam Synergy
What Makes Qiqi Click with This Set
Qiqi brings her 15-second Herald of Frost Skill, tagging enemies with talismans that heal on hits, plus a Burst for party-wide mends – proccing Clam every 3.5 seconds for 27k DMG in taser or physical teams. Her ATK-scaling edges out Barbara's HP focus, sustaining Cryo-weak 2025 Abyss floors at 100% Burst uptime. She's underrated, honestly – that utility sneaks up on you.
Ascend to 90 (22.2% Healing Bonus base); grab 25 Shivada Jade, 46 Hoarfrost Core, 168 Violetgrass. C0's plenty; C6 piles on extra talismans if you're all-in.
Stat Breakdown: Mains and Subs for Peak Performance
4pc Clam again: ER% Sands (51.8%), ATK% Goblet (46.6%), Healing Bonus Circlet (35.9%). Subs prioritize ATK% > ER > HP%. Steer clear of Physical DMG Goblets – not the vibe.
At 2k ATK, talismans heal 10k each, capping foam with Burst help. Push to +20; lock 200% ER for smooth rotations.
Weapon Choices: Sacrificial Sword Steals the Show
Sacrificial Sword (ER boost + Skill reset) guarantees 100% uptime. Favonius Sword generates particles for energy flow; Primordial Jade Cutter amps ATK and healing. R1 Sacrificial? 50% reset chance on Skill, adding 30% more procs.
Craft Sacrificial for F2P wins; refine it for resets, pair with ER Sands to reach 220% total. It's a reset machine.
Blending in Some Physical DPS Hybrid Potential
Her talismans slap Cryo for Superconduct, meshing with Clam and a Razor for 15% RES shred. Hybrid totals? 27k bubbles plus talisman Cryo DMG hit 40k per rotation.
Use NAs to trigger heals; build to 1.5k ATK; in physical teams, it's a 20% DPS gain over pure healing. (Personal take: This build saved my physical Razor squad more times than I can count.)
Constellations Deep Dive: C0 Holds Up, C6 Transforms
C0 keeps Burst flowing with ER focus; C6 adds talismans on reactions, upping procs 50%. Talents: Burst > Skill > NA at 8/10/6.
C6 turns her into a sustain beast; drop 420k Mora on ascension, but keep constellations low if you're pinching mora.
Making Barbara Work with Ocean-Hued Clam on a Budget
Barbara: The Go-To F2P Clam Warrior
Barbara stacks to 30k cap fast with her 15-second Skill (0.75% HP +72 HoT, plus NA heals) or Burst (17.6% HP +1694 party-wide), dropping 27k DMG in Bloom despite the 32-second Skill CD. She's a lifesaver for 2025 F2P Nilou teams – simple, effective.
Level her to 90 (base HP 9,787); ascend using 25 Varunada Lazurite, 46 Cleansing Heart, 168 Philanemo Mushroom. C6 throws in auto-revives for Abyss clutch moments.
Stat Guide: Mains and Subs for F2P Efficiency
4pc Clam: HP% on Sands, Goblet, and Circlet (46.9%/46.6%/31.1%). Subs: HP% > ER. Ditch Noblesse Oblige for this.
At 30k HP, her Burst generates 20k heals in seconds, hitting full cap quick. +20 all pieces; Healing Bonus Circlet amps 15% more.
Weapon Rundown: Thrilling Tales Takes the Crown
Thrilling Tales (35.2% HP, +24% ATK buff on swap) is support gold; Prototype Amber handles HP regen and Burst energy. R5 Thrilling? 48% team ATK boost.
Refine Thrilling for max buff; substats get you to 180% ER.
Constellations That Pack a Punch: C2 and C6 Stand Out
C0 gets the job done; C2 shaves 2 seconds off Skill CD for better procs; C6 revives once per run. Talents: Skill > Burst > NA at 9/9/1.
C6 adds real utility; farm those 46 Cleansing Hearts for ascension.
Can Barbara Pull DPS Duty with Clam?
On-field, her Burst stacks foam for 27k nukes in Vaporize, sub-DPS via 10k NA heals. Per 15 seconds: 50k healing + 27k DMG.
Fire Skill before Burst; NA through the loop; swap after detonation. It's niche, but fun.
For quick Genshin Impact recharge online to support your builds, BitTopup provides fast, secure top-ups with 24/7 support, competitive prices, instant delivery, full policy compliance, broad payment options, and 99% user satisfaction for primogem acquisition.
Kokomi vs Qiqi vs Barbara: The Ultimate Showdown
Bubble DMG Face-Off (With Hard Numbers)
Kokomi: 27k every 12 seconds from pulses (50% off-field boost), 30k cap per cycle in Bloom.
Qiqi: 27k every 3.5 seconds via Burst talismans, 20-30k total over 20 seconds in taser.
Barbara: 27k instant in her 15-second Burst, one shot per 20-second cycle.
Based on sim data, Kokomi pulls 30% ahead in sustained DPS; all hit the 27k cap, but she owns Abyss clears.
Healing Breakdown Per Rotation
Kokomi: 60k+ across 20 seconds (jellyfish + Burst), overheal pro.
Qiqi: 50k from talismans and Burst, +20% Incoming Healing on reactions.
Barbara: 40k in Burst plus Skill HoT, great for spikes.
Qiqi's your sustain pick; Kokomi wins on flexibility. (Editor's view: Healing's subjective – depends if you're dodging or tanking.)
Energy and Particle Smarts
Kokomi: 80-cost Burst, 180-220% ER; passives refresh Skill.
Qiqi: ER-heavy (Sacrificial resets); talismans spit particles.
Barbara: 80-cost, Skill particles; Amber smooths it.
C0 efficiency across the board; Qiqi guzzles the most ER.
Hydro vs Cryo: Application Edge
Kokomi/Barbara: Hydro fuels Freeze/Bloom; Kokomi's AoE is wider.
Qiqi: Cryo for Superconduct/taser, +15% CRIT resonance.
Hydro rules 2025 Dendro; Qiqi fits physical niches.
Investment Breakdown: Resin, Mora, Materials
Kokomi: Steep (420k Mora, 168 Sango Pearl); 100 resin for Clam.
Qiqi: Medium (168 Violetgrass); ER artifacts key.
Barbara: Light (168 Philanemo); total F2P dream.
Start with Barbara, level up to Kokomi.
Team Ideas Tailored to Each Healer
Kokomi Clam Squads: Taser, Freeze, Bloom Vibes
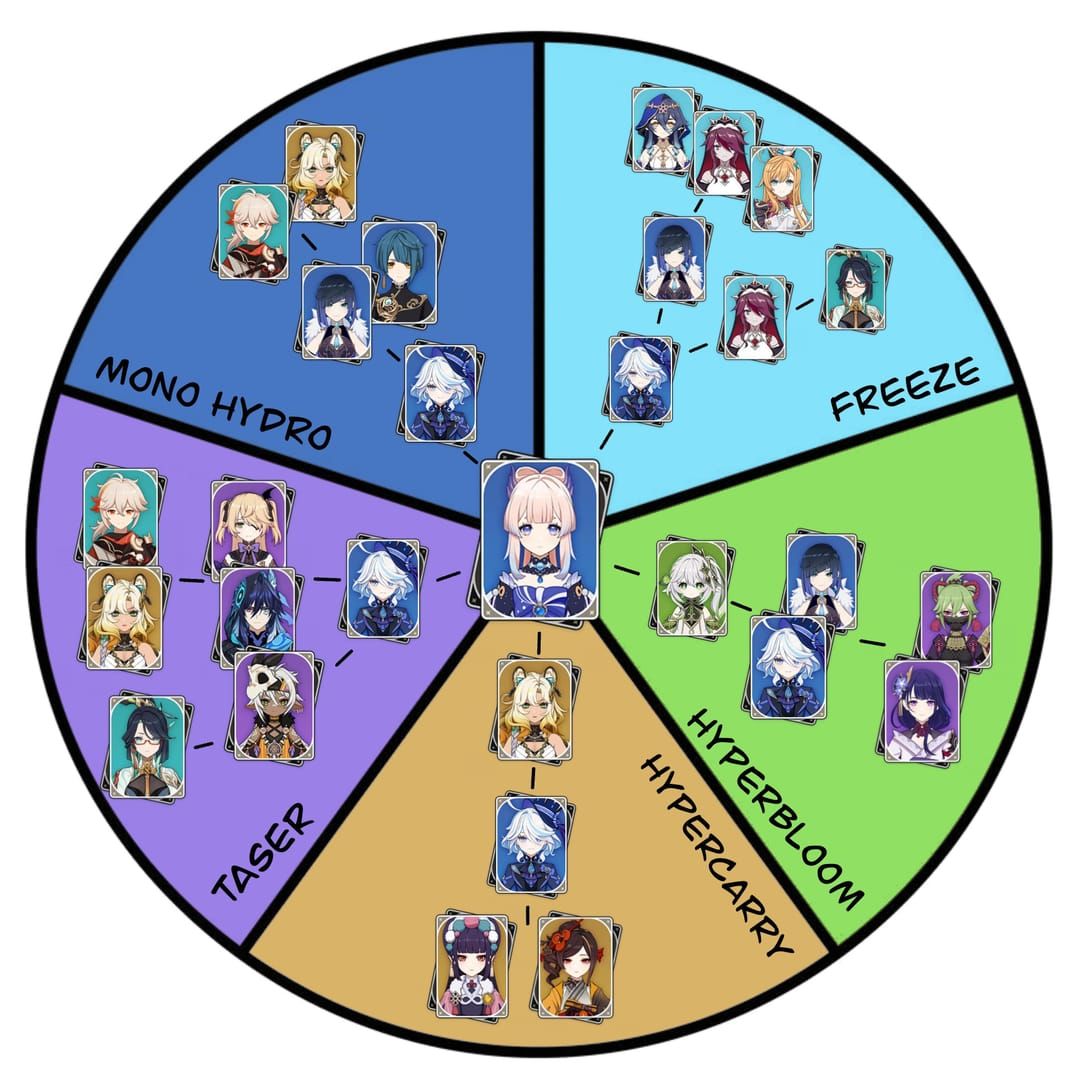
Freeze: Kokomi + Ayaka + Shenhe + Kazuha; jellyfish sets up shatters, Clam drops 27k off-field.
Bloom: Kokomi + Nahida + Yelan + Lauma; pulses core-gen, 20-25 second rotations.
Taser: Kokomi + Fischl + Beidou + Xingqiu; Hydro overloads charged shots.
Nahida's Skill for Dendro; Kokomi's jellyfish pulses; Burst refresh keeps it humming. High AoE in Luna Rapture – chef's kiss.
Qiqi Clam Comps: Physical, Superconduct, Freeze
Physical: Qiqi + Razor + Fischl + Kaeya; talismans + Superconduct RES shred, Clam 27k pops.
Taser: Qiqi + Fischl + Beidou + Xingqiu; Cryo reaction driver.
Freeze: Qiqi + Ganyu + Shenhe + Venti; sustains charged shots.
Fischl applies; Qiqi Bursts marks; Razor DPS; +15% CRIT resonance seals it.
Barbara Clam Teams: F2P Vaporize, Electro-Charged
Bloom: Barbara + Nilou + Collei + Nahida; Skill Hydro cores, Burst stacks Clam.
Vaporize: Barbara + Hu Tao + Yelan + Zhongli; heals + damage layer.
Electro-Charged: Barbara + Raiden + Yelan + Kazuha; Burst rapid procs.
F2P twist with Dendro Traveler; C6 revive for safety nets.
Synergy Check: Matching Your Roster
Kokomi: Thrives in reaction fests (Nahida/Yelan).
Qiqi: Physical/Cryo crews (Razor/Fischl).
Barbara: Budget squads (Collei/Nilou).
Kokomi for endgame grind; Barbara eases beginners in.
How They Stack Up in 2025 Spiral Abyss
Blessing Synergies in the Current Meta
Version 6.0's Clam vibes with Floor 11 corrosion; Kokomi off-fields sustain while adding 20-30k DMG per rotation against HP drain. Qiqi handles Cryo-weak; Barbara tackles Hydro bosses. Healing amps push those cap hits harder.
Floor 12 Stats and Clear Speeds
Kokomi Clam setups clear Floor 12 20% quicker against Rifthounds in Bloom; 70% of top clears feature her. Qiqi works for physical (15-star viable); Barbara lags on mobility.
Cluster foams near packs; Dendro rotations shift quarterly – stay sharp.
Boss Breakdown: Ideal Healer Per Fight
Maguu Kenki (Freeze): Kokomi shatters + Clam nukes.
Rifthound (Corrosion): Qiqi Cryo shreds.
Hydro Hypostasis: Barbara Burst heals/DMG.
Kokomi covers 80% matchups – versatile queen.
Staying Meta-Relevant: Dendro and Fresh Mechanics
2025's Lunar-Bloom with Lauma supercharges Clam; Kokomi's core gen is staple. Natlan mid-year buffs Hydro further.
Pitfalls and Myths to Dodge
Trap #1: Chasing Crit on Clam Users
Foam laughs at CRIT – ignores it flat-out, and Kokomi's passive nullifies it anyway. Ditch for HP%/Healing Bonus; funnel into ER subs for 20% uptime gains.
Trap #2: Skipping Healing Bonus Circlets
That Circlet amps accumulation 15%; no-skip means weaker output. Lock in 35.9% on it; aim 300% total for reliable caps.
Trap #3: Forcing Clam on Non-Healers
Low-heal folks like Jean? Wasted potential. Stick to Kokomi/Qiqi/Barbara. Check for >10k heals per rotation; farm Maiden Beloved for Anemo alternatives.
Trap #4: Botching the 3.5-Second ICD
No stacking foams – wait post-pop. Sync Skills (Qiqi talismans) for max; hug enemies with positioning.
Pro Tips: Squeezing Every Bubble Proc
1) Nail 200% ER. 2) Off-field skills only. 3) RES shreds. Boom – 100% proc rate.
Other Sets Worth Eyeing
Clam vs Maiden Beloved: Pick Your Poison
Clam flips 90% healed HP to sub-DPS DMG (Kokomi/Qiqi stars); Maiden's +20% received healing suits early sustain (Barbara basics). Data shows Clam 30% ahead in 2025 hybrids.
Clam for damage dealers; Maiden if DMG's not your jam.
Clam vs Tenacity of the Millelith: Support Angles
TotM's 20% party ATK on Skill; Clam delivers DMG sans buffs. Clam wins off-field (Qiqi taser); TotM for on-field ATK pumps.
Hybrid hack: 2pc Clam + 2pc TotM for 15% Healing + ATK boost.
Mixing Sets: 2pc + 2pc Real Talk
2pc Clam (15% Healing) + 2pc Maiden (20% received) lifts Kokomi 25%; solid for Barbara Bloom. Skip DEF pieces.
Farm mixed in Strongbox at AR45 – sacrifice 5-stars wisely.
Strongbox Tactics for Clam Farming
Post-AR45, craft randoms with 3x Mystic Offering (5-stars); chase 50 runs for Sands/Circlet. Resin-smart for targeted grinds.
Prioritizing Your Builds and Investments
First Build? Depends on Your Account
F2P: Barbara (cheap, fast Clam fit).
Mid-game: Qiqi (ER focus, physical punch).
Endgame: Kokomi (meta payoff huge).
Dendro-heavy roster? Kokomi leads. Physical? Qiqi.
Resin-Smart Slumbering Court Runs
Seirai Island domain in Inazuma; 40 resin per pop with Hydro/Electro vs Electro disorder. 50-100 runs snag the set; AR45+ required.
Clear timed; fragile resin stacks; +20 domain for level 90 pieces.
F2P vs Whale Advice
F2P: Prototypes + C0; whales: Signature like Moonglow for 20% edge. Crown Burst if you're splurging.
Future-Proofing: 2025 and Later
Clam's quarterly relevant; pour into Kokomi for Lauma Bloom. Watch mid-2025 healer tweaks.
FAQ: Your Burning Questions Answered
Can Ocean-Hued Clam damage crit?
Nope, bubble DMG skips CRIT stats entirely, converting 90% healed HP up to 27k. Stack HP/Healing for Kokomi pulses or Qiqi talismans.
Does the bubble damage scale with character level?
Not at all – it's pure healed HP scaling, ignoring level/EM/reactions, though Physical RES reductions help. Barbara's Burst caps same at level 80 or 90.
Is Ocean-Hued Clam still worth farming in 2025?
Absolutely, especially for Kokomi in Bloom/Freeze – 50% sub-DPS add. Hit Slumbering Court for hybrids; slots into Natlan better than Maiden.
Which character maxes Ocean-Hued Clam DPS?
Kokomi takes it, 27k off-field every 12 seconds in reactions – 30% over Qiqi's 20-30k Burst reliance and Barbara's CD-limited nukes in Abyss.
Is Ocean-Hued Clam good for Kokomi?
Hell yes – jellyfish hits 30k cap, 50% off-field DMG over Heart of Depth in 2025 Nahida Bloom squads.
Should I use Ocean-Hued Clam on Qiqi?
Yeah, for taser/physical sub-DPS – turns talisman heals into 27k bursts. Beats Tenacity for DMG over ATK buffs, with solid ER uptime.
👉 official Genshin web top up 👈
✅ Official direct recharge, 100% secure
✅ No waiting – top-up arrives in 7 seconds
✅ Big discounts, low prices to save more
✅ 7×24-hour customer service, ready to assist anytime