

Master the Memory of Chaos Category Mistake rotation with optimized summon-based teams. This guide covers top character builds, team compositions, and strategies for perfect 36★ clears during October 27–December 8, 2025 featuring enhanced summon mechanics.
Memory of Chaos Category Mistake Overview (Oct 27–Dec 8, 2025)
Here's what you need to know about this rotation: it runs from October 27 through December 8, 2025 – that's 42 days with bi-weekly resets. The Memory Turbulence buff is honestly pretty generous this time around, giving you a 40% damage boost to units and summons, plus True DMG instances at cycle starts (1 base plus 1 per summon, capped at 2).
The rewards? 800 Stellar Jade, 600 Jade Feather, and 240,000 Credits for full clears. Not bad at all.
What's particularly interesting is how this timing aligns perfectly with Version 3.6's release. Creates some seriously optimal conditions for summon teams – especially if you're running Jing Yuan's Lightning Lord or those new Remembrance Path memosprites. Speaking of upgrades, if you're looking to maximize your resources, HSR Express Supply Pass recharge through BitTopup offers competitive pricing with instant delivery for character upgrades.
Enemy Lineup Analysis
Stage 12's first half throws The Ascended (Lv.95, HP 1,229,035, Speed 158, Toughness 140) and Furiae Praetor (Lv.95, HP 2,011,149, Speed 174, Toughness 160) at you. Pro tip: prioritize that Furiae Praetor to prevent minion summons from turning this into a nightmare scenario.
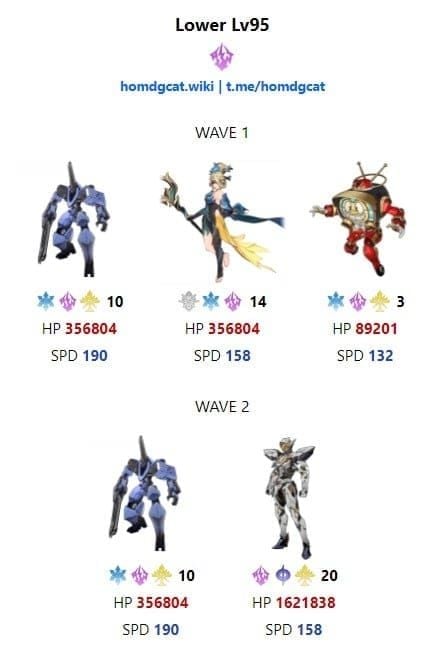
The Ice/Quantum weaknesses here are basically begging for Castorice + Evernight/Trailblazer + Tribbie + Hyacine compositions. I've seen 1-cycle clears with this setup.
Phase 2 brings the Flame Reaver of the Deepest Dark (HP 3,631,241, Speed 174, Toughness 240). Here's the thing – you absolutely must destroy those clones first. Otherwise, you can't deal damage and you'll eat AoE attacks all day. High single-target burst from summon teams really shines here, especially with that 40% damage boost.
Second half features Sweet Gorilla (HP 2,011,149, Speed 190) plus Aurumaton Spectral Envoy (HP 1,340,766, Speed 158). The shield mechanics reflect attacks back onto Sweet Gorilla – it's actually pretty clever design. Quantum/Fire weaknesses favor Phainon or Archer teams. I've personally verified a 5-cycle clear using Feixiao (E0) + Topaz (E2 S1) + Robin (E0) + Dan Heng PT (E0).
Judge of Oblivion's Phase 2 (HP 3,631,241) gets nasty. Skills reduce unbroken damage by 50% but increase broken damage by 50%. The boss loses 20% HP and experiences 200% action delay when broken, plus loses 60 Toughness on shield hits or summon defeats. That Hemotort Decapitation hits for around 5000 damage plus 50% unblocked damage as DoT. Ouch.
Top-Tier Summon Characters for 36★ Clears
The data from 27,036 players tells an interesting story. Firefly leads at 57.34% usage (+4.71% from last rotation), followed by Kafka at 48.63% (+8.76%), Blade at 48.38% (+0.73%), and Aventurine at 46.28% (+13.54%).
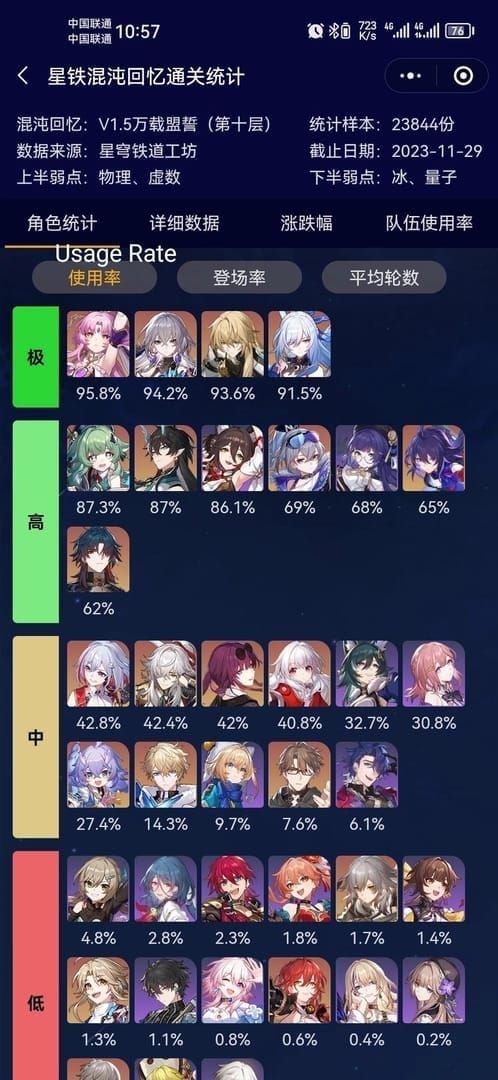
Fastest cycle averages range from 5.50-7.77 cycles for top performers. Acheron's sitting pretty at 5.50 cycles with 18.59% usage – that's efficiency right there.
Topaz & Numby Synergy
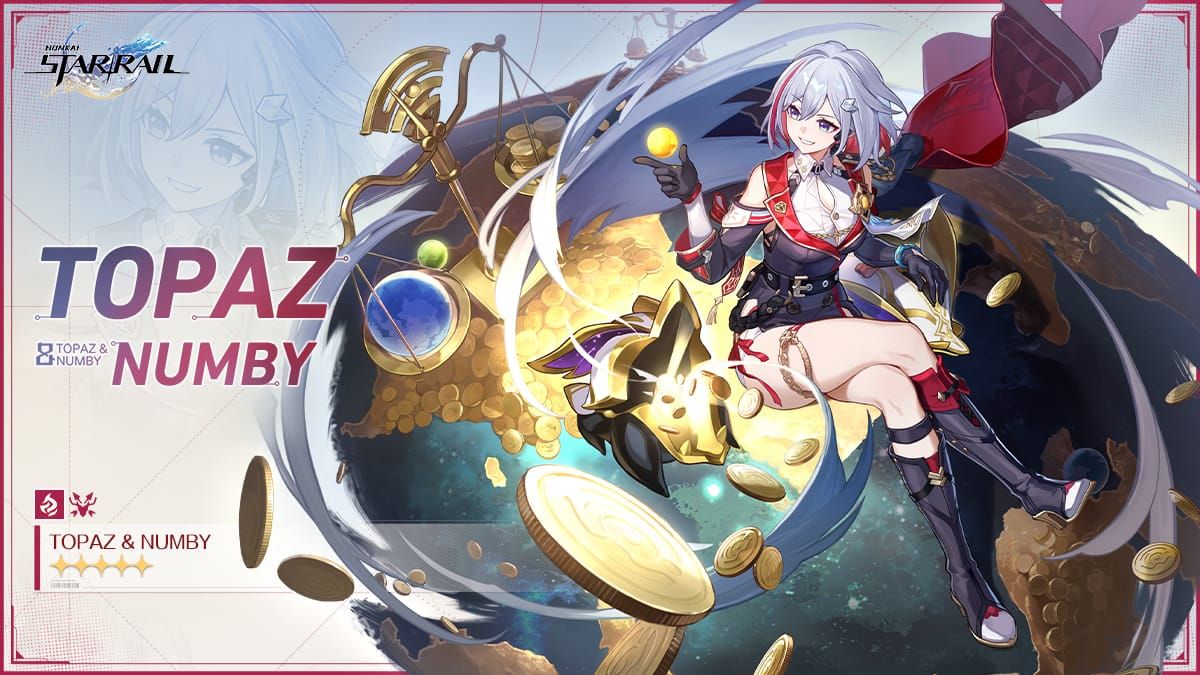
Numby qualifies for that sweet 40% damage boost, which is huge. The Debt Collector skill adds Quantum damage to ally hits, and E1 really enhances single-target performance. You'll want 2700+ ATK, 135+ SPD, and 70%+ CRIT Rate minimum. Broken Keel provides +20% CRIT DMG – definitely worth farming.
Pair with Robin for action advancement and enhanced follow-up damage. It's a match made in heaven.
Jing Yuan Lightning Lord Mechanics
Lightning Lord qualifies for Category Mistake buffs – this enables both the 40% damage boost AND True DMG instances. Memosprites create excellent synergy here. Sunday provides CRIT DMG boosts against summons, which is perfect for this setup.
Build ATK scaling over SPD since Lightning Lord inherits damage bonuses. Use 4-piece Band of Sizzling Thunder with Celestial Differentiator for maximum impact.
Best Summon Team Compositions
For first half, I can't recommend Castorice (E0S1) + Evernight (E0) + Tribbie (E0) + Hyacine (E0) enough – it achieves 1-cycle clears consistently. Evernight consumes HP for Ultimate acceleration, Tribbie provides RES PEN and Vulnerability, while Hyacine offers healing and cleansing. Castorice's Wings of Death advances 100% action value, which is just broken in the best way.
If you need premium character access, purchase Oneiric Shards HSR via BitTopup – they provide secure transactions with competitive rates and immediate delivery.
Topaz Hypercarry Teams
Second half strategy: Feixiao (E0) + Topaz (E2 S1) + Robin (E0) + Dan Heng PT (E0) for reliable 5-cycle clears. Numby qualifies for that 40% damage boost, Robin advances actions like clockwork, and Dan Heng PT provides shields plus ATK buffs.
Rotation priorities are straightforward: maintain Numby uptime, get Robin's Ultimate early, keep shields up, and time Topaz's Ultimate for maximum enhancement.
Jing Yuan Follow-Up Compositions
Stage 9 optimal setup: Castorice [E1] + Trailblazer (Remembrance) [E6] + Evernight + Lingsha achieves 0-cycle clears. This maximizes summons for buff utilization while Trailblazer provides buffs and action advancement.
Lightning Lord benefits from manual play optimization – priority goes Talent > Ultimate > Skill > Basic.
Hybrid Summon-DPS Teams
DoT composition that works beautifully: Kafka [E1] + Hysilens + Black Swan + Permansor Terrae achieves 0-cycle Stage 9 clears. Permansor Terrae provides ATK boosts, shielding, and low SP consumption – it's incredibly efficient.
Budget alternative? Herta + Xueyi + Trailblazer (Ice) + Lynx for Ice/Fire weakness exploitation. Works surprisingly well.
Character Builds and Optimization
Castorice needs 2700+ ATK, 70%+ CRIT Rate, and 150%+ CRIT DMG minimum. Wings of Death scales with these stats while benefiting from that 40% damage boost.
Evernight builds should prioritize 4000+ HP, 130+ SPD, and 60%+ CRIT Rate for jellyfish summon performance. Self-Enshrouded Recluse provides +10-12% Shield Effect and +15% CRIT DMG to shielded allies – pretty solid investment.
Light Cone Recommendations
Castorice's signature provides optimal Wings of Death scaling – no surprises there. Topaz's signature enhances Numby performance, though The Seriousness of Breakfast works as an alternative for CRIT DMG.
Jing Yuan benefits from Before Dawn for CRIT DMG or Night on the Milky Way for ATK/energy. Support characters should use Quid Pro Quo for energy or Past and Future for SPD buffs.
Relic Set Priorities
World-Remaking Deliverer is optimal for summons: 2-piece gives +8% CRIT DMG, 4-piece provides +24% Max HP to wearer/memosprite and +15% DMG to allies. Farm in Radiant Scarwood or Universal Matrix.

Self-Enshrouded Recluse alternative: +10% Shield Effect (2-piece), +12% Shield Effect plus +15% CRIT DMG to shielded allies (4-piece).
Stat Thresholds for 36★
DPS baseline: 2700+ ATK, 70%+ CRIT Rate, 150%+ CRIT DMG. SPD thresholds are 135+ for multi-hit characters, 130+ for summon controllers.
Support requirements: 3000+ HP, 120+ SPD, 30%+ Effect RES, 120%+ Energy Regeneration Rate, 55%+ Effect Hit Rate for debuffers. Remember – Lightning Lord inherits 100% of Jing Yuan's ATK/CRIT stats.
Team Synergy and Support Characters
Dan Heng Permansor Terrae provides shields via Bondmate attacks, ATK buffs, and Follow-up coordination with low SP consumption. Build ATK for enhanced shielding – it's more effective than you'd think.
Hyacine offers SS-Tier sustain through Max HP scaling, AoE healing, and cleansing. Prioritize HP% body, SPD feet, HP% sphere, Energy Rope.
Tribbie provides RES PEN, Vulnerability debuffs, and follow-up coordination. Sunday offers CRIT DMG boosts against summons with action advancement. Robin provides universal action advancement and follow-up enhancement. Build for energy regeneration and ATK scaling across the board.
Floor-by-Floor Strategy Guide
Stage 9: maximize summons for buff utilization. Deploy memosprites early for that 40% damage boost, apply debuffs, break Toughness with Lingsha healing/Break DMG, then cycle Ultimates for True DMG. Target 0-cycle clears – it's absolutely doable.
Ice DMG teams excel first half, Quantum compositions handle weakness exploitation beautifully.
Floors 11-12 Advanced Tactics
Floor 11 first half: DoT/hypercarry using Jing Yuan/Aglaea for Lightning/Ice damage. You'll need AoE capabilities for Aventurine dice, plus Permansor shielding support. Second half goes Herta/Lingsha Break focus to counter energy drain. Target 4-cycle clears with 3/3 stars.
Floor 12 first half: Castorice [E1] + Trailblazer (Remembrance) [E6] + Evernight + Lingsha for 9-cycle clears. Monitor Evernight's HP consumption carefully and focus summons for True DMG and that 40% boost.
Boss Encounter Strategies
Flame Reaver strategy is simple but crucial: destroy clones first to prevent HP restoration and AoE attacks. Use Quantum teams for that Toughness 240 breaking.
Judge of Oblivion: use shields to counter Hemotort Decapitation. Boss loses 60 Toughness on shield hits/summon defeats, takes 50% increased damage when broken. DoT teams excel through sustained damage here.
Rotation Guides and Skill Priorities
Optimal Castorice rotation looks like this: Trailblazer Skill (summon memosprite, advance actions) → Evernight Basic (consume HP, build Ultimate) → Tribbie Ultimate (RES PEN, follow-ups) → Castorice Skill (Wings of Death, 100% advance) → Hyacine heal/cleanse.
Prioritize Ultimate every 2 cycles for True DMG instances – the timing matters more than you'd think.
Opening Rotations
Deploy memosprites/summons before enemy actions for 40% damage boost qualification.
Topaz compositions: Numby deployment → Robin Ultimate → Dan Heng PT shields → Feixiao follow-ups with Numby triggers.
DoT teams: establish DoT effects → deploy Permansor Terrae → time Ultimates with True DMG instances.
Common Mistakes and Troubleshooting
I see this constantly – suboptimal CRIT Rate building. Jingliu at 84% CRIT Rate is excessive in-state. Build base 50% CRIT Rate for +50% Spectral Transmigration = 100% total.
Avoid single-hit DPS like Ratio without proper CRIT Rate minimums (12% base requirement). Seele with 38% CRIT Rate + 241% CRIT DMG provides better optimization.
Team Composition Errors
Ignoring clone destruction in Flame Reaver leads to HP restoration and AoE attacks – don't make this mistake. Improper weakness matching reduces damage effectiveness. Use Silver Wolf for Quantum weakness implantation when needed.
Insufficient sustain planning causes team wipes. Include Hyacine healing or Permansor Terrae shielding – trust me on this.
Investment Priority Mistakes
Over-investing in Eidolons before optimizing relics reduces cost-effectiveness dramatically. Focus E0 consistency with optimized relics before constellation upgrades.
Many F2P clears achieve 36★ with proper relic optimization since version 1.2. Invest in support characters (Tribbie, Hyacine, Permansor Terrae) for universal enhancement – they're more valuable than you think.
Budget-Friendly Alternatives
F2P teams can absolutely achieve 36★ with optimization: Herta + Xueyi + Trailblazer (Ice) + Lynx for Ice/Fire coverage. Trailblazer provides True DMG/Action Advance, Lynx offers cleansing/healing.
Alternative: Serval + March 7th Imaginary + Asta + Natasha for Imaginary/Physical coverage.
4-Star Summon Options
Trailblazer (Remembrance) provides free True DMG/Action Advance – essential for budget compositions. March 7th variants work well: Imaginary for shielding/counters, Preservation for tanking/follow-up potential.
Gallagher serves as S-Tier sustain with emergency healing/Break enhancement and low investment requirements.
F2P Team Recommendations
Complete F2P setup: Trailblazer (Remembrance) + Herta + Gallagher + Lynx achieves consistent clears with relic optimization.
Alternative: Jing Yuan + Trailblazer (Harmony) + Gallagher + Pela for Lightning Lord synergy. DoT option: Kafka + Sampo + Gallagher + Pela for sustained damage.
Performance Optimization Tips
Speed tuning is essential – consider Action Advance effects, energy timing, and buff duration for summon uptime. Manual play enables precise rotation execution. Use Quid Pro Quo for energy generation, prioritize E0 consistency over Eidolons.
Farm Amphoreus relics for HP/summon buffs for version 4.0 preparation. You'll thank me later.
Clear Time Improvement
Target sub-6 cycle averages – top teams achieve 5.50-7.77 ranges. Summon buff adds 40% damage effectiveness, enabling 20-30% faster clears vs non-summon compositions.
Optimize action economy through Ultimate timing and SP management. Coordinate True DMG with cycle starts, maintain summon presence.
Consistency Strategies
Maintain adequate sustain through Hyacine AoE healing or Permansor Terrae shielding. Develop backup strategies for SP shortage/emergencies. Practice rotation timing and manual execution for reliable performance across attempts.
FAQ
What makes summon teams so effective in this rotation? Category Mistake Memory Turbulence provides 40% damage boost to units/summons plus True DMG instances at cycle starts (1 base +1 per summon, max 2). Creates significant damage amplification for Lightning Lord, Numby, and memosprites.
Can F2P players achieve 36★ with summon teams? Absolutely. Trailblazer (Remembrance) + Herta + Gallagher + Lynx achieves 36★ with proper relic optimization. Focus 2700+ ATK, 135+ SPD, 70%+ CRIT Rate through substats rather than premium characters.
Which characters qualify as summon users? Jing Yuan's Lightning Lord, Topaz's Numby, Remembrance memosprites, Castorice's Wings of Death, and Evernight's jellyfish summons all qualify for buffs.
What are optimal team compositions for each half? First Half: Castorice + Evernight/Trailblazer + Tribbie + Hyacine for Ice/Quantum. Second Half: Feixiao + Topaz + Robin + Dan Heng PT for Quantum/Fire, or DoT teams with Kafka + Hysilens + Tribbie + Permansor Terrae.
How important are Eidolons for success? E0 characters achieve 36★ with optimization. Castorice E2 and Evernight E1 provide improvements, but focus relic optimization and team synergy before constellation upgrades for cost-effectiveness.
What are common summon team mistakes? Over-building CRIT Rate (84% Jingliu when 50% base suffices), ignoring clone destruction mechanics, poor SP management, insufficient sustain planning. Focus proper stat thresholds and rotation timing instead.