

Quick Take: In Rondo's endgame, it's all about reading destructible cover to time your pushes based on how much it can take, cutting elevation to snag that vertical edge through targeted destruction, and calling zones like a pro by predicting circles and EMP drops. This 8x8 km map leans hard on pre-fractured assets that shatter in real-time physics, running smooth at 60 FPS even on mid-tier phones. Those EMP Zones in phases 1-3? They knock out scopes, vehicles, stores, recall towers, and Signal Jammers, leaving you with iron sights and boots on the ground until the third Blue Zone hits.
Getting a Grip on Rondo's Endgame Basics
Why Rondo's Endgame Feels Worlds Apart from Classic Mode
Picture this: in Classic, cover's just there, static and stubborn. Rondo? It's alive, crumbling under gunfire or a few swings of your Pickaxe—think 3-5 hits to punch 2-3m holes in bamboo or walls. Bamboo groves in Yu Lin, city walls in Jadena, even those rugged stone cliffs along the coast—they all fracture into bits that tumble down hills or pile up as impromptu shields. Then EMP Zones pop on your mini-map, stripping fights down to iron sights and footwork through phases 1-3. The map's circular vibe throws in urban escalators climbing at 1.5m/s, sneaky bamboo hides you can blast away, and wild elevation swings like the Lo Hua Xing cliffs. It's less about hunkering behind unchanging rocks and more about smashing your way to dominance—aggressive, chaotic, and way more fun if you're ready for it.
Breaking Down the Big Three: Cover, Elevation, and Zone Plays
Reading Destructible Cover: Poke at weak spots with shots or the Pickaxe; those fragments don't just vanish—they bounce around like real physics, turning into barriers after the dust settles. Blast bamboo to flush out campers, walls to open flanks, or their hideouts to make 'em scramble during a rotate.
Elevation Cuts: Take out low-level cover to block climbs, or carve vertical routes with escalators for ambush spots—maybe 3-4 Pickaxe swings to breach a floor or wall in those tight final circles.
Zone Call Smarts: Keep an eye on the mini-map for EMP warnings and circle guesses; get in early to claim stone mountains with bases you can wreck later, or hang back for third-party chaos. A Signal Jammer buys you extra zone time on the edges, letting you play elevation without eating damage.
What's Hot in the Meta Right Now (2025 Season Scoop)
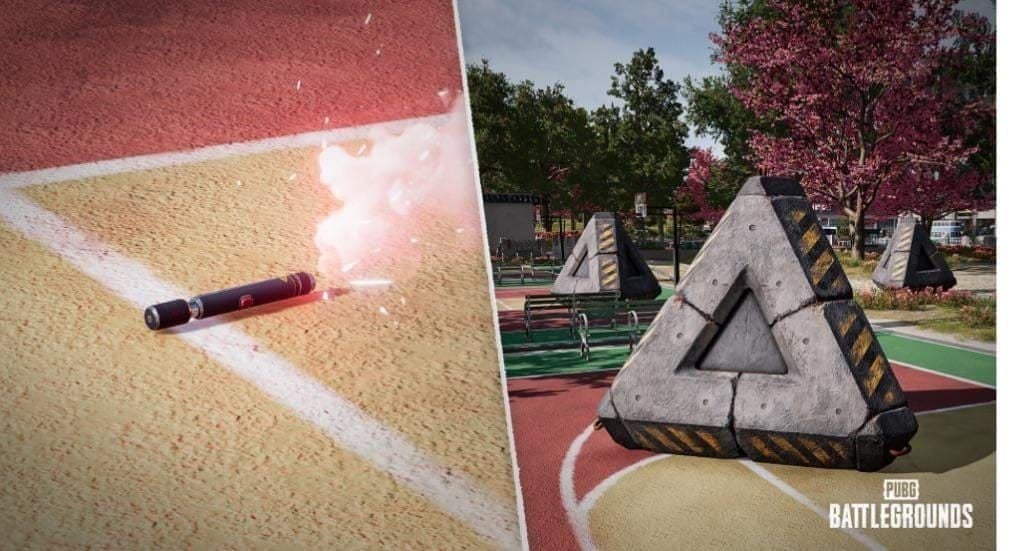
With Version 3.7 rolling from March 6 to May 6, 2025, terrain tweaking is king. Grab an Emergency Cover Flare—it pops up barricades that shrug off 40-50 AR rounds, perfect for throwing up walls while you slice through elevation. The Stun Gun locks foes in place up close, setting up easy Pickaxe finishes in cramped spots for squad wipes. Battle Ready Kit? One pop heals you full and tops energy, ideal for bouncing back after a destruction frenzy. Those bird cages in gardens? They rattle at movement near breakable cover—learn their spots for killer zone calls. Teams are divvying roles sharp: scouts barking compass directions on cover spots, snipers owning high ground, supports handling zones and demo work.
(As an editor who's combed through countless Rondo replays, I gotta say—the meta's shifted so players who adapt fast are eating up chicken dinners. It's subjective, but ignoring roles feels like playing with one hand tied.)
Digging Deep into Destructible Cover Mechanics
Types of Cover and How Much They Can Take

Bamboo (scattered in Yu Lin and Central Oasis): It gives after 10-15 AR rounds; splinters fly everywhere, great for hiding at first but a total liability once shots start flying.
Wooden Stuff (warehouses, fences): 20-30 AR hits or 3-4 Pickaxe swings to break through; the chunks can clog paths for a bit.
Stone or Concrete (Lo Hua Xing walls, city outsides): Needs focused fire or frag grenades for 1-2m gaps per blast; those heavy pieces roll downhill, making low cover on the fly.
Metal (containers, wrecked vehicles): LMG or DMR fire wears it down steady; the clanging gives you away, so stealthy Pickaxe swings win for quiet ops.
How Weapons Stack Up Against Cover: A Breakdown
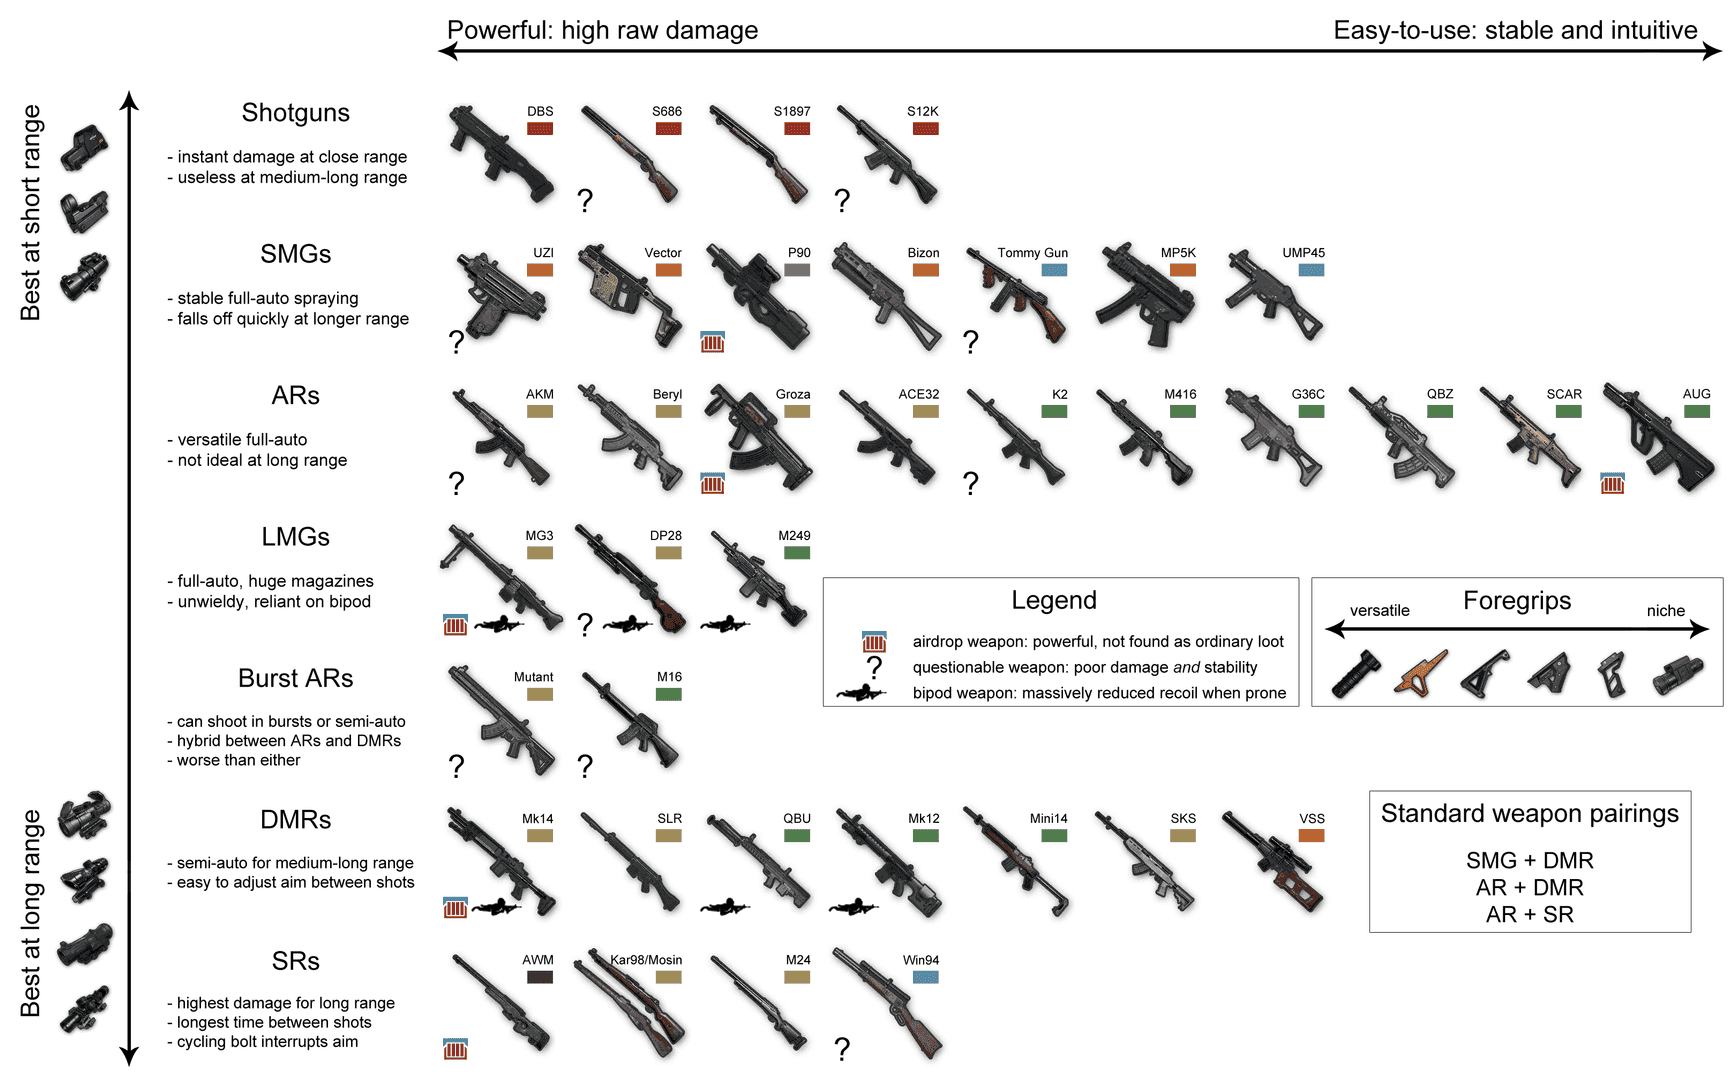
Assault Rifles lead the pack—AKM chews through bamboo in 8-12 shots, wood in 25-30; M416 takes 12-15 for bamboo, 30-35 for wood, but its quicker fire rate keeps things efficient.
Submachine Guns like the JS9 (900+ RPM) rip bamboo apart in under 2 seconds for those tight urban runs; they're ammo-smart for pinning down, though they fizzle against stone past 20m.
DMRs such as SKS or Mini14 crack wood with each shot; land 3 headshots through beat-up bamboo, and fragments scatter to reveal your target.
Snipers? AWM or M24 punch right through bamboo to tag what's behind; on stone, they poke fist-sized holes for scouting without committing to a full breach.
Explosives shine bright—frags wipe 3-4m sections, Molotovs light up wood bits to spread the pain, and that Emergency Cover Flare tanks 40-50 AR rounds like a champ.
What the Environment Does to Cover Strength
Firing downward from high up speeds things up—gravity helps fragments break apart 15-20% faster than uphill shots, where pieces kinda patch gaps on their own. Damage sticks around; a wooden wall that's eaten 10 rounds mid-game only needs 15 more to cave. Dust clouds from dune busts blind sightlines for 2-3 seconds, prime for elevation cuts. Wreck stuff on slopes, and fragments roll down to expose prone players or jam routes—hell, trigger a stone avalanche to lock off low access entirely.
Hey, if you're grinding Rondo to climb ranks, don't sleep on a solid UC stockpile for those premium drops. PUBG Mobile UC buy via BitTopup hooks you up with killer prices and instant top-ups, so you snag Emergency Cover Flares, Battle Ready Kits, and endgame must-haves on the spot. Their secure setup and round-the-clock support? Total game-changer for dedicated squads.
Nailing Cover Reads in the Final Circles
Spotting Enemy Cover's Health on the Fly
Fresh bamboo's got those vibrant green stalks; once it's hurt, it turns brown and bends—horizontal cracks mean 40-60% left, vertical splits scream under 30%. Listen up: solid thunk turns hollow crack at 50% durability; metal gets a higher pitch as it thins. Tracers zipping through with little bend? Low health. If they stop inside, it's holding at 60% or better. Dial in 4x-6x scopes to spot bullet holes—fist-sized from ARs on wood; 10+ means a mag finishes the job.
Spotting the Signs: Visuals and Sounds of Breaking Cover
Bamboo throws splinters 1-2m high; wood spits out waist-level chunks; stone kicks up 3-4 second debris clouds—perfect for a rush. Bird cages jingle if fragments hit 'em, tipping you off. Near water? Splashes tell direction and range. With an M416's 30-round dump: impacts hit 0-1s, cracking at 1.5-2s, partial breach 2.5-3s, full collapse 3.5-4s—time your team push right there. Pickaxe thwack echoes 30-40m every 1.5s per swing, giving 4-6s heads-up for a 3-swing bamboo takedown; cover it with buddy fire.
Prepping Your Spot Before the Break
Angle 15-20° off the breach line to catch flanks when it goes; crouch at the edge for snap ADS. Pre-aim at cover's sweet spot—1.6m head height. Enemies pop up into your line 70% of the time on breaches. Cook a frag for 2s, lob at 30% integrity when cracking starts for a blast trap. Duo it: two players chew opposite wood sides on countdown, turning collapse into a 180° kill box.
Syncing Your Push to the Collapse
Bamboo drops in 2-3s? Sprint in hipfiring JS9 or UMP45. Stone's 4-5s debris window? Flank 90° in the dust, hit when it clears. Feint to 50% destruction, hold 3s to bait peeks, then finish to nab 'em mid-stride. Time breaches 10-15s before zone close—double whammy of falling cover and ticking damage.
Elevation Cuts: Your Go-To Advanced Move
Elevation Cuts Explained (With Real Examples)

Ever wonder how to cut off enemy climbs? It's destroying low cover to block ascents or hacking vertical paths with Pickaxe breaches—straight out of access-denial playbook.
Example 1: Cliff Lockdown - Pepper lower stone with DMR mid-game; seal with grenades in finals, stranding 'em on open turf under your cliff fire.
Example 2: Escalator Trap - Bust the upper wall at Jadena's escalator out for side shots on climbers.
Example 3: Tunnel Surprise - 3-4 Pickaxe swings through concrete ceiling for a pop-up over exit lurkers.
Example 4: Reverse Play - LMG the peak barriers on stone mountains from below, crumbling their high-ground shield against third-parties.
Spotting Cut Chances Across Map Types
In urban spots like Jadena or industrial zones, drop second-floor chunks onto first-floor foes; breach warehouse roofs from under.
Natural areas (Yu Lin, Oasis): Shred mid-slope bamboo to spot climbers; low dune stone reveals pushes to upper levels.
Coastal runs (Lo Hua Xing): Early gaps in approach paths; Flare across or breach cliff edges to force defender bailouts.
Transitions? Punch urban walls for views into bamboo wilds, outing rotators cold.
Pulling Off Cuts Without Getting Wrecked
Scout with 6x, tag breakables, pack 3+ frags, and ping the plan—Lower wall down in 10, push escalator. Kick off during distractions or 20s pre-zone; one wrecks, two pin with 5-round bursts. Crouch in partial cover mid-Pickaxe; climb in 5-6s smoke, set crossfire 2-3m from rims.
Shutting Down Enemy Cuts
Beat 'em to it—half-damage low cover mid-game to scare off breaches. Ear on for Pickaxe rhythms or gunfire: Pickaxe southwest, 30m, warehouse wall. Race downward destruction (grenades speed up); keep two exits, Molotov fallbacks, Jammer for edge re-climbs.
Owning High Ground in Rondo's Endgame
Why High Ground Hits Different in Rondo vs. Classic
Low ground crumbles fast under destructible fire, but ridgelines and cliffs up top hold firm—grab it early, and as enemy cover fails, you're golden. At 10m up, you've got 60% more cover variety, letting you snipe 100m+ bamboo to herd 'em into kill funnels. Downward shots scatter fragments with 20-30% less ammo; uphill? Gravity fights back with self-healing gaps. Lock high pre-EMP to dodge phase 3's vehicle blackout and foot scrambles.
Top Ways to Claim High Ground in Late Zones
Rotate phase 2-3 to stone peaks or fortress cliffs in vehicles—UAZ at 90km/h eats 1.5km in 60s, park 50m shy. Jadena escalators net 10m in 6-7s; wreck upper exit wall for prime angles. 3 Pickaxe swings through thin wood/concrete boosts your crew. Jammer on zone edge shoves foes inside low; 2-3 smokes at base hide a 15s creep up.
Knowing When to Ditch High Ground (Smart Bails)
Bug out on third-party noise below—shift 50-100m over post-loot. If zone's 30s away but safe high takes 40s, drop Flare mid-sprint. Bail below 100 rounds after burning 200-300 on destruction, hit compounds for resupply. Three-sided surround (gunfire, bird chatter)? Wreck the fourth for escape, frag your trail.
Surviving Low Ground and Flipping the Script
M249's 100-round belts chew high cover in 10-round bursts. Line 4-5 smokes for a 40m wall; dash seconds 3-8 to dead spots. Wide 100m+ flanks via rocks/dunes blind 'em. Bait with dummy fire, three advance angled into smoke. Dig in low if zone pulls your way—Battle Ready Kit for descent scraps.
Zone Call Framework: Making the Right Moves
Early vs. Late Rotates: Weighing It Out
Early (phases 1-2): Snag elevation, set destruction stages, loot chill—claims 60-70% high ground. Downsides? 3-4min vulnerability, ammo drain for end, surprise circle flips.
Late (3-4): Gunfire outs positions, thins third-parties, vehicles zip you in. Catches? Prime spots taken means low ground, sprints under fire, EMP foot fumbles.
Hybrid twist: Early central with elevation picks, ditch for phase 3 intel.
For the competitive edge, UC for premium heals and flares is non-negotiable. Instant PUBG UC recharge on BitTopup delivers seamless with tons of payment options, sharp rates, and zero wait. Security and reliability? It's why pros swear by it for grabbing Battle Ready Kits or Emergency Cover Flares mid-grind without skipping a beat.
Decoding Circle Patterns for Prime Spots
Concentric early (1-3 circles hugging 200m center): Mid-elevation central for 360° plays. Edge-pulls (70% northeast keeps going): NE quadrant high, pre-EMP vehicle lines.
Chaotic mess? Mid-tier near hub with Jammer for edges. Terrain sways it—rivers/cliffs mean opposite positioning boosts accuracy 40-50%.
Vehicles in Zone Shifts
Pre-EMP: UAZ 90km/h for 1.5km/60s, park 50m out. Bail on EMP, wreck it (50-60 rounds to boom) for denial or 10-15s chassis hide.
Late rushes: Squad serpentines at full tilt, passengers suppress, crash into destructibles for breaches.
Emergency Rotates While Taking Heat
Smoke every 15m for 30-40m runs; sprint 4-7s with Battle Ready mid-way. Hipfire sprint bamboo for 2m gaps. One perp sprint (15-20s Flare/smoke) lets three advance. Jammer edge surf; side-entry on shrink, skip centers.
Full Endgame Playbook: Weaving It All Together
Scenario 1: High Ground Holding Destructible Turf
Setup: You're perched on Tin Long Garden's stone mountain in phase 4; two squads creeping low through bamboo.
Step 1: 6x tags 60% northwest and fresh east bamboo.
Step 2: DMR 5-round bursts sync to drop both covers at once.
Step 3: Frag the base stone, Pickaxe wooden stairs to funnel 'em single-file.
Step 4: Peak and mid-slope crossfire locks the fields.
Step 5: Pre-bust western cover before phase 5's east pull.
Outcome: Wipes 'em with 150 rounds, blending reads, demo, elevation, and foresight.
Scenario 2: Low Ground Assault on Zone
Setup: Phase 5 in Central Oasis valley; zone yanks to enemy cliff.
Step 1: Four smokes build 50m wall; Pickaxe bamboo lane in 1-3s.
Step 2: 60-round AR upward chips cliff stone to 40-50%.
Step 3: Stump boost to mid-ledge; frag top, Pickaxe lower.
Step 4: Flare barricade, 3 Pickaxe for the climb.
Step 5: Second smoke at 10s; SMG pop 5-10m out.
Outcome: Claims cliff 30s pre-phase 6, layering destruction, smoke, and cuts.
Scenario 3: Four-Squad Final Brawl
Setup: Phase 6, 100m circle with four squads; you're mid-warehouse roof, two low, one high rooftop.
Step 1: Two M416s shred high wood (40 rounds); two watch low windows.
Step 2: Hold post-collapse; wreck their low vehicle/bamboo on push.
Step 3: Phase 7 drops high; bust escalator wall, pre-aim stairs.
Step 4: Crossfire the descent; drop second low cover, Battle Ready under 50% health.
Step 5: Floor breach for ground views.
Outcome: Victory through elevation edge, third-party timing, and demo mastery.
Scenario 4: Solo Taking on a Full Squad
Setup: Phase 6, you're the last one vs. a fresh Lo Hua Xing fortress squad.
Step 1: 4 Pickaxe swings tunnel ceiling for 30m surprise out.
Step 2: Frag front wall distraction (3-4s); emerge opposite.
Step 3: Stun Gun 10m pins one (3s for headshots).
Step 4: Hipfire bust nearby bamboo/crates; smoke the mess.
Step 5: Jammer edges phase 7 shift; grenade stone path.
Step 6: Prone Flare for 2v1 via zone pressure and gaps.
Outcome: Turns chaos into multipliers, outlasting through destruction and smarts.
Scenario 5: Vehicle Rush to Final
Setup: Phase 4, 800m desert dash to zone; no EMP yet, two squads shooting.
Step 1: Hop UAZ, plot bamboo/rock waypoints; pack frags/smokes.
Step 2: 90km/h serpentines every 3-4s; trail smokes dodge tails.
Step 3: Window shots wreck pass-by bamboo, block their rotates.
Step 4: 80km/h slam wood warehouse for 4m hole.
Step 5: Flare at breach; two opposite wall demo, two cover.
Step 6: Blast UAZ tank; boom widens your zone.
Outcome: Locks it with speed, on-the-move wrecks, and quick setup.
Loadout Tweaks for Rondo Domination
Prime Weapon Pairings for Endgame

Go-To Primary: M416 - Slap on compensator, vertical grip, extended quickdraw (60 rounds), 4x; 2.5s reload, 240 rounds total (8 mags: 120 for demo, 120 fights).
Secondary: JS9 - Suppressor, laser, extended (40 rounds), red dot; 900 RPM mulches bamboo under 2s, 160 rounds (4 mags).
Alt Primary: AKM - Compensator, half grip, extended, 3x; 30 rounds flatten bamboo (beats M416's 35-40), 210 rounds (7 mags), 600 RPM punch.
Sniper Pick: Mini14 - Suppressor, extended quickdraw (20 rounds), 6x; precise gaps, 100 rounds (5 mags), team with SMG.
Skip These: AWM/M24 endgame (1.8s/shot too slow for sustain); swap before phase 4.
Throwables Ranked: Smokes, Frags, Molotovs
Smokes (4-5): Peak 8-10m radius in 5-6s; chain 15m for runs, bank 45° off walls for +30% reach.
Frags (3-4): 6m blast wrecks wood (1 hit), stone (2); 2s cook for air-bursts, upward cliff lobs.
Molotovs (1-2): 5s fire stops wood reuse; window tosses clear rooms.
Stuns (0-1): 4s blind for clean breaches; ditch in tight quarters.
Healing Smart in Final Circles
Battle Ready Kit (1): 6s full health/energy; save for phase 6+ crises or mid-rotate.
First Aids (5-6): 75% in 4s; downtime or Flare shields, better than 8s Medkits post-phase 5.
Bandages (10-15): 10%/3s fillers (2-3 after First Aid to 95-100%); quick peeks.
Energy Drinks (3-4): 40% energy over 2min for 6.3m/s sprints, 60 health/min passive.
Painkillers (2-3): 60% in 6s, 3min boost for phase 6-7 peaks.
Adrenaline (1 if spotted): 10s max energy/100% health ramp; phase 4-5 holds.
Attachments Tuned for Close Endgame
Muzzle: Compensator - 20% vertical kick for demo; suppressor on SMG for sneak.
Grip: Vertical (AR)/Laser (SMG) - 15% vertical/30% hipfire; no angled.
Mag: Extended Quickdraw - 50% more rounds/30% faster swap; 25-30 for wood without pause.
Scope: 4x AR/Red Dot SMG - 50-100m aim/0.2s ADS close; skip 6x+.
Stock: Tactical AR - 10% ADS/5% move; pass on SMG.
Endgame Pitfalls and How to Dodge 'Em
The Top 10 Killers in Rondo Finals—and Fixes
1: Sticking to Busted Cover - Never past 50% health; shift on cracks, yell 40%, rotating right 5s.
2: Flat Zone Picks - Ditch centers; edge hills over valleys every time.
3: Busting Your Own Too Soon - Phase 4-5 no-go; hold to 6+, tag Don't shoot northwest stone.
4: Lone Wolf Demo - One wrecks? Nah—2 demo/2 pin, swap 10s, 1-2 destroying, 3-4 east suppress.
5: Forgetting Pickaxe - Stealth breaches slip by; hotkey melee, drill 1.5s swings, eye thin walls (3-4 hits).
6: Chasing Kills Blind - Open fields? Damage 50-75% (6-8 AR), bail for zone/thirds.
7: Smoke Fumbles - Too soon/late; lob 2-3s pre-dash, sprint at peak 2, follow at 10.
8: EMP Blindside - Vehicle traps; spotter EMP 30s, ditch; bail/destroy on impact.
9: Ammo Starve - Under 100 phase 5; phase 3-4 loot to 240 AR/160 SMG, 100 left, mark boxes.
10: Skyline Silhouettes - Edge stands kill; 2-3m back, crouch/prone, lean 1-2s fire/pull.
Comms Gone Wrong and Fix Systems
Vague calls suck—go 270° 80m 60% bamboo. Overlap? Leader owns rotates, solos threats; keep it short Northwest pushing.
Missed demo? Bamboo gone, sightline open or Wall 50%, breach 10s. No roles? Phase 3-4: scout (spots/cover), destroyer (AR), support (smokes/heals), sniper (exposures/high); swap by kit.
Panic mode: Breathe 1s, then East 30m need smoke.
Aggro vs. Chill: Finding Balance
Too hot? Every breach a push, ammo gone—50% rule: only if >50% damaged, bail sans edge. Too passive? No wrecks, boxed in—proactive: demo 60-80m setups, three-side/zone rotates.
Sweet spot: Wreck for space, engage if elevation/cover tops, watch stocks (high? push; low? hold). Phase 4-5 third-party 6+ squads passive; 6-7 on 2-3, go aggressive. Solo: Chill to 1v1, demo for outs.
Tracking and Leveling Up Your Endgame Game
Metrics That Matter (Placements, K/D)
Top 10 finishes: 60%+ for intermediates, 80%+ advanced over 20 games; under 50%? Shore early deaths.
Phase 5+ survival: 70%+ goal; below 60%? Scrub phase 3-4 VOD rotates.
Endgame K/D (5-7): 1.5+ intermediate, 2.5+ advanced; <1.0 too timid, >3.0 with low places? Too reckless.
Demo efficiency: 25-35 rounds wood, 10-15 bamboo; over 50? Bad picks—drill it.
Zone damage 4-7: Under 20% health; over 50%? Late rotates—study patterns.
Elevation time 5-7: 60%+ high; <40%? Low wins less, early grab.
VOD Checklist to Break Down Your Plays
Tape losses/tight wins; skip stomps.
Rotates: Freeze 4-7—Early/late? High? Wreck blocks? Time it, fix phase 5 lates by 20s sooner.
Cover reads: Pause fights—Pre-assess? Pre-wreck? Shift on fade? Flag deaths to safe cover or stuck collapses.
Elevation: Log shifts—Planned? Demo help? Hold more? Weigh time vs. lives.
Demo: Tally—Needed? Goal hit? Ammo waste? Red-flag unused/early noise.
Comms: Actionable vs. fluff count; gaps in flanks/collapses/shifts; aim +20% useful.
Decisions (push/bail/wreck/hold): 65%+ wins; under 50%? Back to frameworks.
Drills to Sharpen Cover and Elevation
1: Demo Timers - 10 wood at 20m intervals under 90s (9s each); bamboo <60s, stone <150s with grenades.
2: Integrity Guesses - Buddy hits 100/75/50/25%; eyeball, verify rounds; 80%+ spot-on ±15%.
3: Cut Climbs - Bottom-to-top hill via wrecks/Pickaxe, no trails; <30s for 20m up.
4: Smoke Runs - 50m open, 4 smokes dash <15s with 80%+ hide (<3s spotted).
5: Zone Guesses - Custom 1-3 predicts, rotate; 60%+ right/10 tries.
6: Multi-Hits - 5 targets 30-80m behind walls; wreck then tag 70%+ <2s post-fall.
7: Hot Rotates - 100m under fire with smokes/demo/Flare; <30% health drop.
8: High Defense - Hold vs. 3 low rushes; wreck advances, repel clean.
FAQs: Your Rondo Endgame Burning Questions
Q1: How's Rondo's destructible cover stack against other PUBG Mobile maps?
Rondo cranks it with pre-fractured assets and real-time physics for full breaks at 60 FPS on mid-range gear—unlike Classic's unchanging rocks. Bamboo/wood/stone go down in 10-50 AR rounds or 3-5 Pickaxe swings, wearing over time. Read via cracks, color shifts, hollow thuds; fragments scatter/roll for shifting battles. LOD tweaks on bits keep frames steady, pushing constant repositions over static hides.
Q2: Pickaxe or shots for endgame cover busts?
Pickaxe when stealth or ammo matters: 1.5s swings, 3-4 for wood/bamboo, quieter than bangs, saves your 240 AR. Exposed without cover fire—pair with suppress, distractions, smoke/tunnels. Gunfire for speed under zone pressure or >50m range. Team it: one swings, two pins, swap 10s.
Q3: Ideal loadout for Rondo finals?
Primary M416 (compensator/vertical/extended quickdraw/4x, 240 rounds); secondary JS9 (suppressor/laser/extended/red dot, 160 rounds). Throwables: 4-5 smokes (runs/revives), 3-4 frags (wrecks/denials), 1-2 Molotovs (debris block). Heals: 1 Battle Ready (crunch time), 5-6 First Aids, 10-15 Bandages, 3-4 Energy Drinks, 2-3 Painkillers. Gear: Flare (shield), Jammer (edges); mixes demo, close kills, rotates, sustain for 5-7.
Q4: Beating high-ground holders in Rondo endgame?
(1) 4-5 smokes for 40m screen; (2) LMG/AR 60-80 rounds on stone, force 'em down; (3) 100m+ smoke flanks sides/rear; (4) Low hold if zone favors you, push descent; (5) 3-4 Pickaxe thin walls/floors for pop-ups. 2s-cooked frags up cliffs double-tap; Battle Ready fuels assaults. No frontals—elevation crushes straight plays.
Q5: Biggest Rondo final mistakes?
(1) Cling <50% cover; shift on cracks; (2) Flat centers; edge hills first; (3) <100 rounds phase 5; phase 3-4 loot 240 AR. Own cover to 6+; 2 wreck/2 pin; smokes 2-3s pre. Balance: Demo for control, bail weak; no open chases or camping.
Q6: EMP Zones messing with Rondo endgame plans?
Phases 1-3 kill scopes/vehicles/stores/recalls/Jammers, iron sights (drill 50-70m) and foot paths via wrecks. 30-60s pre: Phase 2 high rotate, vehicle ditch on hit/destroy block. Hit panic: SMG rush disoriented scope/ride fans. Post-3 normalizes, but early high sticks; map foot routes (bamboo/rocks).