

The Bottom Line: Building teams that can handle Spiral Abyss isn't rocket science, but it's not just throwing your favorite characters together either. You need balanced roles (1 Main DPS, 1-2 Sub-DPS, 1-2 Supports), smart elemental synergy (Pyro still rules, sorry Electro mains), proper energy management, and—here's the kicker—balanced stats over those Instagram-worthy CRIT ratios everyone obsesses over.
Let's Talk About What Actually Makes Teams Work
The Real Deal on Team Building
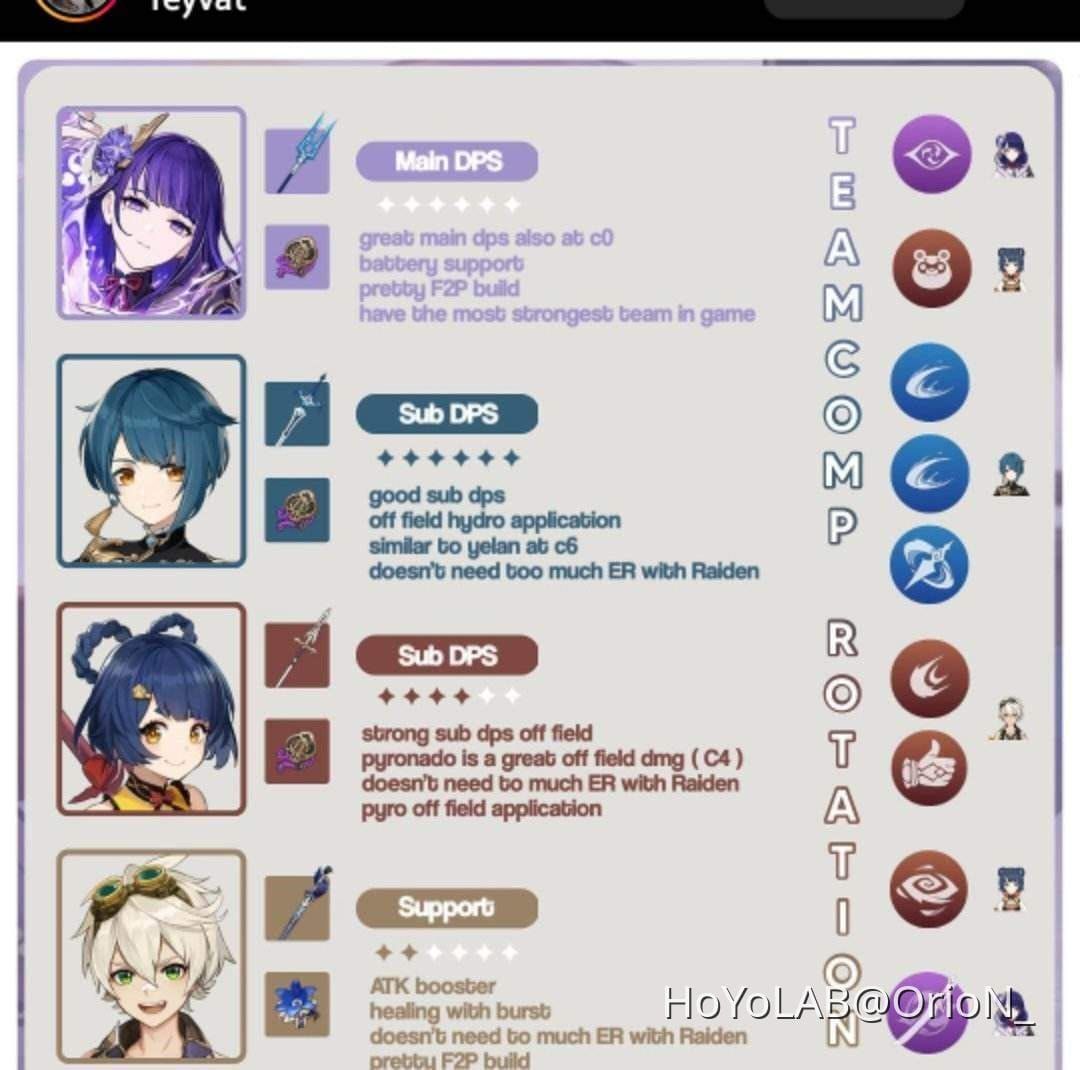
Here's something that might surprise you: team building isn't about having the strongest individual characters. It's about synergy. Take the infamous Raiden National team—Raiden, Xiangling, Xingqiu, Bennett. Plot twist? Raiden isn't even doing most of the heavy lifting. Those support characters Xiangling and Xingqiu are quietly carrying over 70% of your total damage output.
Makes you think differently about who deserves those crown materials, doesn't it?
For players looking to secure key characters without the endless grind, trusted Genshin top up site platforms like BitTopup offer secure Primogem purchases with competitive pricing and instant delivery. Because let's be honest—sometimes you just need that guarantee.
What Scalable Actually Means
When we talk about scalable teams, we're talking about compositions that don't fall apart the moment you step into serious content. An effective Main DPS needs three things: C0 viability (because not everyone's a whale), low investment threshold, and the ability to handle whatever the Abyss throws at you.
Characters like Hu Tao, Raiden, Neuvillette, and Ganyu? They check all these boxes. They work with craftable 4-star weapons and can handle both that annoying single-target boss and those multi-wave encounters that make you question your life choices.
Why Overworld Success Doesn't Equal Abyss Success
Here's where things get real. Spiral Abyss doesn't care about your beautiful screenshot moments. It cares about time pressure, elemental shields, and specific mechanics that will humble even the most confident players.
Take Version 6.0's Ley Line Disorders—200% Electro-Charged damage bonus on the first half, 200% Bloom damage boost on the second. Suddenly, that niche Electro-Charged team you never bothered building becomes the star of the show. The Knuckle Duckle boss? You need exactly 10 hits of Electro-Charged damage to deal with those summoned ducks (each with 26% of the boss's HP, by the way).
Specificity matters. A lot.
The Four Pillars That Actually Matter
Getting Your Roles Right
Let's break down the five character roles: Main DPS (your on-field damage dealer), Sub-DPS (off-field damage), Enabler (applies elements for reactions), Battery (generates energy particles), and Support (healing, shielding, buffs).

Now here's a mistake I see constantly—what I call overstacking supports. Players collect Zhongli, Kazuha, Bennett, and Nahida thinking they've built the ultimate team. Result? You've got 150% damage bonuses applied to... basically nothing. Less than 10,000 DPS output won't clear anything meaningful, no matter how many buffs you stack.
You need muscle before you need steroids.
Elemental Priority (Yes, There's a Hierarchy)
Pyro > Hydro = Cryo > Dendro > Electro.
Before the Dendro mains come for me—this isn't about character quality, it's about reaction accessibility. Pyro gets both Melt (2.0x multiplier) and Vaporize (1.5x multiplier). That's versatility you can build around.
Dendro and Electro? They're heavily dependent on specific characters. Without Nahida, Aggravate teams lose about 40% DPS, and Hyperbloom teams see a 65% reduction in Dendro Core generation. That's not flexibility—that's dependency.
Energy Management (The Unsexy Essential)
Nobody talks about energy management until their Bursts aren't ready when they need them. Battery characters aren't glamorous, but they're essential. Diona keeping Eula's 80-energy Burst available? That's the difference between smooth rotations and awkward downtime.
The High Voltage (Electro) resonance helps here—generating Electro particles on reactions with a 5-second cooldown. Small detail, big impact.
Stats vs. CRIT Obsession
My crit ratio is insane but why is my damage still bad?
I hear this question weekly. The answer? You're probably neglecting ATK% or Energy Recharge while chasing those perfect CRIT numbers. Bennett's ATK buff should reduce your artifact ATK% requirements, letting you focus on CRIT or Energy Recharge substats instead.
Balance beats perfection in one area.
Mastering Elemental Reactions (Beyond the Basics)
The Reaction Hierarchy That Matters
Amplifying reactions (Vaporize, Melt) multiply your triggering attack damage and scale with everything—ATK, CRIT, DMG%, Elemental Mastery. Pyro on Cryo (Melt) and Hydro on Pyro (Vaporize) give you that sweet 2.0x multiplier. Reverse reactions? 1.5x, still solid.
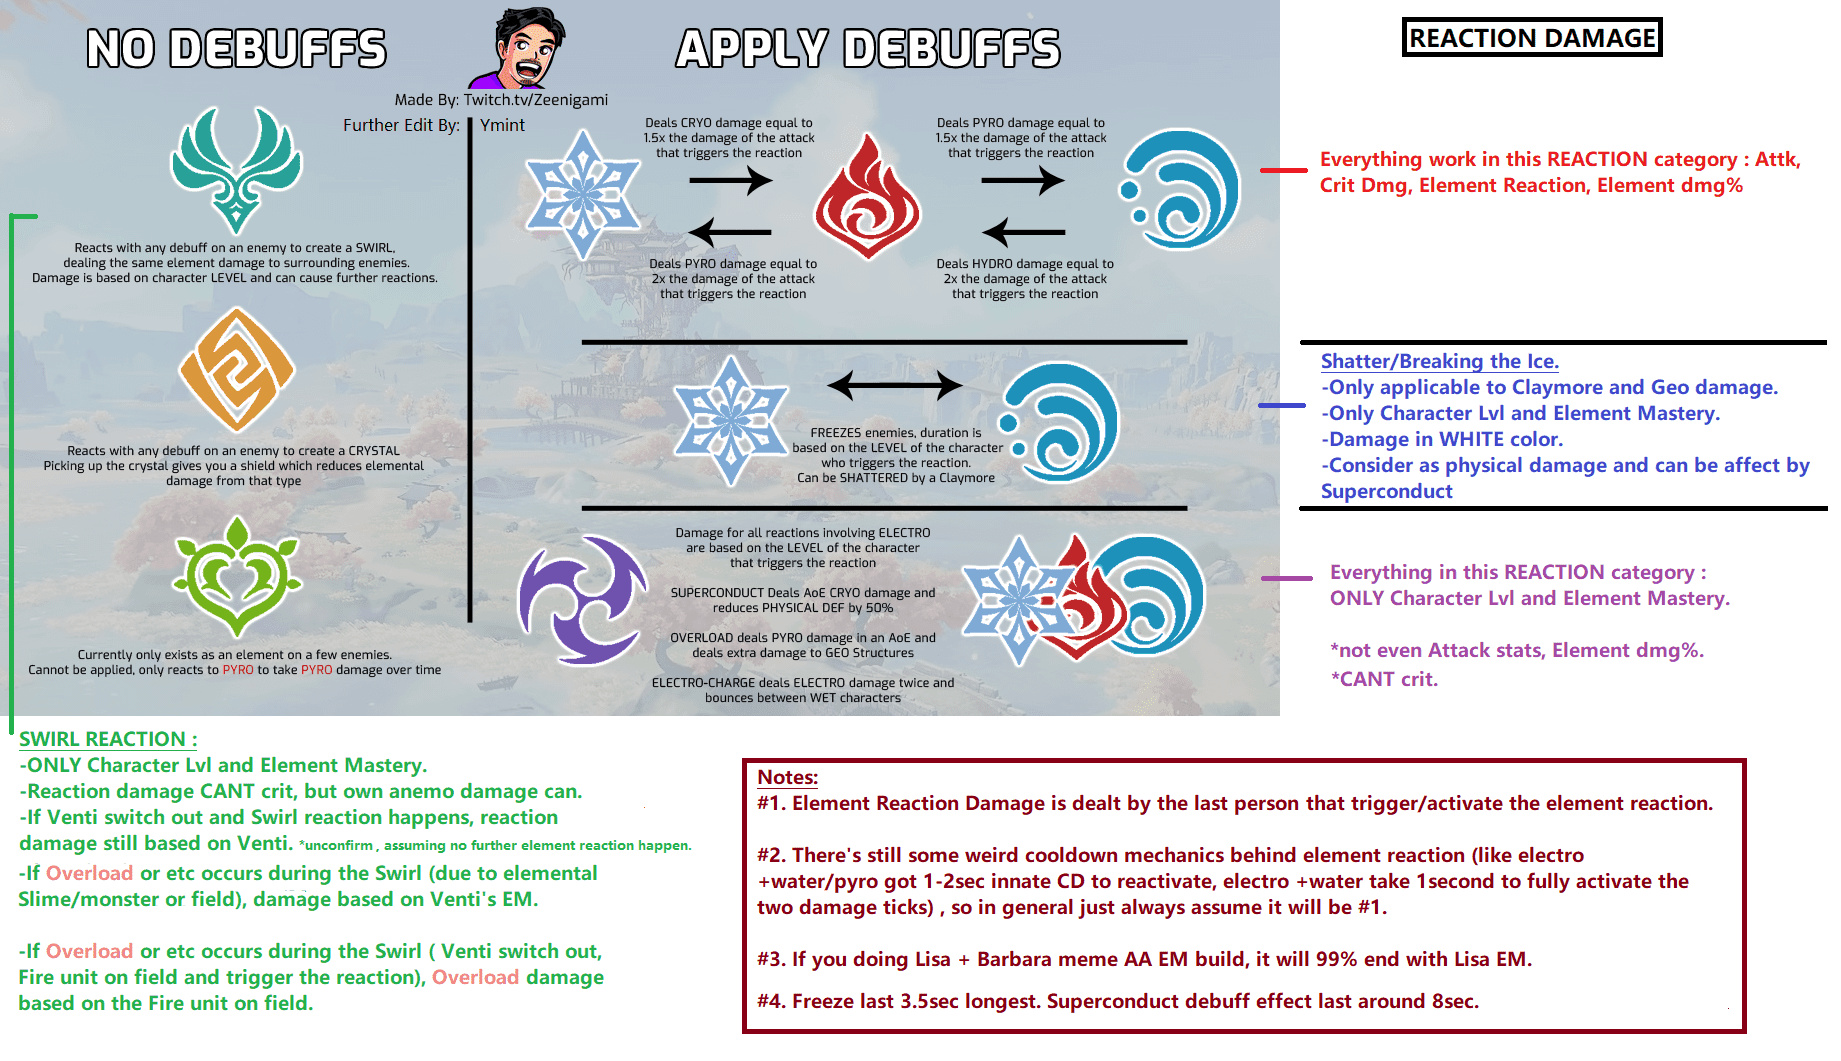
Transformative reactions (Overloaded, Superconduct, Electro-Charged, Swirl, Shatter, Bloom, Burgeon, Hyperbloom) work differently—they deal separate damage that can't CRIT, scaling only with Character Level and Elemental Mastery.
Different tools for different jobs.
Timing and Internal Cooldowns
Internal Cooldown (ICD) mechanics limit how often you can apply elements—usually every 2.5 seconds or every 3 hits, whichever comes first. Characters with no ICD on specific abilities, like Xiangling's Pyronado, are absolute gold for reaction teams.
This is why some characters feel so much smoother than others in reaction-heavy compositions.
The Snapshotting Game-Changer
Snapshotting lets certain abilities retain character stats from the moment you cast them. Xiangling's Pyronado cast within Bennett's buff field? It keeps that ATK bonus for the full duration, even if you move out of the circle.
Understanding this mechanic transforms how you approach rotations and buff timing.
Character Roles: Assignment and Optimization
Choosing Your DPS
How your DPS activates their damage matters more than you might think. Normal Attack activation (Neuvillette) is straightforward and stable. Skill-based activation (Arlecchino, Hu Tao) offers high damage but demands technical execution. Burst-reliant characters (Raiden Shogun, Ayaka) pack a punch but come with energy requirements and team restrictions.
Pick based on your comfort level and available supports.
For consistent access to optimal DPS characters, Genesis Crystals instant checkout services through BitTopup provide immediate access with secure payment processing. Sometimes the guarantee is worth the investment.
Support Tiers (Not All Supports Are Equal)
Tier 1 supports (Bennett, Furina, Nahida, Kazuha) fit into diverse top-tier compositions. Tier 2 supports (Chevreuse for Overload, Shenhe for Cryo, Kujou Sara for Electro) excel in specific archetypes but lack broad application.
The principle Flexible DPS, Eternal Supports only works when you have strong DPS foundations. Otherwise, you're just collecting expensive buffers.
Healer vs. Shielder: The Eternal Debate
Shielding gives you damage absorption and interruption resistance. Zhongli's Jade Shield absorbs 150% against all damage types plus reduces enemy resistance. Pretty comprehensive protection.
But healing becomes essential against specific mechanics—like the Radiant Moonfly boss's party-wide HP drain. Characters like Baizhu, Kokomi, or Jean turn survival nightmares into manageable DPS checks through strong team-wide healing and cleansing.
Context determines the right choice.
Crowd Control That Actually Works
Kazuha's held skill demonstrates optimal crowd control—10-meter radius with reversed attenuation, pulling distant enemies more strongly than close ones. This grouping capability significantly improves AoE damage efficiency and reaction consistency.
Not all crowd control is created equal.
Energy and Rotations: The Technical Stuff
Energy Requirements by the Numbers
High-cost Bursts like Eula's 80-energy requirement need dedicated battery support or significant Energy Recharge investment. Same-element batteries provide optimal particle generation efficiency—element matching isn't just about reactions.
Particle Generation Patterns
Fischl exemplifies effective battery function through Oz's consistent Electro particle generation while contributing high personal damage. Understanding these patterns helps you build more efficient teams.
Rotation Sequencing
A Mavuika Melt team rotation shows proper sequencing: Mavuika Skill → Xilonen Battle Will generation → Bennett buff → Citlali Cryo application and shielding → Mavuika Burst and Charged Attack execution.
Setup, buff coordination, elemental application order—it all matters.
Investment Strategy: Where to Spend Your Resources
The 70-20-10 Rule
Long-term account progression benefits from structured Primogem allocation: 70% for essential Main DPS characters, 20% for key Support characters, 10% for personal preference.
New character investment requires 3-4 weeks of dedicated farming to achieve effectiveness. A Level 70 character with 1/1/1 talents significantly underperforms a fully invested Level 90 character with 9/9/9 talents, regardless of meta perception.
Investment depth beats breadth.
Constellation Value Analysis
Constellation value varies dramatically. C0-viable characters like Hu Tao, Raiden, and Neuvillette achieve full effectiveness without additional investment. Gaming's C4 restores energy, while C6 adds 20% CRIT Rate and 40% CRIT DMG.
Know your breakpoints before you pull.
Artifacts: Sets vs. Substats
Support characters often prioritize powerful set bonuses like 4-piece Viridescent Venerer or Noblesse Oblige even with mediocre substats—team utility outweighs personal damage optimization. DPS characters face trade-offs between 4-piece set bonuses and 2-piece combinations with superior substats.
Different priorities for different roles.
Abyss Adaptation: Playing the Meta Game
Floor-Specific Strategy
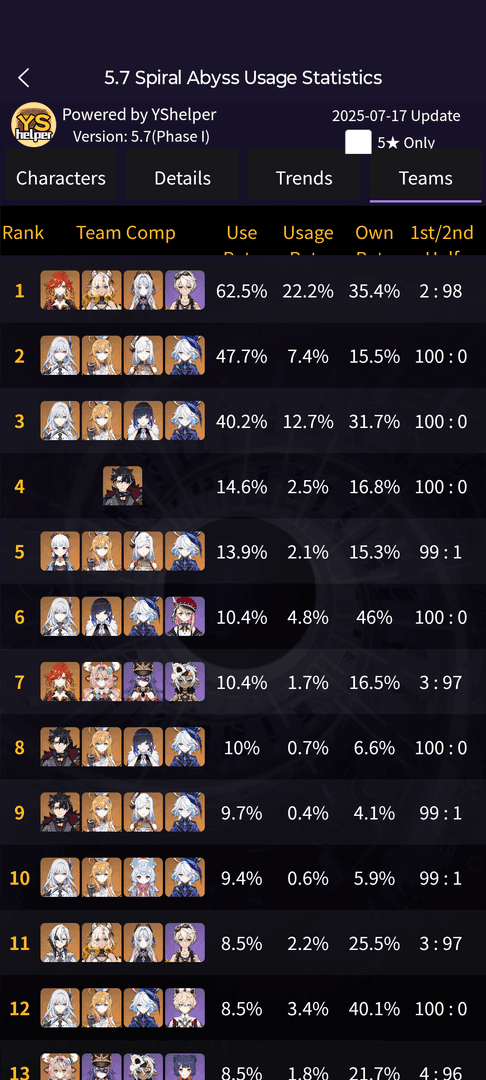
Spiral Abyss Floor 12 mechanics directly influence optimal team selection. Version 6.0's 200% Electro-Charged and Bloom damage bonuses encouraged specific teams like Neuvillette/Furina/Fischl/Kazuha for first half and Nilou/Nahida/Kokomi/Dendro Traveler for second half.
Usage rate data from version 5.8 shows character effectiveness: Escoffier (95.6%), Furina (92.8%), Skirk (90%), Citlali (89.5%), Mavuika (84.6%), Bennett (80.2%). These numbers tell a story about what actually works.
Enemy-Specific Counters
The Knuckle Duckle boss summons 5 ducks with 26% boss HP each, defeated by 10 Electro-Charged hits. This favors rapid multi-hit Electro-Charged teams with characters like Fischl or Yae Miko.
Know your enemy mechanics. They're not just flavor text.
Time Management Reality
Abyss time limits demand efficient damage windows and minimal downtime. Teams achieving 36-star clears optimize crowd control, reaction consistency, and burst timing simultaneously.
Every second counts.
Common Mistakes (And How to Avoid Them)
The All Buffs, No Muscle Problem
Acquiring universal buffers without damage foundations creates teams with impressive bonuses applied to insufficient base damage. Solution: prioritize 1-2 effective Main DPS characters before support optimization.
Synergy Misconceptions
Equating Main DPS with longest field time creates building errors. Many top-tier compositions feature Sub-DPS characters contributing majority damage despite limited field presence.
Field time doesn't equal damage contribution.
Meta Chasing Without Understanding
Blindly following meta recommendations without understanding principles creates ineffective teams. Meta compositions require specific character combinations, investment levels, and execution skills that may not align with your account state.
Adapt principles, don't copy blindly.
Practical Implementation
F2P Approach
Free-to-play players benefit from focusing on guaranteed 4-star characters and strategic 5-star acquisitions. The National Team archetype (Bennett, Xiangling, Xingqiu plus flexible fourth slot) provides exceptional effectiveness with minimal investment.
Hyperbloom teams offer another F2P-friendly option—Dendro Traveler, Xingqiu, and Kuki Shinobu can clear most content.
Spender Strategy
Players with spending capacity should prioritize C0-viable 5-star Main DPS characters before constellation investments. Weapon investments typically provide better returns than character constellations for damage optimization.
Long-term Planning
Account development benefits from 1-year planning horizons. Maintaining Primogem reserves for unexpected high-value characters prevents reactive spending and enables strategic timing.
Version cycles introduce new mechanics that may shift optimal compositions. Stay flexible.
Advanced Optimization and Future-Proofing
Meta Evolution Patterns
Recent trends favor hybrid characters providing damage plus utility over pure specialists. Characters like Furina combine Sub-DPS damage with team buffing, while Citlali offers shielding with Cryo application.
Versatility is increasingly valuable.
New Character Integration
Evaluate new characters within existing frameworks rather than building entirely new compositions. Consider constellation requirements, weapon dependencies, and team slot competition.
Team Evolution Planning
Effective building anticipates natural upgrade paths. Initial teams using 4-star characters should identify clear upgrade routes to 5-star alternatives without requiring complete overhauls.
Plan for growth, not just current needs.
FAQ
Q: What's the most important principle for Abyss-ready teams?
Balanced role distribution with proper elemental synergy. One Main DPS, 1-2 Sub-DPS, 1-2 Supports, prioritizing team synergy over individual power. Raiden National proves this—Sub-DPS characters contribute over 70% of damage despite Raiden's field presence.
Q: How do I avoid building All Buffs, No Muscle teams?
Secure 1-2 effective C0-viable Main DPS characters (Hu Tao, Neuvillette, Raiden, Ganyu) before investing in universal supports. 150% damage bonuses mean nothing without strong damage foundations.
Q: Which elements should I prioritize?
Pyro > Hydro = Cryo > Dendro > Electro for Main DPS selection. Pyro enables both Melt (2.0x) and Vaporize (1.5x) reactions, while Dendro/Electro depend heavily on specific characters like Nahida.
Q: How much Energy Recharge do I actually need?
Varies by character and team. High-cost Bursts (80 energy like Eula) need dedicated same-element batteries or 140-180% Energy Recharge depending on team support. Characters like Diona effectively battery Cryo DPS while providing utility.
Q: 4-piece sets or better substats?
Support characters typically prioritize set bonuses (4pc Viridescent Venerer, Noblesse Oblige) even with mediocre substats for team utility. DPS characters balance set bonuses against substat quality—exceptional sets usually justify completion.
Q: How do I adapt teams for different Abyss mechanics?
Study Ley Line Disorders and enemy mechanics for targeted adaptation. Version 6.0's 200% Electro-Charged bonus favored teams like Neuvillette/Furina/Fischl/Kazuha, while Knuckle Duckle requires rapid Electro-Charged application for efficient duck elimination (26% boss HP each).