

Faruzan requires 220-300% Energy Recharge at C0-C5 for consistent burst rotations, dropping to 160-200% at C6. Her 80-cost burst and complex particle generation mechanics demand careful ER optimization through weapons, artifacts, and team synergy.
Let's be honest here – Faruzan is simultaneously one of the most powerful Anemo supports in the game and one of the most energy-hungry characters you'll ever build. Her buffs for Anemo DPS units like Wanderer, Xiao, and Heizou are absolutely unmatched, but that 80-cost burst? It's going to make you rethink everything you know about energy management.
The thing that makes Faruzan so tricky is her particle generation system. Unlike most characters who just press E and call it a day, she requires this whole charged shot dance with strict timing windows. Miss your shots? No particles. It's that simple – and that brutal.
For players optimizing Faruzan builds efficiently, BitTopup offers cheap Genesis Crystal bundles with competitive pricing and instant delivery for acquiring necessary wishes for constellations and weapons.
Understanding Faruzan's Energy Requirements Basics
The 80-Cost Reality Check
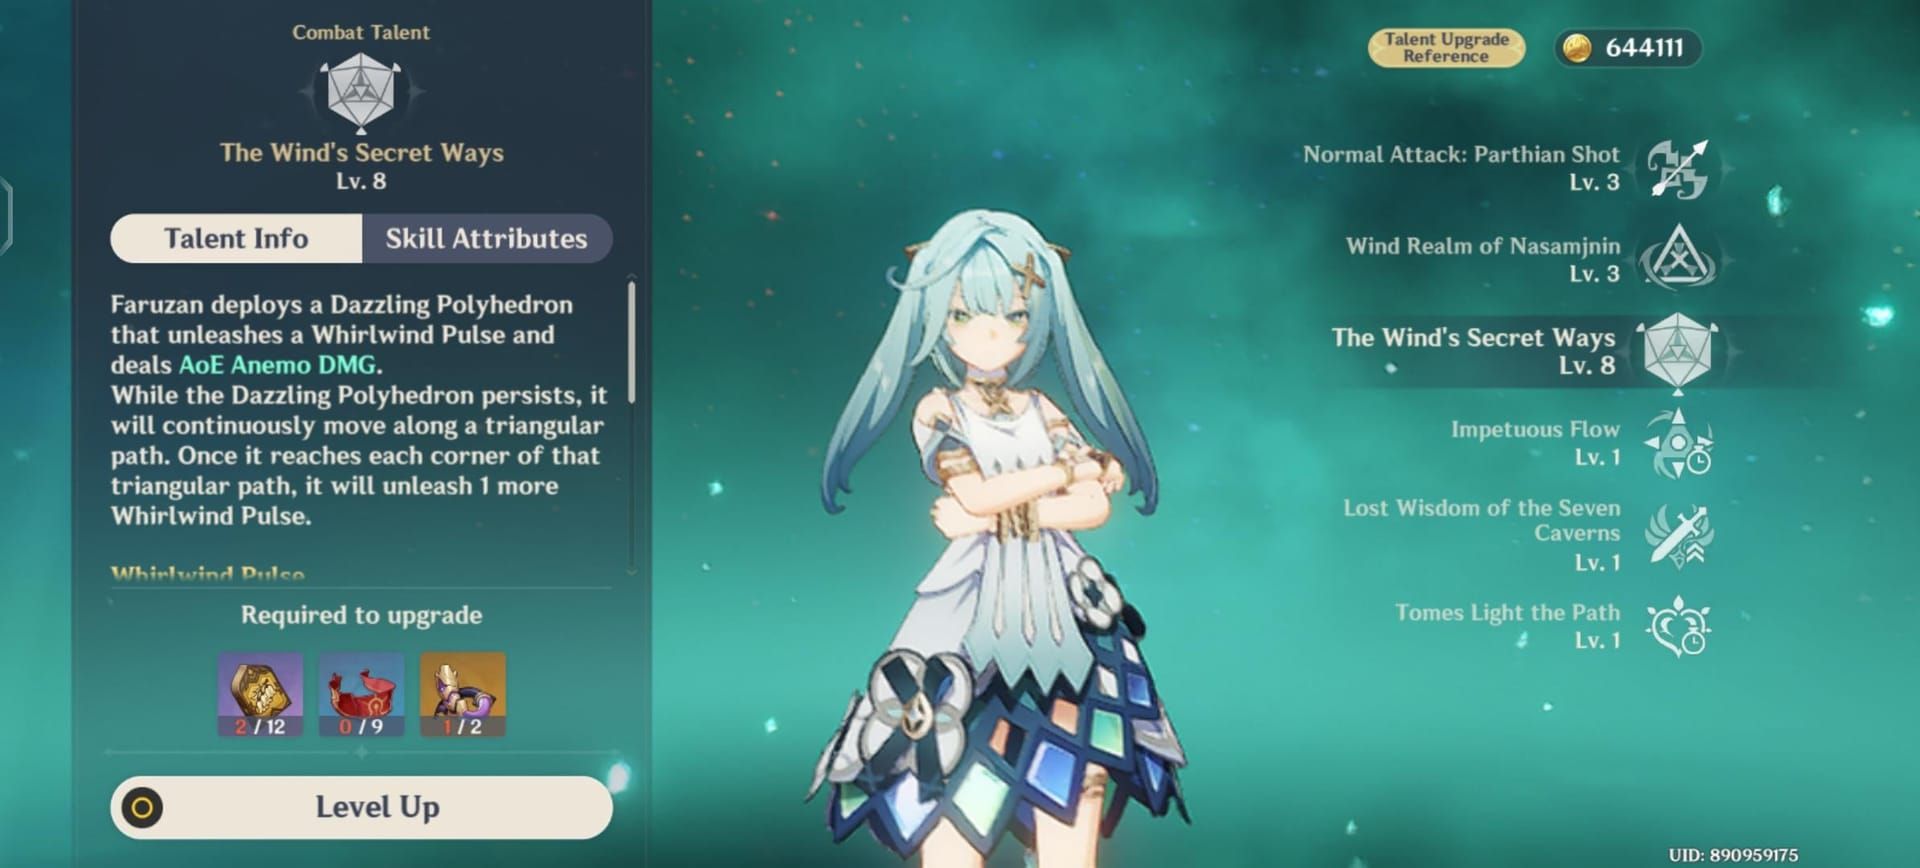
That 80 energy cost isn't just a number on paper – it's a commitment. With a 20-second cooldown and 12-second base duration, you're looking at tight rotation windows where every particle counts. The Dazzling Polyhedron fires off Whirlwind Pulses every 2 seconds (7 total), and each pulse applies buffs lasting 4 seconds.
Here's where it gets interesting: you actually get 16 seconds of buff uptime from a 12-second burst duration. C2 extends this to 18 seconds total duration with 22 seconds of buff coverage – suddenly those constellation investments start making sense, right?
The Charged Shot Particle Dance

This is where Faruzan gets... complicated. Her Elemental Skill doesn't generate particles on cast. Instead, you need to follow up with fully charged Hurricane Arrow shots that create Pressurized Collapse vortices. These vortices generate 2 Anemo particles when they hit enemies, but here's the kicker – there's a strict 5.5-second internal cooldown.
Miss your charged shot? Zero particles. Fire multiple shots rapidly? Still just one set of particles every 5.5 seconds. It's a system that rewards precision and punishes button mashing.
Constellation Game-Changers
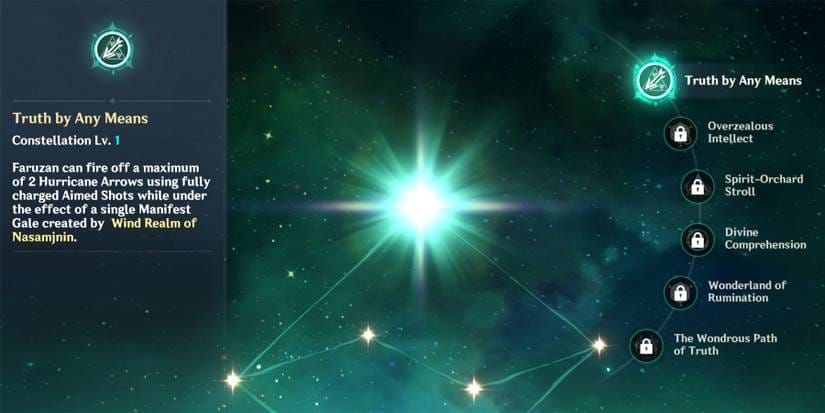
Pre-C6 Faruzan is honestly a bit of a project. You're looking at meticulous ER planning and some pretty hefty stat investments. C1 gives you a second Hurricane Arrow charge, which helps with consistency but doesn't bypass that particle ICD.
C4 is where things start getting spicy – it introduces flat energy restoration. Two energy for one opponent, plus 0.5 energy per additional enemy up to 4 energy max per vortex. This bypasses the particle ICD entirely, which is huge for multi-target scenarios.
But C6? That's the constellation that transforms her from energy-hungry support to energy-comfortable powerhouse. Active characters can trigger Pressurized Collapse every 3 seconds when dealing Anemo damage. We're talking up to 8 additional particles per rotation while consistently triggering that C4 restoration.
ER Calculation Framework for Faruzan
The Math Behind the Madness
Pre-C6 Faruzan in double Anemo teams needs 220-240% ER if you nail two successful Pressurized Collapse activations plus one Favonius proc – assuming you catch every single particle. Drop down to just one Pressurized Collapse activation? You're looking at 275-300% ER territory.
These numbers assume perfect play, by the way. In reality, you'll want some buffer room.
Team Comp Variables That Actually Matter
Triple Anemo setups can drop those pre-C6 requirements to 190-205% through extra particle generation. At C6, triple Anemo teams let you operate at 160-185% ER – suddenly very manageable.
Each Favonius proc reduces your ER needs by 25-35%. That 4-piece Exile set? It's regenerating 2 energy for everyone every 2 seconds for 6 seconds after burst, cutting Faruzan's ER requirements by roughly 25%. These aren't just theoretical optimizations – they're practical solutions to real energy problems.
Enemy Density Reality
Multi-target encounters boost that C4 restoration from 2 to 4 energy per vortex. But here's something the theorycrafters don't always mention – combat positioning matters. Mobile enemies, terrain obstacles, even camera angles can mess with your charged shot targeting. Spiral Abyss chambers with varying enemy counts require ER flexibility because what works against a group of Hilichurls might leave you energy-starved against a single Ruin Guard.
Constellation-Specific ER Targets
C0: The Struggle is Real
C0 Faruzan demands 250-300% Energy Recharge for comfortable rotations. I know that sounds brutal, but it's the reality of running her without constellations. Optimized double Anemo teams with perfect execution can squeeze by at 220-240% ER, but you're walking a tightrope.
Triple Anemo? That's your lifeline, dropping requirements to 190-205% through additional particle generation.
C1-C5: Incremental Improvements
C1 provides minimal ER improvement due to that 5.5-second particle ICD – you still can't double-activate for more particles. C4 is where you see meaningful reduction through flat energy restoration: 2 energy single-target, up to 4 energy multi-target per activation.
C5 maintains those C4 ER requirements while improving damage scaling. Not revolutionary, but solid progress.
C6: The Sweet Spot
This is where Faruzan transforms. ER requirements drop to 160-200% in most compositions through off-field Pressurized Collapse generation every 3 seconds. Double Anemo teams need 175-200% ER, triple Anemo 160-185%.
Suddenly you've got energy abundance, which means ATK% Sands becomes viable when you can meet ER requirements through substats and weapons. It's like playing a different character entirely.
Weapon Selection for Energy Optimization
Favonius Warbow: The Universal Solution

Favonius Warbow provides 61.3% ER at level 90 plus team-wide particle generation on CRIT hits. You'll need 30-60% CRIT Rate for optimal consistency – totally achievable through weak point hits with charged shots.
Each proc reduces team ER requirements by 25-35%. For energy-hungry compositions, this weapon is basically mandatory.
For premium weapon optimization, BitTopup provides Genshin recharge secure checkout with multiple payment options and 24/7 customer support.
Alternative Options (When They Make Sense)
Elegy for the End offers 55.1% ER and team buffs but lacks Favonius's particle generation – suitable for C6 builds where energy isn't as tight. Sacrificial Bow provides 30.6% ER with skill reset, but that particle ICD limits its energy benefits.
F2P players aren't left out: End of the Line (45.9% ER) and Fading Twilight (30.6% ER) work as ER stat sticks, though they lack the active energy generation that makes Favonius so valuable.
The Priority Hierarchy
Pre-C6 builds universally benefit from Favonius Warbow's energy generation. C6 builds gain flexibility for damage-focused options like Elegy when ER requirements are met through other sources.
Priority order: ER requirements first, team energy support second, personal damage optimization last. Don't get seduced by big damage numbers if you can't burst consistently.
Artifact Stats Priority and Distribution
The ER Sands vs ATK Sands Debate
ER Sands remains mandatory for pre-C6 builds – that 51.8% ER foundation is non-negotiable. ATK% Sands becomes viable only when ER requirements are met through weapon and substats, which typically happens at C6 with Favonius Warbow or Elegy.
Substat Hunting Strategy
Substat priority: ER to threshold > CRIT Rate for Favonius > CRIT DMG > ATK%. Pre-C6 builds require aggressive ER substat pursuit – you're basically hunting every ER roll you can find. C6 builds gain flexibility for more balanced distribution.
CRIT Rate targets of 30-60% ensure consistent Favonius activation. Don't sleep on this – inconsistent Favonius procs can break your rotations.
Set Bonus Considerations
4-piece Exile provides 6-energy restoration to party members, reducing Faruzan's ER requirements by about 25%. 2-piece Emblem + 2-piece Exile offers 40% ER from set bonuses alone.

At C6, 4-piece Tenacity becomes optimal through consistent Pressurized Collapse triggering. The energy situation is comfortable enough that you can focus on team buffs.
Team Synergy and Battery Strategies
Energy Funneling Fundamentals
The standard combo Faruzan E → CA → Q generates particles before burst activation. Alternative Faruzan E → Q → CA transfers particle benefits to your main DPS while increasing Faruzan's personal ER requirements.
Timing precision is crucial here – particle travel time and collection windows matter more than you might think.
Multi-Character Battery Networks
Triple Anemo provides comprehensive energy solutions through multiple generators. Favonius distribution across team members creates powerful battery networks that can collectively reduce ER requirements by 50% or more.
Shield providers like Zhongli protect charged shot execution while providing defensive utility. It's not just about the energy – it's about creating conditions where you can actually execute your energy generation consistently.
Rotation Flexibility
Optimal rotations balance energy generation, buff uptime, and DPS windows, but rotation flexibility is crucial for dynamic combat scenarios. Advanced players pre-charge energy before challenging encounters using overworld enemies or previous Abyss chambers.
Common ER Mistakes and Solutions
The Over-Investment Trap
Excessive ER beyond constellation targets wastes stat allocation. C6 players commonly maintain pre-C6 ER levels, sacrificing offensive potential for unnecessary energy comfort.
Solution: gradual ER reduction through 20-30% increments while monitoring burst availability. Test in challenging content before committing to lower ER builds.
Rotation Timing Failures
Inconsistent charged shot execution eliminates particle generation entirely. Practice routines against stationary targets build muscle memory – seriously, spend some time in the overworld getting your timing down.
Backup energy strategies are essential when primary generation fails. Alternative particle sources, emergency Favonius procs, these safety nets prevent rotation collapse.
Team Composition Mismatches
Pairing Faruzan with energy-hungry teammates without battery support creates unsustainable energy demands. The solution involves balanced team energy planning through Favonius distribution, Anemo resonance, and dedicated batteries.
Energy priority systems prevent conflicts – decide who gets energy first when resources are limited.
Advanced Optimization Techniques
Spiral Abyss Adaptations
Build 20-30% ER surplus above calculated minimums for suboptimal conditions. Chamber-specific strategies adapt rotations for enemy behavior patterns – what works against stationary enemies might fail against highly mobile ones.
Energy management between chambers is crucial for maintaining performance across multi-chamber floors. Sometimes you need to adjust your final chamber strategy based on energy states from previous encounters.
Content-Specific Adjustments
Different content types require varying approaches. Overworld allows relaxed requirements since you can take your time. Time-limited challenges demand consistency above all else.
Co-op provides additional particles but requires higher ER for reliability – you can't always count on perfect team coordination. Event content may disrupt standard patterns with unique mechanics or enemy behaviors.
Future-Proofing Your Build
New character releases may provide alternative energy solutions. Artifact set additions could introduce new energy management options. Meta evolution may shift optimal targets – regular build evaluation ensures continued optimization as the game evolves.
The key is building flexibility into your approach rather than optimizing for one specific scenario.
FAQ
How much ER does Faruzan need at C0? 250-300% Energy Recharge for consistent rotations. Optimized double Anemo teams with perfect execution can drop to 220-240%, but conservative builds should target the higher range to account for rotation errors and suboptimal conditions.
Does Faruzan need less ER at C6? Absolutely. C6 reduces requirements to 160-200% through off-field Pressurized Collapse generation every 3 seconds, providing consistent particles and C4 energy restoration without requiring field time.
What weapon gives Faruzan the most energy? Favonius Warbow provides 61.3% ER and team-wide particle generation on CRIT hits. Each proc reduces team ER requirements by 25-35%, making it superior to higher ER weapons that lack active particle generation.
Should Faruzan use ER sands or ATK sands? ER Sands is mandatory for pre-C6 builds. ATK% Sands becomes viable only at C6 when ER requirements can be met through weapon and substats – don't make the switch until you're absolutely certain about your energy situation.
Which teammates reduce Faruzan's ER needs? Triple Anemo reduces requirements by 15-35% through additional particles. Favonius weapon teammates provide 25-35% reduction per proc. Zhongli with Favonius Lance or Bennett with Favonius Sword are particularly valuable for their defensive utility and energy generation.
What's the minimum ER for burst every rotation? C0-C5 requires 220-300% depending on team composition and execution quality. C6 operates comfortably at 160-200%. Practical builds should include a 20-30% buffer above calculated minimums for challenging content consistency.