

Master Blood Strike through strategic drop spots, optimal perks, and performance settings. This guide covers gameplay fundamentals, weapon loadouts, and progression strategies using data-driven tactics and proven techniques.
Getting Your Bearings in Blood Strike
Here's the thing about Blood Strike – it's not your typical battle royale where you can just wing it and hope for the best. The game breaks down into three distinct phases that'll make or break your match: the initial landing and looting scramble, positioning yourself for zone rotations, and those nail-biting final circle showdowns.
Now, EVO Squad Fight throws a curveball into the mix. After round three, platform skills activate right at map center, and suddenly you're dealing with coordinated team captures that can completely shift momentum. It's chaotic, but manageable once you get the hang of it.
Trinity of Deathfire? That's where things get spicy. You're locked into just three weapons – Kar98k, M1887, and Magnum – and here's the kicker: kill streaks actually boost your armor until you die and everything resets. Talk about high-stakes gameplay.
Here's what I've learned after countless hours grinding: survival trumps eliminations every single time. I know it sounds counterintuitive when you're watching streamers drop 20-bombs, but smart positioning will carry you further than aggressive fragging ever will. You want to balance resource gathering with zone timing because – trust me on this – late rotations create the worst possible engagements.
Focus on consistent top-10 finishes rather than chasing high kill games. Your rank will thank you later.
For enhanced gaming experience, Blood Strike Golds top up through BitTopup provides secure instant delivery. BitTopup offers competitive pricing with 24/7 support, ensuring seamless Strike Pass progression and premium content access.
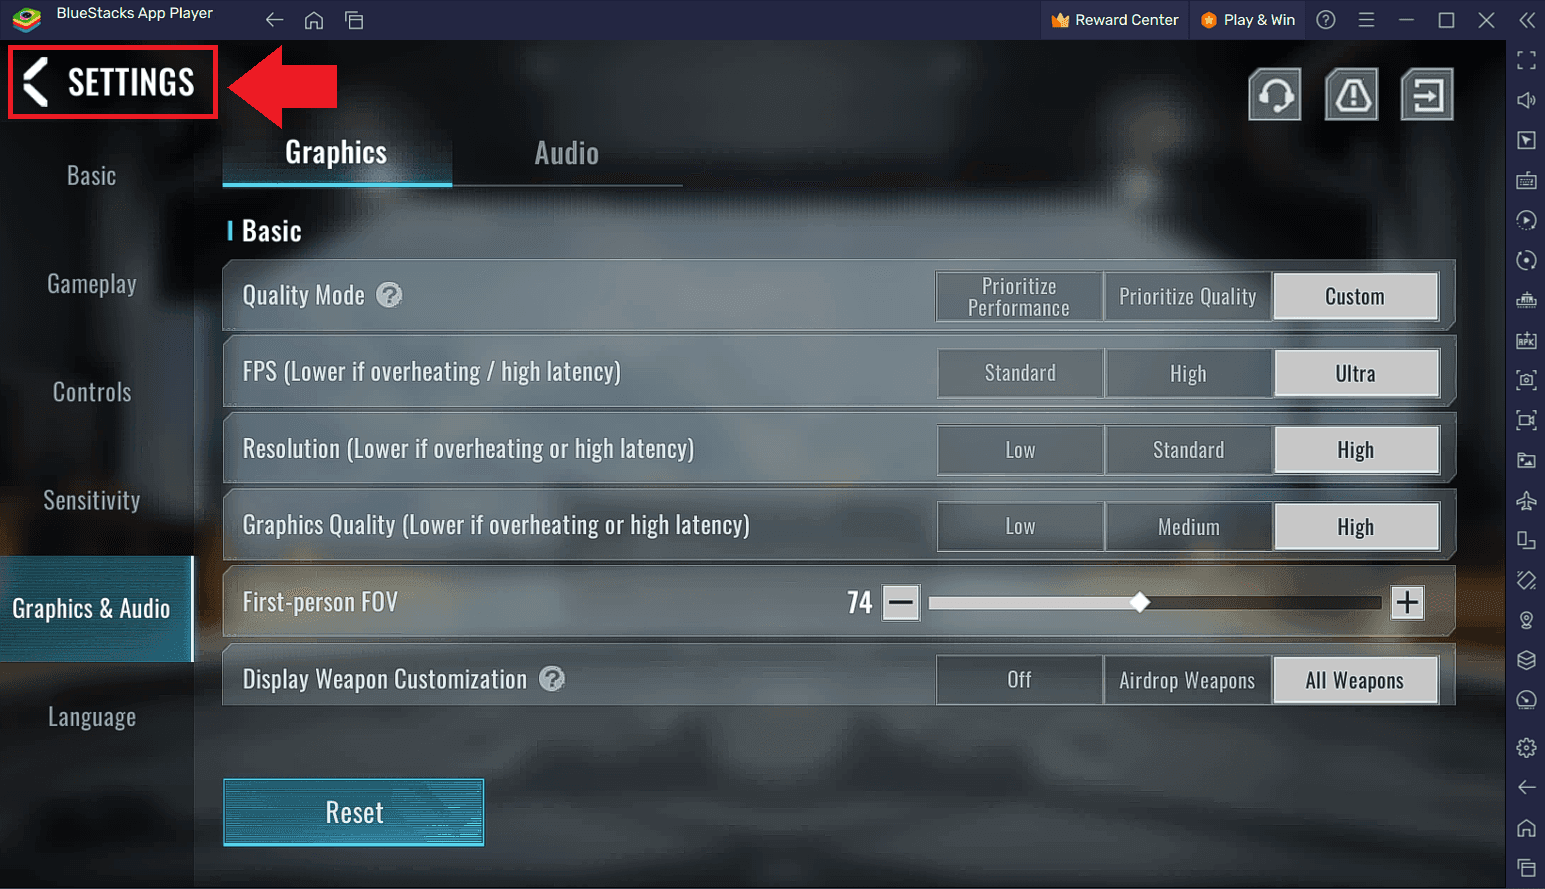
Dialing In Your Settings (This Actually Matters)
Look, I get it – settings optimization sounds boring. But here's the reality: if you're not hitting consistent 60+ FPS, you're fighting an uphill battle before you even drop.
Start with 1280x720 resolution. Yeah, it doesn't look as pretty, but you'll see a 50% reduction in GPU load. Pair that with low textures and disabled shadows/reflections, and suddenly you're maintaining stable frame rates that actually matter for competitive play.
Professional players typically run 300-800 eDPI (that's DPI multiplied by sensitivity), with most settling somewhere in the 400-600 range for optimal stability. Don't just copy someone else's settings though – you need to test this yourself.
Here's my go-to sensitivity test: grab a SCAR rifle, fire 10-round bursts at mid-range targets, and adjust in 5% increments until you're achieving less than 10% grouping variation. It's methodical, but it works.
Audio setup is where most people mess up. Set master volume to 80-90% with effects cranked to 100% for footstep detection, but keep music at 20%. Use stereo headphones with Windows stereo output – avoid surround processing because it actually distorts directional accuracy. (I learned this the hard way after months of wondering why I couldn't pinpoint enemy locations.)
Cap your FPS 3-5 frames below your refresh rate to prevent stuttering. If you're on mobile with 90/120Hz support, enable it. The difference is night and day.
Strategic Drop Spots That Actually Work
Sakura Valley sits dead center with warehouses packed with high-quality loot and four supply posts.

The premium chest spawns and trading resources make it perfect for aggressive early-game strategies. Fair warning though – expect heavy competition, so you better be ready to loot fast and fight faster.
Rocket Base clusters buildings together with premium chests and four supply posts, letting you gear up rapidly. This spot favors players who're comfortable with early engagements while building superior mid-game loadouts. Not for the faint of heart.
Port offers edge positioning for safer looting with premium loot and ordinary packs. The peripheral location reduces third-party risks while maintaining supply post access. It's honestly perfect for edge rotation strategies when you're prioritizing survival over chaos.
Missile Basement is high-risk, high-reward central positioning near safe zones. Premium warehouse loot and three supply posts, but the heavy traffic demands swift rival elimination. Only drop here if you're confident in your combat skills.
For consistent progression, buy Blood Strike Gold recharge through BitTopup's reliable platform. BitTopup ensures instant delivery with secure payment processing, supporting competitive advancement with affordable pricing.
Deserted Valley specializes in long-range engagements and offers higher XP through reduced chaotic encounters. It's optimal for ranking progression due to easier survival and strategic positioning advantages over Shutter Island. (Personally, I prefer this for solo queue matches.)
Mastering the Perk System
S-tier Striker Skills – these are your bread and butter:
Spike gives you invisibility with undetectable movement and increased speed. Perfect for flanking and intel gathering while staying completely hidden from radar.

It's honestly overpowered in the right hands.
Zero offers bullet deflection, increased movement speed, and charged attacks with knockback. High-risk option that absolutely dominates close-quarters with unmatched potential. Takes practice, but the payoff is huge.
Volt provides AOE disable on enemy abilities while damaging armor, plus shield enhancement, speed increases, and faster reloads. Versatile and reliable.
A-tier Options worth considering:
Blast brings wall-damaging skills that break defensive positions, plus passive enemy marking for team awareness. Solid utility pick.
Nova creates area denial through damage and vision obstruction – effective for blocking chokepoints when you need breathing room.
Lucian drops June 15, 2025, featuring neural amplifiers and bioelectric camouflage with pseudo-sleep totem teleportation and echolocation scanning. Unlock via Strike Pass level 15 for S-tier assassin capabilities. (I'm definitely grinding for this one.)
Weapon Selection and Loadouts
S-tier Assault Rifles that'll carry you:
KAG-6 delivers consistent damage, accuracy, and fire rate across all ranges. It's the reliable workhorse.
AK-47 brings high mid-range damage with improved May 2025 recoil that makes it much more accessible.
AR97 requires specific attachments: Muzzle Compensator (L38), Extended Barrel (L20), Extended Vertical Grip (L40), Romeo4T Red Dot (L42), Sniper Stock (L43), 45-round Magazine (L29). Fully kitted, it's a monster.
SMG Selection for close-quarters:
P90 offers S-tier hip-fire accuracy and surprising medium-range capability.
Vector provides high fire rate precision for close-quarters dominance.
INP9 is my recommended beginner option with manageable recoil patterns.
Sniper Rifles for long-range control:
Kala delivers extreme range with one-shot capabilities and superb recoil control.
Kar98k offers near one-hit-kill upper-body/headshots with May 2025 quick-scoping improvements.
Optimal Combinations: AK47 + M4A1 (damage/versatility), M4A1 + Vector (accuracy/close-range), AK47 + Kala (mid-long range control). These pairings cover all engagement distances effectively.
Map Awareness and Positioning
Monitor zone timers constantly – and I mean constantly. Begin rotations with 30-40 seconds remaining to avoid late-game disadvantages that'll get you killed. Secure high ground whenever possible for superior angles and escape routes.
Pre-aim common angles while maintaining cover proximity for quick disengagement. Don't get caught in the open.
Avoid extended open-area engagements where multiple teams can converge on your position. Maintain escape route awareness and disengage when additional teams approach. Use natural cover to limit exposure angles during combat.
Deserted Valley favors long-range positioning with terrain cover and sightline maintenance. Shutter Island demands close-quarters awareness with building control and vertical advantages. Adapt your strategy accordingly.
Combat Fundamentals
Maintain 60+ FPS for predictable recoil with medium sensitivity and controlled burst firing. Practice with 10-minute warm-ups followed by 20-minute pattern training sessions. Pull down during ADS while maintaining head-level positioning.
Strafe while shooting and combine jump-slide combos to disrupt enemy aim assist. Turn off auto-sprint for enhanced combat control. Professional eDPI ranges 300-800, with most using 400-600 for stability.
Prioritize positioning over aggressive rushing. Use cover during peek engagements, coordinate team pushes utilizing bait-and-trade tactics. Focus on survival-oriented positioning rather than high-risk eliminations. (This took me way too long to learn.)
Common Mistakes and Solutions
Over-aggression: Play methodically with cover utilization and gather intel before engagements. Coordinate team pushes and prioritize survival over elimination counts. I see too many players throw away good positions for unnecessary fights.
Poor teamwork: Use voice chat for callouts and assign roles (entry fragger, support, sniper). Stick together during rotations and focus on collective performance rather than individual glory.
Bad loadout choices: Use meta combinations like AK47 + M4A1 and select S-tier Strikers (Spike, Zero, Volt). Avoid experimental builds in ranked matches – save that for casual play.
Tunnel vision: Prioritize positioning and zone awareness over fragging. Track survival statistics and practice disengagement techniques to preserve health for final circles.
Your Progression Roadmap
Week 1-2: Master controls, sensitivity, and map layouts. Get comfortable with the basics.
Week 3-4: Develop weapon proficiency and practice recoil patterns until they're muscle memory.
Month 2-3: Focus on positioning strategies and team coordination. This is where good players separate from great ones.
Daily Practice: 10-minute aim training (flicks, tracking, precision), movement practice (strafing, slide cancels, jump shots), casual matches for reaction improvement.
Performance Tracking: Monitor survival time, average placement, and damage per match over eliminations. Track sensitivity consistency and FPS stability. Document loadout effectiveness across different map scenarios.
Advanced Progression: Study professional configurations, practice countering specific playstyles and Striker abilities. Develop map-specific strategies for consistent top-10 finishes.
FAQ
What are the best beginner drop spots? Sakura Valley and Rocket Base offer excellent loot density with manageable competition. Both provide premium chests and four supply posts for quick gear acquisition.
How should I configure sensitivity settings? Set 60-80% sensitivity based on 800-1600 DPI, targeting 300-800 eDPI. Test with SCAR 10-round bursts, adjust in 5% increments until achieving less than 10% grouping variation.
Which Striker skills work best for new players? Spike offers S-tier invisibility and speed for intel gathering. Volt provides AOE disable capabilities. Blast delivers solid utility through wall damage and enemy marking.
What graphics settings provide competitive advantage? Use 1280x720 resolution, low textures, disabled shadows/reflections for 60+ FPS. Higher frame rates improve sensitivity consistency more than visual quality.
How do I avoid common beginner mistakes? Focus survival over eliminations, use voice communication, stick with meta loadouts like AK47 + M4A1. Practice patience during mid-game positioning.
What's the most effective weapon progression path? Start with INP9 SMG, progress to M4A1 assault rifle, advance to AK47/KAG-6. Pair assault rifles with SMGs for complete range coverage.