

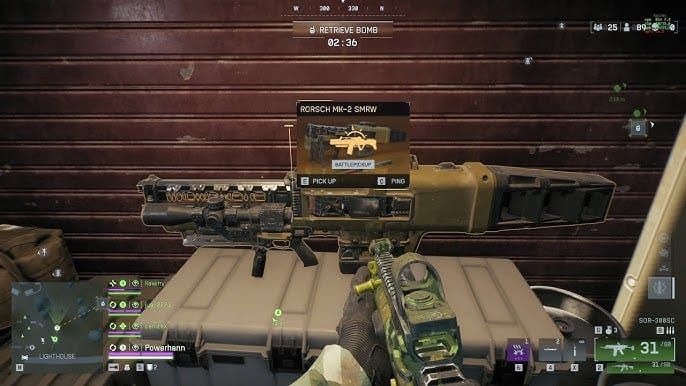
The Rorsch Mk2 bodyshot build stays competitive in Delta Force's Subzero Survival mode after the December 3, 2025 patch 1.202.37108. While the weapon received no direct stat changes, recent assault rifle adjustments to the AK-12 and SG552 shifted the meta. This guide covers tested bodyshot configurations, attachment optimization, and wave-specific loadouts for patch 39.1.
Why Bodyshot Builds Dominate Subzero 39.1
The Rorsch Mk2 rewards consistent center-mass accuracy over precision headshots. Unlike weapons demanding perfect aim under pressure, bodyshot builds capitalize on stable recoil and forgiving damage during extended firefights against multiple enemies.
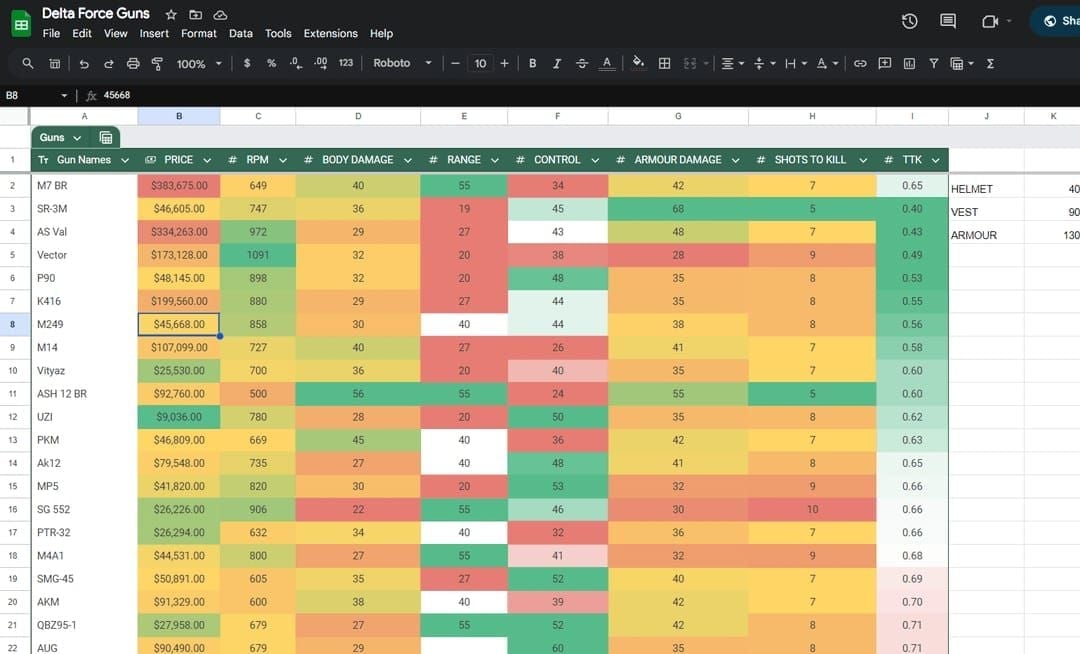
Post-December 3 update, the SG552 got base damage increased from 22 to 24 and armor penetration boosted from 30 to 31. The AK-12's damage falloff changed at 40m (0.9 vs previous 0.75) and 70m (0.75 vs 0.7). These adjustments haven't displaced the Rorsch Mk2, but created distinct engagement range advantages.
For quick arsenal optimization, Delta Force credits buy rorsch mk2 bodyshot builds through BitTopup provides instant premium currency for unlocking critical attachments.
Current Meta Position
The Rorsch Mk2 functions as a versatile workhorse in Subzero, particularly effective in waves 11-25 where sustained damage matters more than burst elimination. While the M4A1 maintains 10.1% pick rate with 672 RPM and 25 damage per shot, the Rorsch Mk2 offers superior ammunition economy and controllable recoil.
Bodyshot viability stems from damage multiplier distribution across enemy hitboxes. Unlike marksman rifles that heavily penalize non-headshot accuracy, assault rifles maintain competitive TTK when targeting center mass, especially against armored enemies where penetration values matter more.
Bodyshot vs Headshot Philosophy
Bodyshot builds prioritize: recoil stability for sustained accuracy, magazine capacity for extended engagements, and effective range optimization. This contrasts with headshot configs that sacrifice stability for faster ADS and vertical recoil reduction.
In Subzero's chaotic multi-enemy scenarios, maintaining steady bodyshots often produces faster clear times than attempting precision shots that miss 30-40% under pressure. Landing 8 bodyshots at 90% accuracy eliminates targets faster than attempting 5 headshots at 60% accuracy, especially factoring recoil recovery between bursts.
Base Performance Stats
The Rorsch Mk2 delivers competitive damage without attachments, though true potential emerges through strategic modification. Unlike the pre-nerf M250 LMG (55 damage per shot, 125-round mag at 550 RPM, reduced to 45 damage Season 1), assault rifles require attachment synergy.
Critical metrics: damage falloff ranges, recoil pattern predictability, ammunition capacity relative to reload speed. The weapon maintains effective damage within 40-60m engagements, the most common Subzero combat distance. Beyond 70m, damage reduction warrants switching to DMRs like the SKS (base damage increased from 44 to 48).
S-Tier Bodyshot Build (Highest DPS)
Optimal bodyshot config prioritizes damage retention across ranges while maintaining controllable recoil. Assumes access to high-tier attachments.
Complete Attachment Setup
Barrel: Extended variant maximizing effective range without excessive fire rate reduction. Counteracts damage falloff, maintaining bodyshot lethality at 50-60m
Optic: 2x-3x magnification for target acquisition without hindering close-quarters adaptability
Magazine: Extended capacity (45-60 rounds) for multi-enemy waves without frequent reloads. AUG's 60-Round Drum Mag control penalty reduced from -12 to -6
Grip: Vertical foregrip reduces horizontal bounce; angled grip improves ADS speed for aggressive positioning
Stock: Stability-focused. M14's Rail Integral Stock changed from Recoil +8 to Recoil +2 Control +4
Muzzle: Compensator reduces vertical climb for easier bodyshot tracking; flash hider maintains stealth during night waves
Damage Numbers and TTK
Against standard armored enemies, S-tier bodyshot build achieves 4-6 shot eliminations at optimal range, translating to 0.8-1.2 second TTK. This compares favorably to AWM's one-shot chest eliminations within 30m (100 damage, 200m effective range), though bolt-action limits multi-target speed.
Assault rifle falloff typically mirrors SG552's adjusted profile: first decrease at 35m (0.85 multiplier), second at 65m (0.7 multiplier). Optimized barrels shift breakpoints outward 10-15m, maintaining full damage through critical distances.
Optimal Engagement Ranges
S-tier build excels in 30-60m where assault rifles maintain damage superiority over SMGs while offering better handling than LMGs. Position at medium range from spawn points, allowing 2-3 seconds sustained fire before enemies close distance.
Avoid extreme close quarters (under 15m) where shotguns like the 725 Double-Barrel dominate, and distances beyond 70m where DMRs provide superior efficiency. Build versatility allows rapid adaptation between ranges.
Wave Performance
Early waves (1-10): Extended mag allows 8-12 eliminations per reload
Mid waves (11-20): Recoil control enables continuous fire without accuracy degradation
Late waves (21-30+): Requires strategic ammunition management as bosses absorb significantly more bodyshots
Config maintains competitive performance through wave 25 before specialized builds show clear advantages.
A-Tier Balanced Build (Versatility Focus)
Sacrifices 10-15% peak DPS for improved handling and reduced unlock requirements. Suits players rotating between Subzero and standard multiplayer.
Attachment Loadout
Barrel: Standard or slightly extended balancing range with minimal mobility penalty
Optic: Red dot or holographic (1x) for maximum target acquisition and peripheral awareness
Magazine: 40-45 rounds improving capacity without excessive reload penalties
Grip: Hybrid providing moderate recoil reduction without specialization
Stock: Balanced offering minor improvements to stability and mobility
Muzzle: Suppressor for reduced audio signature
Trade-offs
A-tier accepts 5-10m reduced effective range vs S-tier for 15-20% faster ADS and improved movement velocity while aiming. Handling improvements prove valuable when adapting to unexpected spawns or repositioning under pressure.
Recoil pattern becomes slightly more pronounced, requiring active compensation. Players with strong mechanics often prefer this trade-off, as handling improvements enable aggressive positioning that compensates for minor accuracy reduction.
Ammunition Economy
Balanced mag capacity (40-45 vs 60) requires more frequent reloads but maintains faster completion times. Creates engagement-reload-engagement rhythm suiting tactical players using cover effectively.
Budget 8-10 rounds per standard enemy, 20-30 for elite targets when planning reserves.
B-Tier Budget Build (Early Progression)
New players without extensive unlocks can achieve competitive performance using accessible mods available within first 10-15 levels.
For faster progression, top up Delta Force 39.1 subzero tier credits cheap at BitTopup enables immediate battle pass access and attachment unlock acceleration.
Accessible Attachments
Barrel: First extended option (weapon level 5-8). Even basic extensions provide 10-15% range improvement
Optic: Standard red dot (level 3-5). Improved sight picture significantly enhances target acquisition
Magazine: First extended unlock (35-40 rounds). Capacity increase more valuable than advanced mods for learning recoil
Grip: Basic vertical grip for straightforward recoil reduction. Early grips provide 60-70% benefit of advanced options
Stock: Default or first stability unlock. Lowest priority for budget builds
Muzzle: Compensator if available, otherwise none
Performance Expectations
B-tier achieves 70-80% of S-tier effectiveness, with primary deficit in extended range (50m+). Within optimal 25-45m ranges, performance differences narrow to 10-15%, making budget build viable for waves 1-15.
Expect 5-7 shot eliminations vs 4-6 for optimized builds. Additional rounds translate to roughly 20% longer TTK. Focus on positioning and target prioritization to compensate.
Upgrade Path
Prioritize barrel and magazine first—most significant performance per unlock. Optic upgrades offer minimal benefit unless transitioning to longer ranges. Grip and stock provide incremental improvements mattering most at competitive levels.
Attachment Deep Dive
Barrel: Range vs Fire Rate
Extended barrels increase effective range by reducing falloff severity and shifting distance breakpoints outward. A barrel moving first falloff from 35m to 45m maintains full damage through majority of Subzero engagements. However, extended barrels typically reduce fire rate 3-5%.
Trade-off: 10m additional range vs 5% fire rate reduction. In Subzero where engagements cluster 30-50m, range extension proves more valuable.
Optic Choices
Magnification correlates with target acquisition speed and awareness. 1x optics enable fastest target switching and maintain peripheral vision. 2x-3x provide improved precision at medium range without tunnel vision. 4x+ suits DMR applications but proves counterproductive for assault rifle bodyshot builds.
Optic clarity and reticle design improve hit consistency 5-10% compared to cluttered designs.
Magazine Mods
Extended mags follow predictable pattern: each capacity tier adds reload time penalties and minor handling reductions. 60-round drums create 30-40% slower reloads vs standard 30-round. For assault rifles, 45-round extended mags typically add 15-20% reload time—reasonable trade for 50% capacity increase.
If you maintain 70% bodyshot accuracy and enemies require 6 hits average, 45-round mag provides 5-6 eliminations per reload vs 3-4 with standard capacity.
Grip and Stock Combos
Grips affect horizontal recoil while stocks influence vertical climb and overall stability. Optimal combos pair vertical grips with stability stocks for maximum sustained fire accuracy. Players with strong control can substitute angled grips for faster ADS.
M14's Polymer Integral Stock changed from Recoil +4 to Control +4, transforming penalty into benefit.
Muzzle Devices
Compensators reduce vertical recoil 15-25%, making sustained bodyshot tracking easier. Flash hiders eliminate muzzle flash without recoil benefits. Suppressors provide audio reduction at cost of minor velocity penalties affecting long-range damage.
For pure bodyshot optimization, compensators provide most measurable benefit.
Rorsch Mk2 vs Competing ARs
Direct DPS Comparisons
M4A1's 672 RPM and 25 damage creates baseline DPS of 280 (perfect accuracy). AK-12's adjusted falloff (0.9 at 40m vs previous 0.75) maintains higher damage at medium range, potentially exceeding Rorsch Mk2 in 40-60m engagements.
SG552's recent buffs (damage 22→24, armor pen 30→31) improved bodyshot viability against armored enemies, though compressed falloff ranges (first decrease at 35m vs previous 55m) limit long-range applications. Excels in 20-40m where improved armor pen overcomes Rorsch Mk2's versatility.
AUG received upper chest damage multiplier increase from 1.0 to 1.1, creating hybrid bodyshot/upper-torso potential. Players consistently targeting upper chest achieve 10% damage bonuses without headshot precision.
Situational Advantages
Rorsch Mk2 maintains versatility and ammunition availability advantages. Performs competently across all engagement ranges and enemy types. Consistency proves valuable in Subzero's unpredictable spawn patterns.
Disadvantages emerge against min-maxed alternatives. M250 LMG (despite nerfs from 55 to 45 damage) still dominates sustained suppression with 125-round capacity. AWM eliminates priority targets instantly within 30m with chest shots.
When to Switch Weapons
Optimal loadouts include primary assault rifle for general engagements and specialized secondary for specific scenarios. Carry shotgun for close-quarters defense or DMR for long-range priority elimination. 725 Double-Barrel added to multiple classes provides devastating close-range power when enemies breach positions.
Switch to secondary when engagement distances fall outside primary's optimal range for 5-10+ seconds.
Advanced Bodyshot Techniques
Recoil Pattern Mastery

Every weapon follows predictable recoil pattern. Rorsch Mk2's pattern typically climbs vertically first 8-10 rounds before developing slight horizontal drift. Counter by applying gradual downward pressure while firing, maintaining crosshair on center mass.
Practice in controlled environments. Spend 10-15 minutes firing full mags into walls, observing bullet impact pattern, then repeat while actively compensating. Muscle memory develops through repetition.
Movement Mechanics
Stationary firing provides maximum accuracy but creates predictable targets. Incorporate subtle strafing (A-D tapping, left-right thumbstick) while maintaining fire. Movement disrupts enemy aim without significantly impacting accuracy if executed with small, controlled inputs.
Avoid jumping or sprinting while firing—dramatically increases bullet spread. Crouching improves stability 10-15% but reduces mobility.
Target Prioritization
Bodyshot builds excel at clearing multiple standard enemies but struggle against mixed groups with elites. Prioritize: close-range rushers first (highest immediate threat), then sustained fire on elites (highest health pools), finally clean up remaining standard targets.
Minimizes damage taken while maximizing ammunition efficiency.
Subzero Wave Strategy
Early Waves (1-10): Ammo Conservation
Low-health enemies die to 3-4 bodyshots. Prioritize ammunition economy over max DPS using controlled bursts. Extended mag allows engaging multiple enemies per reload, but conservative fire prevents unnecessary expenditure.
Position defensively near ammo resupply, establishing clear sightlines to spawns.
Mid Waves (11-20): DPS Optimization
Enemy health pools and spawn rates increase significantly. Switch to aggressive positioning maximizing engagement time while maintaining escape routes. S-tier build's recoil control enables continuous fire without accuracy degradation.
Coordinate with teammates for crossfire positions. Shepherd's Sonic Drone (30m radius suppression) and Hackclaw's Signal Decoder (60m scan, 3 enemies) provide tactical advantages synchronized with sustained fire.
Late Waves (21-30+): Boss Focus
Boss enemies appear with increasing frequency, requiring concentrated fire from multiple team members. Bodyshot builds contribute consistent damage without requiring precision under pressure. Focus fire on boss weak points when exposed, default to center-mass when obscured.
Uluru Loitering Munition (30 armor damage) softens armored bosses. Coordinate ultimate usage to maximize damage windows.
Team Composition
Optimal teams include: one bodyshot-focused AR for sustained DPS, one precision weapon specialist for priority elimination, one support operator for crowd control/healing. D-Wolf Assault Build (code 6FINC4G0CQTV1IBVCBQVT with AR Gabriel Long Barrel, Sandstorm Compensator, 45-Round Mag) demonstrates effective AR optimization.
Avoid excessive overlap in weapon roles—three AR users compete for same ammo spawns.
Common Mistakes
Attachment Misconceptions
Many assume max range attachments always optimal, ignoring handling penalties reducing practical effectiveness. A barrel adding 15m range but reducing ADS 25% often decreases overall performance in Subzero's dynamic engagements.
Max capacity mags seem universally beneficial until reload speed penalties create vulnerability windows. AUG's 60-Round Drum control penalty reduction from -12 to -6 made it viable, but still creates measurable handling deficits vs 45-round alternatives.
Playstyle Errors
Attempting to engage at all ranges with single config forces suboptimal scenarios. Recognize when disengaging and repositioning provides better outcomes. Bodyshot builds excel in sustained medium-range engagements, not close-quarters brawls or extreme long-range duels.
Reloading at inappropriate times (during advances, in open areas) creates unnecessary risk. Develop awareness of safe reload windows: after clearing immediate threats, behind cover, or during spawn delays.
Performance Metrics
Monitor accuracy percentages, average eliminations per mag, damage per wave. Accuracy below 60% suggests recoil control issues or inappropriate ranges. Eliminations per mag below expected values indicates missed shots or inefficient target selection.
Damage per wave reveals contribution relative to teammates. Consistently low damage despite high accuracy suggests overly conservative positioning.
Unlock Progression
Fastest Path to S-Tier Attachments
Weapon-specific attachments unlock through weapon level progression. Prioritize completing weapon challenges: multi-kills, long-range eliminations, headshot bonuses (even for bodyshot builds, occasional headshots accelerate progression).
Operator unlocks require 500 Delta Coins or Vyron after completing 3-day recruitment (30 matches, 100 kills). K416, K437, PTR-32 ARs added to various operators provide alternative progression paths.
Currency Optimization
Delta Coins and Vyron serve as premium currencies. Prioritize spending on functional improvements (attachment unlocks, operator access) over cosmetics until achieving competitive loadout completion.
Battle pass progression provides structured rewards including currency, attachments, operators. Investment typically returns 2-3x purchase price when fully completed—most efficient premium purchase for active players.
Premium Resources
BitTopup offers competitive pricing on Delta Force premium currency with instant delivery and secure transactions. 24/7 customer support and high user ratings make it trusted for efficient progression. Fast delivery ensures immediate access to time-sensitive battle pass tiers.
Avoid unofficial sources risking account security or violating ToS.
FAQ
What's the best Rorsch Mk2 bodyshot build for Subzero 39.1?
S-tier: extended barrel, 2x-3x optic, 45-60 round mag, vertical grip, stability stock, compensator. Maximizes bodyshot consistency across 30-60m while maintaining ammo capacity for multi-enemy waves.
How does Rorsch Mk2 compare to other ARs in bodyshot damage?
Rorsch Mk2 offers balanced performance across ranges. SG552's buffs (damage 22→24, armor pen 30→31) improved close-medium bodyshot damage. AK-12's adjusted falloff (0.9 at 40m) provides superior medium-range retention. Rorsch Mk2 maintains versatility when distances vary unpredictably.
Which attachments increase bodyshot damage most?
Extended barrels provide most significant improvements by reducing falloff severity and extending effective range breakpoints. Armor-piercing ammo (when available) increases damage against armored enemies. Mag capacity doesn't increase per-shot damage but improves sustained DPS by reducing reload frequency.
Is bodyshot build viable for high-wave Subzero?
Bodyshot builds remain competitive through wave 25-30, after which specialized configs show measurable advantages. Sustained fire capability and ammo efficiency make it viable for most progression goals. Competitive players pushing wave 35+ may benefit from transitioning to precision builds.
What optic works best for bodyshot accuracy?
2x-3x magnification balances target acquisition with medium-range precision. Red dots (1x) suit aggressive close-medium playstyles, while 4x+ creates excessive tunnel vision for AR applications. Test multiple options based on engagement distance comfort.
How to control Rorsch Mk2 recoil for consistent bodyshots?
Apply gradual downward pressure while firing to counter vertical climb, starting after first 3-4 rounds. Practice full mag dumps in controlled environments to develop muscle memory. Use compensator and stability stocks to reduce raw recoil magnitude.
Optimize your Delta Force loadout faster! Get premium currency, battle passes, and exclusive weapon skins at BitTopup – trusted by millions worldwide. Instant delivery, secure payments, 24/7 support. Level up your Rorsch Mk2 builds today!